Centos7 installation configuration Apache+PHP+Mysql+phpmyadmin
Installation of Apache
yum install httpdAfter successful installation, the Apache operation command:
systemctl start httpd      //Start apache
systemctl stop httpd       //Stop apache
systemctl restart httpd    //Restart apache
systemctl enable httpd     //Set apache to boot
exception handling
I configure it on the Ali Cloud and have a problem of inaccessibility after starting Apache, but a general server accessing Apache may need the following operations:
(1) Open 80 ports in the firewall
Now you need to add http services to the firewall to allow external access.
firewall-cmd --add-service=http --permanentThe permanent parameter indicates that this is a permanent firewall rule, and if not, there will be no such rule after restarting the system.
For custom ports (such as 81), firewall rules need to be added.
firewall-cmd --zone=public --add-port=81/tcp --permanentRestart Firewall to make the rule effective.
systemctl restart firewalld(2) Turn off SELINUX
vi /etc/selinux/configRemark the following two sentences and add the last one.
\#SELINUX=enforcing #Annotate
\#SELINUXTYPE=targeted #Annotate
SELINUX=disabled #increase
wq! Save Exit
Enter the following commands
setenforce 0 #Make the configuration take effect immediatelyInstallation of MariaDB (an open source branch of MySQL)
yum install mariadb mariadb-serverAfter successful installation of MariaDB, you need to configure MySQL root password. In addition, note the common commands to start and close MariaDB
systemctl start mariadb     //start-upMariaDB
systemctl stop mariadb      //Stop itMariaDB
systemctl restart mariadb   //restartMariaDB
systemctl enable mariadb    //Set up boot start
Setting the password for root account
mysql_secure_installation
Enter current password for root (enter for none):
Set root password? [Y/n]
Click Enter and prompt whether to set the root account password. Enter y
New password:
Re-enter new password:
Password updated successfully!
It prompts you to enter a new password and re-enter a new password. After re-entry twice, a successful prompt for updating the password appears.
Then just type y all the way.
Remove anonymous users? [Y/n] y
... Success!
Disallow root login remotely? [Y/n] y
... Success!
Remove test database and access to it? [Y/n] y
- Dropping test database...
... Success!
- Removing privileges on test database...
... Success!
Reload privilege tables now? [Y/n] y
... Success!
Thanks for using MariaDB!
After setting the root password, restart MariaDB to take effect
systemctl restart mariadb.serviceTest access database:
mysql -uroot -pThen enter the password and the login will be displayed as follows:
Enter password:
Welcome to the MariaDB monitor. Commands end with ; or \g.
Your MariaDB connection id is 2
Server version: 5.5.44-MariaDB MariaDB Server
Copyright (c) 2000, 2015, Oracle, MariaDB Corporation Ab and others.
Type 'help;' or '\h' for help. Type '\c' to clear the current input statement.
MariaDB [(none)]>
Enter the following command to view the database of the database server
show databases;Exit order:
exit;III. Installation of PHP and PHP Extension
yum install php php-mysql php-gd libjpeg* php-ldap php-odbc php-pear php-xml php-xmlrpc php-mbstring php-bcmath php-mhashAfter installation, restart Apache server
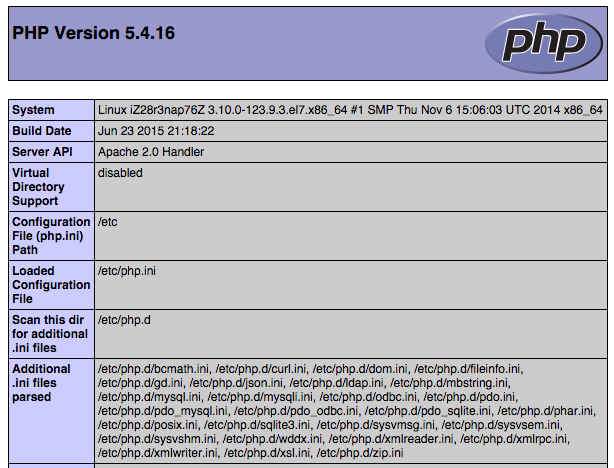
systemctl restart httpd.serviceTest PHP installation results
vi /var/www/html/index.phpEnter the following
<?php
  phpinfo();
?>
Input: wq! Save Exit
Enter the server address in the browser to see if you can see:
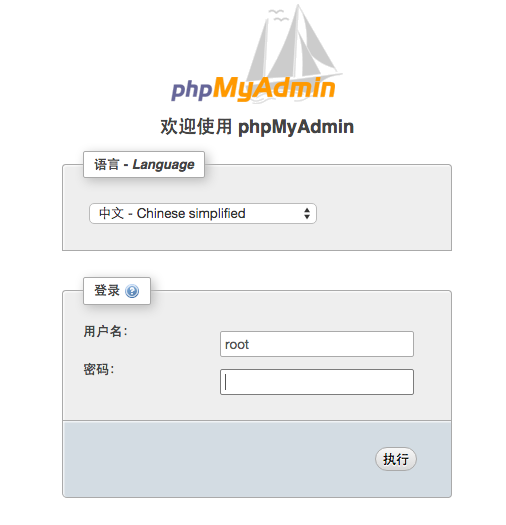
IV. Installing phpmyadmin
Install phpmyadmin using yum
yum install phpmyadmin php-mcryptThe default installation directory for phpMyAdmin is / usr/share/phpMyAdmin, and the virtual host configuration file / etc/httpd/conf.d/phpMyAdmin.conf (case-sensitive) is automatically created in the Apache configuration file directory. By default, phpMyAdmin on CentOS 7 only allows access from the loopback address (127.0.0.1). In order to connect remotely, you need to change its configuration.
vi /etc/httpd/conf.d/phpMyAdmin.confModify the configuration file as follows:
<Directory /usr/share/phpMyAdmin/>
   AddDefaultCharset UTF-8

   <IfModule mod_authz_core.c>
     # Apache 2.4
     <RequireAny>
      # Require ip 127.0.0.1  #Annotate
      # Require ip ::1   #Annotate
      Require all granted   #New addition
     </RequireAny>
 </IfModule>
 <IfModule !mod_authz_core.c>
     # Apache 2.2
     Order Deny,Allow
     Deny from All
     Allow from 127.0.0.1
     Allow from ::1
   </IfModule>
</Directory>

<Directory /usr/share/phpMyAdmin/setup/>
   <IfModule mod_authz_core.c>
     # Apache 2.4
     <RequireAny>
      #Require ip 127.0.0.1  #Annotate
      #Require ip ::1   #Annotate
      Require all granted   #New addition
     </RequireAny>
   </IfModule>
   <IfModule !mod_authz_core.c>
     # Apache 2.2
     Order Deny,Allow
     Deny from All
     Allow from 127.0.0.1
     Allow from ::1
   </IfModule>
</Directory>
Then restart the Apache server
systemctl restart httpdThen you can access it through a browser http://server ip address/phpmyadmin access