Prepare four virtual machines
Virtual Machine Installation
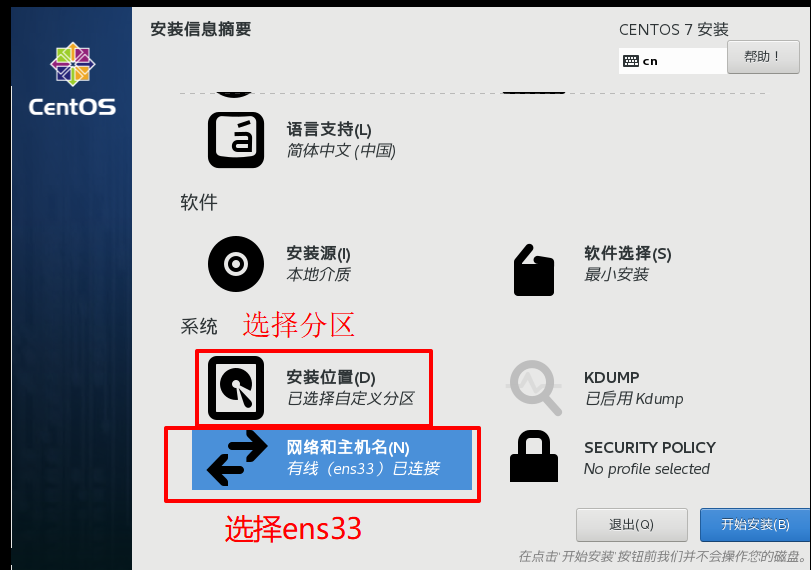
1.Create a new virtual machine
2.Click on Typical Installation(Recommend)
3.Select Chinese and click on your own partition
# Partition Configuration (JD Usage)
/boot 200M
swap 512M  # Not enough native memory, swap
/ # root directory
4.Configure others, as shown below
Update yum
yum install update -y
ip of four hosts
One Master and Three Subordinates
 172.20.10.9 Password: virtual machine hadoop01 corresponding to hadoop01
 172.20.10.10 Password: virtual machine hadoop02 corresponding to hadoop02
 172.20.10.11 Password: virtual machine hadoop03 corresponding to hadoop03
 172.20.10.12 Password: virtual machine hadoop04 corresponding to hadoop04

#Reset the password for root
passwd root
hadoop installation
https://www.cnblogs.com/shireenlee4testing/p/10472018.html
Configure DNS
Each node is configured
vim /etc/hosts
172.20.10.9   hadoop01
172.20.10.10  hadoop02
172.20.10.11  hadoop03
172.20.10.12  hadoop04
Close Firewall
# Close Firewall
systemctl stop firewalld

# Turn off self-start
systemctl disable firewalld
Configure Secret-Free Login
https://www.cnblogs.com/shireenlee4testing/p/10366061.html
Configure DNS
Generate ssh key
# Generate ssh key
ssh-keygen -t rsa

cd /root/.ssh
ls

# Copy the public key to a specific file authorized_keys on the primary node (hadoop01)
cp id_rsa.pub authorized_keys

# Copy authorized_keys to hadoop02
scp authorized_keys root@hadoop02:/root/.ssh/

# Log on to hadoop02 host
cd .ssh/
cat id_rsa.pub >> authorized_keys
# On copying authorized_keys to hadoop03
scp authorized_keys root@hadoop03:/root/.ssh/

# Log on to the hadoop03 host
cd .ssh/
cat id_rsa.pub >> authorized_keys
# Copying authorized_keys to hadoop04
scp authorized_keys root@hadoop04:/root/.ssh/

# Log on to hadoop04 host
cd .ssh/
cat id_rsa.pub >> authorized_keys
# Copy the generated authorized_keys to hadoop01, hadoop02, hadoop03
scp authorized_keys root@hadoop01:/root/.ssh/
scp authorized_keys root@hadoop02:/root/.ssh/
scp authorized_keys root@hadoop03:/root/.ssh/

# Verify Secret Login
//Verify password-free login using ssh username@node name or ssh ip address command
ssh root@hadoop02
wget download jdk8
https://blog.csdn.net/u014700139/article/details/89960494
# Copy the downloaded jdk to hadoop02, hadoop03, hadoop04
scp -r -P 22 jdk.tar.gz root@hadoop02:~/
scp -r -P 22 jdk.tar.gz root@hadoop03:~/
scp -r -P 22 jdk.tar.gz root@hadoop04:~/
Configuring the JDK environment
tar -zxvf jdk.tat.gz
mv jdk1.8.0_241 /opt/
# Create Soft Connections
ln -s /opt/jdk1.8.0_241 /opt/jdk

# Configure the java environment
vim /etc/profile
# Java
export JAVA_HOME=/opt/jdk
export CLASSPATH=$JAVA_HOME/lib/
export PATH=$PATH:$JAVA_HOME/bin

# Make environment variables valid
source /etc/profile

# Verify java installation
java -version
Setting up a fully distributed Hadoop cluster
hadoop version download
http://mirror.bit.edu.cn/apache/hadoop/common/
Download hadoop
wget http://us.mirrors.quenda.co/apache/hadoop/common/hadoop-3.2.1/hadoop-3.2.1.tar.gz
https://mirrors.tuna.tsinghua.edu.cn/apache/hadoop/common/hadoop-3.2.0/hadoop-3.2.0.tar.gz
1. Configure hadoop environment variables (per node)
# Unzip under opt
tar -zxvf hadoop-3.2.0.tar.gz -C /opt/

vim /etc/profile
# hadoop
export HADOOP_HOME=/opt/hadoop-3.2.0
export PATH=$PATH:$HADOOP_HOME/bin
export PATH=$PATH:$HADOOP_HOME/sbin
export HADOOP_CONF_DIR=${HADOOP_HOME}/etc/hadoop

# Save to make profile valid
source /etc/profile
2. Configure JAVA_HOME parameters in the Hadoop environment script file
cd /opt/hadoop-3.2.0/etc/hadoop
#Add or modify the following parameters in the hadoop-env.sh, mapred-env.sh, yarn-env.sh files, respectively
vim hadoop-env.sh
vim mapred-env.sh
vim yarn-env.sh
export JAVA_HOME="/opt/jdk"
3. Modify Hadoop Profile
cd /opt/hadoop-3.2.0/etc/hadoop
In the etc/hadoop directory under the Hadoop installation directory, modify the core-site.xml, hdfs-site.xml, mapred-site.xml, yarn-site.xml, workers files to modify the configuration information as appropriate
create folder
mkdir -p /opt/hadoop/tmp
core-site.xml (Configure Common Component Properties)
<configuration>
  <property>
      <!-- To configure hdfs address -->
      <name>fs.defaultFS</name>
      <value>hdfs://hadoop01:9000</value>
  </property>
  <property>
      <!-- To save a temporary file directory, you first need to/opt/hadoop Create under tmp Catalog -->
      <name>hadoop.tmp.dir</name>
     <value>/opt/hadoop/tmp</value>
 </property>
 </configuration>
hdfs-site.xml (configure HDFS component properties)
<configuration>
      <property>
         <!-- Primary Node Address -->
          <name>dfs.namenode.http-address</name>
          <value>hadoop01:50070</value>
      </property>
      <property>
          <name>dfs.namenode.name.dir</name>
          <value>file:/opt/hadoop/dfs/name</value>
     </property>
     <property>
         <name>dfs.datanode.data.dir</name>
         <value>file:/opt/hadoop/dfs/data</value>
     </property>
     <property>
        <!-- Number of backups is default 3 -->
        <name>dfs.replication</name>
         <value>3</value>
     </property>
        <property>
              <name>dfs.webhdfs.enabled</name>
              <value>true</value>
         </property>
      <property>
            <name>dfs.permissions</name>
            <value>false</value>
            <description>Configuration false After that, you can allow generation without checking permissions dfs The files on the are convenient, but you need to prevent them from being deleted by mistake.</description>
       </property>
 </configuration>
mapred-site.xml (configure Map-Reduce component properties)
<configuration>
    <property>
        <name>mapreduce.framework.name</name>
        <!--#Set MapReduce to run on yarn-->
        <value>yarn</value>
    </property>
    <property>
        <name>mapreduce.jobhistory.address</name>
        <value>hadoop01:10020</value>
    </property>
    <property>
        <name>mapreduce.jobhistory.webapp.address</name>
        <value>hadoop01:19888</value>
    </property>
    <property>
        <name>mapreduce.application.classpath</name>
        <value>$HADOOP_MAPRED_HOME/share/hadoop/mapreduce/*:$HADOOP_MAPRED_HOME/share/hadoop/mapreduce/lib/*</value>
    </property>
</configuration>
yarn-site.xml (Configure Resource Scheduling Properties)
<configuration>
    <property>
        <name>yarn.resourcemanager.hostname</name>
        <!--#Specify the address of yarn's esourceManager management interface, and if not, Active Node will always be 0-->
        <value>hadoop01</value>
    </property>
    <property>
        <name>yarn.nodemanager.aux-services</name>
        <!--#Reducr How to Get Data -->
        <value>mapreduce_shuffle</value>
    </property>
    <property>
        <name>yarn.resourcemanager.webapp.address</name>
        <value>hadoop01:8088</value>
        <description>Configuring an external network only requires replacing the external network ip Is True ip,Otherwise defaults to localhost:8088</description>
    </property>
    <property>
        <name>yarn.scheduler.maximum-allocation-mb</name>
        <value>2048</value>
        <description>Available memory per node,Company MB,Default 8182 MB</description>
    </property>
    <property>
        <name>yarn.nodemanager.vmem-check-enabled</name>
        <value>false</value>
        <description>Ignore virtual memory checks. This configuration is useful if you are installing on a virtual machine, and subsequent operations are not likely to cause problems.</description>
    </property>
    <property>
        <name>yarn.nodemanager.env-whitelist</name>
        <value>     JAVA_HOME,HADOOP_COMMON_HOME,HADOOP_HDFS_HOME,HADOOP_CONF_DIR,CLASSPATH_PREPEND_DISTCACHE,HADOOP_YARN_HOME,HADOOP_MAPRED_HOME
        </value>
    </property>
</configuration>
workers
vim workers
# Add something
hadoop02
hadoop03
hadoop04
4. Copy the configured folder to another slave node
scp -r /opt/hadoop-3.2.0 root@hadoop02:/opt/
scp -r /opt/hadoop-3.2.0 root@hadoop03:/opt/

scp -r /opt/hadoop root@hadoop02:/opt/
scp -r /opt/hadoop root@hadoop03:/opt/
5. Configure startup scripts, add HDFS and Yarn permissions
# Add HDFS permissions: Edit the following script and add HDFS permissions in the empty space on the second line
cd /opt/hadoop-3.2.0/sbin
vim start-dfs.sh
vim stop-dfs.sh

HDFS_DATANODE_USER=root
HDFS_DATANODE_SECURE_USER=hdfs
HDFS_NAMENODE_USER=root
HDFS_SECONDARYNAMENODE_USER=root
# Add Yarn permissions: Edit the following script and add Yarn permissions in the empty space on the second line
cd /opt/hadoop-3.2.0/sbin
vim start-yarn.sh
vim stop-yarn.sh

YARN_RESOURCEMANAGER_USER=root
HDFS_DATANODE_SECURE_USER=yarn
YARN_NODEMANAGER_USER=root
6. Initialization & Startup
cd /opt/hadoop-3.2.0
# init
# Format
bin/hdfs namenode -format wmqhadoop

#start-up
sbin/start-dfs.sh
sbin/start-yarn.sh

# Back Open
sbin/start-all.sh

# Stop it
sbin/stop-all.sh
7. Verify Hadoop started successfully
jps
Open ResourceManager page at browser input: http://hadoop01:8088

Open the Hadoop Namenode page in the browser by typing: http://hadoop01:50070
mysql-5.7 installation
download
wget http://repo.mysql.com/yum/mysql-5.7-community/el/7/x86_64/mysql57-community-release-el7-10.noarch.rpm

rpm -ivh mysql57-community-release-el7-10.noarch.rpm
Use the yum command to complete the installation
1,Installation command:
yum -y install mysql-community-server

2,start-up msyql:
systemctl start mysqld #Start MySQL

3,Get the temporary password for the installation (which is used the first time you log on):
grep 'temporary password' /var/log/mysqld.log
sGpt=V+8f,qv

Auftbt8Mht,x
3.Set up boot-up
systemctl enable mysqld
Sign in
mysql -uroot -p
# Enter the password you just entered
Change Password
ALTER USER 'root'@'localhost' IDENTIFIED BY 'Mysql123!';
Set to allow remote login
1. Execute authorization commands
GRANT ALL PRIVILEGES ON *.* TO 'root'@'%' IDENTIFIED BY 'Mysql123!' WITH GRANT OPTION;
2. Exit mysql Operations Console
exit
3. Open port 3306
Open Firewall
sudo systemctl start firewalld.service
Open port 3306 permanently
sudo firewall-cmd --add-port=3306/tcp --permanent
Reload
sudo firewall-cmd --reload
Close Firewall
sudo systemctl stop firewalld.service
Set default encoding to utf8
View mysql encoding before modification
show variables like '%chara%';
Modify the / etc/my.cnf file to add the following two lines
vim /etc/my.cnf
character_set_server=utf8
init_connect='SET NAMES utf8'
After modification, restart mysql
sudo systemctl restart mysqld
hive installation
https://blog.csdn.net/qq_39315740/article/details/98626518 #Recommended
https://blog.csdn.net/weixin_43207025/article/details/101073351
hive Download
http://mirror.bit.edu.cn/apache/hive/
hive installation
tar -zxvf apache-hive-3.1.2-bin.tar.gz -C /opt/
Configuring environment variables
vim /etc/profile
# hive
export HIVE_HOME=/opt/apache-hive-3.1.2-bin
export PATH=$PATH:$HIVE_HOME/bin

source /etc/profile
Create hive-site.xml file
cd /opt/apache-hive-3.1.2-bin/conf
cp hive-default.xml.template hive-site.xml
For the following HDFS-related settings in hive-site.xml, we need to create the corresponding directory in HDFS now
<property> <name>hive.metastore.warehouse.dir</name> <value>/user/hive/warehouse</value> <description>location of default database for the warehouse</description> </property> <property> <name>hive.exec.scratchdir</name> <value>/tmp/hive</value> <description>HDFS root scratch dir for Hive jobs which gets created with write all (733) permission. For each connecting user, an HDFS scratch dir: ${hive.exec.scratchdir}/<username> is created, with ${hive.scratch.dir.permission}.</description> </property>
Create HDFS Folder
hadoop fs -mkdir -p /user/hive/warehouse   # create folder
hadoop fs -mkdir -p /tmp/hive    # create folder
hadoop fs -chmod -R 777 /user/hive/warehouse   # Grant privileges
hadoop fs -chmod -R 777 /tmp/hive   # Grant privileges

# Check to see if the creation was successful
hadoop fs -ls /
Hive-related configuration
Change {system:java.io.tmpdir} in hive-site.xml to hive's local temporary directory and {system:user.name} to user name.
Create temp directory
cd /opt/apache-hive-3.1.2-bin
mkdir temp
chmod -R 777 temp
# Replace ${system:java.io.tmpdir} with / opt/apache-hive-3.1.2-bin/temp
# Replace ${system:user.name} with root
vim hive-site.xml
%s/${system:java.io.tmpdir}/\/opt\/apache-hive-3.1.2-bin\/temp/g
%s/${system:user.name}/root/g
Database Related Configuration
# Database jdbc address, modified as host ip address in value tag <property> <name>javax.jdo.option.ConnectionURL</name> <value>jdbc:mysql://localhost:3306/hive?createDatabaseIfNotExist=true&characterEncoding=UTF-8</value> </property> # Driver class name for database # The new version 8.0 driver is com.mysql.cj.jdbc.Driver # Older version 5.x is driven by com.mysql.jdbc.Driver <property> <name>javax.jdo.option.ConnectionDriverName</name> <value>com.mysql.jdbc.Driver</value> </property> # Database User Name <property> <name>javax.jdo.option.ConnectionUserName</name> <value>root</value> </property> # Database Password <property> <name>javax.jdo.option.ConnectionPassword</name> <value>Mysql123!</value> #Modify your own mysql password </property> <property> <name>hive.metastore.schema.verification</name> <value>false</value> </property>
Configure hive-log4j2.properties
cd /opt/apache-hive-3.1.2-bin/conf
cp hive-log4j2.properties.template hive-log4j2.properties

vim hive-log4j2.properties
# Modify Content
property.hive.log.dir = /opt/apache-hive-3.1.2-bin/temp/root
Configure hive-env.sh file
cd /opt/apache-hive-3.1.2-bin/conf
cp hive-env.sh.template hive-env.sh
vim hive-env.sh
Add the following:
export JAVA_HOME=/opt/jdk
export HADOOP_HOME=/opt/hadoop-3.2.0
export HIVE_CONF_DIR=/opt/apache-hive-3.1.2-bin/conf
export HIVE_AUX_JARS_PATH=/opt/apache-hive-3.1.2-bin/lib
Hive Start
Download Database 5.7 Driver
https://blog.csdn.net/qq_41950447/article/details/90085170
//Database Driven Download

wget https://cdn.mysql.com//Downloads/Connector-J/mysql-connector-java-5.1.48.tar.gz

# Move the database driver to lib in hive
cp -r mysql-connector-java-5.1.48-bin.jar /opt/apache-hive-3.1.2-bin/lib
Initialization
schematool -dbType mysql -initSchema
problem
# hive initialization error
http://www.lzhpo.com/article/98
# Compare the guava-27.0-jre.jar versions in hadoop and hive
cd /opt/hadoop-3.2.0/share/hadoop/common/lib
ll | grep guava*

cd /opt/apache-hive-3.1.2-bin/lib
ll | grep guava*

//Replace the higher version of guava-27.0-jre.jar with the lower version of guava-19.0-jre.jar

# There are also questions to refer to
https://blog.csdn.net/qq_39315740/article/details/98626518
Hadoop 3.1.2 + Hive 3.1.1 Installation
https://www.cnblogs.com/weavepub/p/11130869.html
other
Modify vim comment color
Create a new.vimrc profile under User~Home folder
vim ~/.vimrc
 #Add the content and save it
hi Comment ctermfg =blue
vim replacement
%s/${system:java.io.tmpdir}/\/opt\/apache-hive-3.1.2-bin\/temp/g
%s/${system:user.name}/root/g

