These days when I started hadoop, I didn't even mention the installation of hadoop distributed cluster in the video. I started to talk about the concept directly. After thinking about it for a few weeks, I still solved it. There are too many small problems and the data are messy. The blogs speak differently. I have to summarize and find out the solutions to the problems. Therefore, I record my successful experience here, I hope it will be helpful to the new people
Reference blog:
https://blog.csdn.net/xiaoxsen/article/details/80462271
https://www.shangmayuan.com/a/28f8b1571406445aabd579d6.html
There are a lot of online information about virtual machine installation system. You can refer to it if you don't elaborate https://blog.csdn.net/wu_zeqin/article/details/79833046
Install a host, copy three slaves, and open a shared folder. vmtool can be installed better


The configuration of virtual machines should not be too high. Opening four virtual machines at the same time is easy to crash. Try not to use vmtool to copy large files, which is also easy to crash. Just copy some commands. If vmtool is not installed, use remote connection software to operate. Switching machines is relatively fast, and repeated commands can also be copied.
1, Setting up new users, installing jdk and hadoop
Use the root account when entering centos system, and then
gourpadd hduser
useradd hduser -g hduser
 It can be set here at the same time hduser Password for
passwd hduser
 Then enter the password twice
Add a user who exclusively uses hadoop and the user group to which he belongs. The purpose of adding this user is to facilitate the security of mutual calls between clusters (I compiled it). Moreover, the connection permission of root user is closed in the later ssh password free login configuration, so he can only connect with other users.
jdk download and hadoop are on the official website, and there are many image links. After that, they are placed in the shared folder of VMware for use by virtual machines.
First, install the jdk. In fact, extract it to a path you remember, modify the environment variable, and let the system find the bin path of the jdk, that is:
JAVA_HOME=~/jdk1.8
PATH=$PATH:$JAVA_HOME/bin
export JAVA_HOME
export PATH
Then, hadoop is also decompressed. At this time, you need to modify the owner of hadoop file with root permission as the new user hduser, that is:
chown hduser:hduser hadoop-3.2
mv hadoop-3.2 /usr/local/hadoop
In this way, when ssh is connected and then hadoop is used, there is no problem of insufficient permissions, which is easier than changing files to 777.
Modifying environment variables is different from jdk, because only hduser uses hadoop files. This time, the modified variables are only written in / home/hduser/.basrc of hduser, that is:
su - hduser
vim .basrc
#Variable information
export JAVA_HOME=/home/hduser/jdk1.8
export HADOOP_HOME=/usr/local/hadoop
export PATH=$PATH:$HADOOP_HOME/bin
export PATH=$PATH:$HADOOP_HOME/sbin
export PATH=$PATH:$HADOOP_HOME/etc/hadoop
export HADOOP_MAPRED_HOME=$HADOOP_HOME
export HADOOP_COMMON_HOME=$HADOOP_HOME
export HADOOP_HDFS_HOME=$HADOOP_HOME
export YARN_HOME=$HADOOP_HOME
export HADOOP_COMMON_HOME=$HADOOP_HOME
export HADOOP_HDFS_HOME=$HADOOP_HOME
export YARN_HOME=$HADOOP_HOME
export HADOOP_COMMON_LIB_NATIVE_DIR=$HADOOP_HOME/lib/native
export HADOOP_OPTS="-Djava.library.path=$HADOOP_HOME/lib"
export JAVA_LIBRARY_PATH=$HADOOP_HOME/lib/native:$JAVA_LIBRARY_PATH
In fact, it is basically the path of jdk and the path of hadoop, saving the command of calling hadoop and running back to the installation path.
At this point, the jdk and hadoop installation are completed, but more importantly, the environment configuration operation is also the most error prone part, which will be described in detail in the third part.
2, ssh secret free
For the interconnection between clusters, ssh connection is used here. You can't enter the password every time, so you should build a secret free connection through key sharing.
First set the hostname, that is, the native Name:
vim /etc/sysconfig/network
 The host is modified to hostname=hadoopm
 Slave modified to haotname=hadoop01    hadoop02    hadoop03
Then restart to take effect, and then modify the host of each machine:
vim /etc/hosts
 Write the corresponding information of the master and slave ip
192.1.2.3   hadoopm
192.1.2.4   hadoop01
192.1.2.5   hadoop02
192.1.2.6   hadoop03
You can use ifconfig to view the ip address, or right-click on the system network connection to view information.
Finally, close the firewall, temporarily close the service iptables stop, and restart the recovery. chkconfig iptables off is permanently closed. The server is not recommended, but the virtual machine can be used, which is more convenient.
Finally, close SELINUX
vim /etc/sysconfig/selinux
SELINUX=disabled
The ssh connection is under the hduser user, so set the key after su - hduser and send it:
ssh-keygen -t rsa
 Enter, enter, enter
 If it has been generated before, you will be asked whether to overwrite it( y/n)It's no use to enter here. You need to enter y

cd ~/.ssh
cat id_rsa.pub >> authorized_keys
At this point, you should be able to ssh yourself. You can ssh your own host name to try
Host operation:
ssh-copy-id -i ~/.ssh/id_rsa.pub hadoop01
ssh-copy-id -i ~/.ssh/id_rsa.pub hadoop02
ssh-copy-id -i ~/.ssh/id_rsa.pub hadoop03
 Slave 01 operation:
ssh-copy-id -i ~/.ssh/id_rsa.pub hadoopm
ssh-copy-id -i ~/.ssh/id_rsa.pub hadoop02
ssh-copy-id -i ~/.ssh/id_rsa.pub hadoop03
The slave machine can be set in turn. If the ssh secret free connection is successful, the hostname will be directly cut into the other machine name:

After completing this step, you can try to ssh each machine. There will be various problems. I will only explain a few thorny problems I encounter:
1. ssh is directly permission denied. This is basically the permission problem of the key
chmod 700 /home/hduser/.ssh
chmod 600 authorized_keys
After modifying a machine, you can try to ssh it with other machines. If you pop up and enter the password, it is basically successful
2. Permission denied (public key, GSSAPI keyex, GSSAPI with MIC, password) appears. You need to modify the SSH configuration file of each machine. Refer to https://phoenixnap.com/kb/ssh-permission-denied-publickey :
get into root jurisdiction
su root
 Input password
vim /etc/ssh/sshd_config
 change
PermitRootLogin no
PubkeyAuthentication yes
GSSAPIAuthentication yes
GSSAPICleanupCredentials no
UsePAM yes
systemctl restart sshd perhaps service sshd restart
After modification, redistribute the key, and then try whether ssh is secret free
ssh-keygen -t rsa
ssh-copy-id -i ~/.ssh/id_rsa.pub hadoop01
3, Modify profile
The difference between master and slave depends on configuration files, so the configuration file variables of master and slave are different. These configuration files are in / etc/hadoop under the hadoop installation path
host:
hadoop-env.sh
/**/
export JAVA_HOME=/home/hduser/jdk1.8
/**/
core-site.xml
/**/
<configuration>
    <property>
        <name>fs.default.name</name>
        <value>hdfs://hadoopm:9000</value>
    </property>
    <property>
        <name>hadoop.tmp.dir</name>
        <value>/data/hadoop_data/hadoop_tmp</value>
    </property>
</configuration>
/**/
hdfs-site.xml
/**/
<configuration>
    <property>
        <name>dfs.replication</name>
        <value>3</value>
    </property>
    <property>
        <name>dfs.namenode.name.dir</name>
        <value>file:/data/hadoop_data/hdfs/namenode</value>        #Establish a real path to store the name node
    </property>
    <property>
        <name>dfs.datanode.data.dir</name>
        <value>file:/data/hadoop_data/hdfs/datanode</value>        #It is used to store data to establish a real path
    </property>
</configuration>
/**/
mapred-site.xml
/**/
<configuration>
    <property>
        <name>mapreduce.framework.name</name>
        <value>yarn</value>
    </property>
</configuration>
/**/
yarn-site.xml
/**/
<configuration>
    <property>
        <name>yarn.resourcemanager.hostname</name>
        <value>hadoopm</value>
    </property>
    <property>
        <name>yarn.nodemanager.aux-services</name>
        <value>mapreduce_shuffle</value>
    </property>
    <property>
        <name>yarn.nodemanager.aux-services.mapreduce.shuffle.class</name>
        <value>org.apache.hadoop.mapred.ShuffleHandler</value>
    </property>
    <property>
        <name>yarn.resourcemanager.address</name>
        <value>hadoopm:8050</value>
    </property>
    <property>
        <name>yarn.resourcemanager.scheduler.address</name>
        <value>hadoopm:8030</value>
    </property>
    <property>
        <name>yarn.resourcemanager.resource-tracker.address</name>
        <value>hadoopm:8025</value>
    </property>
    #When running pyspark with hadoop yarn, an error will be reported if the following two parameters are not added
    <property>
        <name>yarn.nodemanager.pmem-check-enabled</name>
        <value>false</value>
    </property>
    <property>
        <name>yarn.nodemanager.vmem-check-enabled</name>
        <value>false</value>
    </property>
</configuration>
/**/
worker
hadoop01
hadoop02
hadoop03
slaves
hadoop01
hadoop02
hadoop03
Slave:
hadoop-env.sh
/**/
export JAVA_HOME=/home/hduser/jdk1.8
/**/
core-site.xml
/**/
<configuration>
    <property>
        <name>fs.default.name</name>
        <value>hdfs://hadoopm:9000</value>
    </property>
    <property>
        <name>hadoop.tmp.dir</name>
        <value>/data/hadoop_data/hadoop_tmp</value>
    </property>
</configuration>
/**/
hdfs-site.xml
/**/
<configuration>
    <property>
        <name>dfs.replication</name>
        <value>3</value>
    </property>
    <property>
        <name>dfs.datanode.data.dir</name>
        <value>file:/home/data/hadoop_data/hdfs/datanode</value>
    </property>
</configuration>
/**/
mapred-site.xml
/**/
<configuration>
    <property>
        <name>mapred.job.tracker</name>
        <value>hadoopm:54311</value>
    </property>
</configuration>
/**/
yarn-site.xml
/**/
<configuration>
    <property>
        <name>yarn.nodemanager.aux-services</name>
        <value>mapreduce_shuffle</value>
    </property>
    <property>
        <name>yarn.nodemanager.aux-services.mapreduce.shuffle.class</name>
        <value>org.apache.hadoop.mapred.ShuffleHandler</value>
    </property>
    <property>
        <name>yarn.resourcemanager.address</name>
        <value>hadoopm:8050</value>
    </property>
    <property>
        <name>yarn.resourcemanager.scheduler.address</name>
        <value>hadoopm:8030</value>
    </property>
    <property>
        <name>yarn.resourcemanager.resource-tracker.address</name>
        <value>hadoopm:8025</value>
    </property>
    #When running pyspark with hadoop yarn, an error will be reported if the following two parameters are not added
    <property>
        <name>yarn.nodemanager.pmem-check-enabled</name>
        <value>false</value>
    </property>
    <property>
        <name>yarn.nodemanager.vmem-check-enabled</name>
        <value>false</value>
    </property>
</configuration>
/**/
Then execute vim log4j.properties on all machines and add the following lines
log4j.logger.org.apache.hadoop.util.NativeCodeLoader=ERROR
Here, you have completed the configuration files of one master and one slave. The remaining two slaves can copy the configuration files through the first slave
rsync -av Yours hadoop route/etc hadoop02:Yours hadoop route/
Copy the etc folder to slave 2. You can also use this method to directly transfer the whole hadoop. Note that it should be executed under the hduser user. root cannot connect to ssh, but the hduser has less permissions, resulting in insufficient transmission permissions. Try to transfer the files with the owner as hduser.
4, Startup and related errors
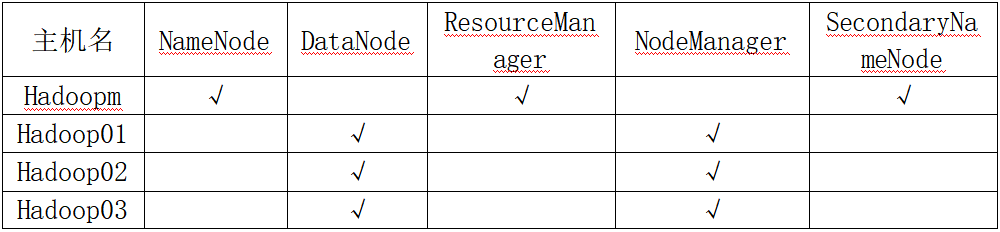
After modifying the above configuration file, we need to create a folder as a namenode. The path is: / data/hadoop_data/hdfs/namenode in the configuration file hdfs_site.xml. Hadoop will not automatically generate this folder for us, so we need to create it ourselves. Note that it should be created by the hduser user. Otherwise, we can't create and write files here after starting the cluster . if it has been created by root user, you can also directly modify the owner in the folder attribute:

The folders to be created include / data / hadoop_data / HDFS / nanode, / data/hadoop_data/hdfs/datanode, / data/hadoop_data/hadoop_tmp (the file for secondarynanode). However, datanode is not set in the host and nanode is not set in the slave, so the host only needs to create two folders and the slave only needs one folder.

Here, we can try to create this directory with root permission and directly enter the path to create a new folder without the command line. Then we cd to / data/hadoop_data/hdfs/namenode and execute hadoop namenode -format to format. At this time, if the Hadoop command cannot be found, we need source ~/.basrc.
If Hadoop M: ssh: connect to host Hadoop m port 2112: connection rejected appears, we want to change the port number to the commonly used port 22, but where is the configuration file? You can use find. | xargs grep '2112' in hadoop/etc/hadoop / to query. It is found that the ssh port number can be modified in / etc / Hadoop / Hadoop env.sh, vim goes in / 2112 to locate and change it to 22.

After executing hadoop namenode -format, we can see this sentence in the output result:
2021-10-08 21:00:38,053 WARN namenode.NameNode: Encountered exception during format:
java.io.IOException: Cannot create directory /data/hadoop_data/hdfs/namenode/current
	at org.apache.hadoop.hdfs.server.common.Storage$StorageDirectory.clearDirectory(Storage.java:447)
The current folder cannot be created. You should think of the problem of permission. Change the permission and start again:
2021-10-08 21:05:54,356 INFO namenode.FSImage: Allocated new BlockPoolId: BP-1995783002-192.168.52.142-1633698354342
2021-10-08 21:05:54,371 INFO common.Storage: Storage directory /data/hadoop_data/hdfs/namenode has been successfully formatted.
2021-10-08 21:05:54,446 INFO namenode.FSImageFormatProtobuf: Saving image file /data/hadoop_data/hdfs/namenode/current/fsimage.ckpt_0000000000000000000 using no compression
2021-10-08 21:05:54,924 INFO namenode.FSImageFormatProtobuf: Image file /data/hadoop_data/hdfs/namenode/current/fsimage.ckpt_0000000000000000000 of size 398 bytes saved in 0 seconds .
2021-10-08 21:05:54,948 INFO namenode.NNStorageRetentionManager: Going to retain 1 images with txid >= 0
2021-10-08 21:05:54,952 INFO namenode.FSImage: FSImageSaver clean checkpoint: txid=0 when meet shutdown.
2021-10-08 21:05:54,952 INFO namenode.NameNode: SHUTDOWN_MSG:
/************************************************************
SHUTDOWN_MSG: Shutting down NameNode at hadoopm/192.168.52.142
************************************************************/
In this way, the namenode format is completed and the cluster service can be started. Execute start-all.sh on the host to start all services,
[hduser@hadoopm namenode]$ start-all.sh
WARNING: Attempting to start all Apache Hadoop daemons as hduser in 10 seconds.
WARNING: This is not a recommended production deployment configuration.
WARNING: Use CTRL-C to abort.
Starting namenodes on [hadoopm]
Starting datanodes
Starting secondary namenodes [hadoopm]
Starting resourcemanager
Starting nodemanagers

[hduser@hadoopm namenode]$ jps
42034 SecondaryNameNode
42567 Jps
42250 ResourceManager
41802 NameNode
When I switch to the slave machine and input jps, I find that there is only nodemanager and no datanode. This is because my hadoop has been formatted twice. There are two host cluster ID S, and the old ones have been overwritten, while the slave machine retains the old ones. The two do not correspond and cannot open datanode
[hduser@hadoop03 ~]$ jps
9686 Jps
9578 NodeManager
You can find the version file in the current folder under the host namenode path, copy the CID, and then paste it into the version under the current folder in the slave datanode folder to force synchronization. After trying, you can directly empty the datanode of the slave, and then execute start-all.sh again.
Finally, jps is input from the slave, and datanode appears:
[hduser@hadoop03 ~]$ jps
10322 DataNode
10552 Jps
10444 NodeManager
Successfully built.
In fact, the overall construction is not difficult, but it is cumbersome. There are too many host names of various folder paths, and an error in one step will lead to failure to open. However, in addition to observing in the command line, after hadoop is opened, you can also view the log under the logs folder to find errors. At first, I couldn't even open datanode and namenode, Finally, one by one, it was found that one was the permission problem and the other was the path error, which tortured for several weeks.