server information
System: CentOS 6.5 minimal version
Host: Virtual Machine
Virtual Machine IP: 192.168.128.128/24
Host IP:10.1.79.24/24
Install postfix
Note: CentOS 7 has actually replaced sendmail with postfix+Sasl2, so there is no need to install it.
1. Remove sendmail
Installation completed also requires replacing the sendmail that comes with the system:
# rpm -e sendmail
#perhaps
# yum remove sendmail
Modify MTA (Default Mail Transfer Agent)
Write to see which mail systems are available
alternatives --display mta
mta - status is manual.
link currently points to /usr/sbin/sendmail.sendmail
/usr/sbin/sendmail.sendmail - priority 90
slave mta-pam: /etc/pam.d/smtp.sendmail
slave mta-mailq: /usr/bin/mailq.sendmail
slave mta-newaliases: /usr/bin/newaliases.sendmail
slave mta-rmail: /usr/bin/rmail.sendmail
slave mta-sendmail: /usr/lib/sendmail.sendmail
slave mta-mailqman: /usr/share/man/man1/mailq.sendmail.1.gz
slave mta-newaliasesman: /usr/share/man/man1/newaliases.sendmail.1.gz
slave mta-aliasesman: /usr/share/man/man5/aliases.sendmail.5.gz
slave mta-sendmailman: /usr/share/man/man8/sendmail.sendmail.8.gz
/usr/sbin/sendmail.postfix - priority 30
slave mta-pam: /etc/pam.d/smtp.postfix
slave mta-mailq: /usr/bin/mailq.postfix
slave mta-newaliases: /usr/bin/newaliases.postfix
slave mta-rmail: /usr/bin/rmail.postfix
slave mta-sendmail: /usr/lib/sendmail.postfix
slave mta-mailqman: /usr/share/man/man1/mailq.postfix.1.gz
slave mta-newaliasesman: /usr/share/man/man1/newaliases.postfix.1.gz
slave mta-aliasesman: /usr/share/man/man5/aliases.postfix.5.gz
slave mta-sendmailman: /usr/share/man/man1/sendmail.postfix.1.gz
Current `best' version is /usr/sbin/sendmail.sendmail.
Then we changed it to / usr/lib/sendmail.postfix
alternatives --set mta /usr/sbin/sendmail.postfix
Check to see if the setup is successful.
alternatives --display mta | grep "/usr/sbin/sendmail.postfix"
The first line shows the state of mta. For example:
Links currently point to / usr/sbin/sendmail.postfix
/usr/sbin/sendmail.postfix - priority 30
 The current "best" version is / usr/sbin/sendmail.postfix.
Configure Postfix
Edit/etc/postfix/main.cf, which can be downloaded and modified, or can be edited using vi:
vi /etc/postfix/main.cf
The editorial content is as follows
# Line 75: Uncomment and set hostname
myhostname = mail.bujidao.me
# Line 83: Cancel the comment and set the domain name
mydomain = bujidao.me
# Line 99: Uncomment
myorigin = $mydomain
# Line 116: Modification
inet_interfaces = all
# Line 119: Recommend ipv4, if ipv6 is supported, then all
inet_protocols = ipv4
#209 lines, remove the previous comment, or you can't send it to the public network [http://www.cnblogs.com/apexchu/p/4271264.html]
local_recipient_maps =
# Line 164: Add
mydestination = $myhostname, localhost.$mydomain, localhost, $mydomain
# Line 264: Uncomment, specify the range of Intranet and local IP addresses
mynetworks = 127.0.0.0/8, 10.1.79.0/24,192.168.128.128
# Line 419: Uncomment, Mail Save Directory
home_mailbox = Maildir/
# Line 571: Add
smtpd_banner = $myhostname ESMTP $mail_name

# Add to the last
# Maximum size of mail is 10M
message_size_limit = 10485760
# Require maximum inbox capacity of 1G
mailbox_size_limit = 1073741824
# SMTP authentication
smtpd_sasl_type = dovecot
smtpd_sasl_path = private/auth
smtpd_sasl_auth_enable = yes
smtpd_sasl_security_options = noanonymous
smtpd_sasl_local_domain = $myhostname
smtpd_recipient_restrictions = permit_mynetworks,permit_auth_destination,permit_sasl_authenticated,reject
After modification, use service to start postfix, and chkconfig postfix on to start postfix.
#service postfix restart
#checkconfig postfix  on #Start-up, optional
Install Dovecot
yum -y install dovecot
Configure Dovecot
1. Modify dovecot.cong
vi /etc/dovecot/dovecot.conf
Amend as follows:
listen = *,::

protocols = imap pop3 lmtp
2. Modify auth.conf
vi /etc/dovecot/conf.d/10-auth.conf
# Line 9: Uncomment and modify to allow plaintext validation
disable_plaintext_auth = no
# Line 97: Add to allow plaintext login
auth_mechanisms = plain login
3. Modify mail.conf
vi /etc/dovecot/conf.d/10-mail.conf
# 30 lines: Uncomment and add, using qmail style
mail_location = maildir:~/Maildir
4. Modify master.conf
vi /etc/dovecot/conf.d/10-master.conf
# Lines 88-90: Uncomment and add
# Postfix smtp verification
unix_listener /var/spool/postfix/private/auth {
    mode = 0666
    user = postfix
    group = postfix
}
5. Modify pop3.conf
vi /etc/dovecot/conf.d/20-pop3.conf
pop3_uidl_format = %08Xu%08Xv
pop3_client_workarounds = outlook-no-nuls oe-ns-eoh
6. Configuring ssl validation
vi /etc/dovecot/conf.d/10-ssl.conf
ssl = no    #Open SSL
#We will not open ssl for the time being because we do not have a valid certificate and there may be problems with self-signed certificates.
#ssl_cert = </etc/pki/dovecot/certs/dovecot.pem
#ssl_key = </etc/pki/dovecot/private/dovecot.pem
7. Start the dovecot and set the boot start
service dovecot start
chkconfig dovecot on
8. Check related ports
ps aux | grep "dovecot"
root       3894  0.0  0.1 107936   604 pts/1    S+   14:27   0:00 tail -f dovecot-err.log
root       4040  0.0  0.1 107936   604 pts/2    S+   14:53   0:00 tail -f /var/log/dovecot-info.log
root       4442  0.0  0.3  15640  1520 ?        Ss   16:01   0:00 /usr/sbin/dovecot -F
dovecot    4445  0.0  0.2   9308  1024 ?        S    16:01   0:00 dovecot/anvil
root       4446  0.0  0.2   9436  1184 ?        S    16:01   0:00 dovecot/log
root       4517  0.0  0.2 112664   972 pts/0    R+   16:12   0:00 grep --color=auto dovecot
perhaps
netstat -lntp -4
Proto Recv-Q Send-Q Local Address           Foreign Address         State       PID/Program name
tcp        0      0 0.0.0.0:110             0.0.0.0:*               LISTEN      4533/dovecot
tcp        0      0 0.0.0.0:143             0.0.0.0:*               LISTEN      4533/dovecot
tcp        0      0 0.0.0.0:22              0.0.0.0:*               LISTEN      969/sshd
tcp        1      0 0.0.0.0:25              0.0.0.0:*               LISTEN      4361/master
Using lsof query
lsof -i :143
COMMAND  PID USER   FD   TYPE DEVICE SIZE/OFF NODE NAME
dovecot 4533 root   36u  IPv4  95185      0t0  TCP *:imap (LISTEN)
dovecot 4533 root   37u  IPv6  95186      0t0  TCP *:imap (LISTEN)
lsof -i :110
COMMAND  PID USER   FD   TYPE DEVICE SIZE/OFF NODE NAME
dovecot 4533 root   24u  IPv4  95149      0t0  TCP *:pop3 (LISTEN)
dovecot 4533 root   25u  IPv6  95150      0t0  TCP *:pop3 (LISTEN)
lsof -i :25
COMMAND  PID USER   FD   TYPE DEVICE SIZE/OFF NODE NAME
master  4361 root   13u  IPv4  93270      0t0  TCP *:smtp (LISTEN)
master  4361 root   14u  IPv6  93271      0t0  TCP *:smtp (LISTEN)
You can see that master is stmpd, occupying 25,dovecot accounts for 110 (pop3) and 143 (imap) ports.
Mailbox Verification and Use
Creating Users
Once everything is done, you can use third-party software like Foxmail to send and receive e-mails. Here we need to say that system users are mail users, such as root, is a mailbox user, mailbox is root@domain.com, password is root's password, so we need to create users, as long as we use adduser to create users, and then use passwd to set passwords.
Well, suppose we create an admin user:
#Create user groups and users, and do not allow users to log on to the system, but the account exists, only for mailboxes
groupadd mailusers
adduser -g mailusers -s /sbin/nologin martin
adduser -g mailusers -s /sbin/nologin jack

#Add passwords to martin and jack, respectively
passwd martin
passwd jack
Using pseudo domain name verification
In principle, if we want to use mailbox, we must have domain name. We can either build our own DNS server or buy domain name. Here, for convenience, we can implement it by modifying hosts.
Modify hosts on virtual machines
127.0.0.1       bujidao.me
192.168.128.128 bujidao.me

127.0.0.1       mail.bujidao.me
192.168.128.128 mail.bujidao.me
Then modify the hosts on the host. If you don't use the host, then the hosts don't need to be changed, but most of the time, we need to change.
Add the following
192.168.128.128 bujidao.me
192.168.128.128 mail.bujidao.me
Close virtual firewall
service iptables stop
Use foxmail proxy client to send and receive mail
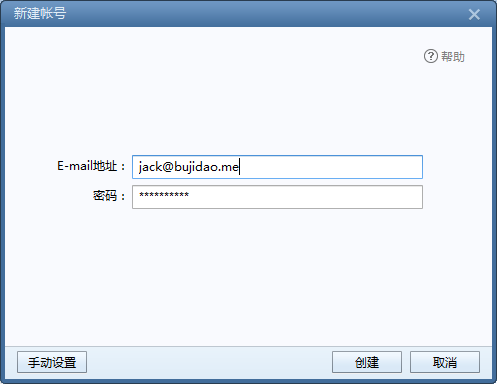
Then create and go to the next page to modify the mail account
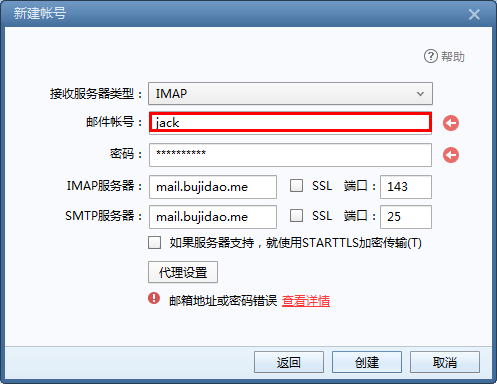
Note: The red box should not be taken with it. @domain Otherwise, we can't log in because we didn't add mailbox to the account we created for the system
Click Create to add a jack account. In the same way, we can add martin to foxmail.
Then we can use jack and martin to send mail to each other.
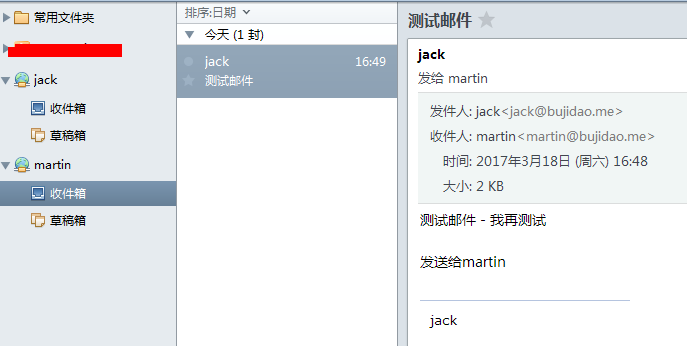
Of course, we can also send it to other mailboxes. Of course, we oppose spam and make it our duty to be a good citizen.
Reference resources:
Construction of Mail Server in Linux System (Postfix+Dovecot)
CentOS 6.5 Installation and Configuration of Mail Server (postfix + dovecot)
Postfix+Dovecot+MySQL Build Mail Server