Explanation: Almost many bloggers will encounter the situation of being attacked by CC and exploded by SSH. At this time, we need to take defensive measures. A few days ago, we sent a script to prevent CC. https://www.moerats.com/archives/484/ However, for CentOS 7, because of the firewall factors, it is still a bit troublesome to configure. Here, we try to share a simple anti-CC attack and SSH blasting method for CentOS 7.
Preface
Fail2ban can monitor your system log and then match the error information in the log to perform the corresponding masking action. Most of the online tutorials are about fail2ban+iptables combination. Considering that CentOS 7 has its own Firewall, we can also use fail2ban + Firewall to prevent CC attacks and SSH blasting.
This tutorial edits files using vi command, if not, you can use a relatively simple nano, you can refer to: https://www.moerats.com/archives/485/ Or use FTP tools such as WinSCP to log in to VPS operations.
Dead work
1. Check whether Firewall is enabled
#If you have installed iptables, it is recommended to close it first
service iptables stop
#View Firewall status
firewall-cmd --state
#Start firewalld
systemctl start firewalld
#Set up boot start
systemctl enable firewalld.service
Firewall will disable all port connections, so be sure to release commonly used ports so as not to be blocked. Here is an example of releasing SSH port (22) for reference:
#Release port 22
firewall-cmd --zone=public --add-port=80/tcp --permanent
#Heavy load configuration
firewall-cmd --reload
#View released ports
firewall-cmd --zone=public --list-ports
2. Install fail2ban
fail2ban can monitor and control logs and shield anomalous IP using Firewall after matching anomalous IP according to certain rules, especially for some blasting/scanning.
#The CentOS built-in source does not contain fail2ban, so you need to install the epel source first.
yum -y install epel-release
#Install fial2ban
yum -y install fail2ban
After successful installation, the fail2ban configuration file is located in / etc/fail2ban, where jail.conf is the main configuration file, and the relevant matching rules are located in the filter.d directory. Other directories / files are seldom used. If you need to know more about them, you can search them by yourself.
3. Configuration rules
New jail.local to override some default rules of fail2ban:
#New configuration
vi /etc/fail2ban/jail.local
#Default configuration
[DEFAULT]
ignoreip = 127.0.0.1/8
bantime  = 86400
findtime = 600
maxretry = 5
#Here banaction must be firewallcmd-ipset, which is the key to fiewall support. If you use Iptables, please don't fill in this form.
banaction = firewallcmd-ipset
action = %(action_mwl)s
Description of parameters:
ignoreip: IP whitelist, whitelist IP will not be blocked, can fill in more than (,) separated
 bantime: Shielding time in seconds (s)
findtime: Time range
 maxretry: maximum number
 banaction: The method used to shield IP using firewalld to shield ports
Prevention of SSH Blasting
If you are still using the default SSH port (22), it may be scanned every day. We can modify the port to avoid being scanned as much as possible. https://www.moerats.com/archives/394/ Or you can use fail2ban to shield malicious IP.
Continue to modify the jail.local configuration file and add the following to it:
[sshd]
enabled = true
filter  = sshd
port    = 22
action = %(action_mwl)s
logpath = /var/log/secure
Description of parameters:
[sshd]: Name, can be filled in at will
 Filter: The name of the rule, you must fill in the rule in the filter.d directory, sshd is fail2ban built-in rule
 Port: corresponding port
 action: action taken
 logpath: The log path to be monitored
At this point, our jail.local rule may look like the following:
[DEFAULT]
ignoreip = 127.0.0.1/8
bantime  = 86400
findtime = 600
maxretry = 5
banaction = firewallcmd-ipset
action = %(action_mwl)s

[sshd]
enabled = true
filter  = sshd
port    = 22
action = %(action_mwl)s
logpath = /var/log/secure
The above configuration means that if the same IP, in 10 minutes, if more than five successive errors, then use Firewall to banish his IP. Enter system CTL start fail2ban to start fail2ban to try the effect.
If you use another server to try to connect SSH and input passwords incorrectly, you will find that the IP is banned after more than five consecutive times. You can enter: fail2ban-client status sshd to view the IP being banned, as shown in the following screenshot. 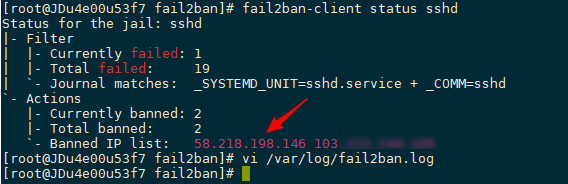
Preventing CC Attack
This paper takes Nginx as an example, uses fail2ban to monitor nginx logs, matches IP requests frequently in a short time, and uses firewalld to shield its IP to achieve CC protection.
#Need to create a new nginx log matching rule first
vi /etc/fail2ban/filter.d/nginx-cc.conf
#Fill in the following
[Definition]
failregex =  -.*- .*HTTP/1.* .* .*$
ignoreregex =
Continue to modify jail.local to add the following:
[nginx-cc]
enabled = true
port = http,https
filter = nginx-cc
action = %(action_mwl)s
maxretry = 20
findtime = 60
bantime = 3600
logpath = /usr/local/nginx/logs/access.log
The above configuration means that if the same IP reaches 20 requests within 60 seconds, its IP ban will last 1 hour. The above configuration is only for testing. Please modify it according to your actual situation. logpath is the nginx log path.
Preventing Wordpress Blasting
If you analyze logs regularly, you will find a large number of robots scanning the wordpress login page wp-login.php. Although the other party may not succeed, it is better to avoid killing his IP in case.
#Need to create a new nginx log matching rule first
vi /etc/fail2ban/filter.d/wordpress.conf
#Fill in the following
[Definition]
failregex = ^ -.* /wp-login.php.* HTTP/1\.."
ignoreregex =
Continue to modify jail.local to add the following:
[wordpress]
enabled = true
port = http,https
filter = wordpress
action = %(action_mwl)s
maxretry = 20
findtime = 60
bantime = 3600
logpath = /usr/local/nginx/logs/access.log
Of course, don't forget to enter system CTL restart fail2ban and restart fail2ban to take effect.
Frequently used commands
#start-up
systemctl start fail2ban
#Stop it
systemctl stop fail2ban
#Boot up
systemctl enable fail2ban
#Look at ban IP, where sshd is the name, such as [wordpress] above.
fail2ban-client status sshd
#Delete ban IP
fail2ban-client set sshd delignoreip 192.168.111.111
#view log
tail /var/log/fail2ban.log
summary
Fail2ban already has many matching rules built-in, which are located in the filter.d directory. It contains common SSH/FTP/Nginx/Apache log matching. If they can not meet your needs, you can also create new rules to match exception IP. Using fail2ban + Firewall to prevent malicious IP is an effective way, which can greatly improve server security.