Reference resources: https://blog.csdn.net/linuxnews/article/details/51106905
Environment Configuration:
Local ip:192.168.1.41
Set Host Name
hostnamectl set-hostname mail.jlkj.comAdd hosts
echo "192.168.1.41 mail.jlkj.com" >> /etc/hostsTurn off the firewall:
sed -i 's/SELINUX=enforcing/SELINUX=disabled/' /etc/sysconfig/selinux
setenforce 0
systemctl stop iptables
systemctl disable iptables
systemctl stop firewalld
systemctl disable firewalld
Turn off other mail services
systemctl stop postfix.service
systemctl disable postfix.service
Installation Dependency:
yum update -y
yum -y install perl perl-core nmap sudo libidn gmp libaio libstdc++ unzip sysstat sqlite nc
Set up local dns:
Configure dns server
1. Install bind
yum -y install bind bind-utils2. Modify the main profile
vim /etc/named.conf
Add the following configuration:
zone "jlkj.com" IN {
        type master;
        file "jlkj.com";
        allow-update { none; };
};
zone "1.168.192.in-addr.arpa" IN {
        type master;
        file "192.168.1.arpa";
        allow-update { none; };
};
2. Configuration Zone Profile
vim /var/named/jlkj.com
$TTL 1D
@   IN SOA  @ rname.invalid. (
                    0   ; serial
                    1D  ; refresh
                    1H  ; retry
                    1W  ; expire
                    3H )    ; minimum
    NS  ns.jlkj.com.
    MX 10   mail.jlkj.com.
ns  A   192.168.1.41
mail    A   192.168.1.41
vim /var/named/192.168.1.arpa
$TTL 1D
@       IN SOA  @ rname.invalid. (
                                        0       ; serial
                                        1D      ; refresh
                                        1H      ; retry
                                        1W      ; expire
                                        3H )    ; minimum
        NS      ns.jlkj.com.
109     PTR     ns.jlkj.com.
109     PTR     mail.jlkj.com.
3. Restart bind
systemctl restart named.service4. Use a local dns server
# [root@mail named]# cat /etc/resolv.conf
# Generated by NetworkManager
search jlkj.com
nameserver 127.0.0.1
nameserver 192.168.1.1
nameserver 114.114.114.114
Test MX parsing:
[root@mail ~]# nslookup -qt=mx mail.zimbra.com
*** Invalid option: qt=mx
Server:     127.0.0.1
Address:    127.0.0.1#53

Name:   mail.zimbra.com
Address: 192.168.1.41
Now it's normal
Install zimbrta
 wget https://files.zimbra.com/downloads/8.6.0_GA/zcs-8.6.0_GA_1153.RHEL7_64.20141215151110.tgz
tar -zxvf zcs-8.6.0_GA_1153.RHEL7_64.20141215151110
 mv zcs-8.6.0_GA_1153.RHEL7_64.20141215151110 zimbra
cd zimbrta
#Turn on one-click foolish installation
./install.sh --platform-override
The steps for determining and choosing these are as follows: https://blog.csdn.net/linuxnews/article/details/51106905 Install zimbra
After installation:
Management server: https://192.168.1.41:7071
Client; https://192.168.1.41
At this time, internal network experts can send and external network can send and receive, which requires a public network for external network to send and receive.And configure MX records at the dns manufacturer
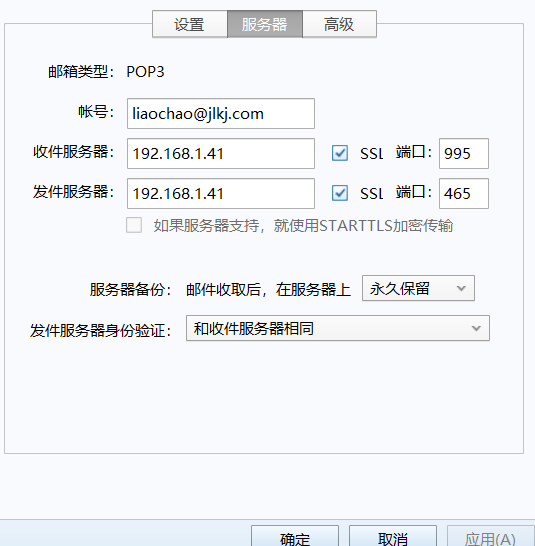
foxmail configuration:
