1. LVS+Keepalived Highly Available Clusters
Keepalived is designed to build highly available LVS load balancing clusters that can call ipvsadm tools to create virtual servers and manage server pools rather than just as a two-machine hot standby.Building LVS clusters with Keepalived is easier and easier to use. The main advantages are: hot standby switching for LVS load dispatcher to improve usability; health checking for nodes in server pool, automatic removal of failed nodes, and re-joining after recovery.
In the LVS cluster structure based on LVS+Keepalived implementation, there are at least two hot standby load dispatchers and more than three node servers.This blog will build a LVS site cluster platform with both load balancing and high availability capabilities by adding a slave load dispatcher based on the DR mode LVS cluster and using Keepalived to warm up master and slave dispatchers.
Because the service involves LVS technology, the following links can be used for an overview and configuration of LVS:
Overview of LVS Load Balancing Clusters for Centos 7
Building a Load Balancing Cluster Based on Address Translation (LVS-NAT) Mode
Building a Load Balanced Cluster Based on Direct Routing Mode (DR)
1. The case environment is as follows:

The ipvsadm management tool is also required to build LVS clusters using Keepalived, but most of the work is done automatically by Keepalived and there is no need to manually execute ipvsadm (in addition to viewing and monitoring the cluster).
2. Environmental Analysis
1), 2 schedulers and 2 Web nodes use the same segment address to communicate directly with the external network.In order to share storage security, web nodes and storage servers are generally planned for an intranet environment, so Web nodes must have two or more interfaces for network cards.
2) I have limited resources here and it is also convenient to configure, so there are only two dispatchers and web nodes, which is enough when the amount of web access requests is small, but if the access requests are large, then at least three dispatchers and web nodes should be configured separately. If there are only two web nodes and the amount of access is large, then once one is down, the restA single seedling must be killed because it can't handle the surge in requests for access.
3) Prepare a system image to install related services.
4) Configure your own firewall policy and IP addresses other than VIP (I closed the firewall directly here).
5) keepalived automatically calls the IP_vs module, so there is no need to load it manually.
3. Final results
1) Clients access the cluster VIP multiple times and get the same web page.
2) After the primary dispatcher is down, the VIP address of the cluster will automatically drift to the slave (backup) dispatcher, at which point all dispatch tasks are assigned from the slave dispatcher.When the primary dispatcher resumes operation, the VIP address of the cluster is automatically transferred back to the primary dispatcher, which continues to work and returns to the backup state from the dispatcher.
3) When a web node is down, it will be detected by the keepalived health check function, which automatically removes the down nodes from the web node pool and automatically adds them to the web node pool when the web node is back running.
2. Start configuring LVS+Keepalived highly available clusters
1. Deploy the first Web server
[root@centos01 ~]# Yum-y install httpd <!--Install httpd service-->
[root@centos01 ~]# echo "www.benet.com" >
/var/www/html/index.html   <!--Create a Web site home page to write test data-->
[root@centos01 ~]# Systemctl start httpd <!--Start httpd service-->
[root@centos01 ~]# Systemctl enable httpd<!--Set boot autostart-->
[root@centos01 ~]# cp /etc/sysconfig/network-scripts/ifcfg-lo
/etc/sysconfig/network-scripts/ifcfg-lo:0
           <!--copy lo:0 Network Card Profile-->
[root@centos01 ~]# vim /etc/sysconfig/network-scripts/ifcfg-lo:0
         <!--edit lo:0 Network Card Profile-->
DEVICE=lo:0   <!--Modify Network Card Name-->
IPADDR=192.168.100.253   <!--To configure VIP address-->
NETMASK=255.255.255.255   <!--Configure Subnet Mask-->
ONBOOT=yes
<!--Keep the above four lines of configuration items and delete the extra lines-->
[root@centos01 ~]# Systemctl restart network <!--Restart network card service-->
[root@centos01 ~]# Ifconfig <!--Check to see if the configuration is valid-->
lo: flags=73<UP,LOOPBACK,RUNNING>  mtu 65536
        inet 127.0.0.1  netmask 255.0.0.0
        inet6 ::1  prefixlen 128  scopeid 0x10<host>
        loop  txqueuelen 1  (Local Loopback)
        RX packets 488  bytes 39520 (38.5 KiB)
        RX errors 0  dropped 0  overruns 0  frame 0
        TX packets 488  bytes 39520 (38.5 KiB)
        TX errors 0  dropped 0 overruns 0  carrier 0  collisions 0

lo:0: flags=73<UP,LOOPBACK,RUNNING>  mtu 65536
        inet 192.168.100.253  netmask 255.255.255.255
        loop  txqueuelen 1  (Local Loopback)
[root@centos01 ~]# Vim/etc/sysctl.conf <!--Modify web server ARP response-->
net.ipv4.conf.all.arp_ignore = 1
net.ipv4.conf.all.arp_announce = 2
net.ipv4.conf.default.arp_ignore = 1
net.ipv4.conf.default.arp_announce = 2
net.ipv4.conf.lo.arp_ignore = 1
net.ipv4.conf.lo.arp_announce = 2
[root@centos01 ~]# Sysctl-p <!--Refresh Configuration-->
net.ipv4.conf.all.arp_ignore = 1
net.ipv4.conf.all.arp_announce = 2
net.ipv4.conf.default.arp_ignore = 1
net.ipv4.conf.default.arp_announce = 2
net.ipv4.conf.lo.arp_ignore = 1
net.ipv4.conf.lo.arp_announce = 2
2. Deploy a second Web server
[root@centos02 ~]# Yum-y install httpd <!--Install httpd service-->
[root@centos02 ~]# echo "www.accp.com" >
/var/www/html/index.html   <!--Create a Web site home page to write test data-->
[root@centos02 ~]# Systemctl start httpd <!--Start httpd service-->
[root@centos02 ~]# Systemctl enable httpd <!--Set startup autostart-->
[root@centos02 ~]# scp root@192.168.100.10:/etc/sysconfig/network-scripts/ifcfg-lo:0
/etc/sysconfig/network-scripts/
<!--Copy from the first Web server lo:0 Network Card Profile to Second Site Server-->
The authenticity of host '192.168.100.10 (192.168.100.10)' can't be established.
ECDSA key fingerprint is SHA256:PUueT9fU9QbsyNB5NC5hbSXzaWxxQavBxXmfoknXl4I.
ECDSA key fingerprint is MD5:6d:f7:95:0e:51:1a:d8:9e:7b:b6:3f:58:51:51:4b:3b.
Are you sure you want to continue connecting (yes/no)? yes  <!--input yes-->
Warning: Permanently added '192.168.100.10' (ECDSA) to the list of known hosts.
root@192.168.100.10's password:   <!--Input password-->
ifcfg-lo:0                                                          100%   70    53.3KB/s   00:00
[root@centos02 ~]# scp root@192.168.100.10:/etc/sysctl.conf /etc/sysctl.conf
            <!--Copy ARP Response to the second site server-->
root@192.168.100.10's password:    <!--Input password-->
sysctl.conf                                                         100%  660   304.3KB/s   00:00
[root@centos02 ~]# Systemctl restart network <!--Restart network card service-->
[root@centos02 ~]# Ifconfig <!--Check if the configuration is valid-->
lo: flags=73<UP,LOOPBACK,RUNNING>  mtu 65536
        inet 127.0.0.1  netmask 255.0.0.0
        inet6 ::1  prefixlen 128  scopeid 0x10<host>
        loop  txqueuelen 1  (Local Loopback)
        RX packets 496  bytes 40064 (39.1 KiB)
        RX errors 0  dropped 0  overruns 0  frame 0
        TX packets 496  bytes 40064 (39.1 KiB)
        TX errors 0  dropped 0 overruns 0  carrier 0  collisions 0

lo:0: flags=73<UP,LOOPBACK,RUNNING>  mtu 65536
        inet 192.168.100.253  netmask 255.255.255.255
        loop  txqueuelen 1  (Local Loopback)
[root@centos02 ~]# Sysctl-p <!--Refresh Configuration-->
net.ipv4.conf.all.arp_ignore = 1
net.ipv4.conf.all.arp_announce = 2
net.ipv4.conf.default.arp_ignore = 1
net.ipv4.conf.default.arp_announce = 2
net.ipv4.conf.lo.arp_ignore = 1
net.ipv4.conf.lo.arp_announce = 2
3. Deploy the master dispatcher
[root@centos04 ~]# Yum-y install keepalived ipvsadm <!--Install required tools-->
[root@centos04 ~]# Vim/etc/sysctl.conf <!--Adjust the kernel parameters and write the following three lines-->
            .....................
net.ipv4.conf.all.send_redirects = 0
net.ipv4.conf.default.send_redirects = 0
net.ipv4.conf.ens33.send_redirects = 0
[root@centos04 ~]# Sysctl-p <!--Refresh-->
net.ipv4.conf.all.send_redirects = 0
net.ipv4.conf.default.send_redirects = 0
net.ipv4.conf.ens33.send_redirects = 0
[root@centos04 ~]# cd /etc/keepalived/
[root@centos04 keepalived]# CP keepalived.conf keepalived.conf.bak <!--Backup Profile-->
[root@centos04 keepalived]# VIM keepalived.conf <!--Edit keepalived profile-->

! Configuration File for keepalived

global_defs {
   router_id LVS_DEVEL1<!--Change the name of this server to be unique among all dispatcher names in the cluster-->
}

vrrp_instance VI_1 {         <!--Definition VRRP Hot standby instance-->
    state MASTER             <!--Set as Master Scheduler-->
    interface ens32            <!--Load bearing VIP The physical network card interface of the address is changed according to the actual situation-->
    virtual_router_id 51<!--Virtual router ID No, each hot standby group remains the same-->
    priority 100            <!--Priority, the larger the number, the higher the priority-->
    advert_int 1           <!--Number of seconds between announcements (heart rate)-->
    authentication {       <!--Authentication information, consistent for each hot standby group-->
        auth_type PASS   <!--Authentication type-->
        auth_pass 1111       <!--Password String-->
    }
    virtual_ipaddress {
        192.168.100.253     <!--Specify drift IP Address( VIP),There can be multiple-->
    }
}

virtual_server 192.168.100.253 80 { <!--Change to VIP Address and required port-->
    delay_loop 6            <!--Interval between health checks (seconds)-->
    lb_algo rr   <!--Change the load scheduling algorithm as needed. rr Represents polling-->
    lb_kind DR   <!--Set working mode to DR(Direct Routing) Mode-->
    persistence_timeout 50   <!--Connection Hold Time-->
    protocol TCP          <!--The application services used are TCP Agreement-->

real_server 192.168.100.10 80 {       <!--One web Configuration of nodes, real_server 192.168.100.10 80 {  ..... }Copy below.After copying, change the node IP Address is OK-->
        weight 1                 <!--Weight of nodes-->
        TCP_CHECK {       <!--Health examination methods-->
            connect_port 80   <!--Target Port for Check-->
            connect_timeout 3     <!--Connection timeout (seconds)-->
            nb_get_retry 3       <!--retry count-->
            delay_before_retry 3   <!--Retry interval (seconds)-->
        }
    }

    real_server 192.168.100.20 80 {        <!--One web Configuration of the node, after changes are made, several copies of the node are copied real_serve 192.168.100.20 80  {  ..... }To the top of the line, it is best not to paste below, in case braces are missing-->
        weight 1            <!--Weight of nodes-->
        TCP_CHECK {    <!--Health examination methods-->
            connect_port 80     <!--Target Port for Check-->
            connect_timeout 3   <!--Connection timeout (seconds)-->
            nb_get_retry 3          <!--retry count-->
            delay_before_retry 3   <!--Retry interval (seconds)-->
        }
    }
}

 <!--There are many more configuration items below. I have 98 lines here. Delete them all. If you do not delete them, restarting the service may cause an error.-->
[root@centos04 ~]# Systemctl restart keepalived <!--Restart the service-->
[root@centos04 ~]# Systemctl enable keepalived <!--Set boot-up self-start-->
4. Configure Slave Scheduler
[root@centos05 ~]# yum -y install ipvsadm keepalived
                  <!--install ipvsadm and keepalived software package-->
[root@centos05 ~]# scp root@192.168.100.40:/etc/sysctl.conf /etc/
<!--That will host the dispatcher/proc Copy the parameter file over-->
root@192.168.100.40 s password:            <!--Enter the user password for the master dispatcher-->
sysctl.conf                                 100%  566   205.8KB/s   00:00
[root@centos05 ~]# Sysctl-p <!--Refresh-->
net.ipv4.conf.all.send_redirects = 0
net.ipv4.conf.default.send_redirects = 0
net.ipv4.conf.ens33.send_redirects = 0
[root@centos05 ~]# scp root@192.168.100.40:/etc/keepalived/keepalived.conf
/etc/keepalived/
             <!--Copy the primary node's keepalived Master profile to slave server-->
root@192.168.100.40's password:       <!--Input password-->
keepalived.conf                                                                                     100%  803     2.1MB/s   00:00
[root@centos05 ~]# Vim/etc/keepalived/keepalived.conf <!--Modify keepalived main profile-->
<!--If both servers are ens32 If you have a network card, there are only three items you need (the other items remain default)-->
   router_id LVS_HA_Backup    <!--take route_id Change to something different, route_id Must be unique-->
    state BACKUP         <!--Status changed to BACKUP,Note case-->
    interface ens32
    priority 99      <!--Priority is smaller than the primary scheduler and cannot conflict with other backup schedulers priority-->
[root@centos05 ~]# Systemctl start keepalived <!--Start keepalived service-->
[root@centos05 ~]# Chkconfig --level 35 keepalived on <!--Set boot-up autostart-->
At this point, the master and slave schedulers are also configured. If you need to deploy more than one slave scheduler, follow the above configuration of the slave (backup) scheduler.
5. Configure Client Access
Client Test Access VIP Address: 192.168.100.253
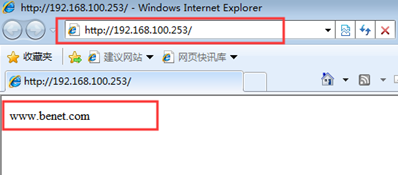
In order to test, different web page files are prepared for each web node to test whether there is load balancing effect. Now the effect is available, so to build a shared storage server, all web nodes read the web page files from the shared storage server to provide the same web page files to the client.
Next, start configuring the shared storage server
6. Configure NFS Server
[root@centos03 ~]# Yum-y install rpcbind nfs-utils <!--Install required packages-->
[root@centos03 ~]# Mkdir/web <!--Create shared site root directory-->
[root@centos03 ~]# echo "www.nfs.com" > /web/index.html
              <!--Create a Web site home page to write test data-->
[root@centos03 ~]# Vim/etc/exports <!--Modify nfs master profile share/web directory-->
/web    192.168.100.10(ro) 192.168.100.20(rw)
[root@centos03 ~]# Systemctl start rpcbind <! - - Start related services - >
[root@centos03 ~]# Systemctl start NFS <!--Start related services-->
[root@centos03 ~]# Systemctl enable rpcbind <!--Set startup autostart-->
[root@centos03 ~]# Systemctl enable NFS <!--Set startup autostart-->
[root@centos03 ~]# Showmount-e 192.168.100.30 <!--View shared directories-->
Export list for 192.168.100.30:
/web 192.168.100.20,192.168.100.10
7. Web site mounts shared storage directory
1) Web Node 1 Server Mounts Shared Directory
[root@centos01 ~]# mount 192.168.100.30:/web /var/www/html/
          <!--Mount the shared directory to the root directory of the site server-->
[root@centos01 ~]# Cat/var/www/html/index.html <!--Check to see if the mount was successful-->
www.nfs.com
[root@centos01 ~]# Vim/etc/fstab <!--Set automount-->
192.168.100.30:/web     /var/www/html/                            nfs     defaults        0 0
[root@centos01 ~]# Systemctl restart httpd <!--Restart httpd service-->
2) Web Node 2 Server Mounts Shared Directory
[root@centos02 ~]# mount 192.168.100.30:/web /var/www/html/
          <!--Mount the shared directory to the root directory of the site server-->
[root@centos02 ~]# Cat/var/www/html/index.html <!--Check to see if the mount was successful-->
www.nfs.com
[root@centos02 ~]# Vim/etc/fstab <!--Set automount-->
192.168.100.30:/web     /var/www/html/                            nfs     defaults        0 0
[root@centos02 ~]# Systemctl restart httpd <!--Restart httpd service-->
8. Client Access Test Again
This time, no matter how the client refreshes, the page it sees will always be www.nfs.com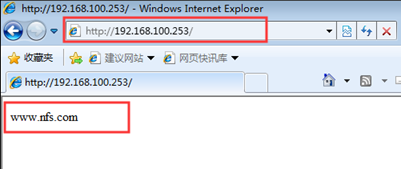
9. Case-related query commands
1) On which dispatcher the VIP is, query the physical interface that the dispatcher hosts the VIP address to see the VIP address (VIP address not found on backup dispatcher):
[root@centos04 ~]# ip a show dev ens32
     <!--Query Hosting VIP Physical Network Card for Address ens32 Or use ip a Commands can also be viewed VIP address-->
ens32: <BROADCAST,MULTICAST,UP,LOWER_UP> ate UP groupn 1000
    link/ether 00:0c:29:77:2c:03 brd ff:ff:ff:ff:ff:ff
    inet 192.168.100.40/24 brd 192.168.100.255 scope global noprefixroute ens32
       valid_lft forever preferred_lft forever
    inet 192.168.100.253/32 scope global ens32    <!--VIP address-->
       valid_lft forever preferred_lft forever
    inet6 fe80::95f8:eeb7:2ed2:d13c/64 scope link noprefixroute
       valid_lft forever preferred_lft forever
2) Query which web nodes are there
[root@centos04 ~]# Ipvsadm-ln <!--Query web node pool and VIP-->
IP Virtual Server version 1.2.1 (size=4096)
Prot LocalAddress:Port Scheduler Flags
  -> RemoteAddress:Port           Forward Weight ActiveConn InActConn
TCP  192.168.100.253:80 rr persistent 50
  -> 192.168.100.10:80            Route   1      0          0
  -> 192.168.100.20:80            Route   1      0          0
3) Simulate the failure of the second Web node and the main dispatcher, and query the VIP and the web node again on the backup dispatcher
[root@centos05 ~]# IP a show dev ens32 <!--You can see that the VIP address has been moved to the backup scheduler-->
ens32: <BROADCAST,MULTICAST,UP,LOWER_UP> ate UP groupn 1000
    link/ether 00:0c:29:77:2c:03 brd ff:ff:ff:ff:ff:ff
    inet 192.168.100.40/24 brd 192.168.100.255 scope global noprefixroute ens32
       valid_lft forever preferred_lft forever
    inet 192.168.100.253/32 scope global ens32    <!--VIP address-->
       valid_lft forever preferred_lft forever
    inet6 fe80::95f8:eeb7:2ed2:d13c/64 scope link noprefixroute
       valid_lft forever preferred_lft forever
[root@centos05 ~]# Ipvsadm-ln <!--When the Web2 node is down, it will not be found.-->
IP Virtual Server version 1.2.1 (size=4096)
Prot LocalAddress:Port Scheduler Flags
  -> RemoteAddress:Port           Forward Weight ActiveConn InActConn
TCP  192.168.100.253:80 rr
  -> 192.168.100.10:80            Route   1      0          0
4) View log messages during scheduler failover
[root@centos05 ~]# tail -30 /var/log/messages
- This is the end of the article. Thank you for reading ---