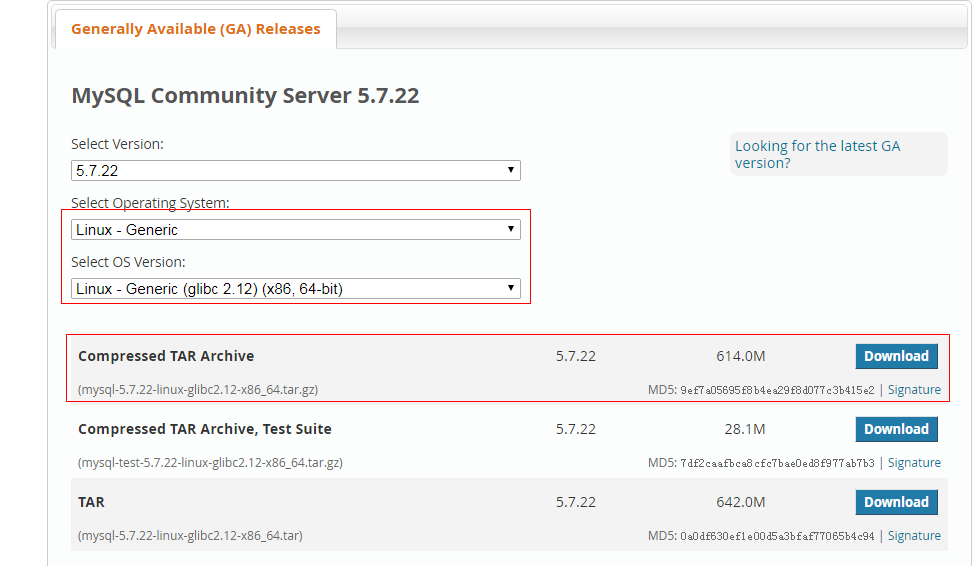
1. Download Compressed Files on mysql Official Website
https://dev.mysql.com/downloads/mysql/5.7.html#downloads 
2. Copy the downloaded files to the / opt directory of centos system

III. Start installation
- 1. Decompress mysql-5.7.22-linux-glibc2.12-x86_64.tar.gz
[root@centosDemo opt]# tar -zxvf mysql-5.7.22-linux-glibc2.12-x86_64.tar.gz- 2. Cut to / usr/local/mysql directory
[root@centosDemo opt]# mv mysql-5.7.22-linux-glibc2.12-x86_64 /usr/local/mysql- 3. Create mysql users and user groups
[root@centosDemo opt]# useradd mysql
[root@centosDemo opt]# id mysql- 4. Enter the mysql folder and modify the owner and group of all files and directories
[root@centosDemo opt]# cd /usr/local/mysql/
[root@centosDemo mysql]# chown -R mysql .
[root@centosDemo mysql]# chgrp -R mysql .- 5. Create a directory for data storage
[root@centosDemo mysql]# mkdir data- 6. Dependency libraries needed to install mysql
[root@centosDemo mysql]# yum install libaio
[root@centosDemo mysql]# yum -y install numactl.x86_64- 7. Enter the bin directory of mysql and execute the installation
[root@centosDemo mysql]# cd bin/
[root@centosDemo bin]# ./mysql_install_db --user=mysql --basedir=/usr/local/mysql/ --datadir=/usr/local/mysql/data- 8. Look at mysql's initial password. The following is my initial password after installation: eODhmNio > - P
[root@centosDemo bin]# cat /root/.mysql_secret
# Password set for user 'root@localhost' at 2018-07-15 16:48:35
#eODhmNio>-P- 9. Start mysql
[root@centosDemo bin]# cd ../support-files/
[root@centosDemo support-files]# ./mysql.server start
Starting MySQL.Logging to '/usr/local/mysql/data/centosDemo.err'.
SUCCESS! - 10. Log on to mysql
[root@centosDemo support-files]# cd ../bin/
[root@centosDemo bin]# ./mysql -uroot -p
Enter password:
Welcome to the MySQL monitor.  Commands end with ; or \g.
Your MySQL connection id is 4
Server version: 5.7.22

Copyright (c) 2000, 2018, Oracle and/or its affiliates. All rights reserved.

Oracle is a registered trademark of Oracle Corporation and/or its
affiliates. Other names may be trademarks of their respective
owners.

Type 'help;' or '\h' for help. Type '\c' to clear the current input statement.

mysql> set password=password('root');
Query OK, 0 rows affected, 1 warning (0.01 sec)

mysql>
4. Setting mysql to auto-start
[root@centosDemo mysql]# cp support-files/mysql.server /etc/init.d/mysql
[root@centosDemo mysql]# chkconfig --add mysql
[root@centosDemo mysql]# chkconfig --list mysql
mysql           0:off   1:off   2:on    3:on    4:on    5:on    6:off
Five. Solve the problem that mysql command cannot be found
[root@centosDemo mysql]# mysql -uroot -p
-bash: /usr/bin/mysql: No such file or directory
[root@centosDemo mysql]# ln -s /usr/local/mysql/bin/mysql /usr/bin/mysql
6. Solving the problem of remote login
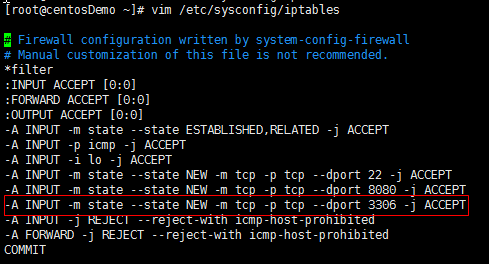
- 1. Setting up firewall to allow 3306 port to be accessed
[root@centosDemo ~]# vim /etc/sysconfig/iptables
- 2. Restart the firewall
[root@centosDemo ~]# service iptables restart
iptables: Setting chains to policy ACCEPT: filter          [  OK  ]
iptables: Flushing firewall rules:                         [  OK  ]
iptables: Unloading modules:                               [  OK  ]
iptables: Applying firewall rules:                         [  OK  ]
-
3. Setting up mysql database to allow remote login
After successful login to mysql, enter the following two commands:
GRANT ALL PRIVILEGES ON . TO root@'%' identified by 'root';
flush privileges;
[root@centosDemo ~]# mysql -uroot -p
Enter password:
Welcome to the MySQL monitor.  Commands end with ; or \g.
Your MySQL connection id is 6
Server version: 5.7.22 MySQL Community Server (GPL)

Copyright (c) 2000, 2018, Oracle and/or its affiliates. All rights reserved.

Oracle is a registered trademark of Oracle Corporation and/or its
affiliates. Other names may be trademarks of their respective
owners.

Type 'help;' or '\h' for help. Type '\c' to clear the current input statement.

mysql> GRANT ALL PRIVILEGES ON *.* TO root@'%' identified by 'root';
Query OK, 0 rows affected, 1 warning (0.01 sec)

mysql> flush privileges;
Query OK, 0 rows affected (0.00 sec)