First, let's talk about fullpage, which is a jquery plug-in that allows the mouse to slide up and down, and then automatically switches to the previous or next screen. It's really a good plug-in to do some big things.First, let's show you the basic effects.
A total of four screens 
Each time the mouse slides up or down, it switches the whole screen.
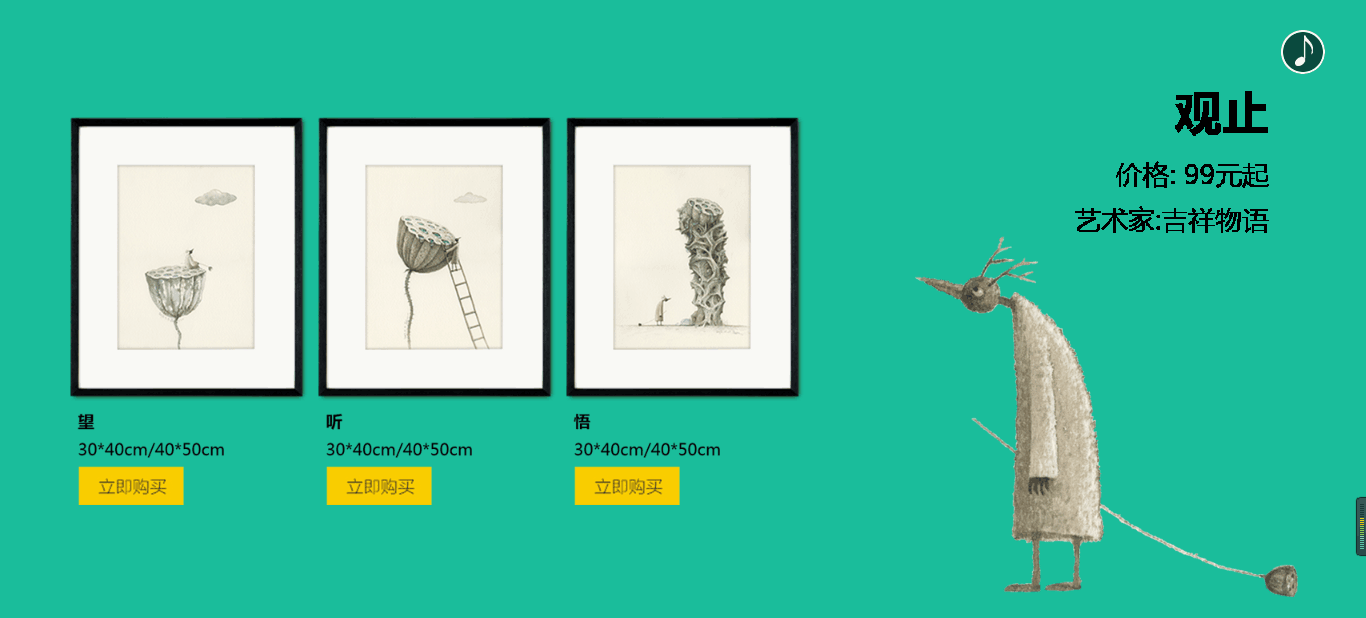
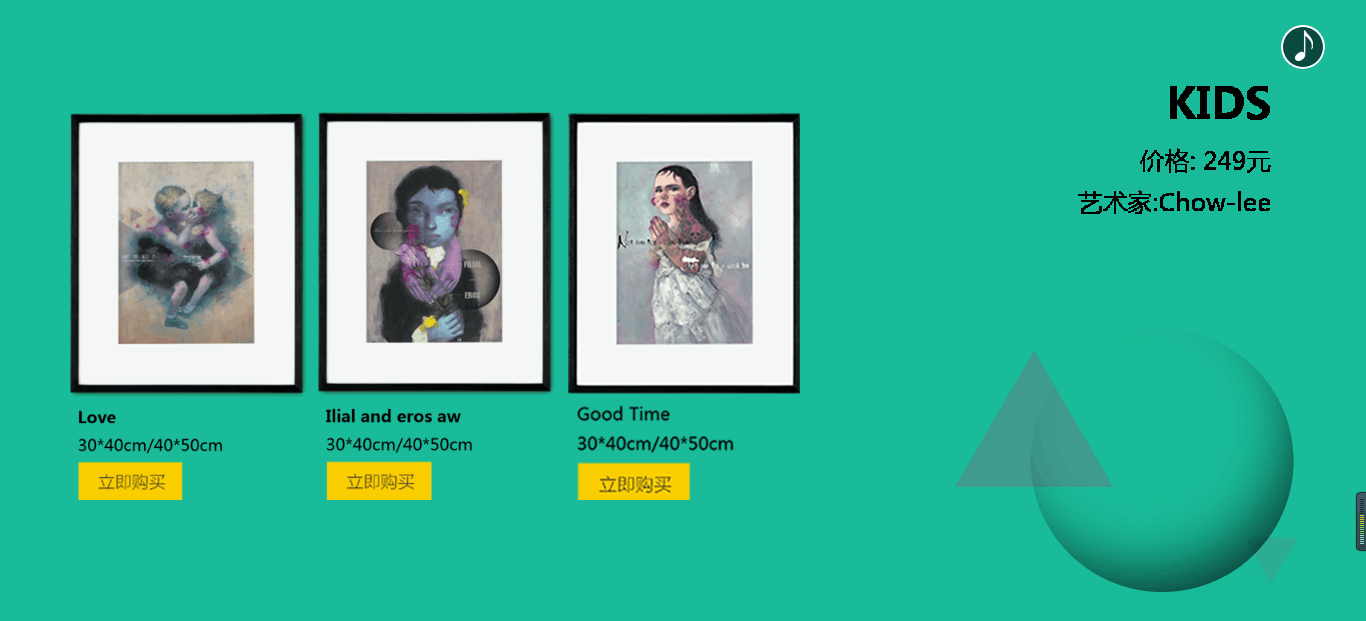
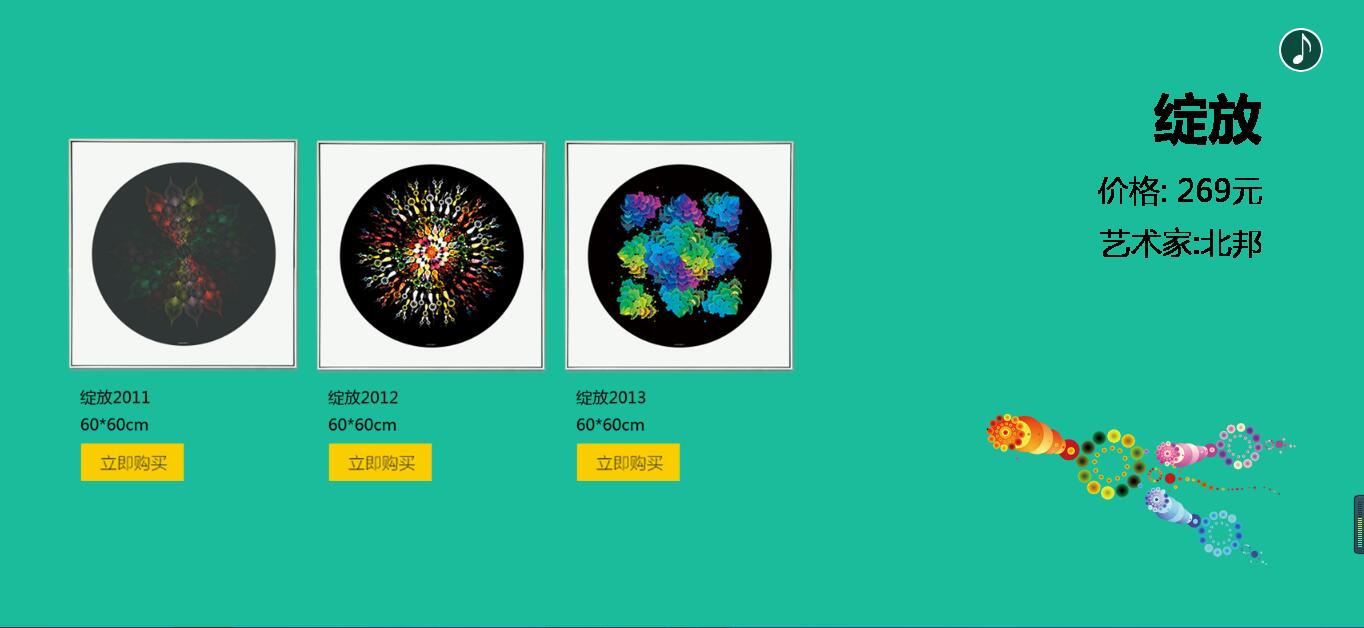
The first screen is made up of one picture and the other three screens are made up of three pictures on the left and two pictures on the right.
The pictures on the left side of the three screens are spread out differently, so they look more cool.
The three pictures on the second screen are displayed in the right place from bottom to top.
The three pictures on the third screen expand from left to right when the page is displayed.
The three pictures on the fourth screen spread out from the middle to both sides when the page is displayed.
Step 1: Download the jquery and fullpage plug-ins, which include css and js, and bring them in.
<script type="text/javascript" src = "./jQuery/jquery-3.2.0.min.js"></script>
    <link rel="stylesheet" type="text/css" href="./fullpage/jquery.fullPage.css">
    <script type="text/javascript" src = "./fullpage/jquery.fullPage.min.js"></script>
Step 2: Set up elements with html:
<div class = "main">

    <div class="section page1">
        <img src="./images/page1.png">
    </div>
    <div class="section page2">
        <div class = "list">
            <img src = "./images/page2_1.png">
            <img src = "./images/page2_2.png">
            <img src = "./images/page2_3.png">
        </div>
            <img class = "text" src = "./images/page2_4.png">
            <img  class = "bg" src = "./images/page2_5.png">

    </div>
     <div class="section page3">
        <div class = "list">
            <img src = "./images/page3_1.png">
            <img src = "./images/page3_2.png">
            <img src = "./images/page3_3.png">
        </div>
        <img class = "text" src = "./images/page3_4.png">
            <img  class = "bg" src = "./images/page3_5.png">
    </div>

       <div class="section page4">
        <div class = "list">
            <img src = "./images/page4_1.png">
            <img src = "./images/page4_2.png">
            <img src = "./images/page4_3.png">
        </div>
            <img class = "text" src = "./images/page4_4.png">
            <img  class = "bg" src = "./images/page4_5.png">
    </div>

</div>
 <div id = "audioBox">
        <audio id = "audio" autoplay loop  src= "./music/music.mp3"></audio>
    </div>
Contains four screens of content and an audio element for playing music.
Step 3: Use fullpage's js to achieve each screen's background color, and js to pause music playback
//1.fullpage, because it has four screens, it has the same color
        $(".main").fullpage({
sectionsColor: ['#1bbc9b','#1bbc9b','#1bbc9b','#1bbc9b']
        });

        //2. Control audio playback
        var audioBox = document.getElementById('audioBox');
        var audio = document.getElementById("audio");

        audioBox.onclick = function(){

        if(audio.paused){
            audio.play();
        }
        else
        {
            audio.pause();
        }
    }
Step 4: Layout using css:
<style type="text/css">
    *{
        margin: 0;
        padding:0;
    }

  //Set icons for background music
    #audioBox{
        width: 45px;
        height: 45px;
        position: absolute;
        background: url(./images/music_on.png) no-repeat center;
        border-radius: 22px;
        top: 5%;
        right: 3%;
        cursor: pointer;
    }

    //Auto hide every screen out
    .section{
        overflow: hidden;
    }

    /*Set the picture of the first screen, because the first screen also has only one picture*/
    .page1 img{
        width: 50%;
        margin-left: 30%;
    }

 /*From the second screen onwards, there is an element block with class=list, set its distance to the left*/
    [class *= "page"] .list{
        margin-left: 5%;
    }

 /*Make the left picture 240px wide*/
    [class *= "page"] .list img{
        width: 240px;

    }

    /*Select background pictures for all pages using the property selector*/
    [class *= "page"] .bg{
        position: absolute;
        bottom: 5%;
        right: 5%;
        width: 30%;
    }

    /*Select text pictures for all pages using the property selector*/
    [class *= "page"] .text{
        position: absolute;
        top: 10%;
        right: 5%;
    }
The basic effects are finished after step 4, but the last point is that the four-screen pictures have not been animated yet.
Step 5: To achieve the animation effect.
1. How can I tell which screen I'm scrolling to?
Because fullpage adds an active class to the current page, you can use the class to determine if the animation will be triggered while on the current page.
2. Animate the first screen
The first screen is mainly the fade-in effect of the picture.
Ideas: Change opacity attribute and transition to change transparency and fade in effect;
.page1 img{
        opacity: 0;   /*Initial state is fully transparent*/
        /*Supplier prefix, duration 1.5s*/
        -moz-transition: opacity 1.5s;
        -webkit-transition: opacity 1.5s;
    }

/*Triggered when the first page is displayed, and the active class is automatically added when the first page is displayed*/
    .page1.active img{
        opacity: 1;
    }
3. Realize the second screen of the animation:
The second screen is an animation in which three pictures on the left slide into the window from bottom to top when they are displayed on the page.
The core idea is to use transform:translateY and transition to achieve;
transition is to detect changes in attribute values
translateY Shift
/*The animation takes 1 second to complete, and all three pictures are moved down to 1000 pixels, which means they are off the screen.*/
    .page2 .list img{
        transition:1s;
        transform: translateY(1000px);
    }

 /*When the second screen triggers, the picture returns to its original position*/
    .page2.active .list img{
        transform:translateY(0px);
    }

/*Use structured pseudo-classes to find each picture and set the delay to make the animation more flexible*/
    .page2 .list img:nth-child(1){
        transition-delay: 0.5s;
    }
    .page2 .list img:nth-child(2){
        transition-delay: 0.8s;
    }
    .page2 .list img:nth-child(3){
        transition-delay: 1s;
    }
4. Animate the third screen
With translateY, the third screen moves left and right, and there must be translateX to control the horizontal direction.First the initial state lets all three pictures overlap on the leftmost side. When the animation is triggered, they are spread out one after the other. It is easy to write '
.page .list img{
/Set the animation duration to 1s, 0.5s delay at the start of the animation/
transition: 1s 0.5s;
}
Since the initial state of the two pictures on this screen is superimposed on the leftmost picture, set their translateX separately for the two pictures
.page .list img:nth-child(2){
/Move 250px to the left just over the first one/
transform:translateX(-250px);
}
.page .list img:nth-child(3){
/moved 500px to the left just over the first one/
transform:translateX(-500px);
}
/Set the animation on trigger to place all img s/
.page3.active .list img{
transform:translateX(0px);
}
5. Set the animation for the fifth screen.
The fifth screen is an animation in which the three pictures on the left overlap on the middle picture, trigger, and then relocate.
(1) It can be achieved by using tanslateX according to the above ideas;
.page4 .list img{
        transition: 1s 0.5s;
    }
    /*Set the first and third initial positions to be in the middle*/
    .page4 .list img:nth-child(1){
        transform:translateX(250px);
    }
    .page4 .list img:nth-child(3){
        transform:translateX(-250px);
    }
  /*Homing on Trigger*/
    .page4.active .list img{
        transform:translateX(0px);
    }
(2) In addition to the transition and transform ation properties of css3, CSS3 animation can also be used: keyframes
.page4.active .list img:nth-child(1){
        transform:translateX(0px);
        -webkit-animation: 'flymove1' 1s ease-in 1;    /*Animation name, duration, finer-grained animation, number of repetitions*/
    }

    .page4.active .list img:nth-child(3){
        transform:translateX(0px);
        -webkit-animation: 'flymove2' 1s ease-in 1;
    }

     @-webkit-keyframes flymove1{
        0%{ transform: translateX(250px);}
        100%{ transform: translateX(0px);}
     }

     @-webkit-keyframes flymove2{
        from{ transform: translateX(-250px);}
        to{ transform: translateX(0px);}
     }
For an understanding of the keyframes parameters, you can check the manual to get familiar with them.
With the code above, a cool full-screen scrolling page is done!
Attached source code:
<!DOCTYPE html>
<html>
<head>
<meta charset = "utf-8" />
    <title>fullpage Full screen scrolling</title>
    <script type="text/javascript" src = "./jQuery/jquery-3.2.0.min.js"></script>
    <link rel="stylesheet" type="text/css" href="./fullpage/jquery.fullPage.css">
    <script type="text/javascript" src = "./fullpage/jquery.fullPage.min.js"></script>

    <style type="text/css">
    *{
        margin: 0;
        padding:0;
    }

    #audioBox{
        width: 45px;
        height: 45px;
        position: absolute;
        background: url(./images/music_on.png) no-repeat center;
        border-radius: 22px;
        top: 5%;
        right: 3%;
        cursor: pointer;
    }

    .section{
        overflow: hidden;
    }

    /*Set Picture for First Screen*/
    .page1 img{
        width: 50%;
        margin-left: 30%;
    }


    [class *= "page"] .list{
        margin-left: 5%;
    }

    [class *= "page"] .list img{
        width: 240px;

    }

    /*Background pictures for all pages*/
    [class *= "page"] .bg{
        position: absolute;
        bottom: 5%;
        right: 5%;
        width: 30%;
    }

    /*Text Picture of All Pages*/
    [class *= "page"] .text{
        position: absolute;
        top: 10%;
        right: 5%;
    }

    /*Animation of the first picture
      Ideas: Change opacity attribute and transition to change transparency and fade in effect;
    */
    .page1 img{
        opacity: 0;/*Initial state is fully transparent*/
        -moz-transition: opacity 1.5s;
        -webkit-transition: opacity 1.5s;
    }

    /*Triggered when the first page is displayed*/

    .page1.active img{
        opacity: 1;
    }

    /*Animation on page 2
    The core idea is to use transform:translateY and transition to achieve;
    transition Is to detect changes in attribute values
    translateY translation
    */

    .page2 .list img{
        transition:1s;
        transform: translateY(1000px);
    }

    .page2.active .list img{
        transform:translateY(0px);
    }

    .page2 .list img:nth-child(1){
        transition-delay: 0.5s;

    }
    .page2 .list img:nth-child(2){
        transition-delay: 0.8s;

    }
    .page2 .list img:nth-child(3){
        transition-delay: 1s;

    }

   /*Set animation for page 3*/
    .page3 .list img{
        transition: 1s 0.5s;
    }
    .page3 .list img:nth-child(2){
        transform:translateX(-250px);
    }
    .page3 .list img:nth-child(3){
        transform:translateX(-500px);
    }

    .page3.active .list img{
        transform:translateX(0px);
    }


   /*Set the animation for page 4*/
    /*.page4 .list img{
        transition: 1s 0.5s;
    }
    .page4 .list img:nth-child(1){
        transform:translateX(250px);
    }
    .page4 .list img:nth-child(3){
        transform:translateX(-250px);
    }

    .page4.active .list img{
        transform:translateX(0px);
    }*/

    .page4.active .list img:nth-child(1){
        transform:translateX(0px);
        -webkit-animation: 'flymove1' 1s ease-in 1; /*Animation name, duration, finer-grained animation, number of repetitions*/
    }

    .page4.active .list img:nth-child(3){
        transform:translateX(0px);
        -webkit-animation: 'flymove2' 1s ease-in 1;
    }

     @-webkit-keyframes flymove1{
        0%{ transform: translateX(250px);}
        100%{ transform: translateX(0px);}
     }

     @-webkit-keyframes flymove2{
        from{ transform: translateX(-250px);}
        to{ transform: translateX(0px);}
     }

    </style>
</head>
<body>

<div class = "main">

    <div class="section page1">
        <img src="./images/page1.png">
    </div>
    <div class="section page2">
        <div class = "list">
            <img src = "./images/page2_1.png">
            <img src = "./images/page2_2.png">
            <img src = "./images/page2_3.png">
        </div>

            <img class = "text" src = "./images/page2_4.png">
            <img  class = "bg" src = "./images/page2_5.png">

    </div>
     <div class="section page3">
        <div class = "list">
            <img src = "./images/page3_1.png">
            <img src = "./images/page3_2.png">
            <img src = "./images/page3_3.png">
        </div>
        <img class = "text" src = "./images/page3_4.png">
            <img  class = "bg" src = "./images/page3_5.png">
    </div>

       <div class="section page4">
        <div class = "list">
            <img src = "./images/page4_1.png">
            <img src = "./images/page4_2.png">
            <img src = "./images/page4_3.png">
        </div>
            <img class = "text" src = "./images/page4_4.png">
            <img  class = "bg" src = "./images/page4_5.png">
    </div>

</div>
 <div id = "audioBox">
        <audio id = "audio" autoplay loop  src= "./music/music.mp3"></audio>
    </div>
<script type="text/javascript">
    $(function(){

        //1.fullpage
        $(".main").fullpage({
            sectionsColor: ['#1bbc9b','#1bbc9b','#1bbc9b','#1bbc9b']
        });
        //2. Control audio playback

        var audioBox = document.getElementById('audioBox');
        var audio = document.getElementById("audio");

        audioBox.onclick = function(){

        if(audio.paused){
            audio.play();
        }
        else
        {
            audio.pause();
        }
    }
    });
</script>
</body>
</html>