In the previous section, we talked about the configuration and management of services in CAS. We have some knowledge about adding services in CAS to the registry. If you are not familiar with this, you can review it CAS Single Sign-on (5) - Service Configuration and Management.
Today, we continue with articles that we haven't covered before on how to customize form submission in CAS and how to customize user-related pages.
1. Custom User Interface
In the previous section, we explained Service configuration and management, in which we can configure the theme parameter.For example, we used Json in the code in the previous section to store the service configuration, and in the web-10000001.json file, we added anumbrella as the parameter for the specified topic.The configuration is as follows:
{
  "@class" : "org.apereo.cas.services.RegexRegisteredService",
  "serviceId" : "^(https|imaps|http)://.*",
  "name" : "web",
  "id" : 10000001,
  "evaluationOrder" : 10,
  "accessStrategy" : {
    "@class" : "org.apereo.cas.services.DefaultRegisteredServiceAccessStrategy",
    "enabled" : true,
    "ssoEnabled" : true
  },
  "theme": "anumbrella"
}
Next, we create a new anumbrella.properties file in the src/main directory with the same file name as the theme parameter.On the official website, it is recommended that we write as:
cas.standard.css.file=/themes/[theme_name]/css/cas.css
cas.javascript.file=/themes/[theme_name]/js/cas.js
cas.admin.css.file=/themes/[theme_name]/css/admin.css
The writing method used here will completely override the page styles that come with the CAS system. If we only want to customize a part of the page, we can use the custom part style writing.
anumbrella.javascript.file=/themes/anumbrella/js/cas.js
anumbrella.standard.css.file=/themes/anumbrella/css/cas.css
For example, here I just want to customize the login page, the other pages will not change, you can use the above writing.So the contents of the anumbrella.properties file are as follows:
anumbrella.javascript.file=/themes/anumbrella/js/cas.js
anumbrella.standard.css.file=/themes/anumbrella/css/cas.css

anumbrella.login.images.path=/themes/anumbrella/images

cas.standard.css.file=/css/cas.css
cas.javascript.file=/js/cas.js
cas.admin.css.file=/css/admin.css
anumbrella.login.images.path=/themes/anumbrella/images is the path of the picture to use on the html page, so customize the address of the picture here.
Next, we create a new static and Templates folder under the src\mainresources file, a new themes/anumbrella folder under the static folder, and a new anumbrella folder under the templates directory.Continue to create three new folders: css, js, images under static/themes/anumbrella and place the required css, js, pictures below.Next, we create a new casLoginView.html file in the templates/anumbrella directory.
The path is as follows:
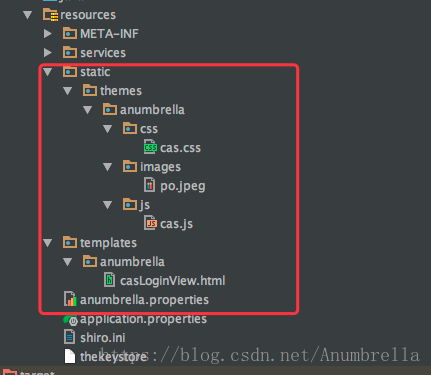
Note: The casLoginView.html file here cannot be unnamed, it must be casLoginView.html.This is the override login page, so it's named casLoginView.html. If you want to override the exit page, it's casLogoutView.html.
Here's how to determine the page name and choose CAS Single Sign-on (2) - Building Basic Services This section has a hint, because the overwrite mode is used, so we build attachments to overwrite the original files, so we can see the specific files in the packaged cas.war decompression package or the target file in IDE.
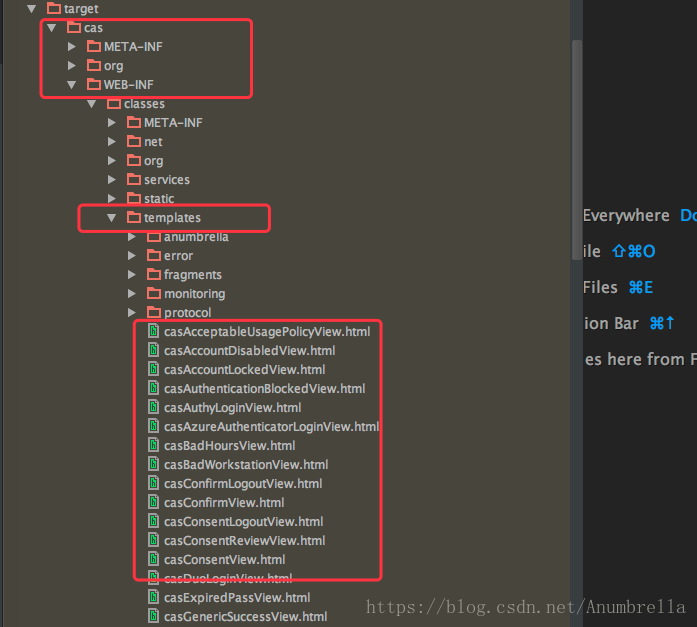
For example, in the templates directory of WEB-INF classes in the cas directory of the target directory in the IDE, we can find various html, as well as the static folder, where we can find all kinds of files we need, and the HTML we write can also refer to the source code here.
When writing html, the content of the from form follows certain standards, such as th:object.
casLoginView.html is as follows:
<!DOCTYPE html> <html> <head> <meta charset="UTF-8"/> <meta name="viewport" content="width=device-width, initial-scale=1"/> <meta http-equiv="X-UA-Compatible" content="IE=edge"/> <title>Single sign-on SSO</title> <link href="https://fonts.googleapis.com/css?family=Lato" rel="stylesheet"> <link rel='stylesheet prefetch' href='https://fonts.googleapis.com/icon?family=Material+Icons'> <link rel="stylesheet" th:href="@{${#themes.code('anumbrella.standard.css.file')}}"/> </head> <body> <div class="cotn_principal"> <div class="cont_centrar"> <div class="cont_login"> <div class="cont_info_log_sign_up"> <div class="col_md_login"> <div class="cont_ba_opcitiy"> <h2>SSO</h2> <p>Click on login to enter information</p> <button class="btn_login" onClick="cambiar_login()">Sign in</button> </div> </div> </div> <div class="cont_back_info"> <div class="cont_img_back_grey"> <img th:src="@{${#themes.code('anumbrella.login.images.path')}+'/po.jpeg'}" alt="" /> </div> </div> <div class="cont_forms" > <div class="cont_img_back_"> <img th:src="@{${#themes.code('anumbrella.login.images.path')}+'/po.jpeg'}" alt="" /> </div> <div class="cont_form_login"> <a href="#" onClick="ocultar_login_sign_up()" ><i class="material-icons"></i></a> <form method="post" th:object="${credential}"> <h2>SSO</h2> <section class="row"> <div th:unless="${openIdLocalId}"> <input class="required" id="username" size="25" tabindex="1" placeholder="User name" type="text" th:disabled="${guaEnabled}" th:field="*{username}" th:accesskey="#{screen.welcome.label.netid.accesskey}" autocomplete="off"/> </div> </section> <section class="row"> <div> <input class="required" type="password" id="password" size="25" tabindex="2" placeholder="Password" th:accesskey="#{screen.welcome.label.password.accesskey}" th:field="*{password}" autocomplete="off"/> </div> </section> <section> <input type="hidden" name="execution" th:value="${flowExecutionKey}"/> <input type="hidden" name="_eventId" value="submit"/> <input type="hidden" name="geolocation"/> <input class="btn btn-submit btn-block btn_login" style="text-align: center" name="submit" accesskey="l" th:value="#{screen.welcome.button.login}" tabindex="6" type="submit"/> </section> <div th:if="${#fields.hasErrors('*')}"> <span th:each="err : ${#fields.errors('*')}" th:utext="${err}"/> </div> </form> </div> <div class="cont_form_sign_up"/> </div> </div> </div> </div> <script th:src="@{${#themes.code('anumbrella.javascript.file')}}"></script> </body> </html>
It is mentioned here that for css, js, picture references, if they are used in css, relative paths are used directly; if you want to write picture addresses in the foreground (in html), you can use this writing as I do here.The path address configured by anumbrella.properties is then applied through th:object.
Because of the Json service configuration we used here, the Json service registration configuration is turned on in application.properties.
##
# Service Registry
#

# Open Identify Json file, default false
cas.serviceRegistry.initFromJson=true

#Automatic scan service configuration, turned on by default
cas.serviceRegistry.watcherEnabled=true

#Scan once in 120 seconds
cas.serviceRegistry.schedule.repeatInterval=120000


#Delay 15 seconds to turn on
# cas.serviceRegistry.schedule.startDelay=15000

##
# Json Configuration
#
cas.serviceRegistry.json.location=classpath:/services
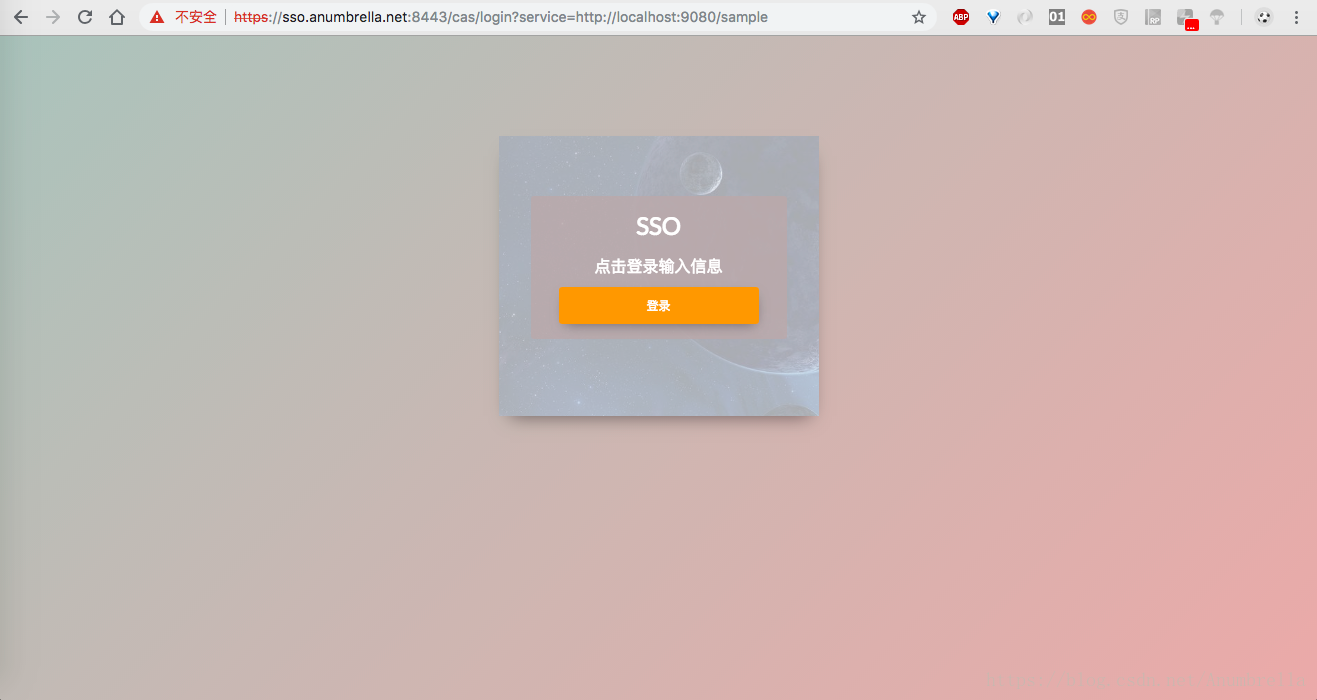
Next we start the CAS service and enter the route https://sso.anumbrella.net:8443/cas/login?service=http://localhost:9080/sample , you can see that our custom login interface appears.
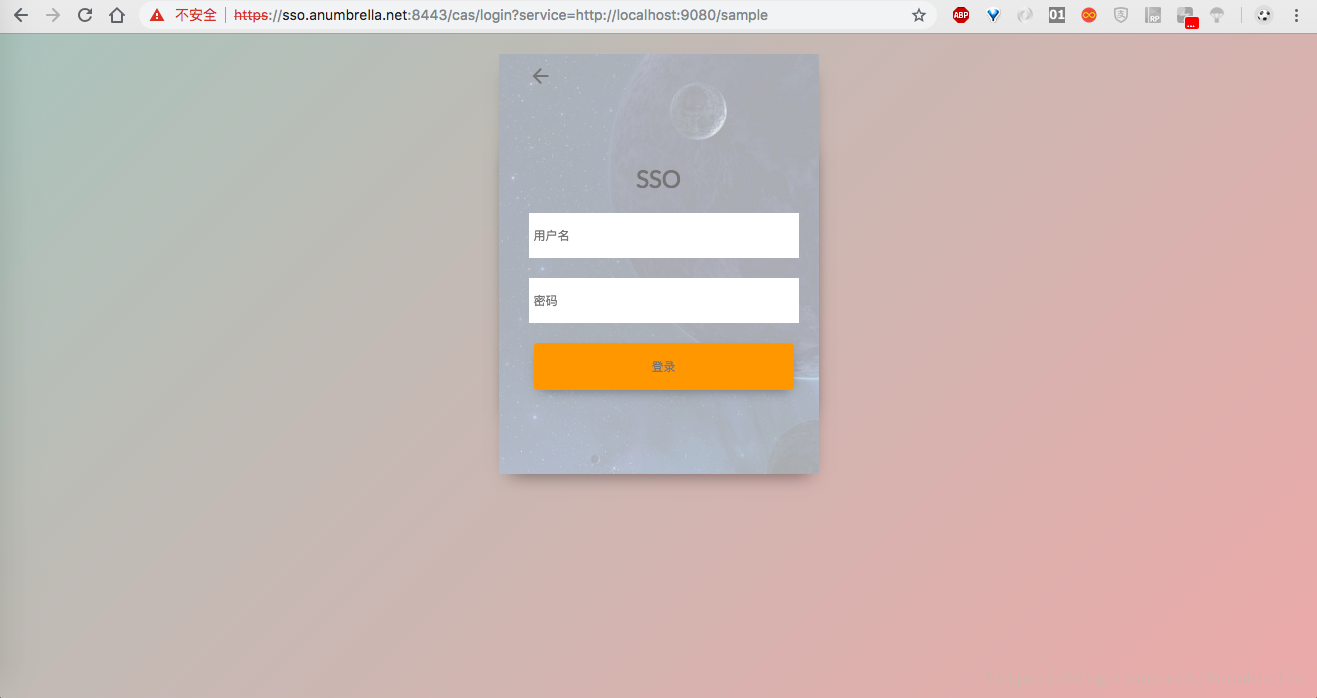
But if we enter it directly https://sso.anumbrella.net:8443/cas/login Return directly to the original CAS theme
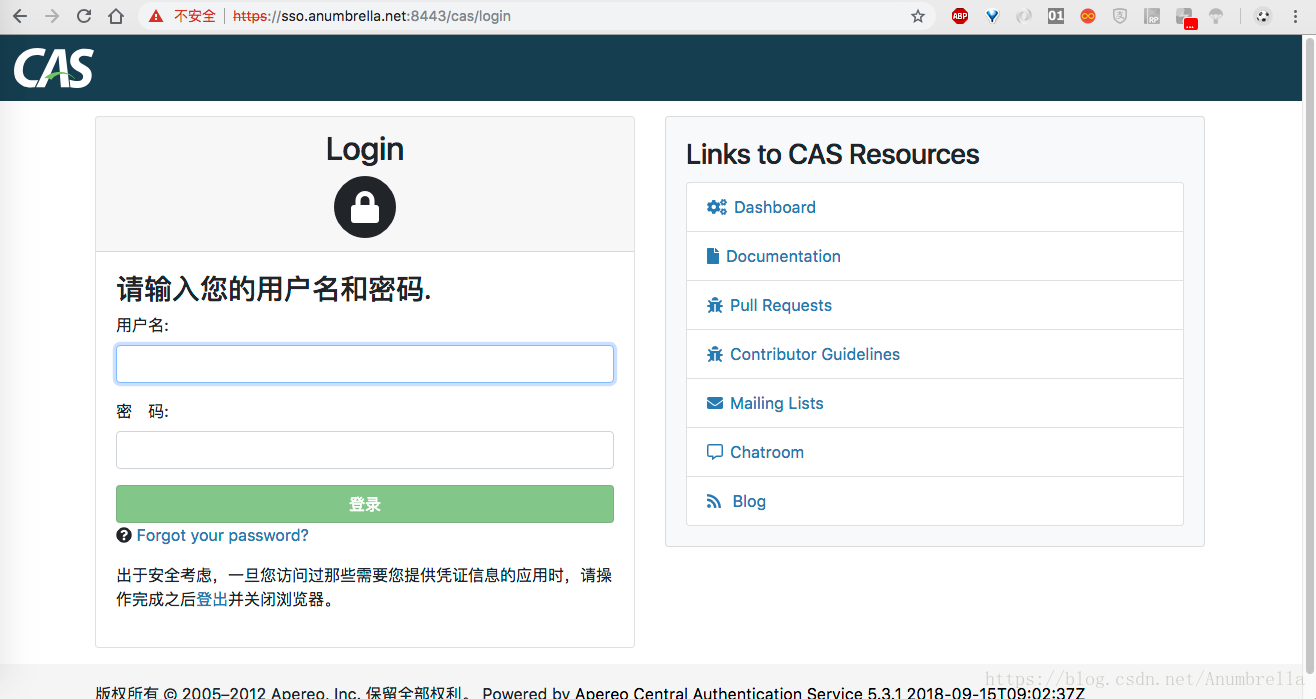
This is because we have previously configured themes in Service, and only the matching Servivce uses the configured themes.So how do I change all the default themes?
There are two ways to do this, one is to change the default theme directly and add the files we need to customize in the application.properties file.
cas.standard.css.file=/css/cas.css
cas.javascript.file=/js/cas.js
cas.admin.css.file=/css/admin.css
Then create a new css, js, images under the static file, put the required css, js, pictures below.Next, we create a new casLoginView.html file in the templates directory.Configuration override here simply overwrites the original default theme file, exactly the same as before, except in a different path.
Another option is to use the default theme configuration to set the newly created theme as the default theme, which is recommended for easier control.Add the following configuration to the application.properties file:
# Default Theme Configuration
cas.theme.defaultThemeName=anumbrella
Restart CAS service, enter https://sso.anumbrella.net:8443/cas/login , found that the login page has changed.Then we logged in and found that we jumped to the original default theme because our theme only covers the login page by default, while others continue to use the default theme, which can be customized to suit your needs.
2. Custom Form Information
First add the dependency class, which uses two dependency classes:
<dependency>
     <groupId>org.apereo.cas</groupId>
     <artifactId>cas-server-core-webflow</artifactId>
     <version>${cas.version}</version>
</dependency>

<dependency>
     <groupId>org.apereo.cas</groupId>
     <artifactId>cas-server-core-webflow-api</artifactId>
     <version>${cas.version}</version>
</dependency>
In front CAS Single Sign-on (4) - Custom Authenticated Logon Policy In, we mentioned that if you want to verify other information, such as mailbox, mobile number, but the mailbox, mobile information is in another database, and there is a limit on the number of incorrect entries of the same IP over a period of time.Here we need to customize the authentication policy and the web authentication process of CAS.
First, we create the form information we need, that is, to use the user name and password, but also to enter the mailbox and mobile number, so we need to customize Credential. Since there is a user name and password, we can directly inherit UsernamePasswordCredential, create a new class CustomCredential, as follows:
package net.anumbrella.sso.entity;

import org.apache.commons.lang.builder.HashCodeBuilder;
import org.apereo.cas.authentication.UsernamePasswordCredential;
import org.slf4j.Logger;
import org.slf4j.LoggerFactory;

import javax.validation.constraints.Size;

/**
 * @author Anumbrella
 */
public class CustomCredential extends UsernamePasswordCredential {

    private static final Logger LOGGER = LoggerFactory.getLogger(CustomCredential.class);

    private static final long serialVersionUID = -4166149641561667276L;

    @Size(min = 1, message = "require email")
    private String email;


    @Size(min = 1, message = "require telephone")
    private String telephone;


    public String getEmail() {
        return email;
    }

    public void setEmail(final String email) {
        this.email = email;
    }

    public String getTelephone() {
        return telephone;
    }

    public void setTelephone(final String telephone) {
        this.telephone = telephone;
    }

    public CustomCredential() {
    }

    public CustomCredential(final String email, final String telephone) {
        this.email = email;
        this.telephone = telephone;
    }

    public boolean equals(final Object o) {
        if (o == this) {
            return true;
        } else if (!(o instanceof CustomCredential)) {
            return false;
        } else {
            CustomCredential other = (CustomCredential) o;
            if (!other.canEqual(this)) {
                return false;
            } else {
                Object this$email = this.email;
                Object other$email = other.email;
                if (this$email == null) {
                    if (other$email != null) {
                        return false;
                    }
                } else if (!this$email.equals(other$email)) {
                    return false;
                }

                Object this$telephone = this.telephone;
                Object other$telephone = other.telephone;
                if (this$telephone == null) {
                    if (other$telephone != null) {
                        return false;
                    }
                } else if (!this$telephone.equals(other$telephone)) {
                    return false;
                }
                return true;
            }
        }
    }

    protected boolean canEqual(final Object other) {
        return other instanceof CustomCredential;
    }

    @Override
    public int hashCode() {
        return new HashCodeBuilder()
                .appendSuper(super.hashCode())
                .append(this.email)
                .append(this.telephone)
                .toHashCode();
    }
}
Mailbox and mobile number are defined here and must be entered.Then we redefine the CAS Web process, creating a new class CustomWebflowConfigurer, which is defined as follows:
package net.anumbrella.sso.config;

import net.anumbrella.sso.entity.CustomCredential;
import org.apereo.cas.configuration.CasConfigurationProperties;
import org.apereo.cas.web.flow.CasWebflowConstants;
import org.apereo.cas.web.flow.configurer.AbstractCasWebflowConfigurer;
import org.springframework.context.ApplicationContext;
import org.springframework.webflow.definition.registry.FlowDefinitionRegistry;
import org.springframework.webflow.engine.Flow;
import org.springframework.webflow.engine.ViewState;
import org.springframework.webflow.engine.builder.BinderConfiguration;
import org.springframework.webflow.engine.builder.support.FlowBuilderServices;

/**
 * @author anumbrella
 */
public class CustomWebflowConfigurer extends AbstractCasWebflowConfigurer {


    public CustomWebflowConfigurer(FlowBuilderServices flowBuilderServices,
                                   FlowDefinitionRegistry flowDefinitionRegistry,
                                   ApplicationContext applicationContext,
                                   CasConfigurationProperties casProperties) {
        super(flowBuilderServices, flowDefinitionRegistry, applicationContext, casProperties);
    }

    @Override
    protected void doInitialize() {
        final Flow flow = super.getLoginFlow();
        bindCredential(flow);
    }

    /**
     * Bind custom redential information
     *
     * @param flow
     */
    protected void bindCredential(Flow flow) {

        // Override Binding Custom credential
        // Override Binding Custom credential
        createFlowVariable(flow, CasWebflowConstants.VAR_ID_CREDENTIAL, CustomCredential.class);

        // Logon Page Bind New Parameters
        final ViewState state = (ViewState) flow.getState(CasWebflowConstants.STATE_ID_VIEW_LOGIN_FORM);
        final BinderConfiguration cfg = getViewStateBinderConfiguration(state);
        // Since the user name and password are already bound, you only need to bind to the new system parameters.
        // Field name, converter, whether a field is required
        cfg.addBinding(new BinderConfiguration.Binding("email", null, true));
        cfg.addBinding(new BinderConfiguration.Binding("telephone", null, true));

    }
}
In the initialization doInitialize, bind the mailbox and phone information, username, and password that we need, so we don't need to add them.
Then add a new class, CustomerAuthWebflowConfiguration, to change the configuration proxy for CAS's Web processes, as follows:
package net.anumbrella.sso.config;

import org.apereo.cas.configuration.CasConfigurationProperties;
import org.apereo.cas.web.flow.CasWebflowConfigurer;
import org.apereo.cas.web.flow.CasWebflowExecutionPlan;
import org.apereo.cas.web.flow.CasWebflowExecutionPlanConfigurer;
import org.apereo.cas.web.flow.config.CasWebflowContextConfiguration;
import org.springframework.beans.factory.annotation.Autowired;
import org.springframework.beans.factory.annotation.Qualifier;
import org.springframework.boot.context.properties.EnableConfigurationProperties;
import org.springframework.context.ApplicationContext;
import org.springframework.context.annotation.Bean;
import org.springframework.context.annotation.Configuration;
import org.springframework.webflow.definition.registry.FlowDefinitionRegistry;
import org.springframework.webflow.engine.builder.support.FlowBuilderServices;

/**
 * @author anumbrella
 */
@Configuration("customerAuthWebflowConfiguration")
@EnableConfigurationProperties(CasConfigurationProperties.class)
public class CustomerAuthWebflowConfiguration implements CasWebflowExecutionPlanConfigurer {

    @Autowired
    private CasConfigurationProperties casProperties;

    @Autowired
    @Qualifier("loginFlowRegistry")
    private FlowDefinitionRegistry loginFlowDefinitionRegistry;

    @Autowired
    private ApplicationContext applicationContext;

    @Autowired
    private FlowBuilderServices flowBuilderServices;

    @Bean
    public CasWebflowConfigurer customWebflowConfigurer() {
        // Instantiate a custom form configuration class
        final CustomWebflowConfigurer c = new CustomWebflowConfigurer(flowBuilderServices, loginFlowDefinitionRegistry,
                applicationContext, casProperties);
        // Initialization
        c.initialize();
        // Return Object
        return c;
    }

    @Override
    public void configureWebflowExecutionPlan(final CasWebflowExecutionPlan plan) {
        plan.registerWebflowConfigurer(customWebflowConfigurer());
    }
}
Initialization and registration of configurations are achieved primarily by inheriting CasWebflowExecutionPlanConfigurer.Finally, under the META-INF file under resources, spring.factories injects the configuration of spring boot, which is our class above, as follows:
org.springframework.boot.autoconfigure.EnableAutoConfiguration=\
  net.anumbrella.sso.config.CustomAuthenticationConfiguration,\
  net.anumbrella.sso.controller.ServicesManagerController,\
  net.anumbrella.sso.config.CustomerAuthWebflowConfiguration
The next step is to process the logic of customizing the submission of information with us CAS Single Sign-on (4) - Custom Authenticated Logon Policy Consistent with the instructions in the section, custom authentication strategies are implemented by intercepting requests for a Handler, mainly by inheriting the AbstractPreAndPostProcessing AuthenticationHandler class. The basic idea is the same, which needs to be roughly changed here as follows:
package net.anumbrella.sso.authentication;

import net.anumbrella.sso.entity.CustomCredential;
import net.anumbrella.sso.entity.User;
import org.apereo.cas.authentication.*;
import org.apereo.cas.authentication.handler.support.AbstractPreAndPostProcessingAuthenticationHandler;
import org.apereo.cas.authentication.principal.PrincipalFactory;
import org.apereo.cas.services.ServicesManager;
import org.springframework.jdbc.core.BeanPropertyRowMapper;
import org.springframework.jdbc.core.JdbcTemplate;
import org.springframework.jdbc.datasource.DriverManagerDataSource;

import javax.security.auth.login.AccountException;
import javax.security.auth.login.FailedLoginException;
import java.security.GeneralSecurityException;
import java.util.ArrayList;
import java.util.Collections;
import java.util.List;

/**
 * @author anumbrella
 */
public class CustomerHandlerAuthentication extends AbstractPreAndPostProcessingAuthenticationHandler {

    public CustomerHandlerAuthentication(String name, ServicesManager servicesManager, PrincipalFactory principalFactory, Integer order) {
        super(name, servicesManager, principalFactory, order);
    }

    @Override
    public boolean supports(Credential credential) {
        //Determine if the redential passed in is the type you can handle
        return credential instanceof CustomCredential;
    }

    @Override
    protected AuthenticationHandlerExecutionResult doAuthentication(Credential credential) throws GeneralSecurityException, PreventedException {

        CustomCredential customCredential = (CustomCredential) credential;

        String username = customCredential.getUsername();
        String password = customCredential.getPassword();
        String email = customCredential.getEmail();
        String telephone = customCredential.getTelephone();

        System.out.println("username : " + username);
        System.out.println("password : " + password);
        System.out.println("email : " + email);
        System.out.println("telephone : " + telephone);


        // JDBC templates rely on connection pools for data connections, so connection pools must be constructed first
        DriverManagerDataSource dataSource = new DriverManagerDataSource();
        dataSource.setDriverClassName("com.mysql.jdbc.Driver");
        dataSource.setUrl("jdbc:mysql://localhost:3306/cas");
        dataSource.setUsername("root");
        dataSource.setPassword("123");

        // Create JDBC Template
        JdbcTemplate jdbcTemplate = new JdbcTemplate();
        jdbcTemplate.setDataSource(dataSource);

        String sql = "SELECT * FROM user WHERE username = ?";

        User info = (User) jdbcTemplate.queryForObject(sql, new Object[]{username}, new BeanPropertyRowMapper(User.class));

        System.out.println("database username : "+ info.getUsername());
        System.out.println("database password : "+ info.getPassword());

        if (info == null) {
            throw new AccountException("Sorry, username not found!");
        }

        if (!info.getPassword().equals(password)) {
            throw new FailedLoginException("Sorry, password not correct!");
        } else {

            final List<MessageDescriptor> list = new ArrayList<>();

            return createHandlerResult(customCredential,
                    this.principalFactory.createPrincipal(username, Collections.emptyMap()), list);
        }
    }
}
In the support method, change the instance class judgment to our custom redential, and in doAuthentication, convert Credential to our custom redential, where I take the mailbox and mobile number and print it to the console.Logic can be handled in real-world development.
Next, in the CustomAuthenticationConfiguration class, we change the custom logic to be processed to the CustomerHandlerAuthentication class we customized above, as follows:
package net.anumbrella.sso.config;

import net.anumbrella.sso.authentication.CustomerHandlerAuthentication;
import org.apereo.cas.authentication.AuthenticationEventExecutionPlan;
import org.apereo.cas.authentication.AuthenticationEventExecutionPlanConfigurer;
import org.apereo.cas.authentication.AuthenticationHandler;
import org.apereo.cas.authentication.principal.DefaultPrincipalFactory;
import org.apereo.cas.configuration.CasConfigurationProperties;
import org.apereo.cas.services.ServicesManager;
import org.springframework.beans.factory.annotation.Autowired;
import org.springframework.beans.factory.annotation.Qualifier;
import org.springframework.boot.context.properties.EnableConfigurationProperties;
import org.springframework.context.annotation.Bean;
import org.springframework.context.annotation.Configuration;

/**
 * @author anumbrella
 */
@Configuration("customAuthenticationConfiguration")
@EnableConfigurationProperties(CasConfigurationProperties.class)
public class CustomAuthenticationConfiguration implements AuthenticationEventExecutionPlanConfigurer {

    @Autowired
    private CasConfigurationProperties casProperties;

    @Autowired
    @Qualifier("servicesManager")
    private ServicesManager servicesManager;


    @Bean
    public AuthenticationHandler myAuthenticationHandler() {
        // Parameters: name, service manager, principalFactory, order
        // Defined as preferring it for authentication
//        return new CustomUsernamePasswordAuthentication(CustomUsernamePasswordAuthentication.class.getName(),
//                servicesManager, new DefaultPrincipalFactory(), 1);

        return new CustomerHandlerAuthentication(CustomerHandlerAuthentication.class.getName(),
                servicesManager, new DefaultPrincipalFactory(), 1);
    }

    @Override
    public void configureAuthenticationExecutionPlan(final AuthenticationEventExecutionPlan plan) {
        plan.registerAuthenticationHandler(myAuthenticationHandler());
    }
}
Finally, spring.factories is injected into the configuration of spring boot under the META-INF file under resources.This is basically the same as Section 4. If you are unfamiliar with it, you can first look at Section 4 --- CAS Single Sign-on (4) - Custom Authenticated Logon Policy.
The background processing is complete. We also need to change the content of the foreground page, casLoginView.html, because we need to change the interface because we also need the mailbox and mobile number in addition to the user name and password.
In the previous casLoginView.html of our custom interface, two new fields were added as follows:
<!DOCTYPE html> <html> <head> <meta charset="UTF-8"/> <meta name="viewport" content="width=device-width, initial-scale=1"/> <meta http-equiv="X-UA-Compatible" content="IE=edge"/> <title>Single sign-on SSO</title> <link href="https://fonts.googleapis.com/css?family=Lato" rel="stylesheet"> <link rel='stylesheet prefetch' href='https://fonts.googleapis.com/icon?family=Material+Icons'> <link rel="stylesheet" th:href="@{${#themes.code('anumbrella.standard.css.file')}}"/> </head> <body> <div class="cotn_principal"> <div class="cont_centrar"> <div class="cont_login"> <div class="cont_info_log_sign_up"> <div class="col_md_login"> <div class="cont_ba_opcitiy"> <h2>SSO</h2> <p>Click on login to enter information</p> <button class="btn_login" onClick="cambiar_login()">Sign in</button> </div> </div> </div> <div class="cont_back_info"> <div class="cont_img_back_grey"> <img th:src="@{${#themes.code('anumbrella.login.images.path')}+'/po.jpeg'}" alt="" /> </div> </div> <div class="cont_forms" > <div class="cont_img_back_"> <img th:src="@{${#themes.code('anumbrella.login.images.path')}+'/po.jpeg'}" alt="" /> </div> <div class="cont_form_login"> <a href="#" onClick="ocultar_login_sign_up()" ><i class="material-icons"></i></a> <form method="post" th:object="${credential}"> <h2>SSO</h2> <section class="row"> <div th:unless="${openIdLocalId}"> <input class="required" id="username" size="25" tabindex="1" placeholder="User name" type="text" th:disabled="${guaEnabled}" th:field="*{username}" th:accesskey="#{screen.welcome.label.netid.accesskey}" autocomplete="off"/> </div> </section> <section class="row"> <div> <input class="required" type="password" id="password" size="25" tabindex="2" placeholder="Password" th:accesskey="#{screen.welcome.label.password.accesskey}" th:field="*{password}" autocomplete="off"/> </div> </section> <section class="row"> <div> <input class="required" id="email" size="25" tabindex="1" placeholder="mailbox" type="text" th:field="*{email}" autocomplete="off"/> </div> </section> <section class="row"> <div> <input class="required" id="telephone" size="25" tabindex="1" placeholder="Mobile phone" type="text" th:field="*{telephone}" autocomplete="off"/> </div> </section> <section> <input type="hidden" name="execution" th:value="${flowExecutionKey}"/> <input type="hidden" name="_eventId" value="submit"/> <input type="hidden" name="geolocation"/> <input class="btn btn-submit btn-block btn_login" style="text-align: center" name="submit" accesskey="l" th:value="#{screen.welcome.button.login}" tabindex="6" type="submit"/> </section> <div th:if="${#fields.hasErrors('*')}"> <span th:each="err : ${#fields.errors('*')}" th:utext="${err}"/> </div> </form> </div> <div class="cont_form_sign_up"/> </div> </div> </div> </div> <script th:src="@{${#themes.code('anumbrella.javascript.file')}}"></script> </body> </html>
Mainly two new fields have been added, as follows:
<section class="row">
    <div>
        <input class="required"
               id="email"
               size="25"
               tabindex="1"
               placeholder="mailbox"
               type="text"
               th:field="*{email}"
               autocomplete="off"/>
    </div>
</section>

<section class="row">
    <div>
        <input class="required"
               id="telephone"
               size="25"
               tabindex="1"
               placeholder="Mobile phone"
               type="text"
               th:field="*{telephone}"
               autocomplete="off"/>
    </div>
</section>
The page binding parameters are the new parameters th:field="{email}" and th:field="{telephone}" fields.After saving the code, restart the CAS service, and we can see that the logon interface style has changed as follows: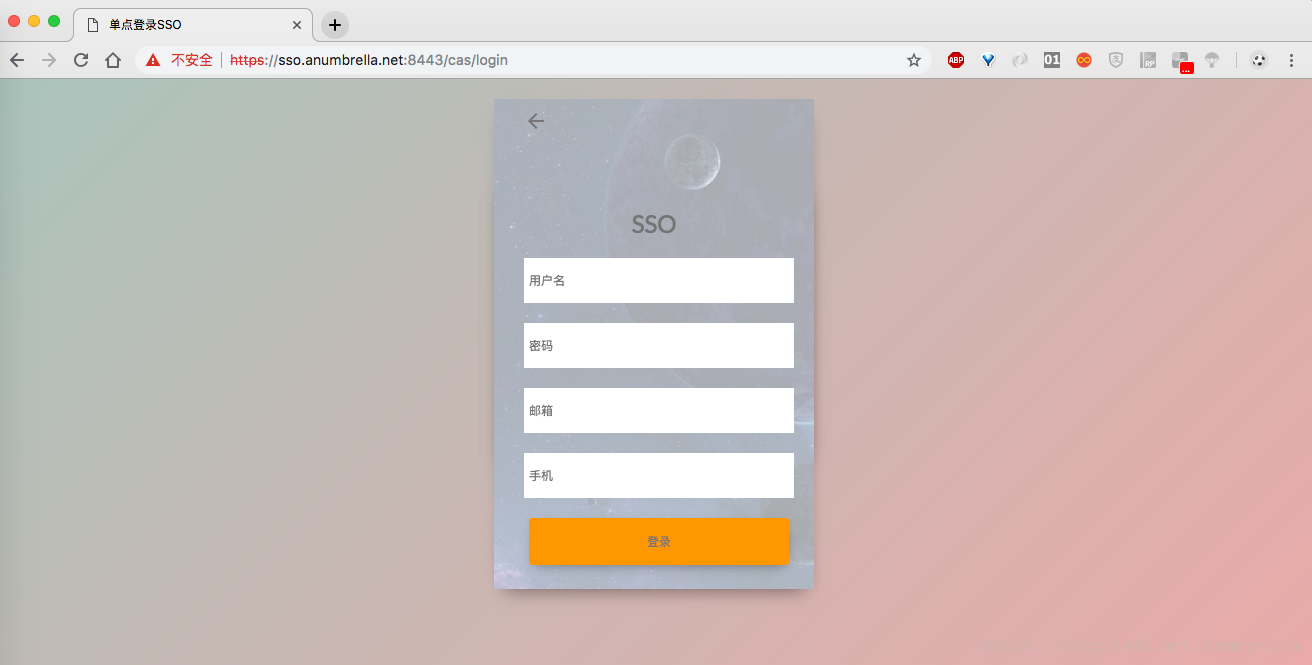
Next, we enter the user name, password and mailbox. Without entering the phone number, clicking Login will fail with prompts.The following:
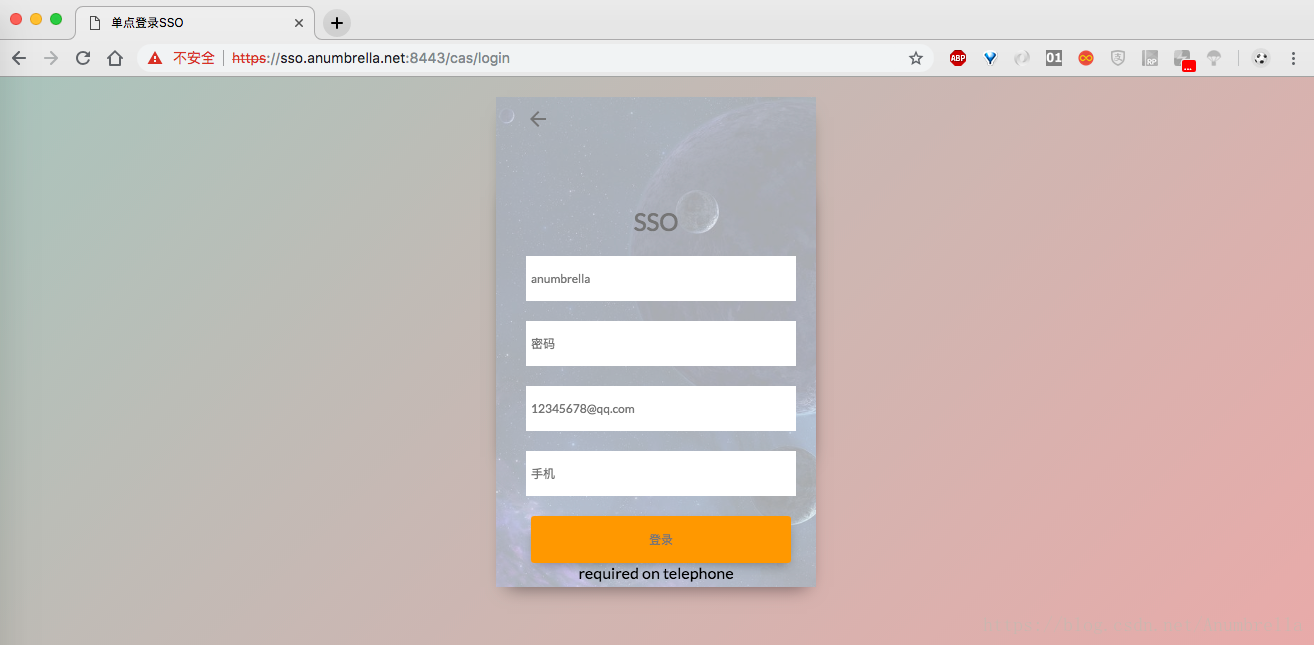
Finally, we enter the complete information, log in successfully, and then we can find the information printed in the background.
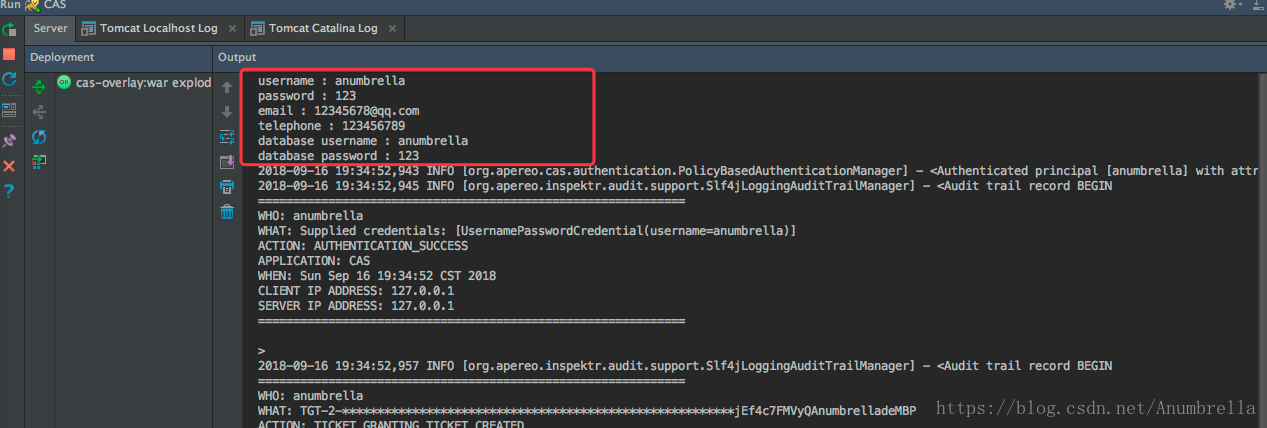
OK, that's the end of this section, followed by other things about CAS.
Code examples: Chapter5