Circles and arcs are one of the basic graphics. Today we will learn how to draw circles and arcs in Canvas. Drawing circles and arcs in Canvas line segment and rectangle Simple as that. In Canvas, the Canvas RenderingContext2D object provides two methods (arc() and arcTo()) to draw circles and arcs.
Basic knowledge of circles and arcs
Before learning how to draw circles and arcs, it is necessary to understand some basic knowledge.
- Angular rotation
- Angle and radian
- tangent
Angular rotation
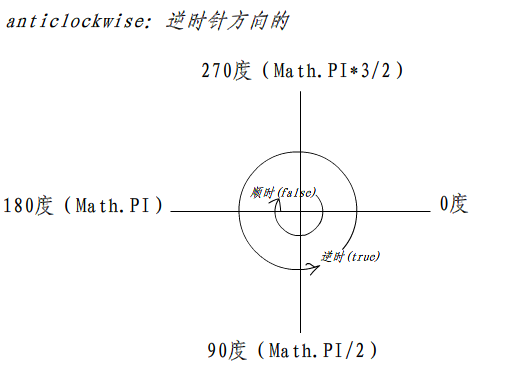
stay coordinate system The rotation is divided into clockwise and counterclockwise rotation.
Angle and radian
In CSS, the angle (deg) is often used to rotate. But when drawing a circle or arc in Canvas, the radian (rad) is used. Wikipedia The radian is described as follows:
Radius, also known as crossbow, is a unit of plane angle, and also a unit of international guidance. Unit radian is defined as the central angle when the length of the arc equals the radius. When an angle is given in radians, it is usually not written in radian units or sometimes recorded as rad.

The radian of a complete circle is 2 pi, SO 2 pi rad = 360 degrees, 1 pi rad = 180 degrees, 1 degree = pi / 180 rad, and 1 rad = 180 degrees / PI (about 57.29577951 degrees). From the angle expressed in degrees, the number multiplied by pi/180 is converted into radians; from the angle expressed in radians, the number multiplied by 180/pi is converted into degrees.
rad = (π / 180) * deg
Alike:
deg = (rad * 180) / π
The various radians we often see are as follows:

Conversion of Radius Angle in JavaScript
It is not enough to understand the relationship between angle and radian. We also need to know how to use JavaScript to convert angle to radian. A Pi is about 3.141592653589793, which corresponds to Math.PI in JavaScript. Then the conversion between angle and radian:
rad = (Math.PI * deg) / 180
Alike:
deg = (rad * 180) / Math.PI
To facilitate calculation and use, it can be encapsulated into JavaScript functions:
function getRads (degrees) {
    return (Math.PI * degrees) / 180;
}

function getDegrees (rads) {
    return (rads * 180) / Math.PI;
}
For example, if we want to convert 30deg into rad, we can use it directly:
getRads(30); // 0.5235987755982988rad
getDegrees(0.7853981633974483); // 45deg
The following figure shows the common conversion between angle and radian:

tangent
tangent (Tangent, tan, tg) trigonometric function One. It is a periodic function with a minimum positive period of PI (Math.PI). The tangent function is Odd function.
In Canvas, sum is often needed trigonometric function In dealing with each other, it also shows how important mathematics is. I regret not having studied it carefully. With regard to the application of trigonometric functions in Canvas, we will spend a lot of time to introduce them later.
Why mention tangent in drawing circles? That's because we'll talk about artTo() later on when we talk about it. The following illustration shows that the relationship between tangent and circle and arc seems a little complicated, but there is no need to rush to get it. It will be understood later.

With these foundations, we can begin to learn how to draw circles and arcs in Canvas. This is also the real theme of this article. If you can't wait, read on.
arc() method
Let's first look at how arc() draws circles and arcs. The arc() method in Canvas accepts six parameters:
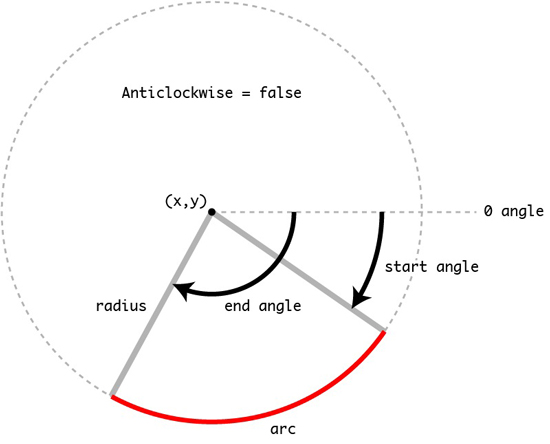
arc(x, y, radius, startRad, endRad, [anticlockwise]);
Draw an arc on the Canvas canvas with coordinate points (x,y) as the center and half radius as the circle. The starting and ending radians of this arc are startRad. Here, the radian is calculated from the angle of clockwise rotation based on the positive direction of the x-axis. Anticlockwise denotes whether arc() starts drawing circles or arcs clockwise or counterclockwise. If its value is true, it denotes counterclockwise, and if false, it denotes clockwise. This parameter is an optional parameter whose value is false (also the default value of anticlockwise) if it is not explicitly set.
I remember when we first learned numbers, the relationship between the circumference of a circle and its radius was C = Pi d or C = 2 pi r. With these foundations, we can use arc() to draw arcs or circles.
Drawing arcs
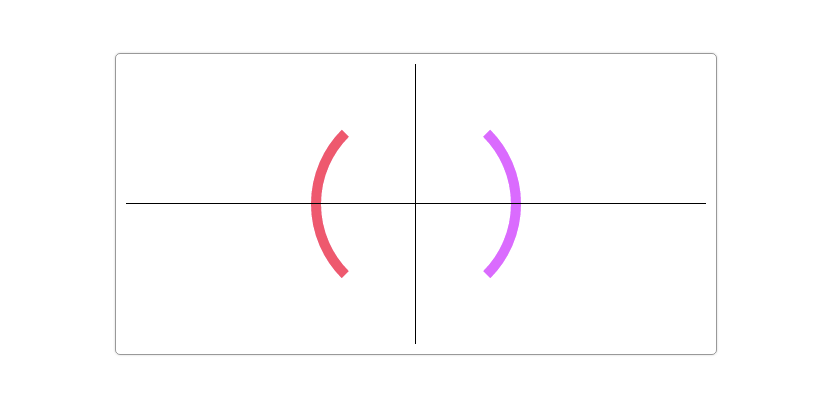
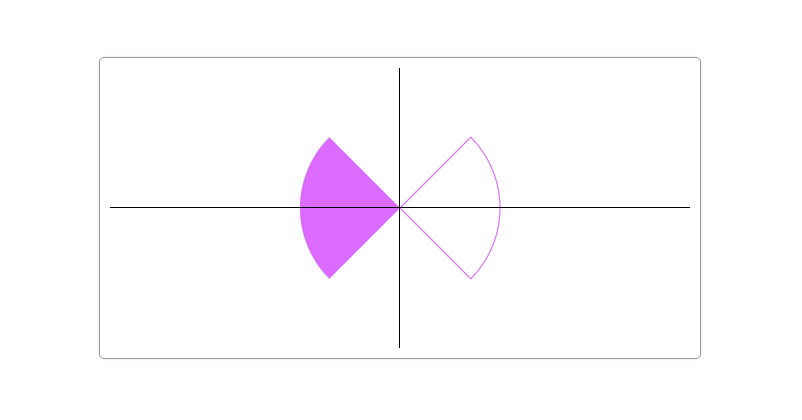
Let's first look at arc() drawing arcs and pass the corresponding parameters to him according to the contents described above.
function drawScreen () {
    // X, y => Centroid coordinate points
    // R => arc radius
    var arc = {
        x: myCanvas.width / 2,
        y: myCanvas.height / 2,
        r: 100
    },
        w = myCanvas.width,
        h = myCanvas.height;

    ctx.save();
    ctx.lineWidth = 10;
    ctx.strokeStyle = '#e3f';

    // startRad => getRads(-45)
    // endRad => getRads(45)
    // Clockwise rotation
    ctx.beginPath();
    ctx.arc(arc.x, arc.y, arc.r,getRads(-45),getRads(45));
    ctx.stroke();


    // startRad => getRads(-135)
    // endRad => getRads(135)
    // Counterclockwise rotation
    ctx.beginPath();
    ctx.strokeStyle = "#f36";
    ctx.arc(arc.x, arc.y, arc.r,getRads(-135),getRads(135),true);
    ctx.stroke();
    ctx.restore();

}
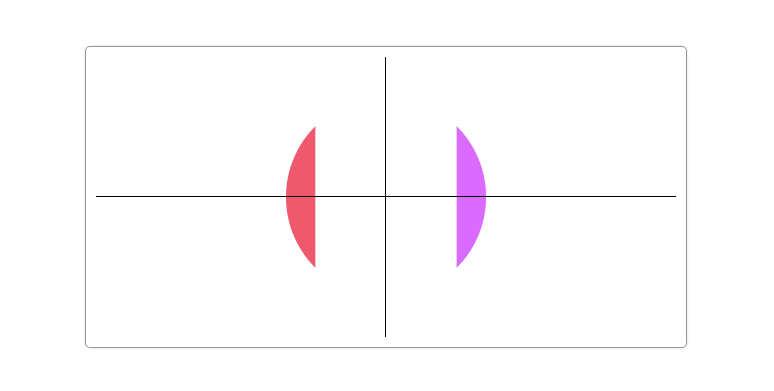
When we replace stroke() with fill(), the above effect is not an arc.
In addition, if closePath() is called before stroke(), the starting and ending points of the arc will be connected directly by one. For example, the above example, plus the following effects:
ctx.beginPath();
ctx.arc(arc.x, arc.y, arc.r,getRads(-45),getRads(45));
ctx.closePath();
ctx.stroke();

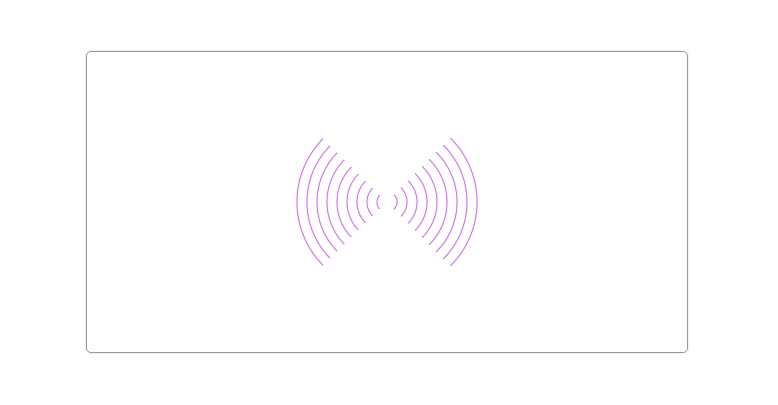
Is arc() easy to draw arcs? In practice, with the help of some conditional loops, we can do some interesting effects. For example, the following example uses arc() to draw a sonic wave rate magnification map:
function drawScreen () {

    var arc = {
        x: myCanvas.width / 2,
        y: myCanvas.height / 2,
        r: 10
    },
        w = myCanvas.width,
        h = myCanvas.height;

    ctx.save();
    ctx.lineWidth = 1;
    ctx.strokeStyle = '#e3f';

    for(var i = 0;i < 10; i++){
        ctx.beginPath();
        ctx.arc(arc.x, arc.y, arc.r * i,getRads(-45),getRads(45));
        ctx.stroke();

        ctx.beginPath();
        ctx.arc(arc.x, arc.y, arc.r * i,getRads(-135),getRads(135),true);
        ctx.stroke();
    }
}
Special attention should be paid to:
- When drawing a graph with arc(), if moveTo() is not set, the starting point is the point at which the arc begins (at startRad). If moveTo() is set, the point will be connected to the arc starting point.
- If stroke() is used, the starting position of the arc will be from the beginning of the connection. If the fill method is used, the path filling is automatically closed
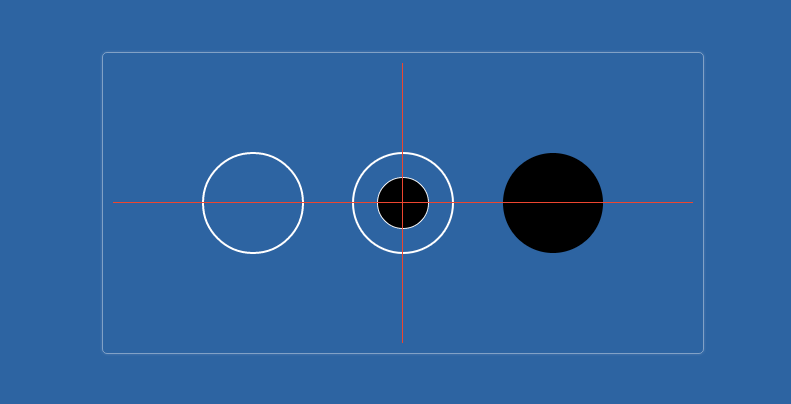
Drawing Circle
Drawing a circle with arc is the same as drawing an arc, except that the startRad and endRad are the same when drawing a circle. For example:
function drawScreen () {

    var arc = {
        x: myCanvas.width / 2,
        y: myCanvas.height / 2,
        r: 50
    },
        w = myCanvas.width,
        h = myCanvas.height;

    ctx.save();
    ctx.lineWidth = 2;
    ctx.strokeStyle = '#fff';
    ctx.fillStyle = '#000';
    // Draw a border circle
    ctx.beginPath();
    ctx.arc(arc.x / 2, arc.y, arc.r, getRads(0), getRads(360), false);
    ctx.stroke();

    // Draw a closed border circle
    ctx.beginPath();
    ctx.arc(arc.x, arc.y, arc.r, getRads(0), getRads(360), false);
    ctx.closePath();
    ctx.stroke();
    // Draw a filling circle
    ctx.beginPath();
    ctx.arc(arc.x * 1.5, arc.y, arc.r,getRads(0), getRads(360), true);
    ctx.fill();
    //Draw a circle filled with borders
    ctx.beginPath();
    ctx.arc(arc.x, arc.y, arc.r / 2,getRads(0), getRads(360), false);
    ctx.stroke();
    ctx.fill();
    ctx.restore();

}
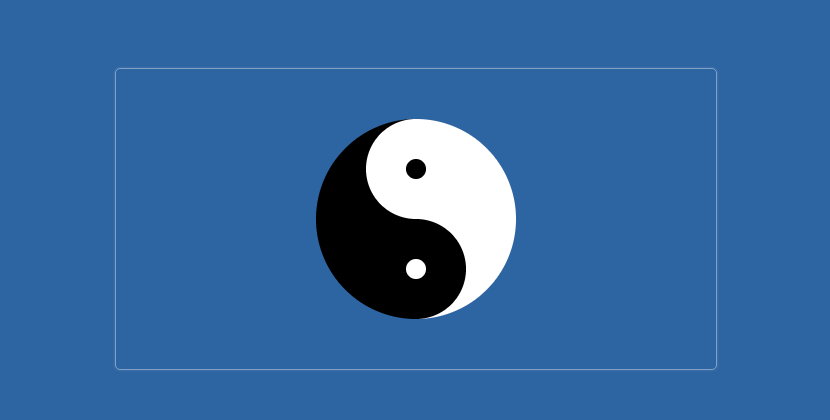
To do a little exercise, use arc() to draw a Tai Chi map:
- Draw a large white and black semicircle to form a circle
- Draw a small white semicircle and a small black semicircle.
- Draw a small white and black dot
Together, these are the Tai Chi maps we want:
function drawScreen () {

    var arc = {
        x: myCanvas.width / 2,
        y: myCanvas.height / 2,
        r: 100
    },
        w = myCanvas.width,
        h = myCanvas.height;

    ctx.save();
    ctx.lineWidth = 1;

    // Draw a big white circle
    ctx.beginPath();
    ctx.fillStyle = '#fff';
    ctx.arc(arc.x, arc.y, arc.r, getRads(-90), getRads(90), false);
    ctx.fill();

    // Draw a big black circle
    ctx.beginPath();
    ctx.fillStyle = '#000';
    ctx.arc(arc.x, arc.y, arc.r, getRads(-90), getRads(90), true);
    ctx.fill();

    // Draw a small white circle
    ctx.beginPath();
    ctx.fillStyle = '#fff';
    ctx.arc(arc.x, arc.y - arc.r/2, arc.r / 2,getRads(-90), getRads(90), true);
    ctx.fill();

    // Draw a small black circle
    ctx.beginPath();
    ctx.fillStyle = '#000';
    ctx.arc(arc.x, arc.y + arc.r/2, arc.r / 2,getRads(-90), getRads(90), false);
    ctx.fill();

    // Draw small black dots
    ctx.beginPath();
    ctx.fillStyle = '#000';
    ctx.arc(arc.x, arc.y - arc.r/2, arc.r / 10,getRads(0), getRads(360), false);
    ctx.fill();

    // Draw small white dots
    ctx.beginPath();
    ctx.fillStyle = '#fff';
    ctx.arc(arc.x, arc.y + arc.r/2, arc.r / 10,getRads(0), getRads(360), false);
    ctx.fill();
  }
Drawing sector
In addition to drawing arcs and circles, arc() can also be used to draw sector shapes. The key point of drawing a sector is to set the starting point to the center of the circle through moveTo(), and then close the path through closePath().
function drawScreen () {

    var arc = {
        x: myCanvas.width / 2,
        y: myCanvas.height / 2,
        r: 100
    },
        w = myCanvas.width,
        h = myCanvas.height;

    ctx.save();
    ctx.lineWidth = 1;
    ctx.strokeStyle = '#e3f';
    ctx.fillStyle = '#e3f';

    ctx.beginPath();
    // The starting point is set at the center of the circle.
    ctx.moveTo(arc.x, arc.y);
    ctx.arc(arc.x, arc.y, arc.r,getRads(-45),getRads(45));
    // Closed Path
    ctx.closePath();
    ctx.stroke();

    ctx.beginPath();
    // The starting point is set at the center of the circle.
    ctx.moveTo(arc.x, arc.y);
    ctx.arc(arc.x, arc.y, arc.r,getRads(-135),getRads(135),true);
    // Closed Path
    ctx.closePath();
    ctx.fill();

    ctx.restore();
}
Using this principle, we can easily achieve a pie chart effect.
Special declaration: startRad and endRad in arc() method are both in radians. Even if you fill in a number, such as 360, they will still be considered 360 radians.
arcTo() method
We learned how to draw arcs, circles or fans by arc() method. In Canvas, Canvas RenderingContext2D also provides another method, arcTo(), to draw arcs, but arcTo() cannot draw circles. Why? Next, let's learn how to use arcTo().
arcTo() accepts five parameters:
arcTo(x1, y1, x2, y2, radius)
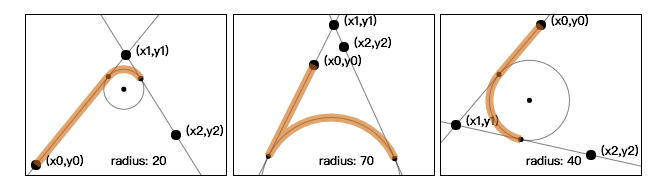
The arcTo() method uses the angle formed by the current endpoint, endpoint one (x1, y1) and endpoint two (x2,y2), and then draws an arc on a circle tangent to both sides of the angle and radius radius. The starting point of an arc is the tangent point of the edge and circle of the current endpoint. The ending point of an arc is the tangent point of the edge and circle of the quotient endpoint 2 (x2,y2), and the drawn arc is the shortest arc between the two tangent points. In addition, if the current endpoint is not the starting point of the arc, the arcTo() method will also add a straight line segment from the current endpoint to the starting point of the arc.
It's a little hard to understand. In fact, although arcTo() draws arcs or circles by two points and radius, there are actually three points involved. That is to say, whether or not arcTo() is called, there is actually a point that already exists (x0,y0). So (x0,y0) and (x1,y1) form a line, then (x1,y1) and (x2,y2) form a line, the intersection of the two lines is (x1,y1). Then the arc or circle drawn by radius will be tangent to the two lines. This is the basis of the article at the beginning.
Or change the picture below, you can better understand.
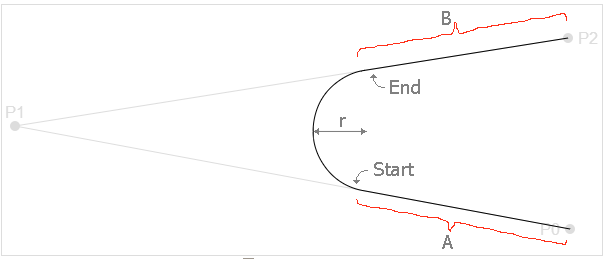
In the arcTo() function, although the parameters only involve P1, that is, the (x1,y1) and (x1,y1) of the parameters. P2 is the two points in the parameter (x2,y2). In fact, there is an implicit point, that is, the current point on the canvas (P 0), which is referred to earlier (x0,y0). When When P 0, P 1, P 2 do not overlap or are not in a straight line, these three points can form a triangle. Imagine, from P0 starts by drawing a line segment to P1, and then from P1 to P2 draws another line segment. These two lines form an angle, and then use the following line segment to draw a line segment from P1 to P2. r Draws a circle and moves it to tangent the circle to the line segment P0P1 and the line segment P1P2 (or possibly the tangent point is in the P0P1 or the extension line of P1P2) and then keep the arc towards the point of P1, which is What arcTo() does in the arc section.
The actual drawing is as follows:
- MoeTo () gives P0 coordinates
- The parameters in arcTo() function give the coordinates of point P1 and point P2, and the radius of the circle. r
- Calculate the tangent points of circles and lines P0P1 and P1P2 with r as radius, and mark them as follows S-point and E-point, corresponding to the Start and End points on the graph
- Draw a line segment from P0 to S
- From point S to point E, draw an arc with radius r
- At this point, the current point of the canvas is point E.
- Then I drew another line from point E to point P2, so that arcTo's work is finished, and then you can stroke() or fill()
Let's look at a drawing process:
function drawScreen () {
    ctx.lineWidth = 1;
    ctx.strokeStyle = '#f36';
    ctx.fillStyle = 'red';

    // A starting point (100, 50), then draw its point. Set the color to red
    ctx.fillRect( 100 - 4, 50 - 4, 8, 8 );
    // The two reference points are (100, 200) and (300, 200) respectively. The point is plotted.
    ctx.fillRect( 100 - 4, 200 - 4, 8, 8 );
    ctx.fillRect( 300 - 4, 200 - 4, 8, 8 );

    // Connect two reference points
    ctx.beginPath();
    ctx.strokeStyle = 'red';
    ctx.moveTo( 100, 200 );
    ctx.lineTo( 300, 200 );
    ctx.stroke();

    // Call the arcTo method to draw an arc. Remember to set the starting point to (100, 50)
    ctx.beginPath();
    ctx.strokeStyle = 'blue';
    ctx.moveTo( 100, 50 );
    ctx.arcTo( 100, 200, 300, 200, 80);
    ctx.stroke();
}
Drawing Rectangles with Rounded Corners
In learning Canvas draw rectangle In one section, we mentioned that we can simulate a rounded rectangle by changing the shape of the end point of the line segment through line Join. There are still many limitations in drawing rectangles with rounded corners by this method. However, it is worth celebrating that acrTo() can easily realize two line tangent arcs. In other words, it is very convenient to use arcTo() to draw a rounded rectangle.
The rounded rectangle consists of four lines and four 1/4 arcs, which are disassembled as follows.
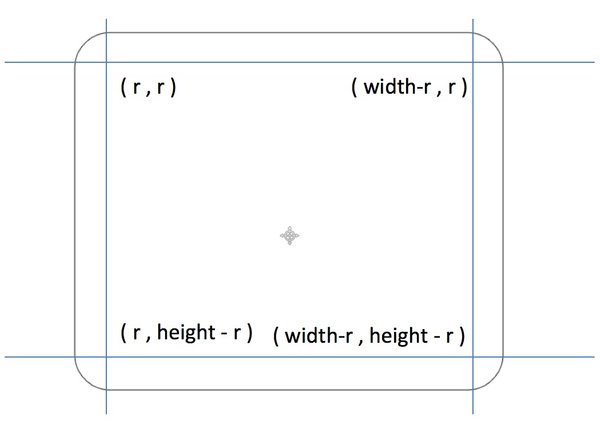
In this way, we can encapsulate a function to draw rounded rectangles. According to the figure above, we can pass the corresponding parameters to this function, such as drawRoundedRect():
- ctx: Canvas Canvas Drawing Environment
- x,y: upper left corner
- Width: Rectangular width
- Height: rectangular height
- r: Rectangular fillet radius
- fill: Draw a filled rectangle
- stroke: Draw a border rectangle
Start encapsulating functions:
function drawRoundedRect(ctx, x, y, width, height, fill, stroke) {
    ctx.save();
    ctx.beginPath();

    // draw top and top right corner
    ctx.moveTo(x + r, y);
    ctx.arcTo(x + width, y, x + width, y + r, r);

    // draw right side and bottom right corner
    ctx.arcTo(x + width, y + height, x + width - r, y + height, r);

    // draw bottom and bottom left corner
    ctx.arcTo(x, y + height, x, y + height - r, r);

    // draw left and top left corner
    ctx.arcTo(x, y, x + r, y, r);

    if (fill) {
        ctx.fill();
    }

    if (stroke) {
        ctx.stroke();
    }

    ctx.restore();
}
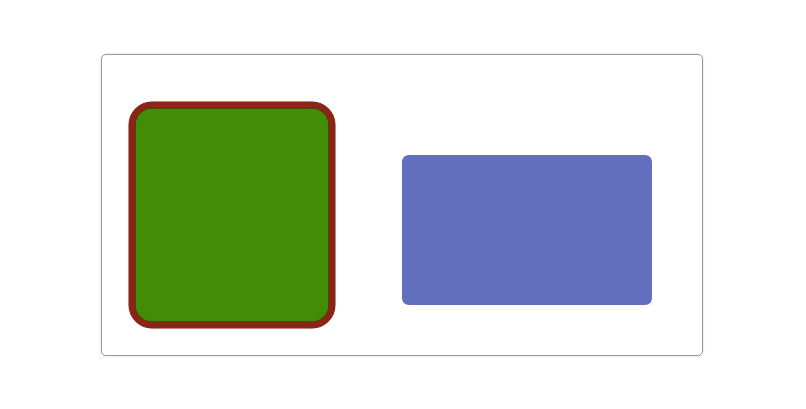
After the function is encapsulated, the rectangle with rounded corners can be easily drawn by calling, and it is easy to use:
function drawScreen () {

    ctx.strokeStyle = 'rgb(150,0,0)';
    ctx.fillStyle = 'rgb(0,150,0)';
    ctx.lineWidth = 7;
    drawRoundedRect(ctx, 30, 50, 200, 220, 20, true, true);

    ctx.strokeStyle = 'rgb(150,0,150)';
    ctx.fillStyle = 'rgba(0,0,150,0.6)';
    ctx.lineWidth = 7;
    drawRoundedRect(ctx, 300, 100, 250, 150, 8, true, false);
}
Is it simple? Let's do a more complicated exercise. For example, the original hot 2048 game.
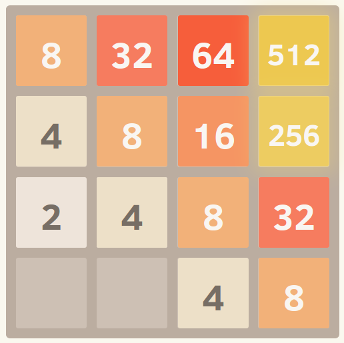
DraRoundedRect () function can be easily drawn out, interested students do not try.
Drawing the Moon
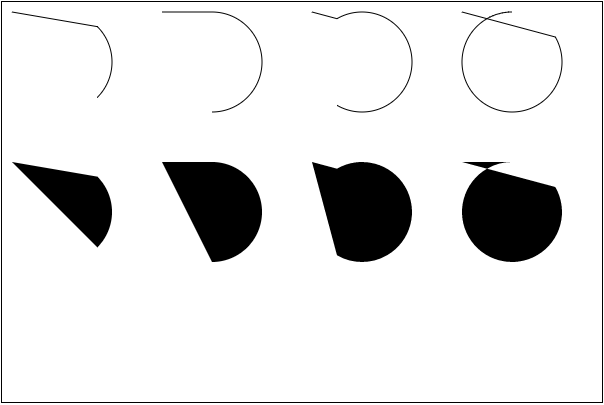
This section focuses on arc() and arcTo() methods, and how to use these two methods to draw arcs or circles in Canvas. So let's look at a small example, which combines the two to draw a moon.
To illustrate the principle of drawing the moon with a picture:
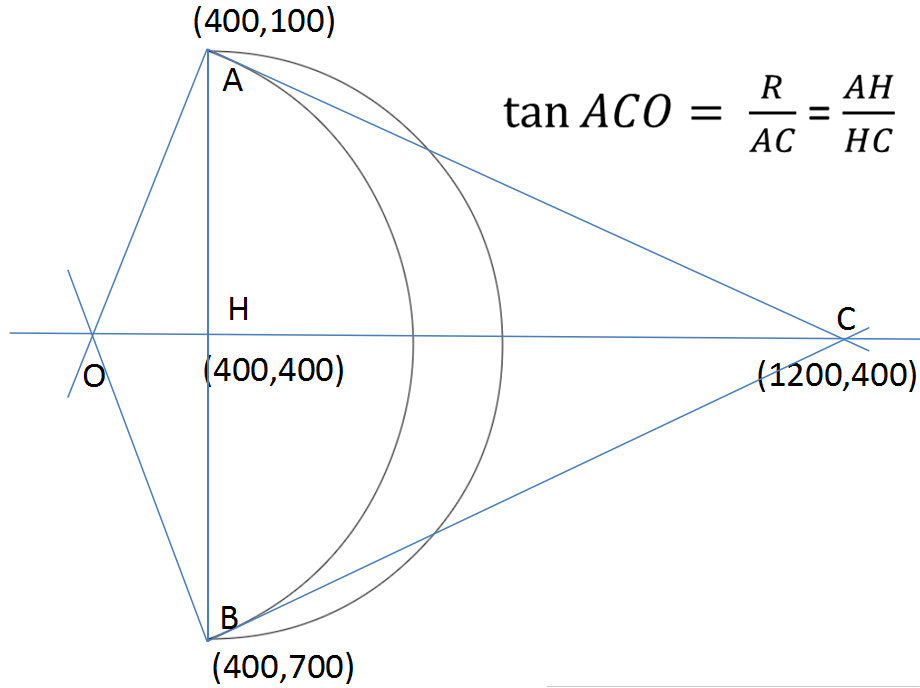
This figure has explained everything. Go straight to the code.
function drawMoon(cxt, d, x, y, R, rot){
    cxt.save();
    cxt.translate(x, y);
    cxt.scale(R, R);
    cxt.rotate(Math.PI / 180 * rot);
    pathMoon(cxt, d);
    cxt.fillStyle = 'hsl' + randomColor();
    cxt.fill();
    cxt.restore();
 }
 //Drawing Path
 function pathMoon(cxt, d){
    //D represents the abscissa of the control point.
    cxt.beginPath();
    cxt.arc(0, 0, 1, Math.PI * 0.5, Math.PI * 1.5, true);
    cxt.moveTo(0, -1);
    cxt.arcTo(d, 0, 0, 1, dis(0, -1, d, 0) * 1 / d);
    cxt.closePath();
 }

 function dis(x1, y1, x2, y2){
    return Math.sqrt((x1 - x2) * (x1 - x2) + (y1 - y2) * (y1 - y2));
 }

 function drawScreen () {
    drawMoon(ctx,2,myCanvas.width / 2,myCanvas.height / 2,100,15);
 }
summary
In Canvas, the Canvas RenderingContext2D object provides two methods (arc() and arcTo()) to draw circles and arcs. arc() can draw arcs, circles and sectors, but arcTo() can only draw arcs. But arcTo() can help us realize rectangles with rounded corners more easily. So far, we have learned how to draw lines, rectangles, arcs and circles in Canvas, but the basic graphics are more than that. Next, we will learn how to draw arrows in Canvas. Interested students, please continue to pay attention to relevant updates.
Copyright belongs to the author.For commercial reprints, please contact the author for authorization. For non-commercial reprints, please indicate the source.
Original: http://www.w3cplus.com/canvas/drawing-arc-and-circle.html © w3cplus.com
Individuals have set up front-end learning groups, aiming at learning front-end together. Pure, pure technical discussion, non-front-end personnel do not disturb! Join the crowd and add me WeChat: iamaixiaoxiao.