- Author: Chief Filling Officer Southern Jiangsu
- Source: @ IT Pingtou Coalition
- Exchange: 912594095, public number: honey Badger8; this article is original, the copyright belongs to the author, reproduced please indicate the original link and source.
Preface
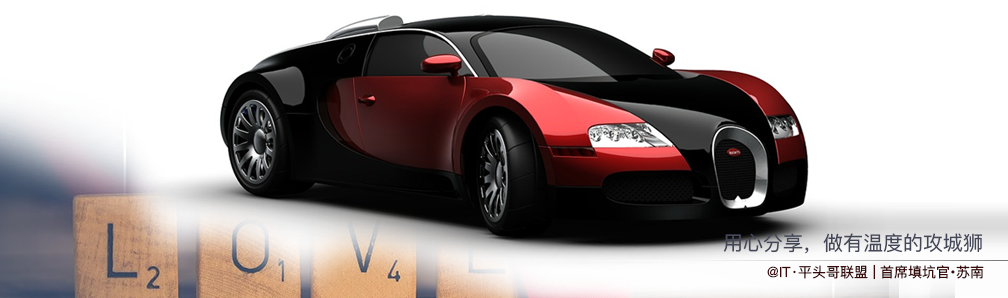
The inspiration comes from finding money the other day, thinking that it's time to buy a car for myself. After working for so many years, I should be better to myself. I searched the Internet to see this model. In fact, I bought one a few years ago, but it was stolen in less than a month, and I was sad for a long time. It must be locked up this time. Three locks guaranteed that the thieves would never steal again. So I took the money and bought some. yakult Shared with colleagues, the mood is more pleasant. - @ IT Pingtou Coalition I'm the chief filling officer. South of Jiangsu(South·Su) ^_^~
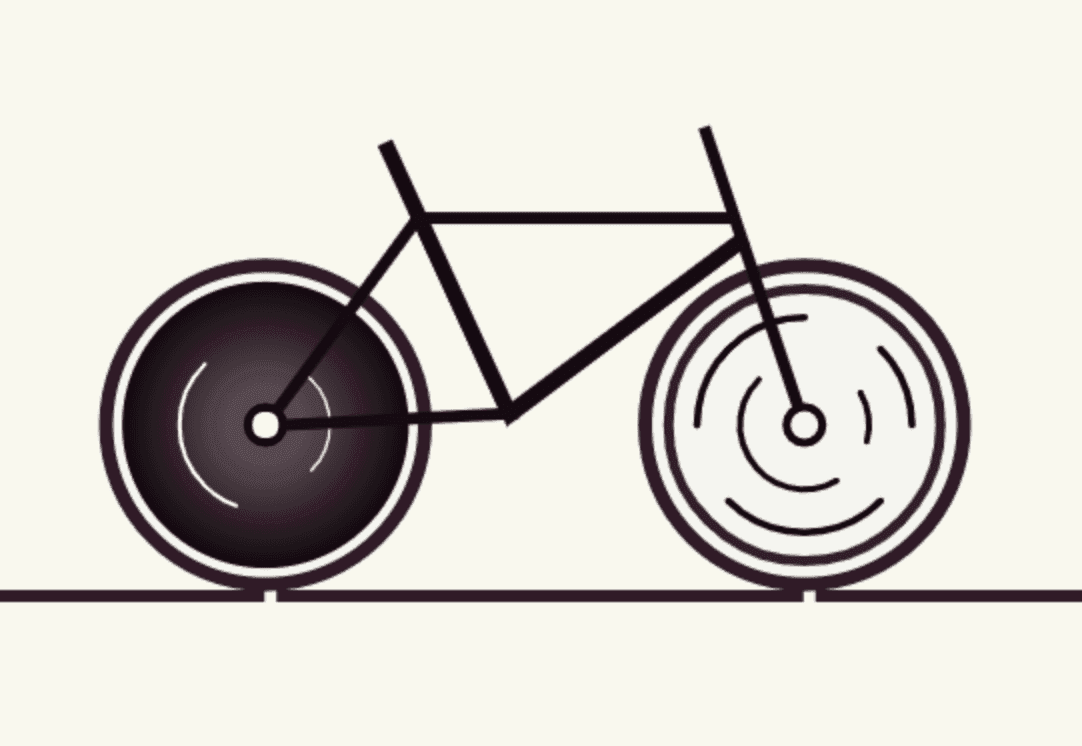
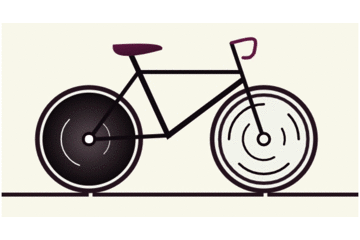
But as a program (well, a rookie, professional chief filling officer), the car is basically useless. Why? Because there are endless bug s, I remember that the biggest dream at the time of graduation was: "pull a sister to fight with the sword in the world, punish the evil, rob the rich and help the poor, happy life *", but one into the deep sea of IT, Since then, BUG can't be changed. . So learn more, this is not to learn to draw a car to satisfy their hearts comfort, here to share with you, alas, a bit biased ~, you first look at the final effect map!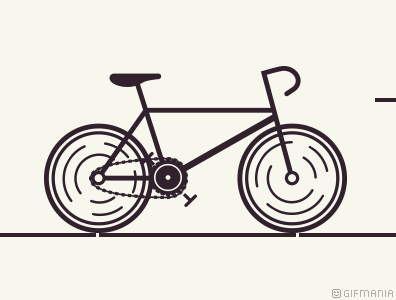
Process analysis:
The effect has been seen, do you feel very good B? In fact, it's general, let me take you to decompose its implementation process.
In the Chinese name of canvas: canvas It's just like drawing on paper. Before drawing something, we have to learn to conceive and disassemble what you want to draw. Like cars, mobile phones and other things, a finished product is made up of many parts. When you disassemble it, it will be easier to assemble it bit by bit.
-
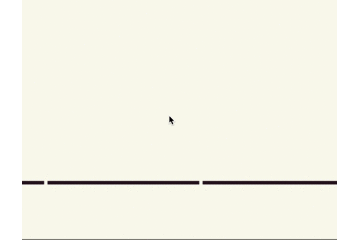
Draw the horizon:
- First, we draw a line at the bottom based on the height of the canvas.
- From the observation of animation, it also has several points. This is used to deceive our eyes when parallax rolls. It is no use to move a line directly. The movement of points can form an animation effect.
- Add a little decoration, a few points of movement is a little too monotonous, you can imagine, when you ride a bicycle, the speed of the car and the surrounding things, buildings, people produce a difference, that feeling is very exciting, then we also add something to make the animation look richer, I chose three lines, the line itself has a gradual transition effect, than pure color. To be smart, animation should look more realistic, and initially it is not within the scope of the canvas, this point should be noted;
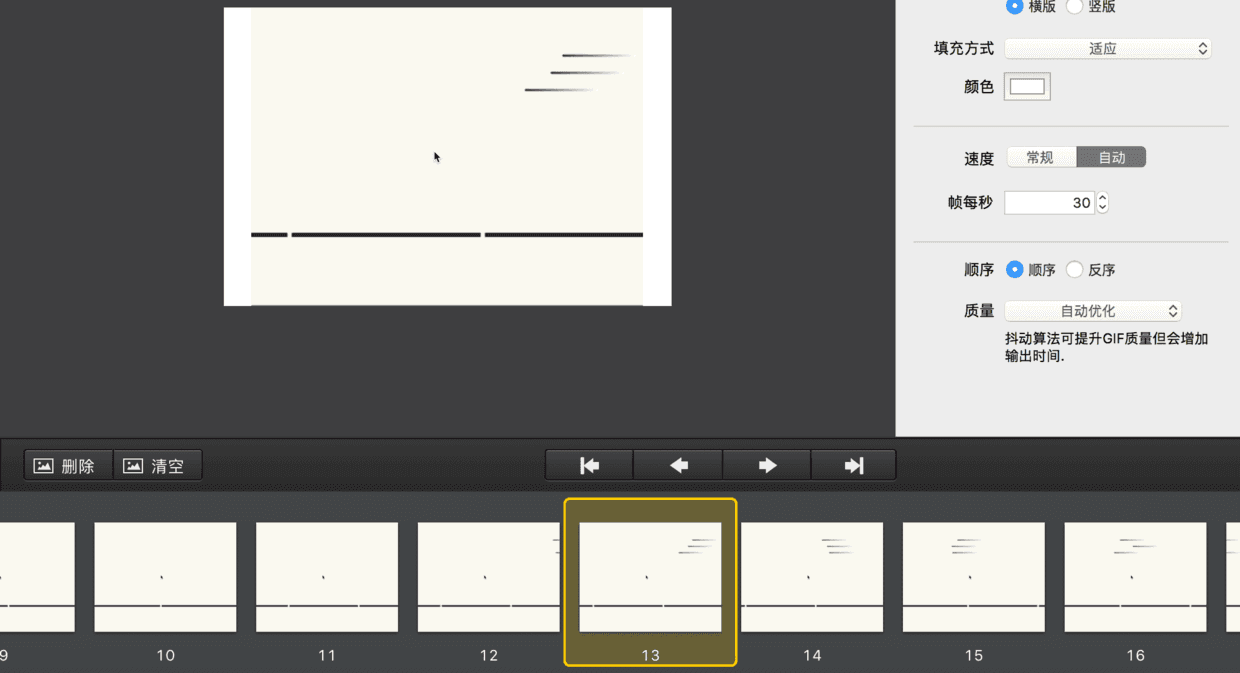
- The following two pictures, the second one is cut out in the tool of generating gif. It is the decomposition of animation. Actually, the so-called animation is also composed of a static picture. Then it transits quickly, which makes the vision form parallax. Finally, it deceives the brain. I saw the animation...
- Knowledge Points: lineTo, strokeStyle, stroke, restore, etc. There are different explanations here. If you don't know something, you can do it yourself. View the w3school API
  horizon(){
      /**
      * The bottom of the wheel, also known as the horizon:
      1.Clear canvas
      2.Draw a straight line with a height of 6px
      This article @IT. Pingtouge Alliance - Chief Filling Officer Southern Jiangsu Share. For non-commercial reprints, please indicate the original link and source.
       */

      this.wheelPos = [];
      this.ctx.save();//Chief Filling Officer Column Exchange in Southern Jiangsu: 9125 94095, Public No. honey Badger 8
      this.ctx.clearRect(0, 0, this.canvasW, this.canvasH);

      let horizonX = 0,horizonY = this.canvasH-100;
      this.ctx.beginPath();
      this.ctx.strokeStyle = this.color;
      this.ctx.lineWidth=6;
      this.ctx.moveTo(horizonX,horizonY);
      this.ctx.lineTo(this.canvasW,horizonY);
      this.ctx.closePath();
      this.ctx.stroke();

      Array.from({length:5}).map((k,v)=>{
          let dotProportion = (this.canvasW*0.49)*v-this.oneCent;
          this.wheelPos.push({x:dotProportion,y:horizonY-this.wheelRadius});
          let startX = dotProportion-(this.animateNum*2); //Used for animation scroll movement
          this.ctx.beginPath();
          this.ctx.strokeStyle = "#f9f8ef";
          this.ctx.lineWidth=6;
          this.ctx.moveTo(startX,horizonY);
          this.ctx.lineTo(startX+5,horizonY);
          this.ctx.closePath();
          this.ctx.stroke();
      });
      this.ctx.restore();
      this.shuttle();
      // this.wheel();
  }
  shuttle(){
      /**
      * Draw a few horizontal lines, a little parallax, feel like riding a bicycle in the fast shuttle feeling:
      This article @IT. Pingtouge Alliance - Chief Filling Officer Southern Jiangsu Share. For non-commercial reprints, please indicate the original link and source.
       */
      let shuttleX = this.canvasW+100,
              shuttleY = this.canvasH/6;
      let shuttleW = shuttleX+100;
      [0,40,0].map((k,v)=>{
          let random = Math.random()+2;
          let x = shuttleX+k-(this.animateNum*(2.2*random));
          let y = shuttleY+v*24;
          let w = shuttleW+k-(this.animateNum*(2.2*random));
          let grd=this.ctx.createLinearGradient(x,y,w,y);
          grd.addColorStop(0,"#30212c");
          grd.addColorStop(1,"#fff");
          this.ctx.beginPath();
          this.ctx.lineCap="round";
          this.ctx.strokeStyle = grd;
          this.ctx.lineWidth=3;//Chief Filling Officer Column Exchange in Southern Jiangsu: 9125 94095, Public No. honey Badger 8
          this.ctx.moveTo(x,y);
          this.ctx.lineTo(w,y);
          this.ctx.stroke();
          this.ctx.closePath();

      });

}-
Draw wheels:
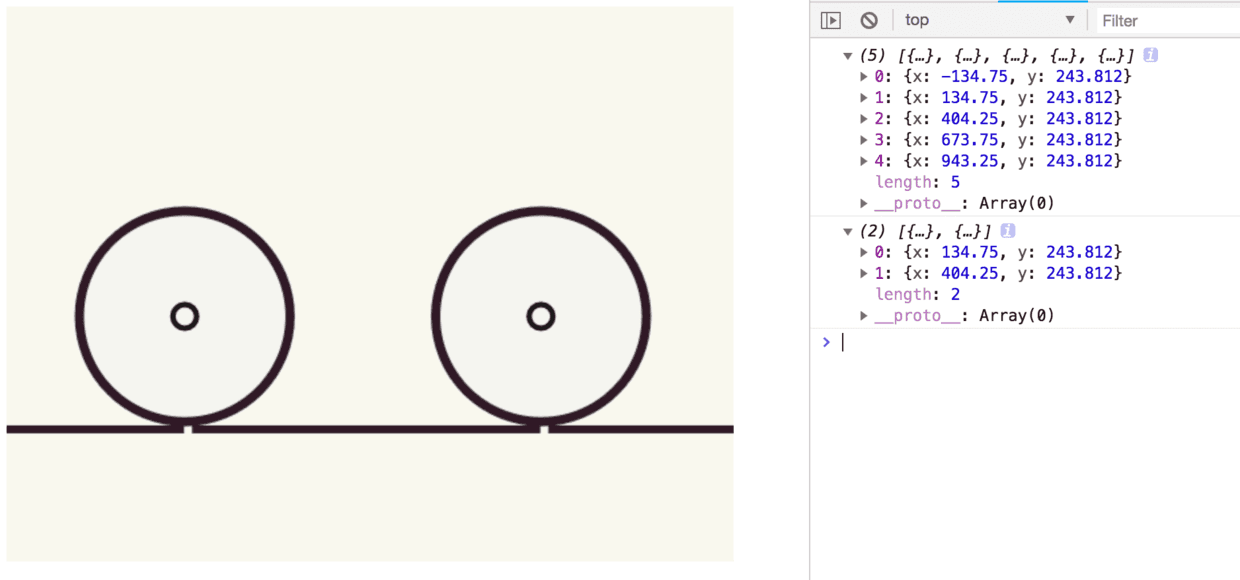
- Next, let's draw the two wheels of the car. Where are the wheels located? I also observed for a while before I found that, in fact, the horizon just now, the position of two points, is the center of the wheel;
- So when we just drew the points, we recorded the coordinates of five points, which saved one calculation, two of which were needed by us.
-
Knowledge points: arc, fill
console.log(this.wheelPos);
this.wheelPos = this.wheelPos.slice(1,3); //Take 1-3 here.
console.log(this.wheelPos);
this.wheelPos.map((wheelItem,v)=>{
let wheelItemX = wheelItem.x,
wheelItemY= wheelItem.y-this.wheelBorder/1.5;
//Tyre
this.ctx.beginPath();
this.ctx.lineWidth=this.wheelBorder;
this.ctx.fillStyle = "#f5f5f0";
this.ctx.strokeStyle = this.color;
this.ctx.arc(wheelItemX,wheelItemY,this.wheelRadius,0,Math.PI*2,false);
this.ctx.closePath();
this.ctx.stroke();
this.ctx.fill();
//The last two tires center point circular bearing
this.axisDot(wheelItemX,wheelItemY);
this.ctx.restore();
});
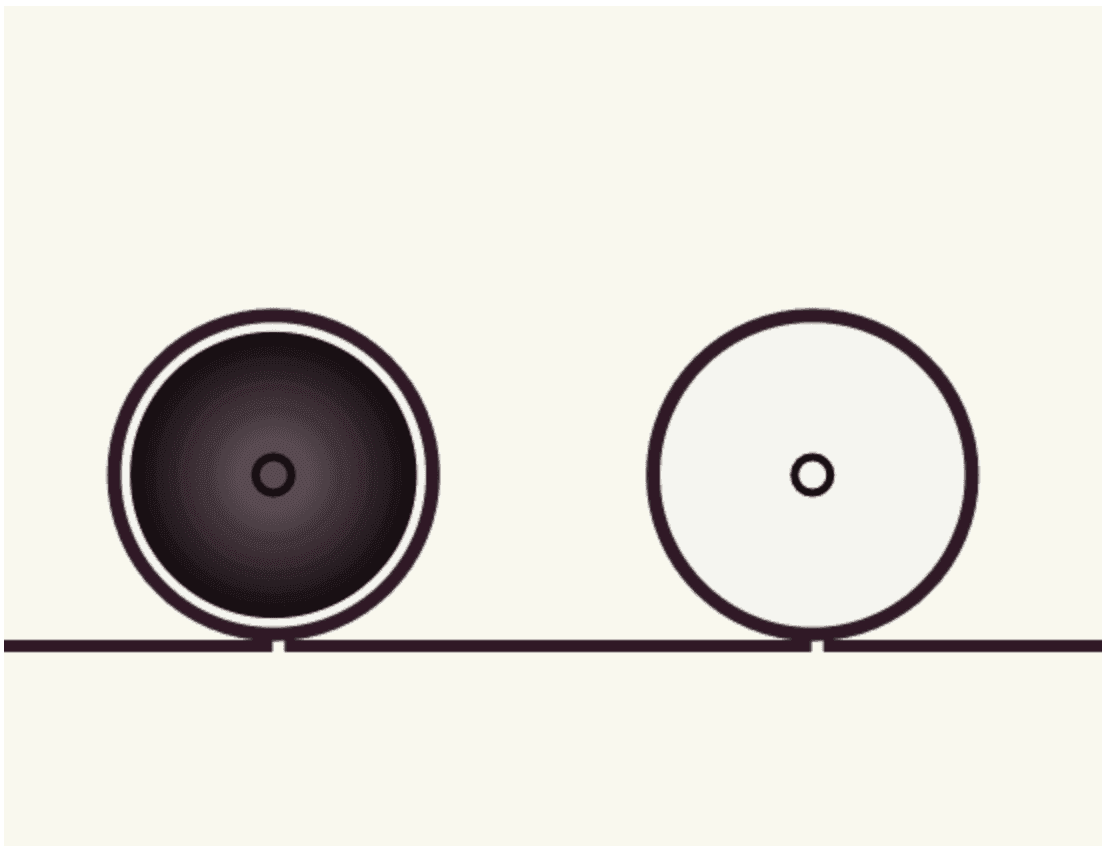
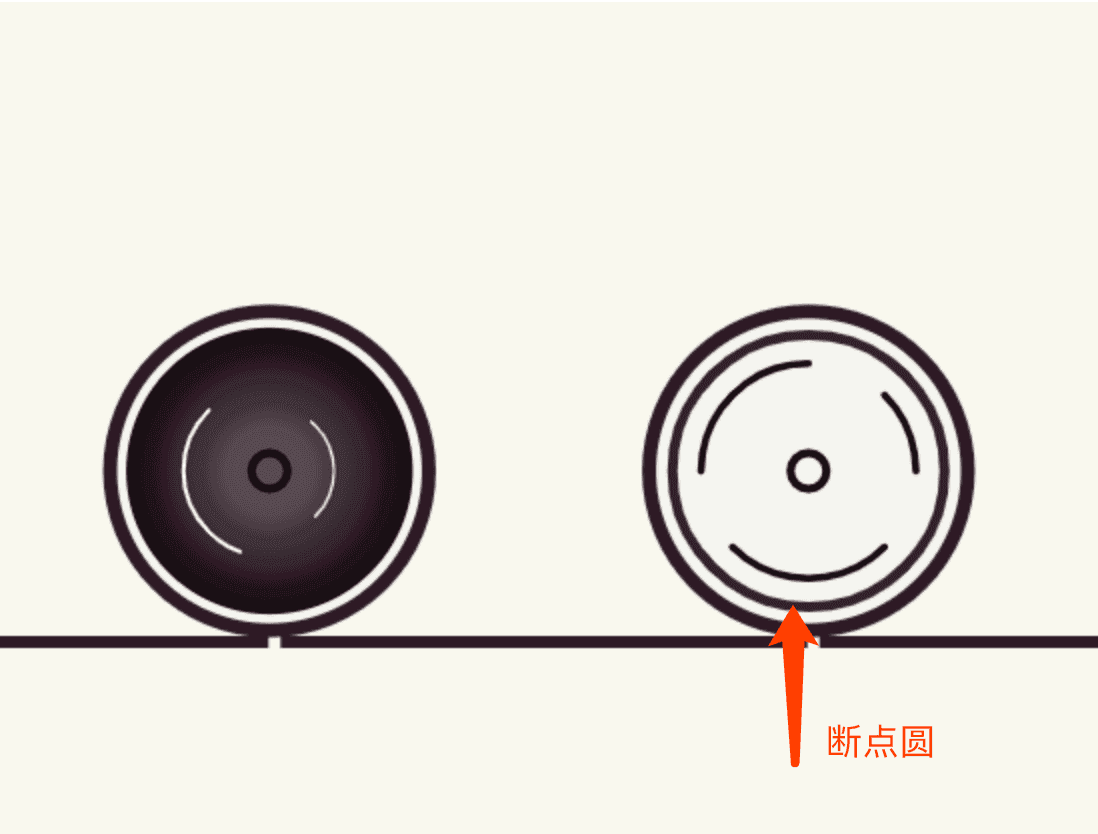
this.ctx.restore();- Similarly, two circles have been drawn on them, but there must be bearings on the wheels. The front and rear wheels have been treated like bark, and the rear wheels have been filled with solid fillers.
- The front wheel is a circle with a breakpoint drawn for animation rotation.
- To reduce the radius of the outer wheel to a certain extent, draw the inner circle. Here I take the outer circle's. 94 as the radius of the inner circle.
- Two semi-circles are added to make the cartoon feel moving when it runs. The semi-circle Math.PI is 180 (Math.PI* degrees)/180; degrees is the starting/ending angle we want to draw.
- As can be seen from the figure below, the filling of the circle uses radioactive gradient, createRadial Gradient - Create radial/annular gradient (for canvas content)
  context.createRadialGradient(x0,y0,r0,x1,y1,r1);
  + Create Radial Gradient API Description:
    x0 = x coordinates of the starting circle of the gradient
    y0 = y coordinates of the starting circle of the gradient
    r0 = the radius of the starting circle
    x1 = x coordinates of the end circle of the gradient
    y1 = y coordinates of the end circle of the gradient
    r1 = the radius of the end circle

    For more details, see an example of the following code
  let scaleMultiple = this.wheelRadius*.94;
  let speed1 = this.animateNum*2; //Outer Circle Semicircular Velocity
  let speed2 = this.animateNum*3; //Speed of inner circle semicircle
  //rear wheel
  if(v === 0){

    //Inner circle
    this.ctx.beginPath();
    let circleGrd=this.ctx.createRadialGradient(wheelItemX,wheelItemY,18,wheelItemX,wheelItemY,scaleMultiple);
      circleGrd.addColorStop(0,"#584a51");
      circleGrd.addColorStop(1,"#11090d");
    this.ctx.fillStyle = circleGrd;
    this.ctx.arc(wheelItemX,wheelItemY,scaleMultiple,0,Math.PI*2,false);
    this.ctx.fill();
    this.ctx.closePath();

    //Two semicircles

    [
      {lineW:2,radius:scaleMultiple*.6,sAngle:getRads(-135+speed1) , eAngle:getRads(110+speed1)},
      {lineW:1.2,radius:scaleMultiple*.45,sAngle:getRads(45+speed2) , eAngle:getRads(-50+speed2)}
    ].map((k,v)=>{
      this.ctx.beginPath();
      this.ctx.lineCap="round";
      this.ctx.strokeStyle ="#fff";
      this.ctx.lineWidth=k.lineW;
      this.ctx.arc(wheelItemX,wheelItemY,k.radius,k.sAngle,k.eAngle,true);
      this.ctx.stroke();
      this.ctx.closePath();

    });
    this.ctx.restore();

  }
- Next we'll take the front wheel.
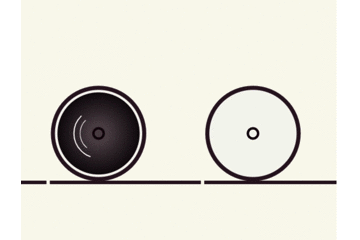
- The front wheel also draws several semicircles, probably starting from a certain angle, and then draws several semicircles separately. The whole is a radius with a break in the middle, such as eAngle = [0, 135, 270], sAngle = [-45, 0, 180]. The circle shown below can be drawn:

- See the following code for specific implementation:
  //Two circles, narrow one more circle, draw line circle
  Array.from({length:3}).map((k,v)=>{
    let prevIndex = v-1 <= 0 ? 0 : v-1;
    let eAngle = v*135, sAngle = -45+(prevIndex*45)+v*90;
    let radius = scaleMultiple*.75;
    let _color_ = "#120008";
    this.ctx.beginPath();
    this.ctx.lineCap="round";
    this.ctx.strokeStyle = _color_;
    this.ctx.lineWidth=3.5;
    this.ctx.arc(wheelItemX,wheelItemY,radius,getRads(sAngle+speed1),getRads(eAngle+speed1),false);
    this.ctx.stroke();
    this.ctx.closePath();

    if(v<2){
      //Reduce the circle again
      let eAngleSmaller = 15+ v*210, sAngleSmaller = -30+v*90;
      let radiusSmaller = scaleMultiple*.45;
      this.ctx.beginPath();
      this.ctx.lineCap="round";
      this.ctx.strokeStyle = _color_;
      this.ctx.lineWidth=3;
      this.ctx.arc(wheelItemX,wheelItemY,radiusSmaller,getRads(sAngleSmaller+speed2),getRads(eAngleSmaller+speed2),false);
      this.ctx.stroke();
      this.ctx.closePath();
    }
    this.ctx.restore();
  });
-
Draw body frame:
- The frame should also be one of the major difficulties in this sharing. At first I thought so, but after careful calm, calm and calm analysis is OK.
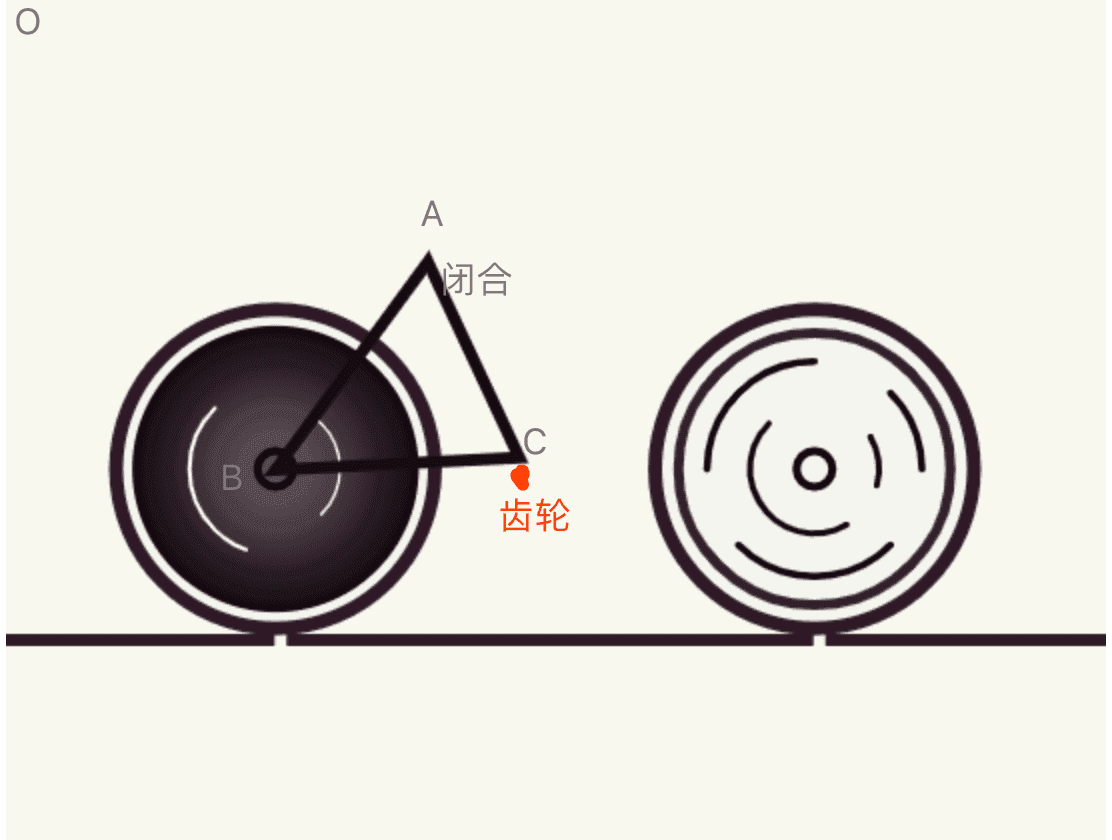
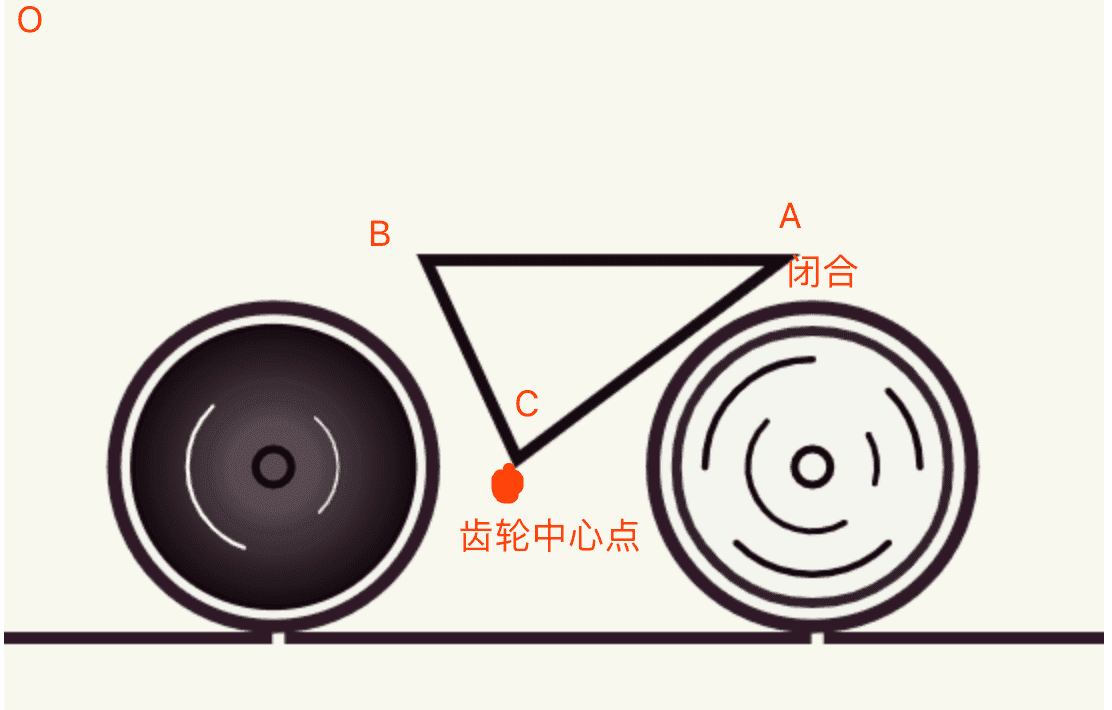
- At first, we used the most clumsy method, lineTO, moveTo, one line drawing. When we draw half way, we can draw two triangles or a diamond. Then we can redraw several spindles. So we tried both methods.
- Let's start with the triangle, and explain it with a picture drawn below.
- Find the center of the disk, which is above the radius of the rear wheel.
- Analyzing the frame structure, we can see that it is a diamond or two triangles. Take triangle as an example, the diamond can see the carBracket 2 method.
- First calculate the starting point of the triangle, then calculate the angle and height of the triangle. See the diagram below.
- Finally, cover the center of the rear wheel with a circle to cover the triangle.
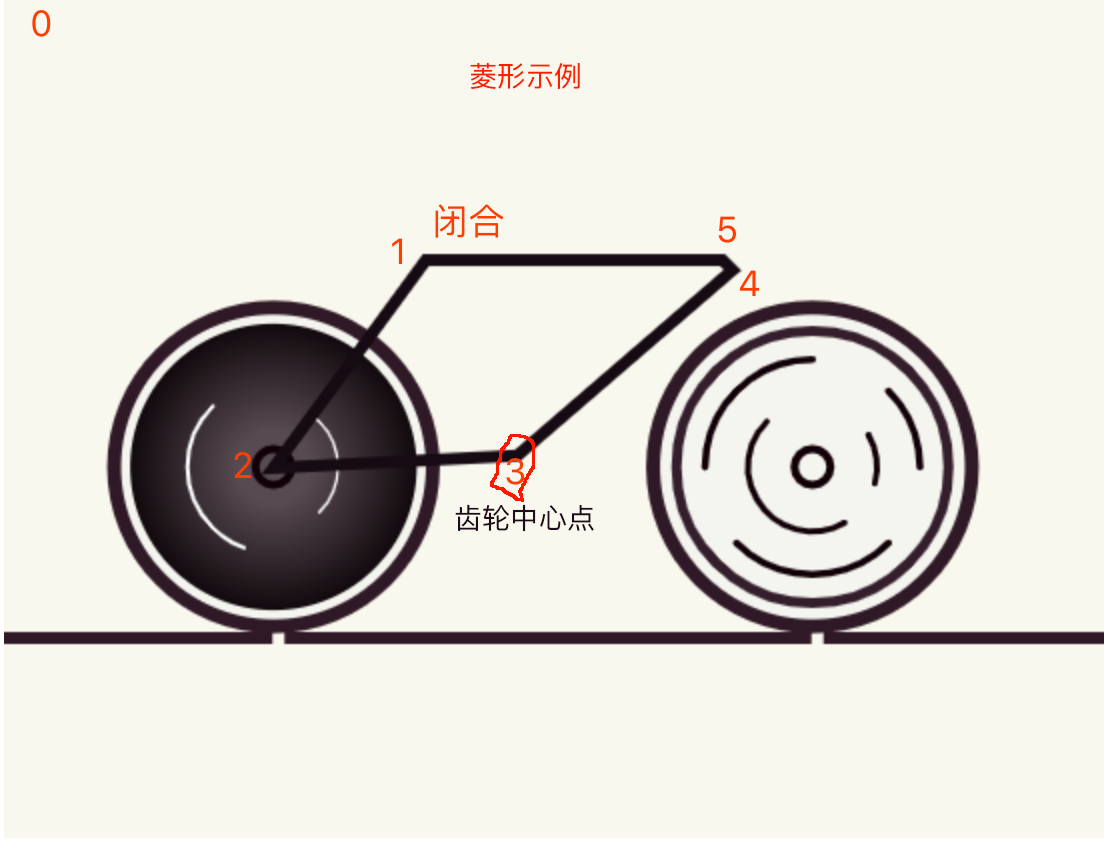
- The diamond is simpler, but it doesn't look so high-end. It's just a line to point line.
- Above is the drawing process of the frame. In fact, it feels that the diamond shape is simple and the code quantity is less. Interested students can try it for themselves. You can see the following main code, beginners on the road. If there is a better way, old drivers are welcome to point out:
CONCLUSION: MoeTo is used to move the canvas coordinates from O to point A x/y, lineTo is drawn from point A to point B, then from point B to point C, closing, that is, a triangle is completed.
//Method 2: Triangle
  ............Omit here N Line code
  [
  {
    moveX:triangleX1,
    moveY:triangleY1,
    lineX1:coordinateX,
    lineY1:triangleH1,
    lineX2:discX,
    lineY2:discY,
  },
  {
    moveX:triangleX2+15,
    moveY:triangleY2,
    lineX1:triangleX1,
    lineY1:triangleY1,
    lineX2:discX,
    lineY2:triangleH2,
  },
  ].map((k,v)=>{
    this.ctx.beginPath();
    this.ctx.moveTo(k.moveX,k.moveY); //Move the coordinates to point A, starting with point A.
    this.ctx.strokeStyle = this.gearColor;
    this.ctx.lineWidth=coordinateW;
    this.ctx.lineTo(k.lineX1,k.lineY1);//Starting from A, draw to B.
    this.ctx.lineTo(k.lineX2,k.lineY2); //From point B to point C, close
    this.ctx.closePath();
    this.ctx.stroke();
    this.ctx.restore();
  });
  ......

//Method 1: Rhombus

  ............Omit here N Line code
  this.ctx.beginPath();
  this.ctx.strokeStyle = this.gearColor;
  this.ctx.lineWidth=coordinateW;
  this.ctx.moveTo(polygon1X,polygon1Y);
  this.ctx.lineTo(coordinateX,height);
  this.ctx.lineTo(discX,discY);
  this.ctx.lineTo(polygon2X,polygon1Y+5);
  this.ctx.lineTo(polygon2X-5,polygon1Y);
  this.ctx.lineTo(polygon1X,polygon1Y);
  this.ctx.closePath();
  this.ctx.stroke();
  ......
-
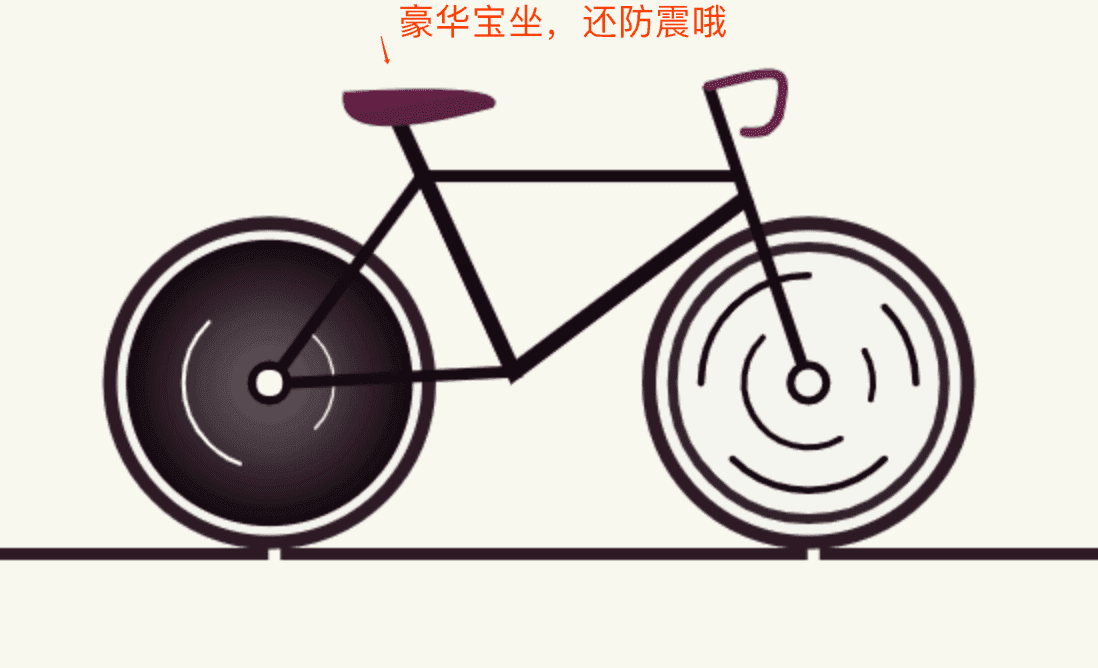
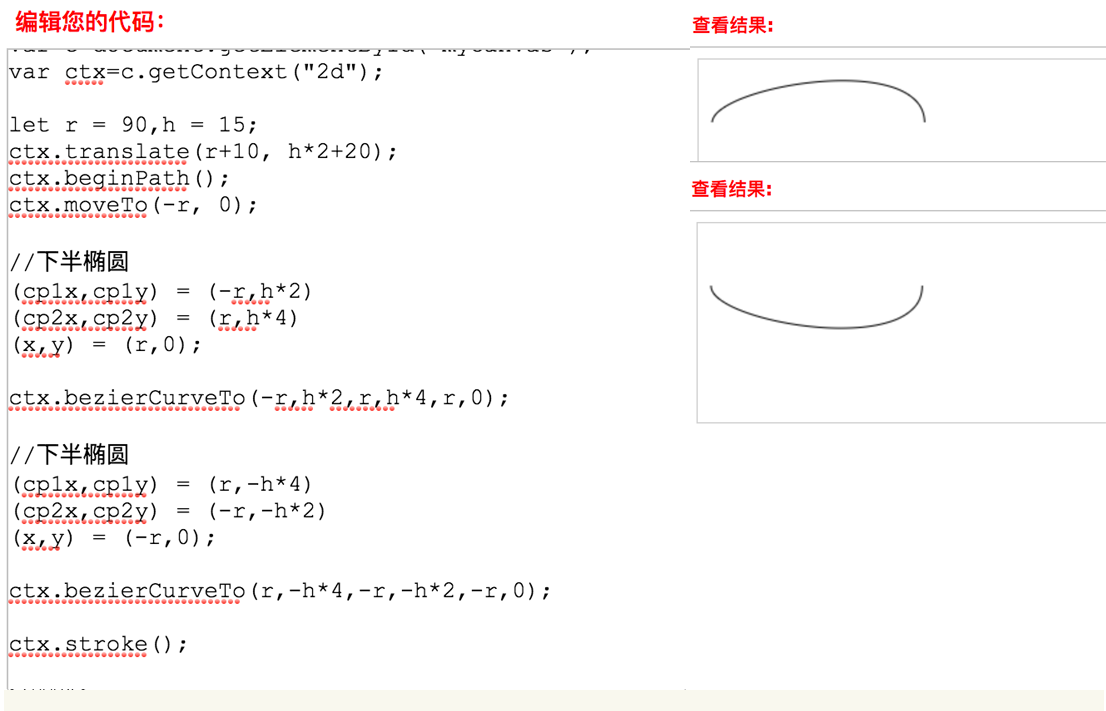
Draw luxury car seats and armrests:
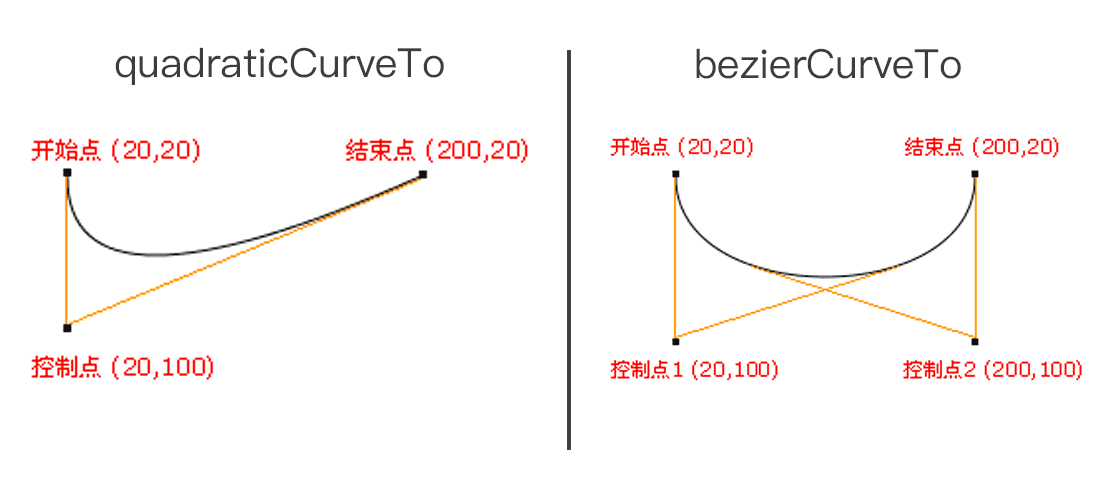
- At first, the seat was rather obscure, and I did not know how to start. The circle was neither round nor square. Later, I reviewed the API of canvas and found that quadratic CurveTo could meet this requirement.
- After drawing, I thought for a long time, and I didn't find any skills or rules. Maybe I didn't learn math well. I couldn't help describing it slowly.
- The same is true of the armrest. I started to try quadratic CurveTo, but I failed to draw it for half a day. Then I tried to find its neighbor Bezier CurveTo, the cubic Bessel curve.
- The cubic Bessel curve needs three points. The first two points are the control points used in the cubic Bessel calculation, and the third point is the end point of the curve. The starting point of the curve is the last point in the current path.
- Knowledge Points: Quadratic Curve To, Bezier Curve To, Create Linear Gradient
  //Sitting position
  this.ctx.restore();
  let seatX = (discX-85),seatY=discY-140;
  let curve1Cpx = [seatX-5,seatY+30,seatX+75,seatY+8];
  let curve2Cpx =[seatX+85,seatY-5,seatX,seatY];
  this.ctx.beginPath();
  // this.ctx.fillStyle = this.gearColor;
  let grd=this.ctx.createLinearGradient(seatX,seatY,seatX+10,seatY+60); //Gradient angle
  grd.addColorStop(0,"#712450");
  grd.addColorStop(1,"#11090d");
  this.ctx.fillStyle = grd;
  this.ctx.moveTo(seatX,seatY);
  this.ctx.quadraticCurveTo(...curve1Cpx);
  this.ctx.quadraticCurveTo(...curve2Cpx);
  this.ctx.fill();

  //Handle on Front Axle
  let steeringX = lever1X-20,steeringY = lever1Y-45;
  let steeringStep1 = [steeringX+40,steeringY-10,steeringX+40,steeringY-10,steeringX+35,steeringY+15]
  let steeringStep2 = [steeringX+30,steeringY+25,steeringX+25,steeringY+23,steeringX+18,steeringY+23]
  this.ctx.beginPath();
  this.ctx.lineCap="round";
  this.ctx.strokeStyle = "#712450";
  this.ctx.lineWidth=coordinateW;
  this.ctx.moveTo(steeringX,steeringY); //40 60;
  this.ctx.bezierCurveTo(...steeringStep1);
  this.ctx.bezierCurveTo(...steeringStep2);
  this.ctx.stroke();
  this.ctx.closePath();
-
Draw the engine and pedal of the car:
- At this point, it's almost the end of this article. Next, I want to talk about the most important part of the car. The middle teeth of the car are * * * and if a car doesn't have it, the best you can do is nothing.
- As mentioned many times before, the center point of the gear, including two triangles, is the angle of triangle calculated by its center. It's easy to know the position. The same way, first draw a few circles, each of which is reduced in a certain proportion.
- Then draw a circle of serrated teeth on the periphery, so that the gear will probably be painted. The skill of the gear is to draw a circle of lines with the disk as the center point. Clock scale The principle is the same.
- The pedal, a good understanding, is to draw two lines with lineTo, one of which rotates 90 degrees. ok, but the point is that it is a process in the animation process. My analysis process is as follows:
- The vertical shaft rotates with the midpoint of the disk gear as the base point N* (Math.PI/180).
- The horizontal axis, the pedal, is centered on the Y axis at the bottom of the vertical axis, on the X axis at half its width, and rotates at the rotate angle of N* (Math.PI/180).
- Having said so much, let's take a look at some of them. Dynamic graph Well, by the way, paste in the code:
  discGear(coordinateX,coordinateY,coordinateW){
    //Intermediate teeth * disc
    let discX = coordinateX,discY = coordinateY;
    let discRadius = this.wheelRadius*.36;//Wheel 3.6;

    let discDotX = discX+discRadius+8,discDotY = discRadius/.98;
    this.ctx.restore();
    this.ctx.save();
    this.ctx.translate(discX,discY);
    // this.ctx.rotate(-(Math.PI/2));

    Array.from({length:30}).map((v,index)=>{
      let radian = (Math.PI / 15) ;
      this.ctx.beginPath();
      this.ctx.lineCap="round";
      this.ctx.strokeStyle = this.color;
      this.ctx.rotate(radian);
      this.ctx.lineWidth=3;
      this.ctx.moveTo(0,discDotY);
      this.ctx.lineTo(1.5,discDotY);
      // ctx.arc(discDotX,discDotY,6,0,Math.PI*2,false);
      this.ctx.closePath();
      this.ctx.stroke();

    });
    this.pedal(discX,discY,discRadius);
    this.pedal(discX,discY,discRadius,1);

    this.ctx.restore();
  }
  pedal(coordinateX,coordinateY,discRadius,turnAngle=0){

    //The pedal is initialized twice, once before the central gear is drawn and once after.
   //This article is shared by @IT.Pingtouge Alliance-Chief Filling Officer Southern Jiangsu

    let pedalX = coordinateX, pedalY = coordinateY - discRadius*.7;
    let pedalW = 6,
        pedalH =  discRadius*1.9;
    let radian = (this.animateNum)*(Math.PI / 180) ;
    let radianHor = (this.animateNum)*(Math.PI / 180) ;
    let turnAngleNum = 1;
    let moveY = 28;
    if(turnAngle !== 0){
      this.ctx.rotate(-180*(Math.PI/180));
      turnAngleNum = (Math.PI/180);
    };
    this.ctx.beginPath();
    this.ctx.rotate(radian*turnAngleNum);
    this.ctx.lineCap="round";
    this.ctx.strokeStyle = this.gearColor;
    this.ctx.lineWidth=pedalW;
    this.ctx.moveTo(-1,moveY);
    this.ctx.lineTo(0,pedalH);
    this.ctx.closePath();
    this.ctx.stroke();

    this.ctx.save();
    let pedalHorW = pedalH/1.5,pedalHorH=pedalW;
    this.ctx.translate(0,pedalH);
    this.ctx.beginPath();
    this.ctx.rotate(-radianHor);

    this.ctx.lineCap="round";//Chief Filling Officer Column Exchange in Southern Jiangsu: 9125 94095, Public No. honey Badger 8
    this.ctx.fillStyle = "#fff";
    this.ctx.strokeStyle = this.gearColor;
    this.ctx.lineWidth =2;
    this.ctx.roundRect(-pedalHorW/2,-2,pedalHorW,pedalHorH,5);
    this.ctx.closePath();
    this.ctx.fill();
    this.ctx.stroke();

    this.ctx.restore();
  }
-
Draw the chain of the car:
- Chains are drawn with Bezier CurveTo, cp1x,cp1y,cp2x,cp2y,x,y and other parameters. Look at the code below, in fact, it is the splicing of two semi-ellipses...
- Chains are drawn with Bezier CurveTo, cp1x,cp1y,cp2x,cp2y,x,y and other parameters. Look at the code below, in fact, it is the splicing of two semi-ellipses...
  //chain

  let chainW = ( coordinateX+discRadius - this.wheelPos[0].x) / 2;
  let chainX = this.wheelPos[0].x +chainW-5 ;
  let chainY = coordinateY;
  this.ctx.save();
  this.ctx.translate(chainX,chainY+4.8);
  this.ctx.rotate(-2*(Math.PI/180));
  let r = chainW+chainW*.06,h = discRadius/2;
  this.ctx.beginPath();
  this.ctx.moveTo(-r, -1);
  this.ctx.lineWidth=3;
  this.ctx.strokeStyle = "#1e0c1a";
  this.ctx.bezierCurveTo(-r,h*1.5,r,h*4,r,0);
  this.ctx.bezierCurveTo(r,-h*4,-r,-h*1.5,-r,0);
  this.ctx.closePath();
  this.ctx.stroke();
  this.ctx.restore();
Epilogue
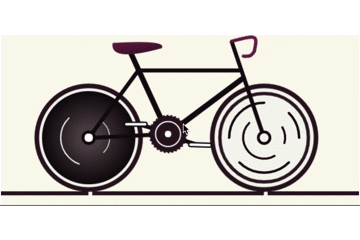
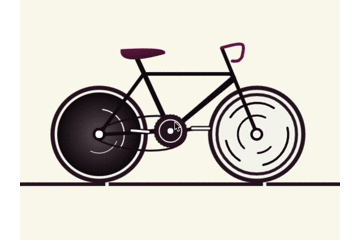
That's today. @ IT Pingtou Coalition - Chief Filling Officer South of Jiangsu Bring you a share, the whole car drawing process, feel that there should be a better way to frame part, if you have better suggestions and ideas, welcome to correct, and finally send a complete example map!
Article source acquisition - > blog-resource
Want a direct online preview
PS: If you think the article is good and want to get more front-end content, please pay attention to the public number below. It's a surprise.

More articles:
- Slow Chewing and Swallowing with Detailed Web Pack 4 Configuration
- How to set an expiration time for the local Storage?
- easy-mock is not one of the best spare tires
- immutability is a summary of React's official appearance.
- Here are all the pits that we have trampled in the interview
- Summary of what you should do to optimize front-end performance!
- How to set an expiration time for the local Storage?
- A little animation - How to draw your 3D magic cube with CSS3?
Author: South Jiangsu - Chief Filling Officer
Links: https://segmentfault.com/a/1190000016969897
Exchange: 912594095, Public No. honey Badger8
This article is original and the copyright belongs to the author. For commercial reprints, please contact @IT.Pingtouge Alliance for authorization. For non-commercial reprints, please indicate the original link and source.