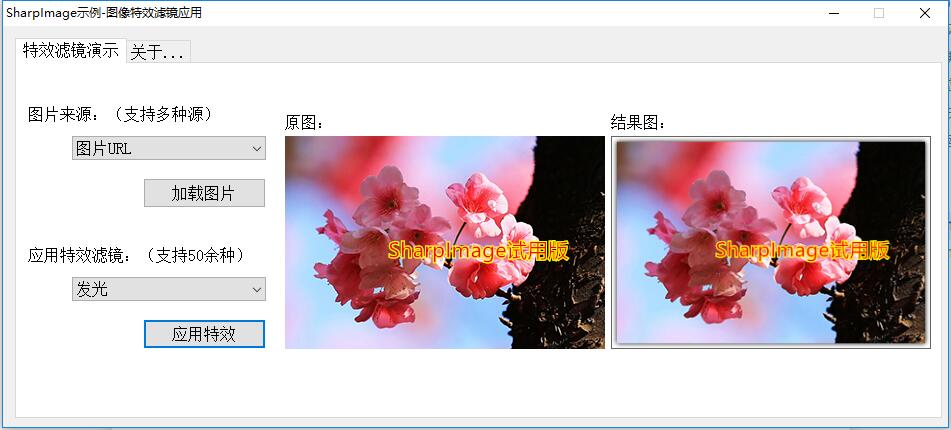
In. net, how to realize the luminous effect in Photoshop filter group simply and quickly? The answer is to call SharpImage! Professional image special effect filters and synthetic libraries. Let's start by demonstrating the key code. You can also download all the source code at the end of the article.
Set authorization
Step 1: After referring to SharpImage.dll, before calling the SharpImage method, you must first set the authorization information through the following code. If it is a trial version, you can enter Test directly.
KeyMgr.SetKey("Test");
Initialize an Image Engine
From a previous blog post, we introduced a picture to understand SharpImage. From that article, we can see that SharpImage is used as the cornerstone of image processing through Image Engine. All effects are carried out as Effects of Image Engine. Effects will be applied to various elements of Image Engine, resulting in thousands of changes. The effect of transformation. See the following code:
//Instantiate ImageEngine
engine = new ImageEngine();
Setting the basic parameters of ImageEngine
Make some custom settings for ImageEngine, refer to the API manual specifically. The code is as follows:
//Set some basic properties
engine.Canvas.AutoSize = true;
engine.Canvas.CenterElements = true;
engine.Canvas.Width = 320;//This is usually set to the width of the picture.
engine.Canvas.Height = 213;//This is usually set to the height of the picture.
engine.Canvas.Fill.Type = FillType.Solid;//Fill the canvas with pure color
engine.Canvas.Fill.BackgroundColor = Color.White;//The canvas is white.
Load the image to be processed
The image to be processed is loaded into memory. SharpImage supports loading in many ways: from image URL, local path, Bitmap object, byte array, Base64 string, you can choose one of them. Here we demonstrate three ways of code:
#region Loading test pictures GDI+object
bmpDemoImage = Properties.Resources.demo;
#endregion

#region Loading the byte stream of the test picture
using (MemoryStream ms = new MemoryStream())
{
    bmpDemoImage.Save(ms, bmpDemoImage.RawFormat);
    arrDemoImage = ms.ToArray();
}
#endregion

#region Loading test pictures Base64 Character string
strBase64DemoImage = Convert.ToBase64String(arrDemoImage);
#endregion
Initialize ImageElement
In SharpImage, images are abstracted as ImageElements, and we bind the images to be processed to ImageElements. The code is as follows:
//Create an Image Element
imageEle = new ImageElement();

//Next, you provide data for ImageElement according to the specific image data source type. Here's a demonstration of manual selection using a ComboBox
switch (cmbBox11.SelectedIndex)
{
  case 0:
          //Picture URL
          imageEle.SourceType = ImageSource.File;
          imageEle.SourceFile = "http://www.zzsgzn.com/images/demo.jpg";
          break;
  case 1://Local path
          imageEle.SourceType = ImageSource.File;
          imageEle.SourceFile = "c:\\demo.jpg";
          break;
  case 2://GDI+object
          imageEle.SourceType = ImageSource.Image;
          imageEle.SourceImage = bmpDemoImage;
          break;
  case 3://Byte array
          imageEle.SourceType = ImageSource.Binary;
          imageEle.SourceBinary = arrDemoImage;
          break;
  case 4://base64 Character string
          imageEle.SourceType = ImageSource.Base64String;
          imageEle.SourceBase64 = strBase64DemoImage;
          break;
}
Binding ImageElement and ImageEngine
To bind the ImageElment object to the ImageEngine, you only need to execute the following code:
//Bind the Image Element to the image engine object
engine.Elements.Add(imageEle);
At this point, it is important to note that engine.Elements can contain many elements, and the final effect will be the superposition of these elements. This principle is the same as Photoshop's layer overlay.
Application filter
Ha, roar! Preparations are in place! Next, apply the filter. The glow effect filter is the glow effect. Instantiate and apply it to Image Engine. The code is as follows:
//Initialize the filter and add it to the effect filter group of Image Engine
GlowEffect effect = new GlowEffect();

//Here, you can also adjust the specific parameters of the filter, referring specifically to the API manual.
...


engine.Effects.Add(effect);
Obtain processing results
After the application, you can get the processing results!
Image bmpResult = engine.GetOutputImage();
Operating effect diagram

demo source download
Related recommendations
You may need to know how to get a picture of a camera frame or a picture of a desktop screen. SharpCapture:
SharpCapture, Desktop Screen, Camera, Audio and Video Collection Library
You may need to know how to adjust several dozen parameters, such as camera brightness, contrast, tone exposure, etc. Please know SharpCamera:
SharpCamera, Professional Advanced Camera Parameters Deep Control Library