Let's see a wave of renderings
Initialize project
1. Installed on node.js Using the following command
npm install --g vue-cli
2. Under the directory where the project will be built
Vue init webpack myproject (project directory name)
All the way back here
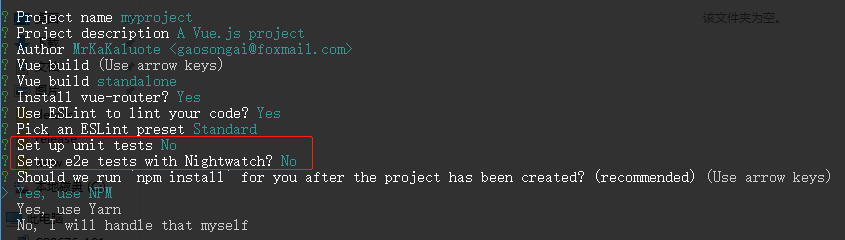
In the middle, you can select ESLint to check the code style of the project. For the sake of beauty and efficiency, you can start it, use Vue router, and use the two tests in the red box. Don't forget. The next step is to ask which one to use for the install dependency package, which is npm by default. Then you can return and wait for the dependency to be downloaded. If it's slow, you can use it image.
After downloading, you will see the following prompt:
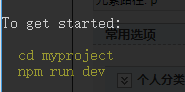
Just follow the steps
Next, type in the browser localhost:8080 , you can enter the world of vue
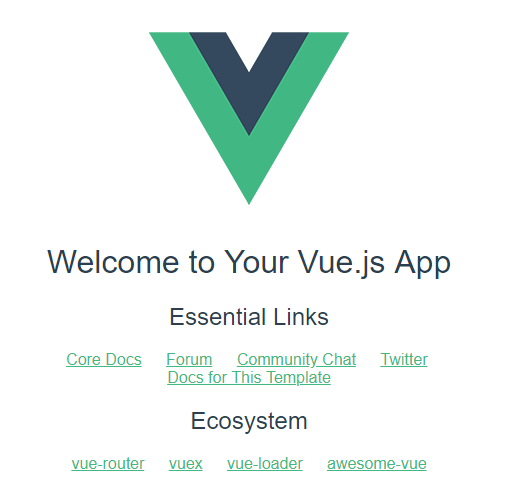
These are not enough. This is far from a responsive app framework. Let's officially build a mobile project.
First, let's take a look at the project structure of the newly built vue
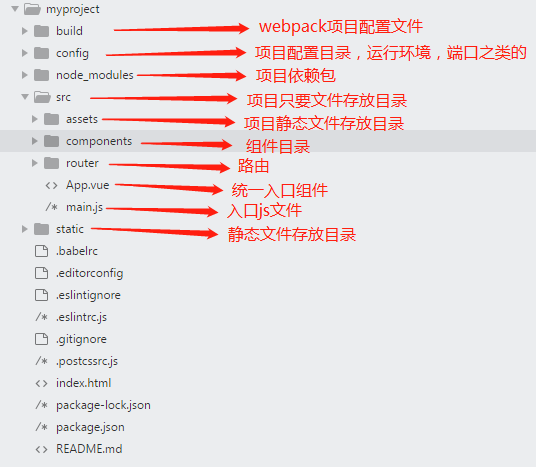
It can be found that there are two folders in the project, assets and static, which can store static files. Isn't that a conflict? In fact, the static files stored in assets will be processed by webback. Generally, some static resources such as pictures will be placed, while static will not be affected by webback. When it is called, it is also called by absolute path, which is usually used to store some third-party static resource libraries.
This project will be based on the project directory of Vue cli to integrate Vue router, vuex and axios, and can automatically adapt to the size of mobile terminal.
Before you start writing code, let's talk about ESlint warning and error reporting. You can optionally modify the verification rules, Click reference to modify You can also use / * eslint disable * / to selectively ignore the verification
Route (Vue router)
The routing of a project is the foundation of a project. We start with routing. When we first initialize the project, Vue router is introduced into the project. In the above picture, the routing configuration file is placed in src\router. According to my personal habits, I will adjust the directory structure above, as follows:
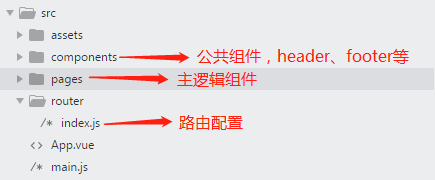
Create a new page directory to store the main logical page, components to store the public components, and router to manage routes uniformly
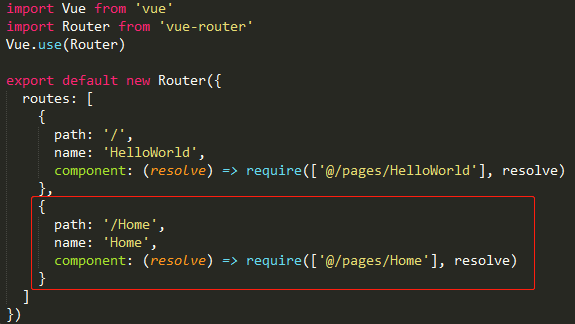
Introduce a new page as shown in the figure, and the route can jump through this$ router.push ('/Home')
Route Vue cli is almost encapsulated, but there is nothing to change. Next, let's look at vuex
vuex (state management module)
The official website of the introduction of vuex also gives a detailed introduction. If you don't know much about its function, you can refer to it What is vuex , only how to integrate in the project and briefly introduce its usage
(1) Install vuex
npm install vuex --save
(2) Configure vuex
According to personal development habits, the configuration of vuex in the project is also different, but it's almost the same. There are also big differences. For example, the official website recommends writing asynchronous operations in actions to change the state. However, I prefer to put asynchronous operations such as request data outside the store for operation, and change the state through commit, which will be in the following data request module As mentioned in the package
No more bullshit. Look at the picture below
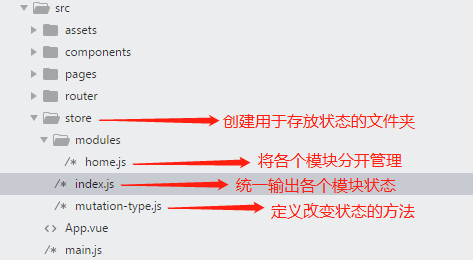
First, a status folder is created to manage the whole status. In modules, the status of each module is written separately, as follows
 1 /**
 2  * home.js
 3  * State management for home module
 4  */
 5 import * as types from '../mutation-type'  // Methods of introducing definitions
 6 const home = {
 7   state: {
 8     number: 1
 9   },
10   mutations: {
11     [types.SET_NUM](state, num) {   // modify state Available through mapMutations call
12       state.number = num
13     }
14   },
15   actions: {},
16   getters: {            // definition getters,Through mapGetters Extended function call
17     number: state => {
18       return state.number
19     }
20   }
21 }
22 export default home    // output home modular
The mutation type defines some ways to modify the state, as follows

stay index.js Unified output, as follows
 1 import Vue from 'vue'
 2 import Vuex from 'vuex'
 3 import home from './modules/home'
 4 import createLogger from 'vuex/dist/logger'
 5
 6 Vue.use(Vuex)
 7 const debug = true
 8
 9 export default new Vuex.Store({
10   modules: {
11     home
12   },
13   plugins: debug ? [createLogger()] : []   // Open or not vuex Of debug pattern
14 })
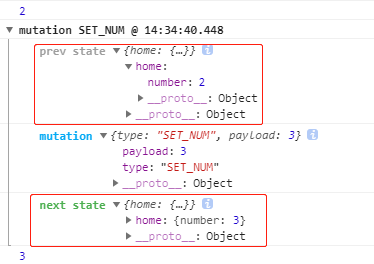
A built-in plug-in of vuex is used here, as shown in the figure above. You can view the modification information in the console every time you change the status after opening it, as shown in the figure below
After the index is configured, it is necessary to main.js Register in
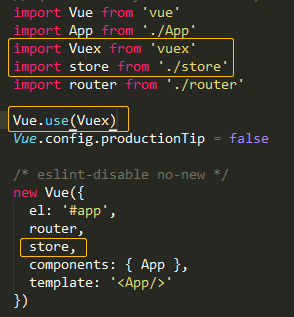
Through the above steps, you can use the status in the project home.vue For example, look at the following code
 1 import {mapMutations, mapGetters, mapState} from 'vuex'  // introduce map method
 2 export default {
 3   data () {
 4     return {
 5       num: 0
 6     }
 7   },
 8   methods: {
 9     ...mapMutations({            // call setNum method
10       setNum: 'SET_NUM'
11     }),
12     increase() {
13       this.num++
14       this.setNum(this.num)      // take this.num to change into setNum
15     }
16   },
17   computed: {
18     // ...mapGetters([           // Get state data through getters
19     //   'number'
20     // ]),
21     ...mapState({                // Get state data through state
22       number: state => state.home.number
23     })
24   }
This is the end of the introduction of vuex. Let's continue to look at the data request module (axios)
axios (data request module)
Previously, the vue data request module used vue resource, which is not recommended or discarded by the government. Let's talk about the integration steps of axios and some points to be noted
(1) Install axios and JS cookies
npm install axios --save
(2) Configure axios
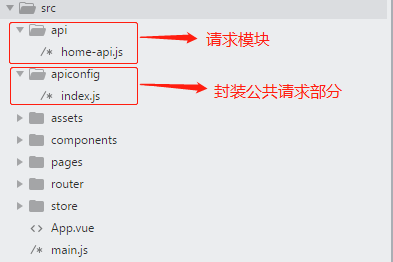
Create a new apiconfig folder under the src directory to encapsulate the request and define some global variables about the request. At the same time, create an api folder to declare the request methods of each module, as shown in the following figure
First, let's look at the public encapsulation part of apiconfig; here we will do the following for the request
- Define some constants such as the status of successful request return, request timeout, etc,
- Make a public encapsulation of the request,
- Store and intercept token s,
Look at the code below
 1 /* eslint-disable */
 2 import axios from 'axios'
 3
 4 /**
 5 * Define request constant
 6 * TIME_OUT,ERR_OK
 7 */
 8 export const TIME_OUT = 1000;    // Request timeout
 9 export const ERR_OK = true;      // Request successfully returns status, field and background are unified
10 export const baseUrl = process.env.BASE_URL   // IMPORT Global url,Defined in global variable process.env For the convenience of forwarding, the value is empty string
11
12 // Request timeout
13 axios.defaults.timeout = TIME_OUT
14
15 // Encapsulation request interception
16 axios.interceptors.request.use(
17     config => {
18         let token = localStorage.getItem('token')   // obtain token
19         config.headers['Content-Type'] = 'application/json;charset=UTF-8'
20         config.headers['Authorization'] = ''
21         if(token != null){                          // If token Not for null,Otherwise token To the backstage
22             config.headers['Authorization'] = token
23         }
24         return config
25     },
26     error => {
27         return Promise.reject(error)
28     }
29 )
30 // Package response interception, judgment token Expired or not
31 axios.interceptors.response.use(
32   response => {
33     let {data} = response
34     if (data.message === 'token failure!') {    // If the error ID returned by the background is token Expired, log in again
35       localStorage.removeItem('token')          // token Expire, remove token
36       // Log in again
37     } else {
38       return Promise.resolve(response)
39     }
40   },
41   error => {
42     return Promise.reject(error)
43   }
44 )
45 // encapsulation post request
46 export function fetch(requestUrl, params = '') {
47   return axios({
48     url: requestUrl,
49     method: 'post',
50     data: {
51       'body': params
52     }
53   })
54 }
The above code takes post request as an example to encapsulate the request in public, and defines some constants for the use of the request. In addition, it intercepts the request and response respectively, so as to facilitate the unified processing of the data when the request or data is returned. The details can be seen in the comments of the code. Next, take login as an example to call the encapsulated request method.
Let's look at the api module. Take home api as an example and look at the code
 1 /**
 2  * Introducing fetch and baseUrl
 3  * @param params
 4  * @returns {*}
 5  */
 6 import {fetch, baseUrl} from 'config/index'
 7 // Login interface
 8 export function loginUserNo(params) {
 9   return fetch(`${baseUrl}/root/login/checkMemberLogin`, params)
10 }
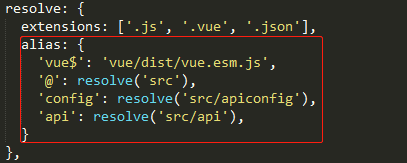
The fetch method and baseUrl are introduced into the file. Why can they be abbreviated as' config/index 'here? It needs to be in' build '/ webpack.base.conf Add the following code in. JS', and the api will be introduced later
After the export login method loginUserNo, you can use this login method in the component, as shown in the following code
 1 import * as homeApi from 'api/home-api'  // introduce api
 2 import { ERR_OK } from 'config/index'    // Import request success status
 3 // Request method
 4 login() {
 5     let params = {
 6         password: '*******',
 7         storeNo: '',
 8         userName: '*********'
 9     }
10     homeApi.loginUserNo(params).then((res) => {
11         let {data} = res
12         if (data.success === ERR_OK) {
13             // Request successful operation, store token
14             localStorage.setItem('token', data.value.token)
15         } else {
16         }
17       }).catch(() => {
18       })
19     }
20 }
You can call the request method by executing the login method after clicking login, but there is another problem
As for data request, a common problem is cross domain. Similarly, clicking on login above will also involve cross domain non request. Fortunately, Vue cli has been configured with a module to solve cross domain problems. We can use config/index.js It is configured with the following addresses to be represented, as shown in the following figure
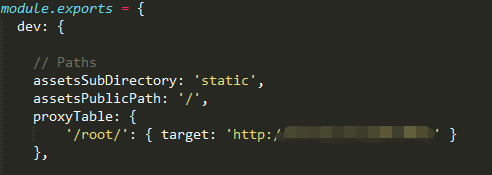
The cross domain problem is solved by forwarding the api starting with root and pointing the address to the interface address.
So far, the introduction and application of vue family bucket has been basically completed, but so far, this project only has simple routing jump, state storage and data request, and our goal is a mobile application framework. Next, we need to solve the following problems
- Mobile adaptation
- Introduction of mobile ui framework
- Optimization of project organization structure
Let's start with the mobile adaptation
Project adaptation
Because the screen size and proportion of mobile devices are quite different, the adaptation of mobile devices is particularly important. Here we mainly use flexible.js To adapt, about flexible.js I don't know what to say here Here we take the most commonly used size of 750 * 1334 as an example
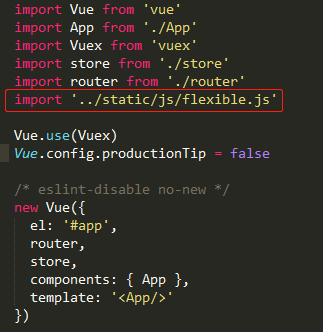
introduce flexible.js , on main.js Introgression flexible.js File, can flexible.js As a static file, it is imported into the outermost static folder, as shown in the following figure
Using less as the preprocessor of css, install less first
(1) Install less and less loader
npm install less less-loader --save-dev
(2) Configure less
In build/webpack.base.conf.js's module.exports.module.rules
1 {
2     test: /\.less$/,
3     loader: 'style-loader!css-loader!less-loader'
4 },
Then when using in components, you can use less normally by adding lang="less" to the style tag. Here, we introduce some less files of initialization project, create the styles folder under src, and put them into the following files

In the style tag of each component index.less and variable.less
 1 <style scoped lang="less">
 2 @import "~styles/index.less";
 3 @import "~styles/variable.less";
 4 .hello{
 5   h1{
 6     color: red;
 7     .fs(38);     // mixin Li number size function
 8   }
 9 }
10 </style>
And when it says about the pixel style, it's all in mixin.less Under the definition, the adaptation problem for all mobile terminals can be realized.
Mobile page switching and switching animation
Here, the switching animation is taken out separately. As a general requirement of mobile terminal, the transition animation is not required for the first level menu switching, and the transition animation is required for the transition from the first level menu to the second level menu. The following solutions are provided for this requirement.
If you need to use animation, you must use vue transition. If you are not familiar with it, you can see it here The solution to implement animation here is to determine the direction of the route to be executed. The following code defines the route method in the route configuration file
 1 // Need left animation for routing this.$router.to('****')
 2 Router.prototype.togo = function (path) {
 3   this.isleft = true
 4   this.isright = false
 5   this.push(path)
 6 }
 7 // Need the route of the right direction animation this.$router.goRight('****')
 8 Router.prototype.goRight = function (path) {
 9   this.isright = true
10   this.isleft = false
11   this.push(path)
12 }
13 // To return the route of button animation this.$router.goBack(),Return to previous route
14 Router.prototype.goBack = function () {
15   this.isright = true
16   this.isleft = false
17   this.go(-1)
18 }
19 // Click the browser Back button to execute. At this time, route fallback is not required
20 Router.prototype.togoback = function () {
21   this.isright = true
22   this.isleft = false
23 }
When executing route jump above, the App.vue Inside, judge the sliding direction to specify the direction of animation. If you don't need animation, you can use this directly$ router.push ('* * * *'), here is App.vue Animation code processed in
<template>
  <div id="app">
    <transition :name="transitionName">
      <router-view class="Router"></router-view>
    </transition>
  </div>
</template>

<script>
export default {
  name: 'App',
  data() {
    return {
      transitionName: 'slideleft'
    }
  },
  watch: {
    $route() {   // Monitor route change reassignment
      if (this.$router.isleft) {
        this.transitionName = 'slideleft'
      }
      if (this.$router.isright) {
        this.transitionName = 'slideright'
      }
    }
  }
}
</script>

<style>
#app {
  font-family: 'Avenir', Helvetica, Arial, sans-serif;
  -webkit-font-smoothing: antialiased;
  -moz-osx-font-smoothing: grayscale;
  text-align: center;
  color: #2c3e50;
}
.Router {
  position: absolute;
  top: 0;
  left: 0;
  right: 0;
  width: 100%;
  height: 100%;
  transition: all .5s ease;
  -webkit-transition: all .5s ease;
  -moz-transition: all .5s ease;
}
.slideleft-enter,
 .slideright-leave-active {
  opacity: 0;
  -webkit-transform: translate(100%, 0);
  transform: translate(100%, 0);
}
.slideleft-leave-active,
.slideright-enter {
  opacity: 0;
  -webkit-transform: translate(-100%, 0);
  transform: translate(-100%, 0);
}
</style>
Use in components
1 this.$router.goBack()   // return
2 this.$router.to('****')  // Go to details
Another step is to monitor and click the browser Back button, and then main.js Here's the code
1 window.addEventListener('popstate', function(e) {
2   router.togoback()   // router It's already up there import come in
3 }, false)
Mobile UI framework selection
As a mobile project, the above steps have been improved in fact. However, when the project schedule is tight or there is a lack of manpower, the introduction of a mobile UI at this time will be even more powerful. You don't need to encapsulate some UI components by yourself. Here, you can use the mint UI to search for its own advantages. Let's talk about the introduction of mint UI.
(1) Install Mint UI
npm install mint-ui --save
(2) Introducing Mint UI
stay main.js Introducing Mint UI
1 import Mint from 'mint-ui'
2 import 'mint-ui/lib/style.css'  // introduce css
3 Vue.use(Mint)   // Global use
In this way, you can use the mint UI components in the entire vue project.
pack
Some problems in packaging
(1) After packing, click the element on ios and a translucent gray box will pop up. Here you need to add a sentence of css for compatibility - WebKit tap highlight- color:rgba (0,0,0,0); put it in the css of the app
(2) A delay of 300ms to the right of the click event can be used fastclick.js To resolve, refer to the following code
1 npm install fastclick --save
2
3 // stay main.js introduce
4 import FastClick from 'fastclick'
5 FastClick.attach(document.body)
Packing precautions
If the project is packaged for the mobile browser, it can be packaged directly without changing other things. After the package is uploaded to the server, use nginx for interface forwarding
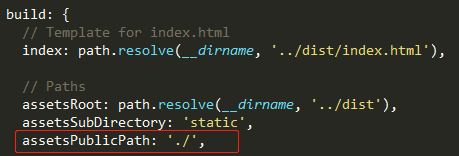
If you want to further package the packed static files into mobile applications, you need to modify the following config/index.js
In config/prod.env.js New baseUrl
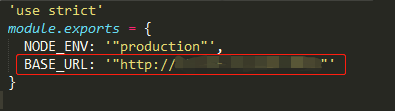
After being packaged as an app, there will be no cross domain problem on the mobile side.
Write at the end
The above project is purely personal built, and is suitable for mobile terminal projects, including browser side, WeChat official account and android, ios application after packaging. There are still some deficiencies, but the basic functions can be used normally. Specific code can be downloaded in my github if necessary. If you think it is useful to you, please give me some advice. Please put forward.
Project address: https://github.com/MrKaKaluote/vue-mobile.git
The project has added the mock function. For details, see here: vue project configuration Mock.js