Introduction to MHA architecture
MHA is the abbreviation of Master High Availability. It is a relatively mature solution for MySQL high availability at present. Its core is a set of scripts written in perl language. It is an excellent set of high availability software for failover and master-slave promotion in MySQL high availability environment.During the MySQL failover process, MHA can automatically complete the database failover within 0-30 seconds, and ensure the maximum consistency of data to achieve a true high availability.
Unlike MMM, MHA-based architectures do not require master-slave replication, only a basic master-slave replication architecture is required.Because when MHA hangs up the primary library, it picks one of the multiple secondary libraries as the new primary library.Each node in the MHA cluster needs ssh-based mutual trust communication with each other for remote control and data management.
What functionality does MHA provide:
- Master nodes can be monitored for availability
- When Master is unavailable, new Masters can be selected from multiple Slave s
- Provides master-slave switching and failover capabilities, and MHA tries to save the binlog on the downtime Master to maximize the assurance that transactions are not lost.However, if the server Master is on is no longer accessible, or if there is a hardware level problem, the binlog cannot be saved successfully
- MHA can be combined with semi-synchronous replication to avoid data inconsistencies between Libraries
- Supports both GTID-based and log point-based replication of MySQL
MHA failover process:
- Try Using ssh to log on to the Master node where the downtime crashed to save binlog events;
- Identify Slaves containing the latest updates as alternative Master s from multiple Slaves;
- Then relay logs based on this Slave synchronization difference are sent to other Slaves.
- Next, synchronize binlog events saved from the original Master;
- Promote the alternative Master to a new Master;
- Make other Slave s connect to the new Master for replication;
- Start the vip address in the new Master to ensure that front-end requests can be sent to the new Master.
The architecture diagram of MHA is as follows:
Build MHA Architecture Manually
Machine description used in this article:
| Name | IP | role |
|---|---|---|
| master | 192.168.190.151 | Main Library |
| slave-01 | 192.168.190.152 | From Library |
| slave-02 | 192.168.190.154 | From Library |
| manager | 192.168.190.153 | Cluster Management Node (MHA) |
Environment Version Description:
- Operating System Version: CentOS 7
- MySQL version: 8.0.19
- MHA version: 0.58
Additional instructions:
- Come here to learn more about the MMM architecture and the way MySQL is installed must have been mastered by all of your buddies, along with an introduction Installation of MySQL There are also many articles, so in order to reduce unnecessary space, this article will not demonstrate the installation of MySQL, the machines used in this article have already installed MySQL in advance.
Configure configuration files for master and slave nodes
1. Create a MySQL user for master-slave replication using the following statement on all master-slave nodes, because each slave library may be elected as the master library, so a user for replication is required:
create user 'repl'@'%' identified with mysql_native_password by 'Abc_123456';
grant replication slave on *.* to 'repl'@'%';
flush privileges;
2. Then modify the MySQL configuration file on the master node:
[root@master ~]# vim /etc/my.cnf
[mysqld]
# Set the id of the current node
server_id=101
# Open binlog and specify the name of the binlog file
log_bin=mysql_bin
# Open relay_log and specify the name of the relay_log file
relay_log=relay_bin
# Log synchronization of relaylog to binlog
log_slave_updates=on
# Turn on GTID replication mode
gtid_mode=ON
enforce_gtid_consistency=1
3. Add the same configuration in the configuration file of slave-01, but the server_id s are different:
[root@slave-01 ~]# vim /etc/my.cnf
[mysqld]
server_id=102
log_bin=mysql_bin
relay_log=relay_bin
log_slave_updates=on
gtid_mode=ON
enforce_gtid_consistency=1
4. Configure slave-02 next:
[root@slave-02 ~]# vim /etc/my.cnf
[mysqld]
server_id=103
log_bin=mysql_bin
relay_log=relay_bin
log_slave_updates=on
gtid_mode=ON
enforce_gtid_consistency=1
After the modification of the above configuration file, restart the MySQL service on each of the three nodes:
[root@master ~]# systemctl restart mysqld
[root@slave-01 ~]# systemctl restart mysqld
[root@slave-02 ~]# systemctl restart mysqld
Configure master-slave relationship for slave-01
Enter the MySQL command line terminal of the slave-01 node and execute the following statements to configure the master-slave replication link:
Mysql> stop slave; --Stop master-slave synchronization
 Mysql> change master to master_host='192.168.190.151', master_port=3306, master_user='repl', master_password='Abc_123456', master_auto_position=1; --Configure the connection information for the master node
 Mysql> start slave; --Start master-slave synchronization
After configuring the master-slave replication link, use show slave status\G; statement to view the master-slave synchronization status. The values of Slave_IO_Running and Slave_SQL_Running are both Yes to indicate that the master-slave synchronization status is normal: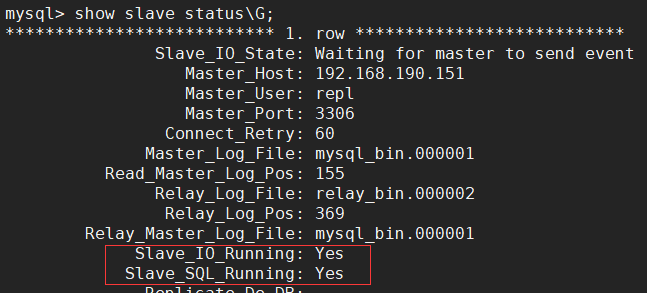
Configure slave-02 master-slave relationship
Similarly, enter the MySQL command line terminal of the slave-02 node and execute the following statements to configure the master-slave replication link:
Mysql> stop slave; --Stop master-slave synchronization
 Mysql> change master to master_host='192.168.190.151', master_port=3306, master_user='repl', master_password='Abc_123456', master_auto_position=1; --Configure the connection information for the master node
 Mysql> start slave; --Start master-slave synchronization
After configuring the master-slave replication link, use show slave status\G; statement to view the master-slave synchronization status. The values of Slave_IO_Running and Slave_SQL_Running are both Yes to indicate that the master-slave synchronization status is normal:
Configure ssh Secret-Free Logon
Configure that all hosts in the cluster can log on securely through ssh, since MHA is SSH-based for remote control and data management.For example, during failover, save the binary logs of the original Master node, configure virtual IP, and so on.
1. Generate ssh login key:
[root@master ~]# ssh-keygen
Generating public/private rsa key pair.
Enter file in which to save the key (/root/.ssh/id_rsa):
Enter passphrase (empty for no passphrase):
Enter same passphrase again:
Your identification has been saved in /root/.ssh/id_rsa.
Your public key has been saved in /root/.ssh/id_rsa.pub.
The key fingerprint is:
SHA256:LzRXziRQPrqaKEteH6KrZpCiV6uGP6GTi6RonE7Hhms root@master
The key's randomart image is:
+---[RSA 2048]----+
|        ...      |
|         o       |
|          + o    |
|         . B     |
| .      S . o    |
|+ + .  . =       |
|=Bo*o.. o .      |
|%EOo.+ + .       |
|%XB*. +          |
+----[SHA256]-----+
2. Copy the key to another server:
[root@master ~]# ssh-copy-id -i /root/.ssh/id_rsa root@192.168.190.151
[root@master ~]# ssh-copy-id -i /root/.ssh/id_rsa root@192.168.190.152
[root@master ~]# ssh-copy-id -i /root/.ssh/id_rsa root@192.168.190.154
[root@master ~]# ssh-copy-id -i /root/.ssh/id_rsa root@192.168.190.153
Then do the same on the other nodes in the cluster, as it is a duplicate operation that is not demonstrated here.Finally, a simple test of whether the normal secret-free login can be done:
[root@master ~]# ssh root@192.168.190.152
Last failed login: Sat Feb  1 15:29:38 CST 2020 from 192.168.190.151 on ssh:notty
There was 1 failed login attempt since the last successful login.  # No password required, test succeeded
Last login: Sat Feb  1 14:14:03 2020 from 192.168.190.1
[root@slave-01 ~]#
Install MHA package
1. First install the mha4mysql-node software package on all nodes. The package can be downloaded at the following address:
The downloaded rpm file is as follows:
[root@master ~]# ls *.rpm
mha4mysql-node-0.58-0.el7.centos.noarch.rpm
[root@master ~]#
perl-related dependencies need to be installed before installing the rpm package:
[root@master ~]# yum -y install epel-release
[root@master ~]# yum -y install perl-DBD-MySQL perl-DBI ncftp
Now you can install mha4mysql-node with the following commands:
[root@master ~]# rpm -ivh mha4mysql-node-0.58-0.el7.centos.noarch.rpm
- Tips: The other two Slave nodes and the monitoring node can be installed as described above, so the demonstration is not repeated here
2. The mha4mysql-manager package is then installed on the monitor node manager and downloaded at the following address:
The downloaded rpm file is as follows:
[root@manager ~]# ls *.rpm
mha4mysql-manager-0.58-0.el7.centos.noarch.rpm
[root@manager ~]#
Similarly, perl-related dependencies need to be installed before installing the rpm package:
[root@manager ~]# yum -y install epel-release
[root@manager ~]# yum -y install perl-Config-Tiny perl-Time-HiRes perl-Parallel-ForkManager perl-Log-Dispatch perl-DBD-MySQL ncftp
Then install the mha4mysql-manager package with the following commands:
[root@manager ~]# rpm -ivh mha4mysql-manager-0.58-0.el7.centos.noarch.rpm
Configure MHA Management Node
1. Create a configuration file for MHA to store directories and working directories:
[root@manager ~]# mkdir /etc/mha
[root@manager ~]# mkdir /home/mysql_mha
2. Create a configuration file for MHA and add the following:
[root@manager ~]# vim /etc/mha/mysql_mha.cnf
[server default]
# Account and password used by mha to access the database
user=mha
password=Abc_123456
# Specify mha's working directory
manager_workdir=/home/mysql_mha
# Storage path of mha log file
manager_log=/home/mysql_mha/manager.log
# Specify the working directory of mha on the remote node
remote_workdir=/home/mysql_mha
# Users who can log on Using ssh
ssh_user=root
# MySQL user and password for master-slave replication
repl_user=repl
repl_password=Abc_123456
# Specify how many seconds to detect
ping_interval=1
# Specify the directory where the master node will store the binlog log files
master_binlog_dir=/var/lib/mysql
# Specify a script that drives virtual IP to a new Master after master-slave switching
master_ip_failover_script=/usr/bin/master_ip_failover
# Specify a script for checking node status twice
secondary_check_script=/usr/bin/masterha_secondary_check -s 192.168.190.151 -s 192.168.190.152 -s 192.168.190.154

# Configuring node information in a cluster
[server1]
hostname=192.168.190.151
# Specify that the node can participate in Master elections
candidate_master=1

[server2]
hostname=192.168.190.152
candidate_master=1

[server3]
hostname=192.168.190.154
# Specify that this node cannot participate in Master elections
no_master=1
3. Write the master_ip_failover script configured in the configuration file, which was modified from the official example of MHA, which is not provided by default.Note that there are several places in the script that need to be modified to suit the actual situation and are noted with comments:
[root@manager ~]# vim /usr/bin/master_ip_failover
#!/usr/bin/env perl

use strict;
use warnings FATAL => 'all';

use Getopt::Long;

my (
    $command, $orig_master_host, $orig_master_ip,$ssh_user,
    $orig_master_port, $new_master_host, $new_master_ip,$new_master_port,
    $orig_master_ssh_port,$new_master_ssh_port,$new_master_user,$new_master_password
);

# The virtual IP defined here can be modified depending on the actual situation.
my $vip = '192.168.190.80/24';
my $key = '1';
# The network card name "ens32" here needs to be modified according to your machine's network card name
my $ssh_start_vip = "sudo /sbin/ifconfig ens32:$key $vip";
my $ssh_stop_vip = "sudo /sbin/ifconfig ens32:$key down";
my $ssh_Bcast_arp= "sudo /sbin/arping -I bond0 -c 3 -A $vip";

GetOptions(
    'command=s'          => \$command,
    'ssh_user=s'         => \$ssh_user,
    'orig_master_host=s' => \$orig_master_host,
    'orig_master_ip=s'   => \$orig_master_ip,
    'orig_master_port=i' => \$orig_master_port,
    'orig_master_ssh_port=i' => \$orig_master_ssh_port,
    'new_master_host=s'  => \$new_master_host,
    'new_master_ip=s'    => \$new_master_ip,
    'new_master_port=i'  => \$new_master_port,
    'new_master_ssh_port' => \$new_master_ssh_port,
    'new_master_user' => \$new_master_user,
    'new_master_password' => \$new_master_password

);

exit &main();

sub main {
    $ssh_user = defined $ssh_user ? $ssh_user : 'root';
    print "\n\nIN SCRIPT TEST====$ssh_user|$ssh_stop_vip==$ssh_user|$ssh_start_vip===\n\n";

    if ( $command eq "stop" || $command eq "stopssh" ) {

        my $exit_code = 1;
        eval {
            print "Disabling the VIP on old master: $orig_master_host \n";
            &stop_vip();
            $exit_code = 0;
        };
        if ($@) {
            warn "Got Error: $@\n";
            exit $exit_code;
        }
        exit $exit_code;
    }
    elsif ( $command eq "start" ) {

        my $exit_code = 10;
        eval {
            print "Enabling the VIP - $vip on the new master - $new_master_host \n";
            &start_vip();
        &start_arp();
            $exit_code = 0;
        };
        if ($@) {
            warn $@;
            exit $exit_code;
        }
        exit $exit_code;
    }
    elsif ( $command eq "status" ) {
        print "Checking the Status of the script.. OK \n";
        exit 0;
    }
    else {
        &usage();
        exit 1;
    }
}

sub start_vip() {
    `ssh $ssh_user\@$new_master_host \" $ssh_start_vip \"`;
}
sub stop_vip() {
    `ssh $ssh_user\@$orig_master_host \" $ssh_stop_vip \"`;
}

sub start_arp() {
    `ssh $ssh_user\@$new_master_host \" $ssh_Bcast_arp \"`;
}
sub usage {
    print
    "Usage: master_ip_failover --command=start|stop|stopssh|status --ssh_user=user --orig_master_host=host --orig_master_ip=ip --orig_master_port=port --new_master_host=host --new_master_ip=ip --new_master_port=port\n";
}
You also need to add executable permissions to the script, otherwise MHA cannot be invoked:
[root@manager ~]# chmod a+x /usr/bin/master_ip_failover
4. Depending on the configuration of remote_workdir in the configuration file, a remote working directory for MHA needs to be created on other nodes:
[root@master ~]# mkdir /home/mysql_mha
[root@slave-01 ~]# mkdir /home/mysql_mha
[root@slave-02 ~]# mkdir /home/mysql_mha
5. The configuration file specifies that the manager should use the mha user to access the database node, so the mha user needs to be created on the master node:
create user 'mha'@'%' identified with mysql_native_password by 'Abc_123456';
grant all privileges on *.* to 'mha'@'%';
flush privileges;
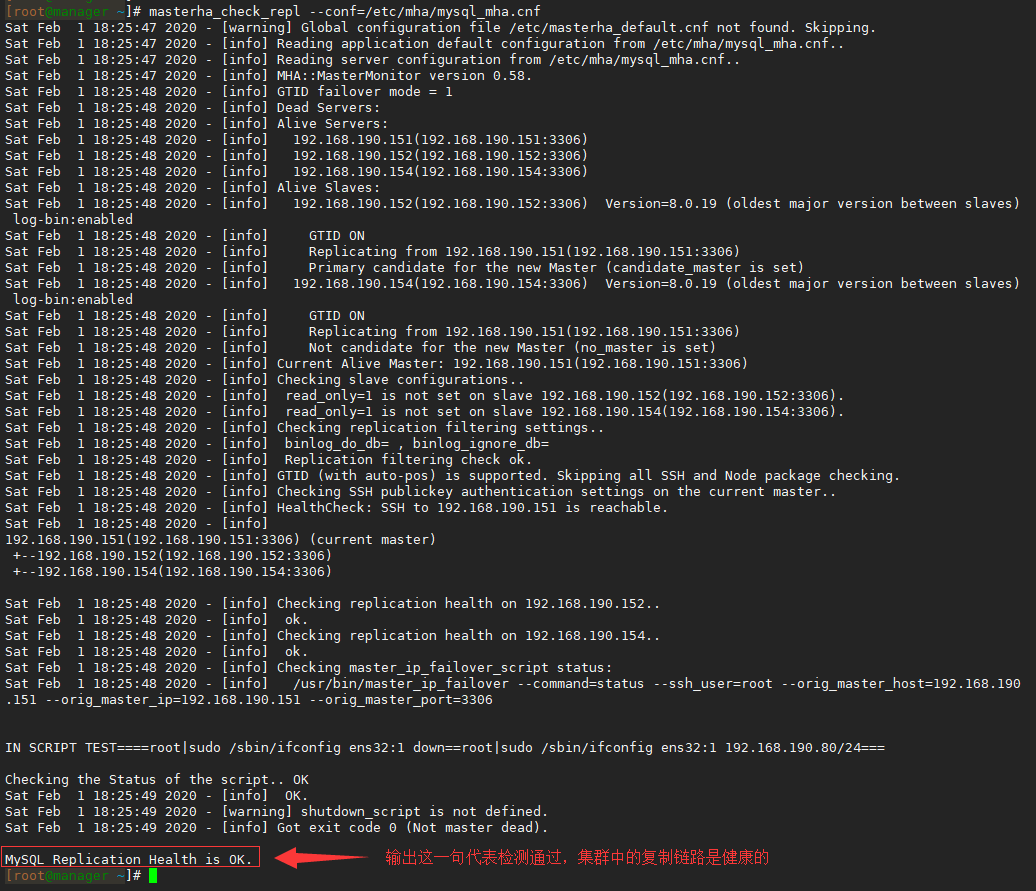
6. After completing all the above steps, the configuration is checked on the manager node using masterha_check_ssh and masterha_check_repl, where masterha_check_ssh is used to check whether SSH logins are working and masterha_check_repl is used to check whether replication links of master-slave nodes are working:
[root@manager ~]# masterha_check_ssh --conf=/etc/mha/mysql_mha.cnf
[root@manager ~]# masterha_check_repl --conf=/etc/mha/mysql_mha.cnf
The results are as follows: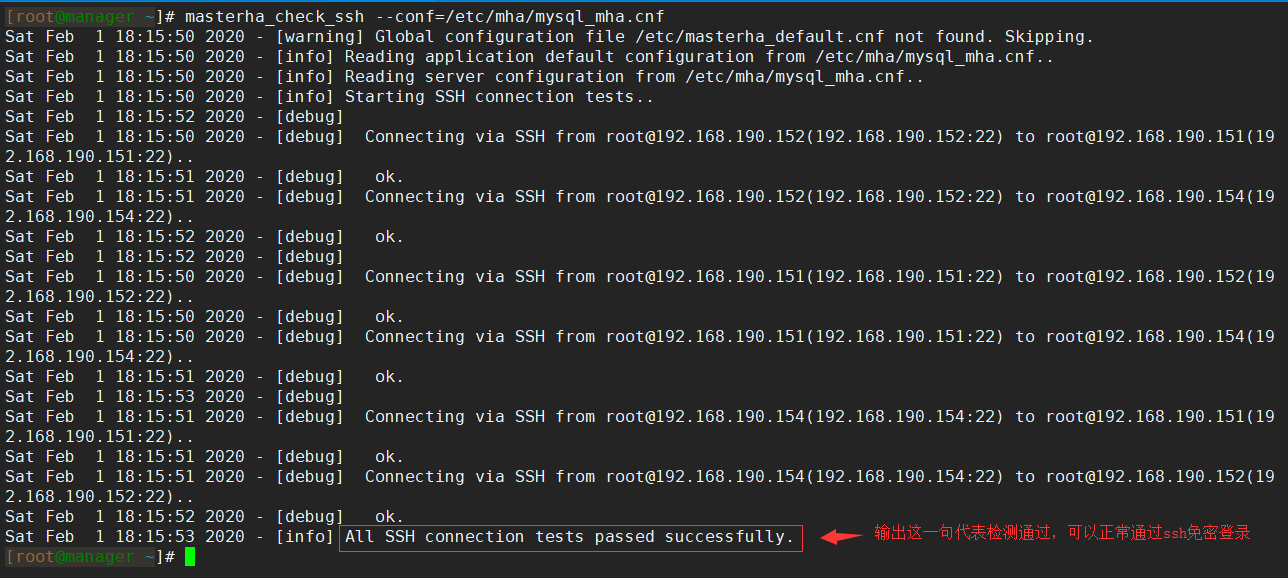
7. After the above tests have passed, the MHA service can be started.The start command is as follows:
[root@manager ~]# nohup masterha_manager --conf=/etc/mha/mysql_mha.cnf &
Once the startup is complete, you can use the ps command to see if the master ha_manager process exists, and if it exists, the startup is successful:
[root@manager ~]# ps aux |grep masterha_manager
root       2842  0.3  1.1 299648 22032 pts/0    S    18:30   0:00 perl /usr/bin/masterha_manager --conf=/etc/mha/mysql_mha.cnf
root       2901  0.0  0.0 112728   976 pts/0    R+   18:31   0:00 grep --color=auto masterha_manager
[root@manager ~]#
8. Finally, we need to go to the master node and configure the virtual IP manually.Because MHA only drives virtual IP to new Master nodes during master-slave switching, it does not actively set virtual IP for Master at first startup, so we need to set it manually.The commands for setting up virtual IP are as follows:
[root@master ~]# ifconfig ens32:1 192.168.190.80/24
After successful setup, you can see the virtual IP bound on the network card using the ip addr command: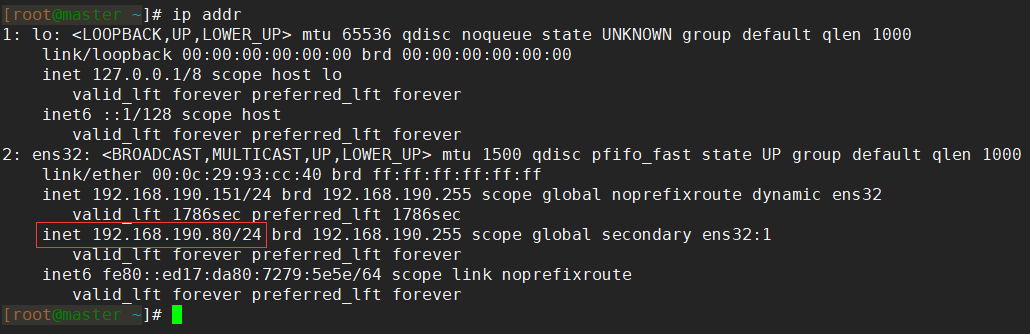
Testing MHA services
So far, we have completed the MHA highly available architecture, and then we will do some simple tests on it.For example, test whether the virtual IP can be ping ed properly. After all, the virtual IP is connected when the application accesses the database, so the first step is to ensure that the virtual IP is accessible.The following: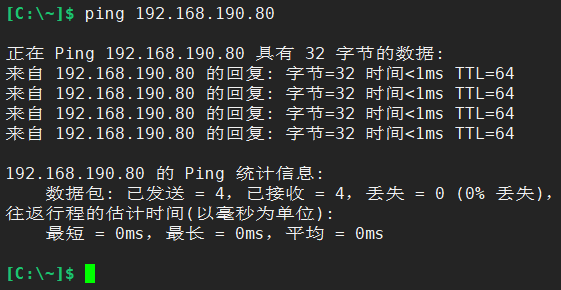
After ping pass, use remote connection tools such as Navicat to test whether the database can be properly connected through virtual IP: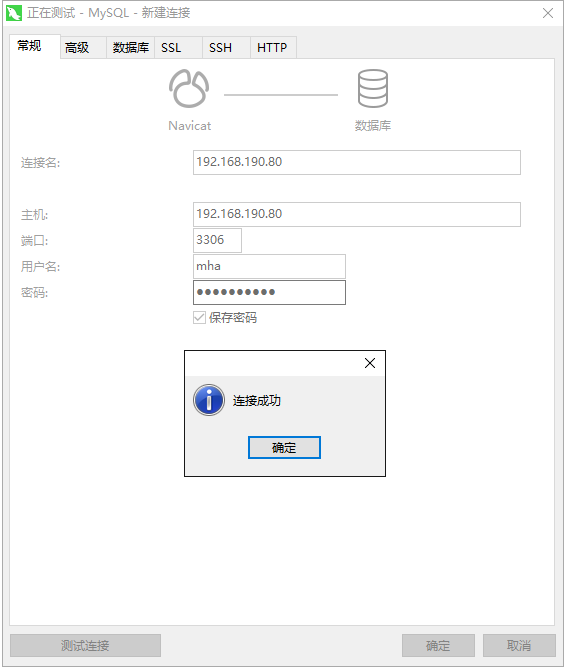
After determining that the virtual IP can be accessed normally, then test whether MHA can switch between master and slave normally. First stop MySQL service on master node to simulate Master downtime:
[root@master ~]# systemctl stop mysqld
Normally, the network card on the master node will no longer bind the virtual IP: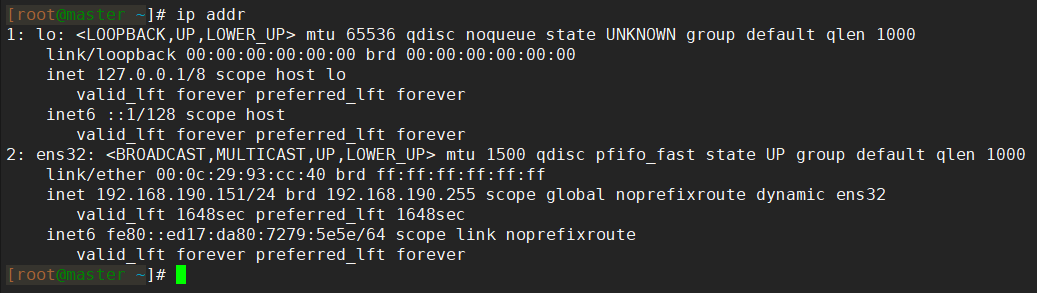
Instead, it will be drifted by the MHA to the network card of the slave-01 node, where the Slave is the new Master: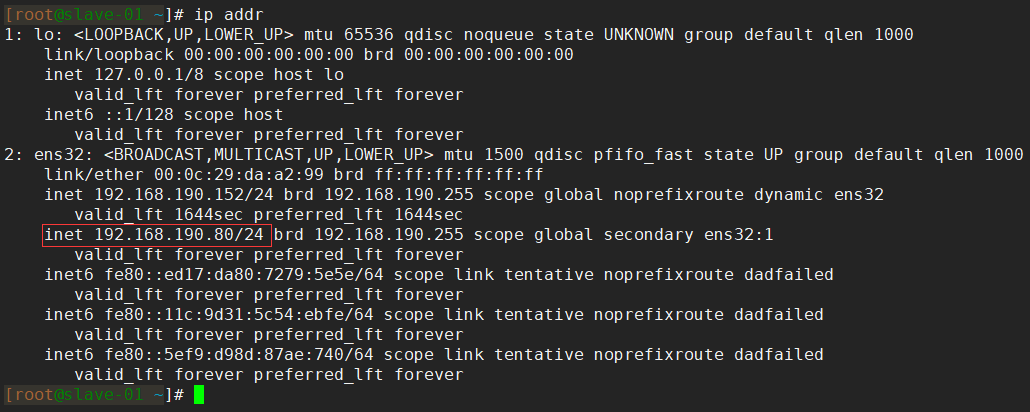
Next, go to the MySQL command line terminal on the slave-02 node to confirm that the Slave is properly synchronized with the new Master.Previously we configured master as the master library for slave-02. Now when master is stopped, you can see that Master_Host for slave-02 has been switched to slave-01 IP by MHA: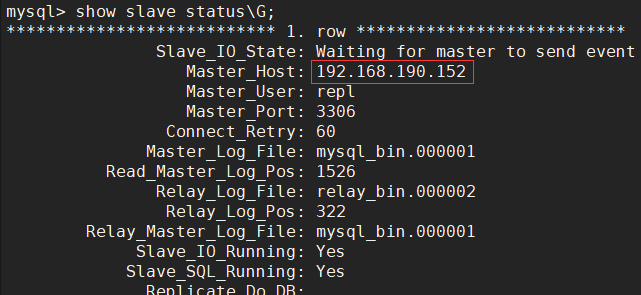
After the above tests, we can see that the MHA architecture we have built is working properly, which has enabled the Replication cluster to have basic high availability. Even after the Master goes offline, it can elect and switch new Masters from Slave normally, and it is also correct to establish replication links between other Slaves and new Masters.
Advantages and disadvantages of MHA architecture
Advantage:
- Developed using Perl scripting language and fully open source, developers can redevelop to suit their needs
- Ability to support GTID-based and log point-based replication modes
- MHA is less prone to data loss during failover
- Multiple Replication clusters can be monitored on one monitoring node
Disadvantages:
- MHA does not provide virtual IP functionality by default and needs to script itself or use third-party tools to configure virtual IP
- After MHA starts, only Master is monitored, Slave is not monitored, and replication links are not monitored.
- Cluster environments need to be able to log on securely through ssh, which has certain security implications
- MHA does not provide read load balancing for Slave and needs to be implemented through third-party tools