Background:
Network environment reference: Cloud networking experience Two vpc networks in Shanghai and Beijing. The servers are distributed as follows:
Let's talk about why we use TencentOS Server 3.1 (TK4) system. It's not because CentOS 8 doesn't provide long-term maintenance... By the way, experience Tencent cloud's open source tencentos. For details, see Tencent cloud's official website: https://cloud.tencent.com/document/product/213/38027 . Compare the process of installing CentOS 8 compatible with CentOS 8. Build kubernetes to experience whether it is feasible to cross regions!
Basic planning:
Note: Well, multi area dispersion comparison can also be highly available!
| ip | hostname | Area | |
|---|---|---|---|
| 10.10.2.8 | sh-master-01 | Shanghai zone 2 | |
| 10.10.2.10 | sh-master-02 | Shanghai zone 2 | |
| 10.10.5.4 | sh-master-03 | Shanghai District 5 | |
| 10.10.4.7 | sh-work-01 | Shanghai District 4 | |
| 10.10.4.14 | sh-work-02 | Shanghai District 4 | |
| 10.10.12.9 | bj-work-01 | Beijing District 5 |
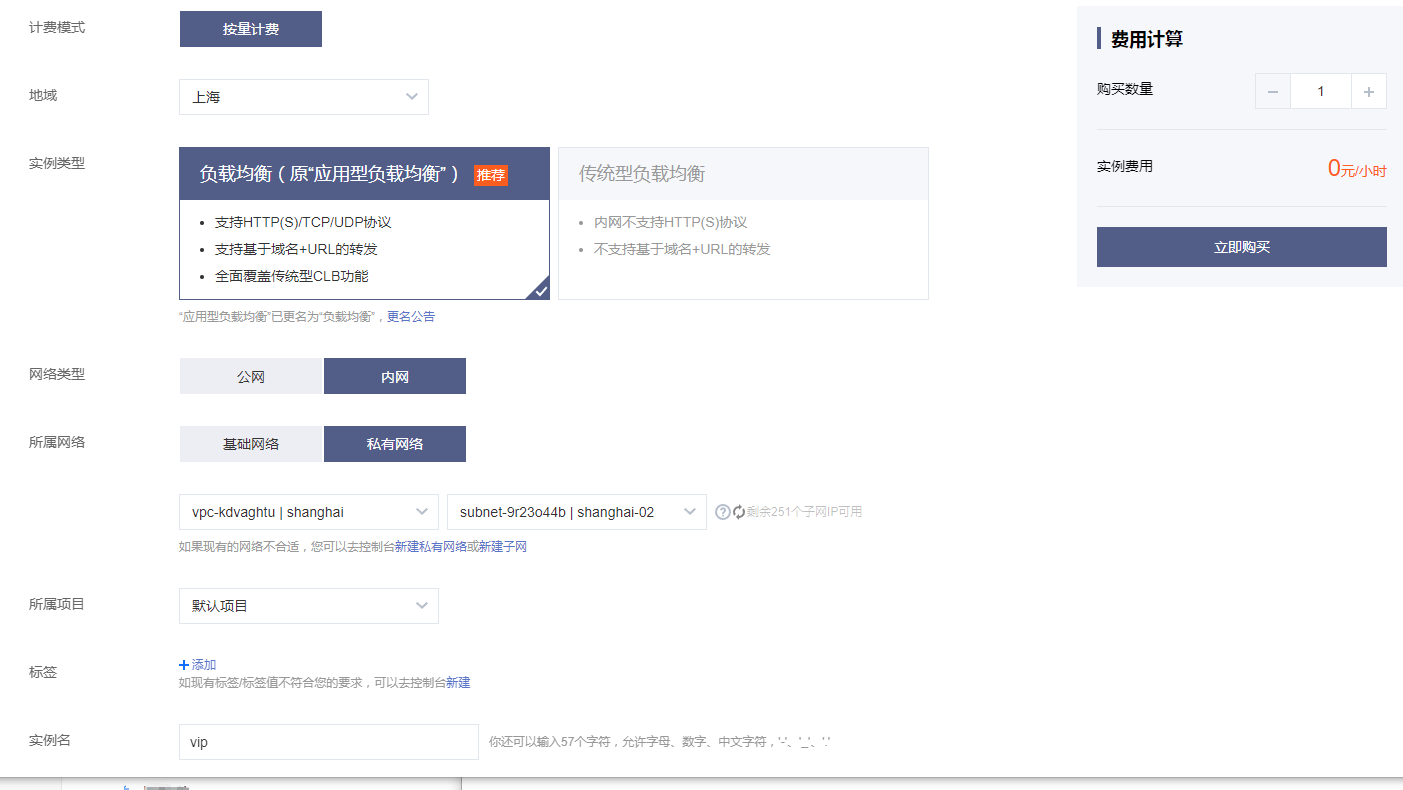
Create an intranet load balancing slb and make apiserver's vip. The traditional type used in the past is now only applied load balancing
System initialization
Note: 1-12 is executed for all nodes
1. Change host name
Note: if the hostname is not initialized, modify the hostname
[root@VM-2-8-centos ~]# hostnamectl set-hostname sh-master-01
[root@VM-2-8-centos ~]# cat /etc/hostname
sh-master-01
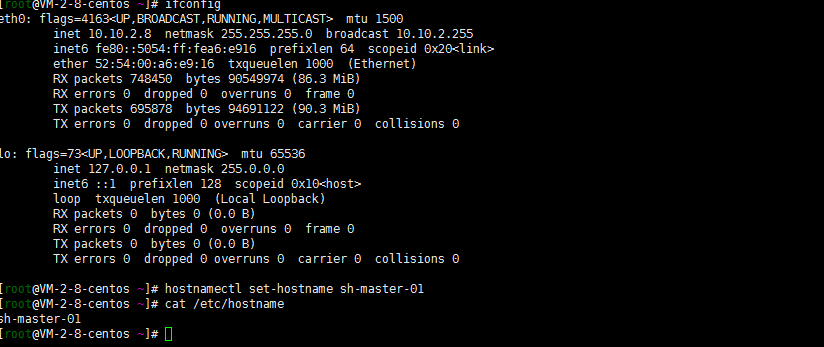
The other ones are the same way
2. Close swap partition
swapoff -a
sed -i 's/.*swap.*/#&/' /etc/fstab
3. Close selinux
[root@sh-master-01 ~]# setenforce  0
ssive/SELINUX=disabled/g" /etc/selinux/configsetenforce: SELinux is disabled
[root@sh-master-01 ~]# sed -i "s/^SELINUX=enforcing/SELINUX=disabled/g" /etc/sysconfig/selinux
[root@sh-master-01 ~]# sed -i "s/^SELINUX=enforcing/SELINUX=disabled/g" /etc/selinux/config
[root@sh-master-01 ~]# sed -i "s/^SELINUX=permissive/SELINUX=disabled/g" /etc/sysconfig/selinux
[root@sh-master-01 ~]# sed -i "s/^SELINUX=permissive/SELINUX=disabled/g" /etc/selinux/config
4. Turn off the firewall
systemctl disable --now firewalld
chkconfig firewalld off
Note: firewalld and iptables are not installed and can be ignored
5. Adjust the file opening number and other configurations
cat> /etc/security/limits.conf <<EOF
* soft nproc 1000000
* hard nproc 1000000
* soft nofile 1000000
* hard nofile 1000000
* soft  memlock  unlimited
* hard memlock  unlimited
EOF
Of course, it seems that there is an 80-nofile.conf in the tencentos limits.d directory. The modified configuration files can be placed here. This avoids modifying the master file

6. yum update
yum update
yum -y install  gcc bc gcc-c++ ncurses ncurses-devel cmake elfutils-libelf-devel openssl-devel flex* bison* autoconf automake zlib* fiex* libxml* ncurses-devel libmcrypt* libtool-ltdl-devel* make cmake  pcre pcre-devel openssl openssl-devel   jemalloc-devel tlc libtool vim unzip wget lrzsz bash-comp* ipvsadm ipset jq sysstat conntrack libseccomp conntrack-tools socat curl wget git conntrack-tools psmisc nfs-utils tree bash-completion conntrack libseccomp net-tools crontabs sysstat iftop nload strace bind-utils tcpdump htop telnet lsof
Of course, I ignored it here... I usually use oneinstack script to initialize cvm
7. Add IPVS
The system kernel of tencentos is 5.4.119
:> /etc/modules-load.d/ipvs.conf
module=(
ip_vs
ip_vs_rr
ip_vs_wrr
ip_vs_sh
nf_conntrack
br_netfilter
  )
for kernel_module in ${module[@]};do
    /sbin/modinfo -F filename $kernel_module |& grep -qv ERROR && echo $kernel_module >> /etc/modules-load.d/ipvs.conf || :
done
systemctl daemon-reload
systemctl enable --now systemd-modules-load.service
Verify that ipvs is loaded successfully
# lsmod | grep ip_vs
ip_vs_sh               16384  0
ip_vs_wrr              16384  0
ip_vs_rr               16384  5
ip_vs                 151552  11 ip_vs_rr,ip_vs_sh,ip_vs_wrr
nf_conntrack          114688  5 xt_conntrack,nf_nat,nf_conntrack_netlink,xt_MASQUERADE,ip_vs
nf_defrag_ipv6         20480  2 nf_conntrack,ip_vs
8. Optimize system parameters (not necessarily optimal, take all)
Oneinstall is the default initialization installation. Don't change it first. Take your time. Wait a minute. There's a problem. Find a problem
cat /etc/sysctl.d/99-sysctl.conf
fs.file-max=1000000
net.ipv4.tcp_max_tw_buckets = 6000
net.ipv4.tcp_sack = 1
net.ipv4.tcp_window_scaling = 1
net.ipv4.tcp_rmem = 4096 87380 4194304
net.ipv4.tcp_wmem = 4096 16384 4194304
net.ipv4.tcp_max_syn_backlog = 16384
net.core.netdev_max_backlog = 32768
net.core.somaxconn = 32768
net.core.wmem_default = 8388608
net.core.rmem_default = 8388608
net.core.rmem_max = 16777216
net.core.wmem_max = 16777216
net.ipv4.tcp_timestamps = 1
net.ipv4.tcp_fin_timeout = 20
net.ipv4.tcp_synack_retries = 2
net.ipv4.tcp_syn_retries = 2
net.ipv4.tcp_syncookies = 1
#net.ipv4.tcp_tw_len = 1
net.ipv4.tcp_tw_reuse = 1
net.ipv4.tcp_mem = 94500000 915000000 927000000
net.ipv4.tcp_max_orphans = 3276800
net.ipv4.ip_local_port_range = 1024 65000
net.nf_conntrack_max = 6553500
net.netfilter.nf_conntrack_max = 6553500
net.netfilter.nf_conntrack_tcp_timeout_close_wait = 60
net.netfilter.nf_conntrack_tcp_timeout_fin_wait = 120
net.netfilter.nf_conntrack_tcp_timeout_time_wait = 120
net.netfilter.nf_conntrack_tcp_timeout_established = 3600
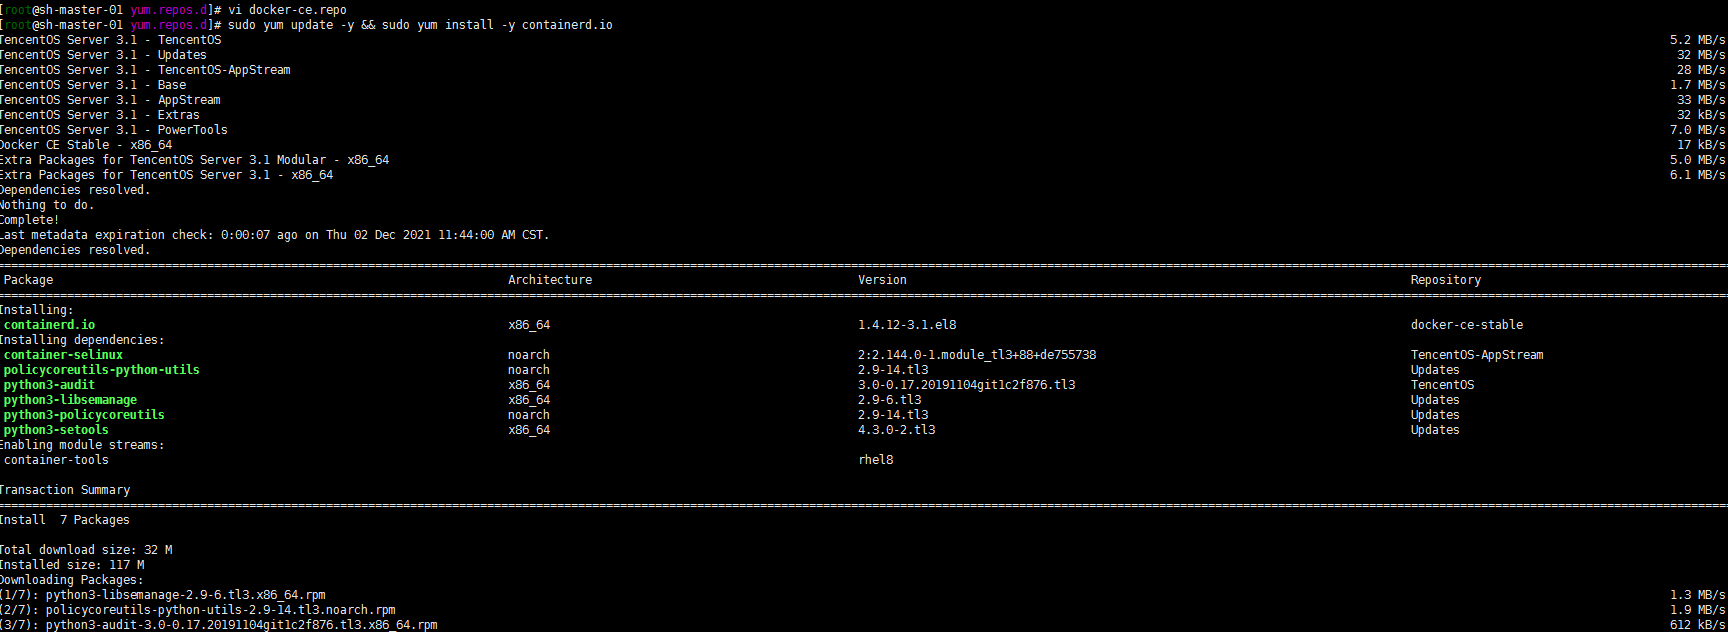
9. containerd installation
The changes of dnf and yum centos8 have been seen by yourself. Almost... I'm used to adding Alibaba cloud sources as follows:
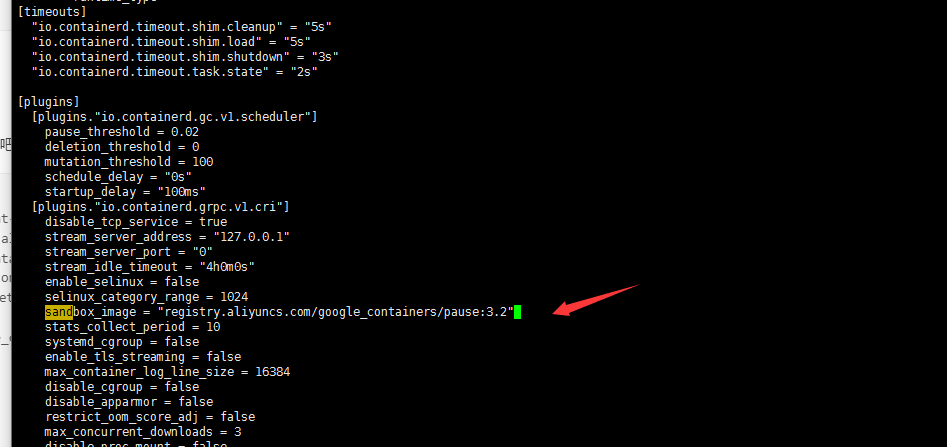
dnf install dnf-utils device-mapper-persistent-data lvm2
yum-config-manager --add-repo http://mirrors.aliyun.com/docker-ce/linux/centos/docker-ce.repo
sudo yum update -y && sudo yum install -y containerd.io
containerd config default > /etc/containerd/config.toml
# Replace the default sand of containerd_ Box image, edit / etc/containerd/config.toml

sandbox_image = "registry.aliyuncs.com/google_containers/pause:3.2"

# Restart containerd
$ systemctl daemon-reload
$ systemctl restart containerd
It seems that I'm still not sure... The matching version is wrong. Hahaha, how to fix it?

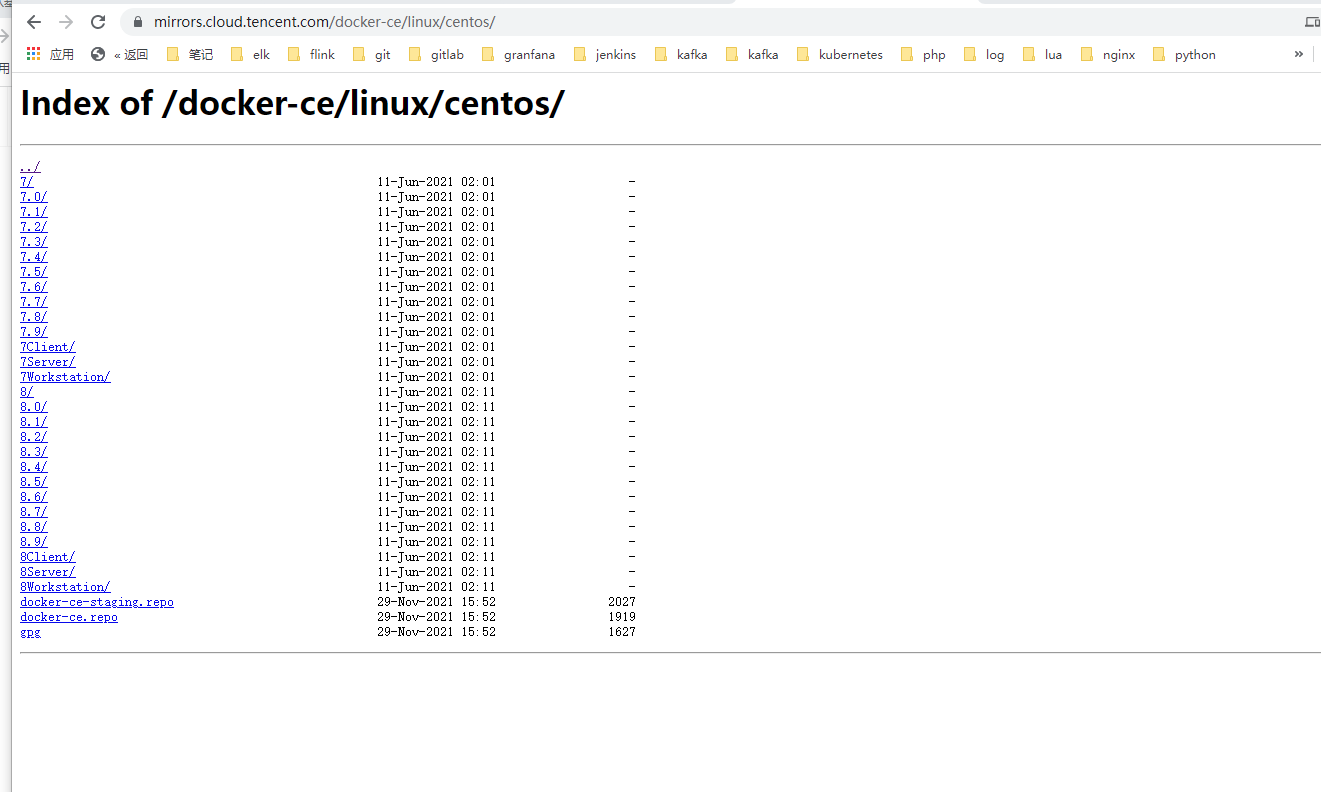
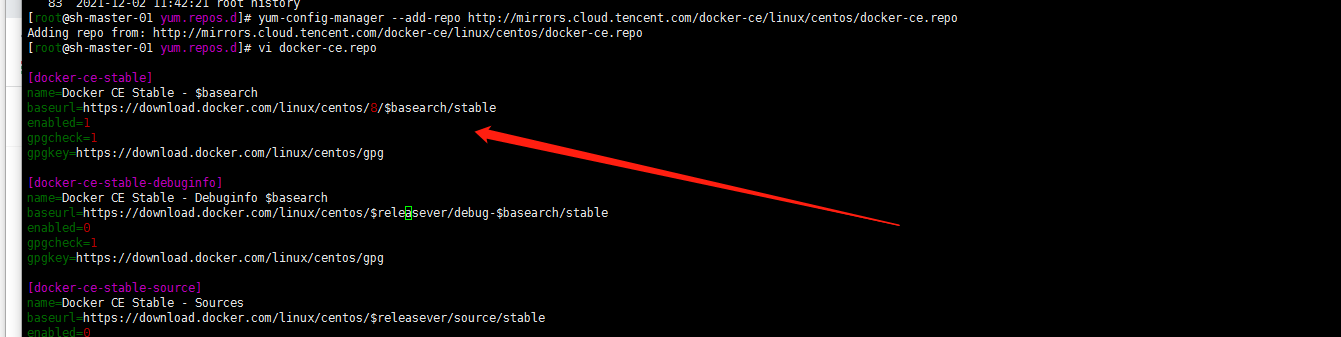
Try Tencent's source. Of course, delete Alibaba's source first:
rm -rf /etc/yum.repos.d/docker-ce.repo
yum clean all
https://mirrors.cloud.tencent.com/docker-ce/linux/centos/
dnf install dnf-utils device-mapper-persistent-data lvm2
yum-config-manager --add-repo http://mirrors.cloud.tencent.com/docker-ce/linux/centos/docker-ce.repo
sudo yum update -y && sudo yum install -y containerd.io
containerd config default > /etc/containerd/config.toml
# Replace the default sand of containerd_ Box image, edit / etc/containerd/config.toml

sandbox_image = "registry.aliyuncs.com/google_containers/pause:3.2"

# Restart containerd
$ systemctl daemon-reload
$ systemctl restart containerd

Still... I don't have my own matching system... How? Manual modification?
Yes, I hope tencentos can support the commonly used yum source... Don't let me convert it manually
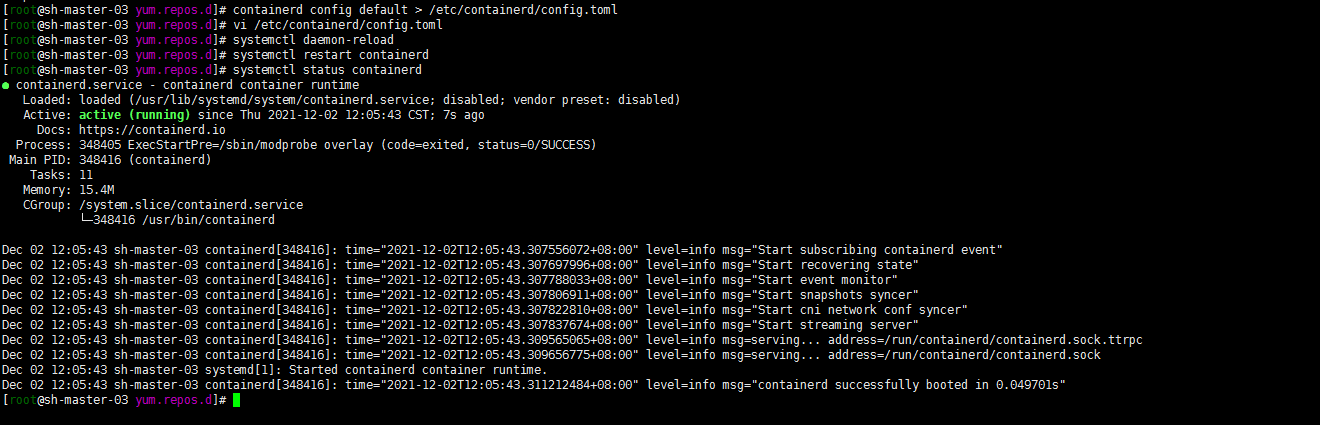
containerd config default > /etc/containerd/config.toml
# Restart containerd
systemctl daemon-reload
systemctl restart containerd
systemctl status containerd
10. Configure CRI client crictl
Note: there seems to be version matching
VERSION="v1.22.0"
wget https://github.com/kubernetes-sigs/cri-tools/releases/download/$VERSION/crictl-$VERSION-linux-amd64.tar.gz
sudo tar zxvf crictl-$VERSION-linux-amd64.tar.gz -C /usr/local/bin
rm -f crictl-$VERSION-linux-amd64.tar.gz
You may not be able to download github to the desktop and upload it manually
cat <<EOF > /etc/crictl.yaml
runtime-endpoint: unix:///run/containerd/containerd.sock
image-endpoint: unix:///run/containerd/containerd.sock
timeout: 10
debug: false
EOF

# Verify whether it is available (you can verify the private warehouse by the way)
crictl  pull nginx:alpine
crictl  rmi  nginx:alpine
crictl  images
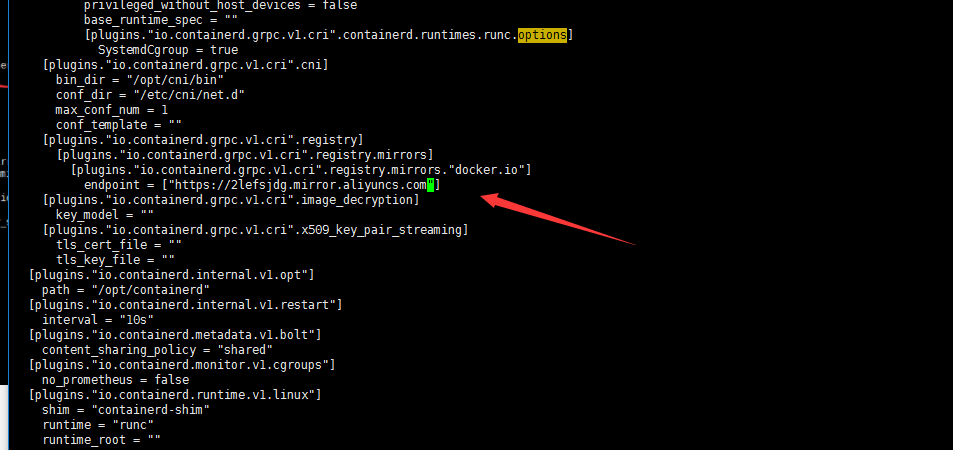
Well, modify the * * endpoint in * * [plugins. "io.containerd.grpc.v1.cri". registry.mirrors. "docker.io"] in / etc/containerd/config.toml to be Alibaba cloud's accelerator address (of course, it can also be from other accelerators). In addition, SystemdCgroup = true is added to [plugins. "io.containerd.grpc.v1.cri". containerd.runtimes.runc.options]

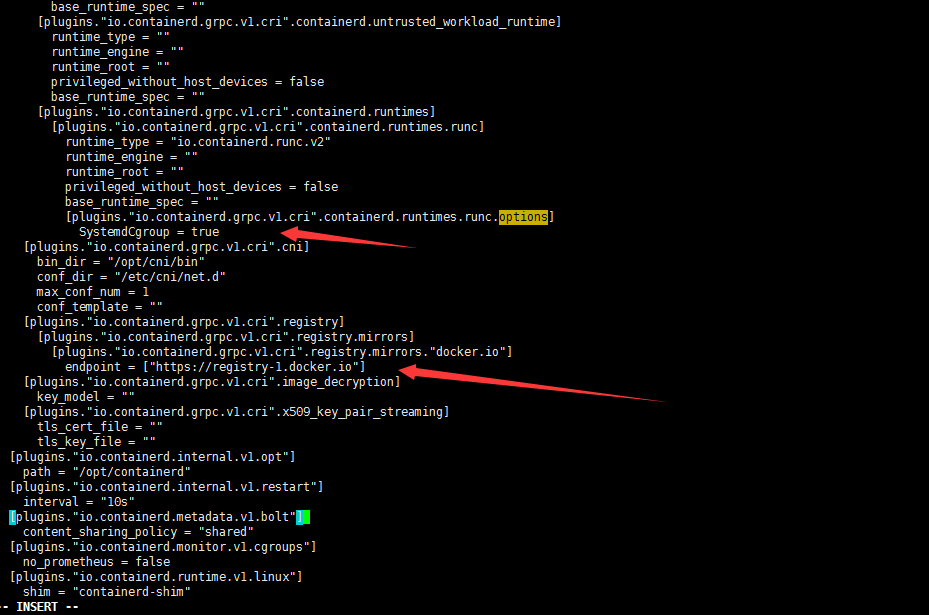
Change the endpoint to Alibaba cloud accelerator address: https://2lefsjdg.mirror.aliyuncs.com
Restart the containerd service to re download the image verification:
systemctl restart containerd.service
crictl  pull nginx:alpine
OK

11. Install kubedm (centos8 does not have a corresponding yum source. Use the Alibaba cloud yum source of centos7)
Note: why install version 1.21.3? Because my online version is also version 1.21.3. Just in time to test the upgrade
cat <<EOF > /etc/yum.repos.d/kubernetes.repo
[kubernetes]
name=Kubernetes
baseurl=http://mirrors.aliyun.com/kubernetes/yum/repos/kubernetes-el7-x86_64
enabled=1
gpgcheck=0
repo_gpgcheck=0
gpgkey=http://mirrors.aliyun.com/kubernetes/yum/doc/yum-key.gpg http://mirrors.aliyun.com/kubernetes/yum/doc/rpm-package-key.gpg
EOF
# Remove the old version if installed
yum remove kubeadm kubectl kubelet kubernetes-cni cri-tools socat
# Check all installable versions. The following two are OK
# yum list --showduplicates kubeadm --disableexcludes=kubernetes
# Install the specified version with the following command
# yum -y install kubeadm-1.21.3 kubectl-1.21.3 kubelet-1.21.3
or
# Install the latest stable version by default. The current version is 1.22.4
#yum install -y kubelet kubeadm kubectl --disableexcludes=kubernetes

# Startup and self start
systemctl enable kubelet.service

Of course, you can also directly use the source of Tencent cloud here... The same reason.
12. Modify kubelet configuration
vi /etc/sysconfig/kubelet
KUBELET_EXTRA_ARGS= --cgroup-driver=systemd --container-runtime=remote --container-runtime-endpoint=/run/containerd/containerd.sock
Additional operations on the master node:
1. Install haproxy
Note: all three master nodes must be installed with haproxy and related configurations
yum install haproxy
cat <<EOF >  /etc/haproxy/haproxy.cfg
#---------------------------------------------------------------------
# Example configuration for a possible web application.  See the
# full configuration options online.
#
#   http://haproxy.1wt.eu/download/1.4/doc/configuration.txt
#
#---------------------------------------------------------------------

#---------------------------------------------------------------------
# Global settings
#---------------------------------------------------------------------
global
    # to have these messages end up in /var/log/haproxy.log you will
    # need to:
    #
    # 1) configure syslog to accept network log events.  This is done
    #    by adding the '-r' option to the SYSLOGD_OPTIONS in
    #    /etc/sysconfig/syslog
    #
    # 2) configure local2 events to go to the /var/log/haproxy.log
    #   file. A line like the following can be added to
    #   /etc/sysconfig/syslog
    #
    #    local2.*                       /var/log/haproxy.log
    #
    log         127.0.0.1 local2

    chroot      /var/lib/haproxy
    pidfile     /var/run/haproxy.pid
    maxconn     4000
    user        haproxy
    group       haproxy
    daemon

    # turn on stats unix socket
    stats socket /var/lib/haproxy/stats

#---------------------------------------------------------------------
# common defaults that all the 'listen' and 'backend' sections will
# use if not designated in their block
#---------------------------------------------------------------------
defaults
    mode                    tcp
    log                     global
    option                  tcplog
    option                  dontlognull
    option http-server-close
    option forwardfor       except 127.0.0.0/8
    option                  redispatch
    retries                 3
    timeout http-request    10s
    timeout queue           1m
    timeout connect         10s
    timeout client          1m
    timeout server          1m
    timeout http-keep-alive 10s
    timeout check           10s
    maxconn                 3000

#---------------------------------------------------------------------
# main frontend which proxys to the backends
#---------------------------------------------------------------------
frontend kubernetes
    bind *:8443              #The configuration port is 8443
    mode tcp
    default_backend kubernetes
#---------------------------------------------------------------------
# static backend for serving up images, stylesheets and such
#---------------------------------------------------------------------
backend kubernetes           #The back-end server, that is, accessing 10.3.2.12:6443 will forward the request to the three back-end servers, so as to achieve load balancing
    balance roundrobin
    server master1  10.10.2.8:6443 check maxconn 2000
    server master2  10.10.2.10:6443 check maxconn 2000
    server master3  10.10.5.4:6443 check maxconn 2000
EOF
 systemctl enable haproxy && systemctl start haproxy && systemctl status haproxy
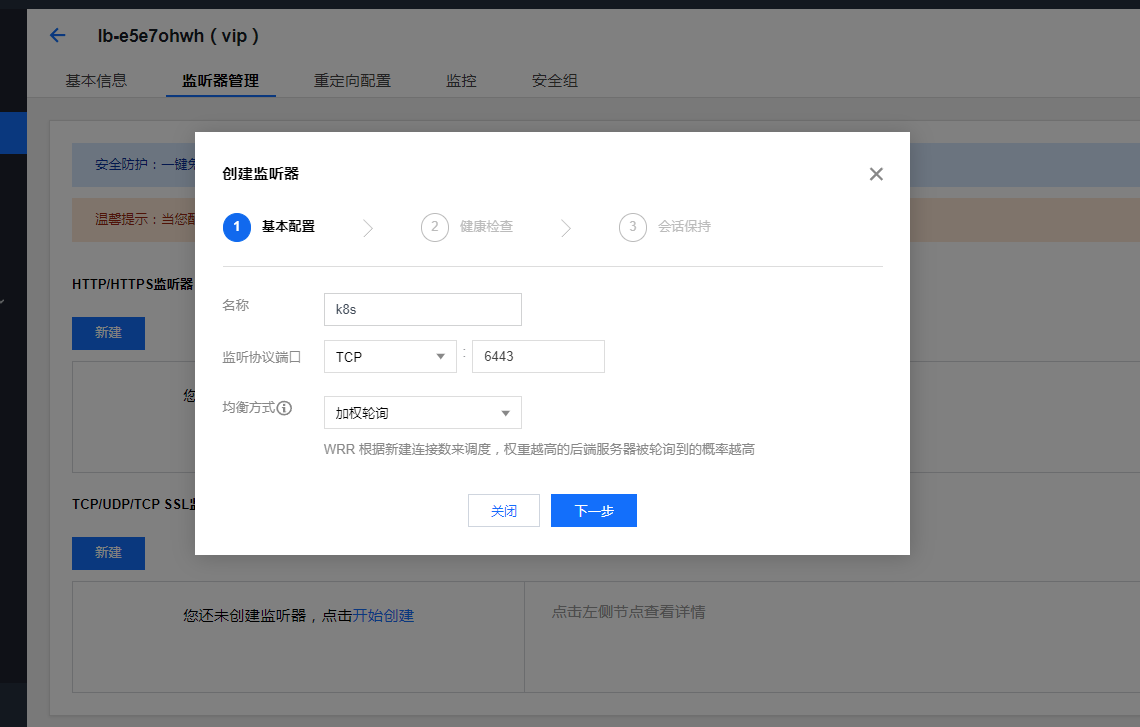
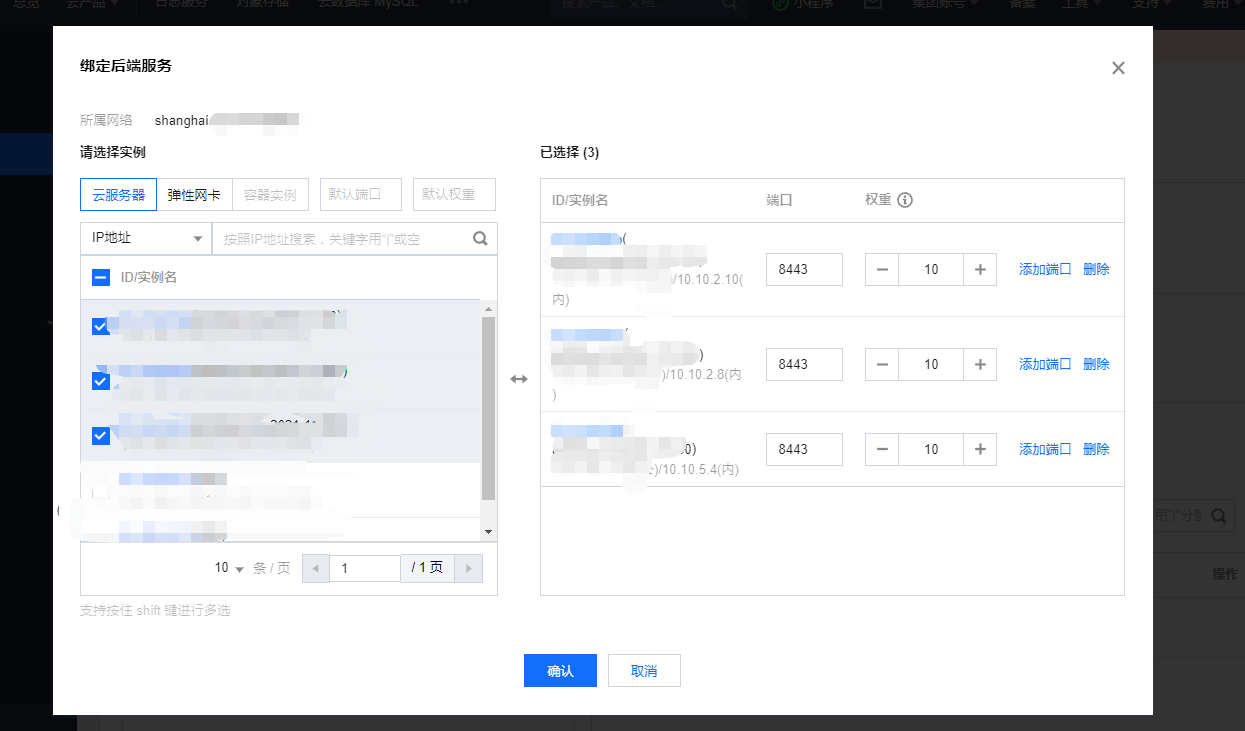
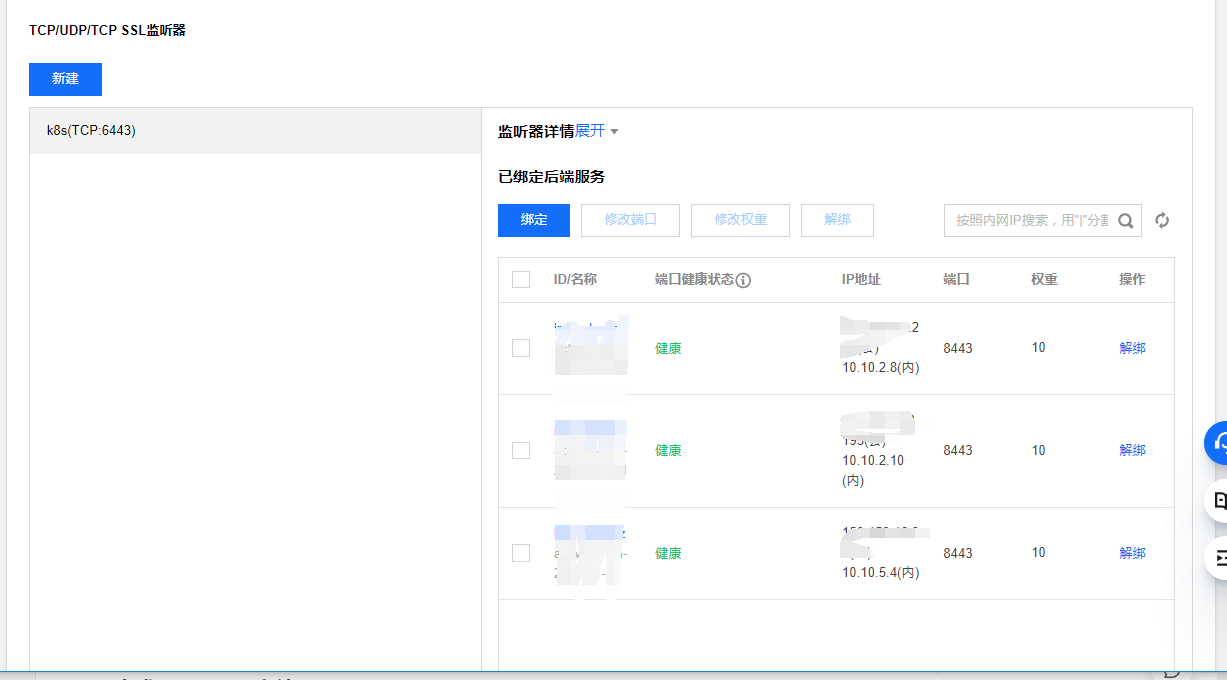
Log in to Tencent cloud load balancing management background: https://console.cloud.tencent.com/clb , create a TCP listener named k8s listening port 6443. The back-end service is bound to port 8443 of three master nodes. The weight is 10 by default and has not been modified.
2. The sh-master-01 node generates a configuration file
Note: of course, it can also be a sh-master-02 or sh-master-03 node
kubeadm config print init-defaults > config.yaml
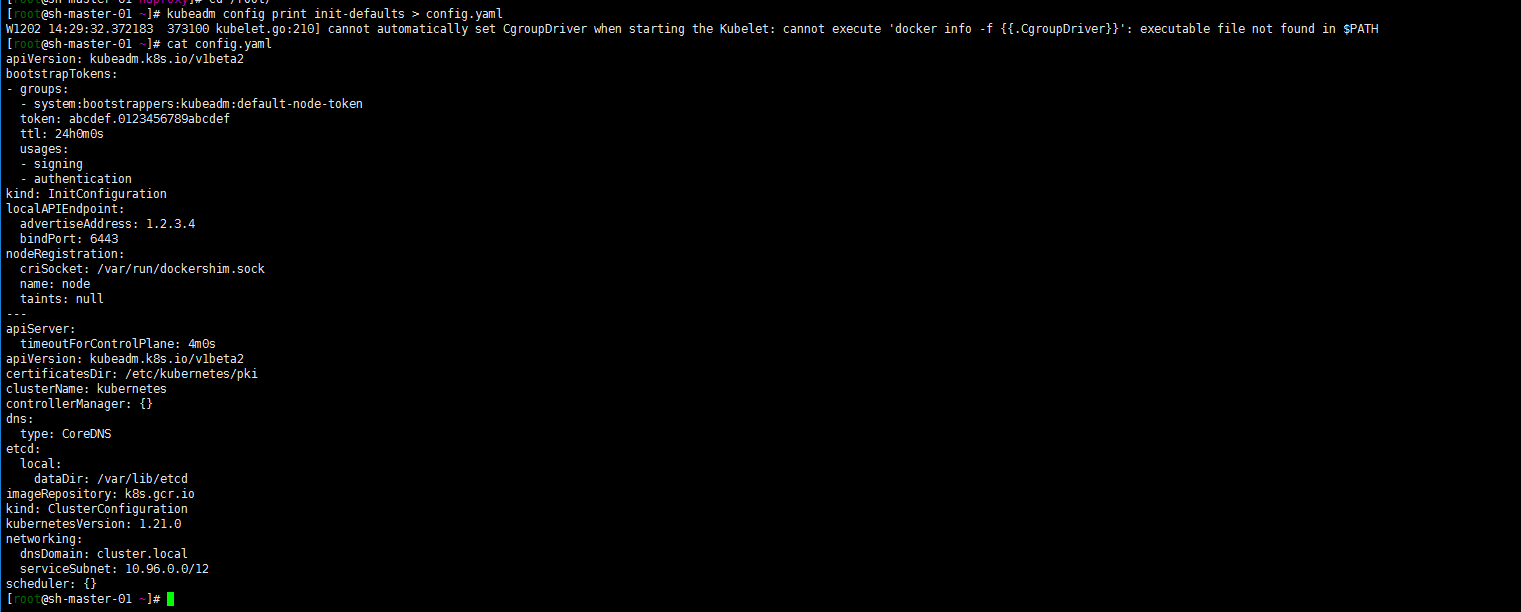
Modify the configuration file as follows:
apiVersion: kubeadm.k8s.io/v1beta2
bootstrapTokens:
- groups:
  - system:bootstrappers:kubeadm:default-node-token
  token: abcdef.0123456789abcdef
  ttl: 24h0m0s
  usages:
  - signing
  - authentication
kind: InitConfiguration
localAPIEndpoint:
  advertiseAddress: 10.10.2.8
  bindPort: 6443
nodeRegistration:
  criSocket: /run/containerd/containerd.sock
  name: sh-master-01
  taints:
  - effect: NoSchedule
    key: node-role.kubernetes.io/master
---
apiServer:
  timeoutForControlPlane: 4m0s
  certSANs:
  - sh-master-01
  - sh-master-02
  - sh-master-03
  - sh-master.k8s.io
  - localhost
  - 127.0.0.1
  - 10.10.2.8
  - 10.10.2.10
  - 10.10.5.4
  - 10.10.2.4
  - xx.xx.xx.xx
apiVersion: kubeadm.k8s.io/v1beta2
certificatesDir: /etc/kubernetes/pki
clusterName: kubernetes
controlPlaneEndpoint: "10.10.2.4:6443"
controllerManager: {}
dns:
  type: CoreDNS
etcd:
  local:
    dataDir: /var/lib/etcd
imageRepository: registry.aliyuncs.com/google_containers
kind: ClusterConfiguration
kubernetesVersion: 1.21.3
networking:
  dnsDomain: cluster.local
  serviceSubnet: 172.31.0.0/16
scheduler: {}
---
apiVersion: kubeproxy.config.k8s.io/v1alpha1
kind: KubeProxyConfiguration
mode: ipvs
ipvs:
  excludeCIDRs: null
  minSyncPeriod: 0s
  scheduler: "rr"
  strictARP: false
  syncPeriod: 15s
iptables:
  masqueradeAll: true
  masqueradeBit: 14
  minSyncPeriod: 0s
  syncPeriod: 30s
The configuration of ipvs is added, the subnet of service is specified, and the domestic image warehouse is also specified. Xx.xx.xx is that I reserved an ip (ip can be reserved to facilitate future expansion of the primary node)
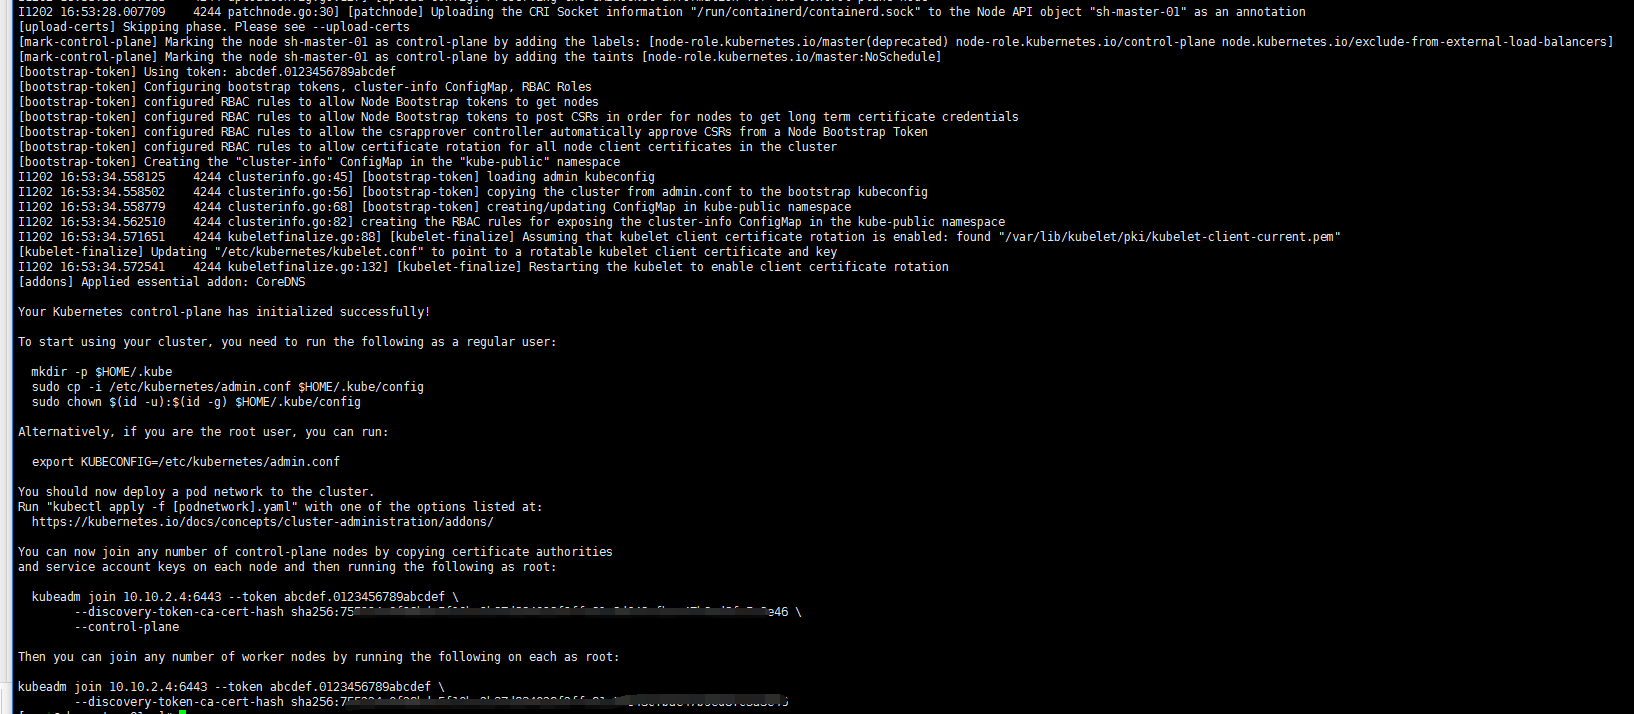
3. Kubedm master-01 node initialization
kubeadm init --config /root/config.yaml
Note: the following screenshot does not match the above command, because I started to want to install cilium... It failed. Hahaha, I'd better start calico first

Well, net.ipv4.ip was not used when optimizing system parameters_ Forward emphasize that sysctl -w is temporary
sysctl -w net.ipv4.ip_forward=1
For a long time, add it to the configuration file:
cat <<EOF > /etc/sysctl.d/99-sysctl.conf
fs.file-max=1000000
net.ipv4.tcp_max_tw_buckets = 6000
net.ipv4.tcp_sack = 1
net.ipv4.tcp_window_scaling = 1
net.ipv4.tcp_rmem = 4096 87380 4194304
net.ipv4.tcp_wmem = 4096 16384 4194304
net.ipv4.tcp_max_syn_backlog = 16384
net.core.netdev_max_backlog = 32768
net.core.somaxconn = 32768
net.core.wmem_default = 8388608
net.core.rmem_default = 8388608
net.core.rmem_max = 16777216
net.core.wmem_max = 16777216
net.ipv4.tcp_timestamps = 1
net.ipv4.tcp_fin_timeout = 20
net.ipv4.tcp_synack_retries = 2
net.ipv4.tcp_syn_retries = 2
net.ipv4.tcp_syncookies = 1
#net.ipv4.tcp_tw_len = 1
net.ipv4.ip_forward = 1
net.ipv4.tcp_tw_reuse = 1
net.ipv4.tcp_mem = 94500000 915000000 927000000
net.ipv4.tcp_max_orphans = 3276800
net.ipv4.ip_local_port_range = 1024 65000
net.nf_conntrack_max = 6553500
net.netfilter.nf_conntrack_max = 6553500
net.netfilter.nf_conntrack_tcp_timeout_close_wait = 60
net.netfilter.nf_conntrack_tcp_timeout_fin_wait = 120
net.netfilter.nf_conntrack_tcp_timeout_time_wait = 120
net.netfilter.nf_conntrack_tcp_timeout_established = 3600
EOF

sysctl --system
Note: all nodes execute
kubeadm init --config /root/config.yaml
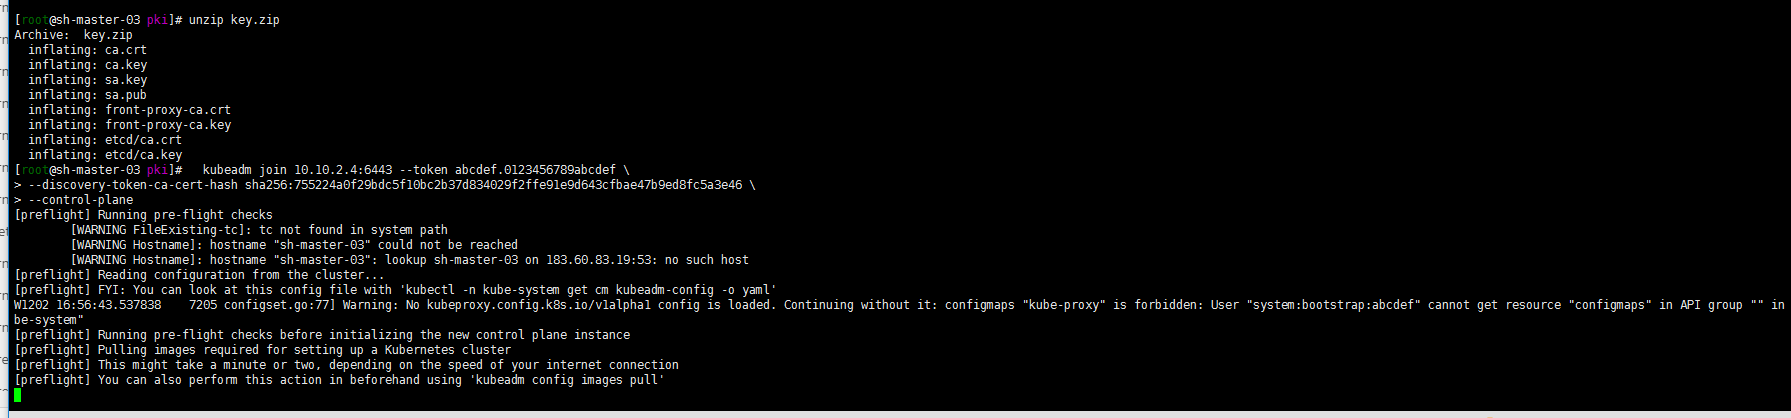
4. Sh-master-02 and sh-master-03 control plane nodes join the cluster
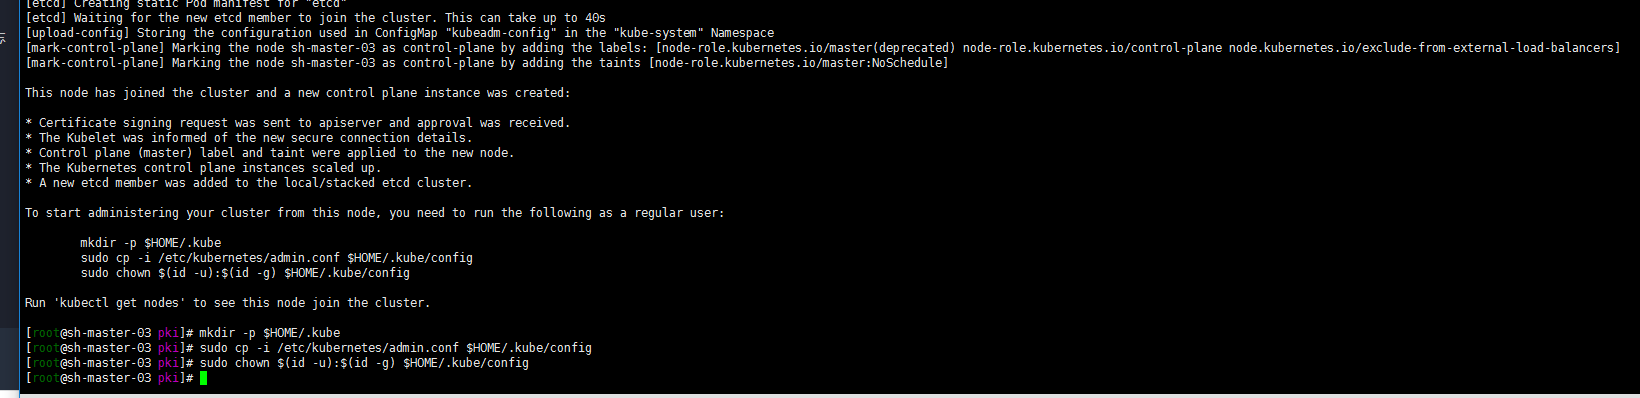
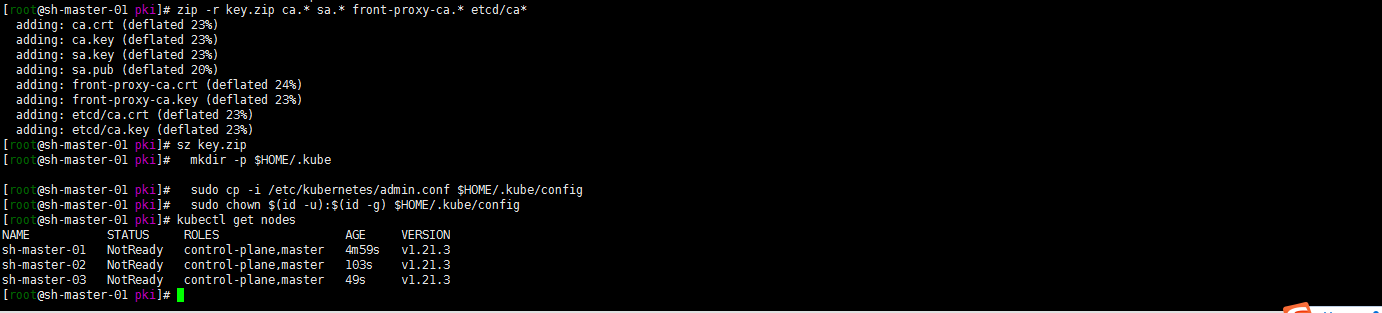
mkdir -p $HOME/.kube
mkdir -p $HOME/.kube  sudo cp -i /etc/kubernetes/admin.conf $HOME/.kube/config
sudo chown $(id -u):$(id -g) $HOME/.kube/config

According to output sh-master-02 ,sh-master-03 Nodes join the cluster
 take sh-master-01 /etc/kubernetes/pki Directory ca.* sa.* front-proxy-ca.* etcd/ca* Package and distribute to sh-master-02,sh-master-03 /etc/kubernetes/pki Directory
kubeadm join 10.10.2.4:6443 --token abcdef.0123456789abcdef --discovery-token-ca-cert-hash sha256:ccfd4e2b85a6a07fde8580422769c9e14113e8f05e95272e51cca2f13b0eb8c3 --control-plan
 Then the same sh-master-01 Execute the following command again:
mkdir -p $HOME/.kube
sudo \cp /etc/kubernetes/admin.conf $HOME/.kube/config
sudo chown $(id -u):$(id -g) $HOME/.kube/config
kubectl get nodes
Well, because cni network plug-ins are not installed, they are not ready.
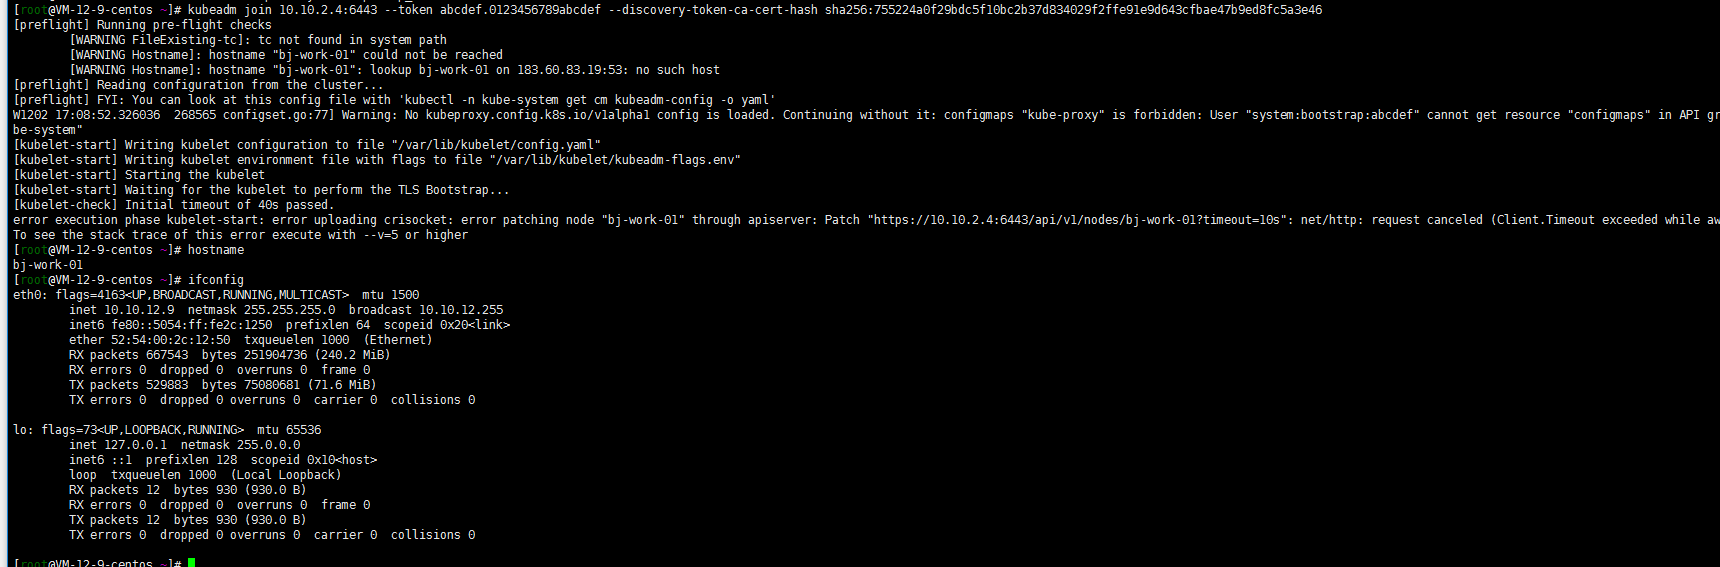
work nodes join the cluster
kubeadm join 10.10.2.4:6443 --token abcdef.0123456789abcdef --discovery-token-ca-cert-hash sha256:ccfd4e2b85a6a07fde8580422769c9e14113e8f05e95272e51cca2f13b0eb8c3

first cnn management console First, I purchased 1Mbps bandwidth. After all, I did the following tests:

Install cni network plug-in
Let's start with a simple calico (we didn't start with the whole flannel city. We'll calculate one by one first. We'll learn to optimize the others later)
curl https://docs.projectcalico.org/v3.11/manifests/calico.yaml -O
sed -i -e "s?192.168.0.0/16?172.31.0.0/16?g" calico.yaml
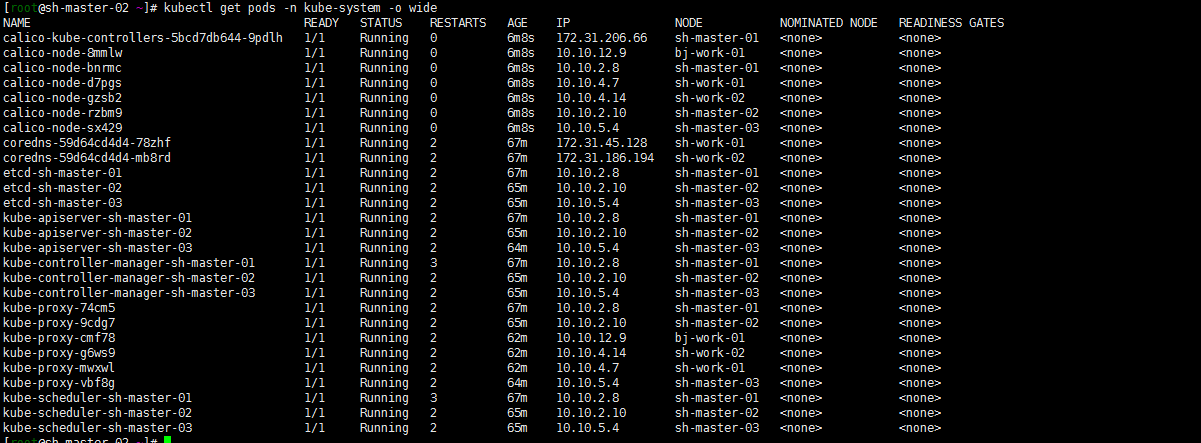
kubectl apply -f calico.yaml
kubectl get pods -o kube-system -o wide
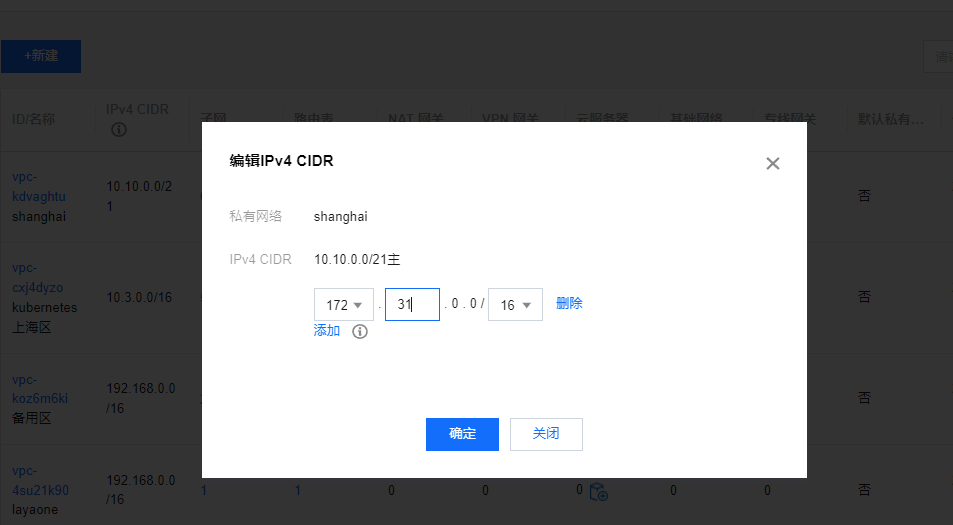
Note: I'm also in Tencent cloud Private network console Add an auxiliary cidr. I wonder if I can also communicate with container networks in other regions? Not tested yet... Just remember to add:
[
](https://console.cloud.tencent.com/vpc/vpc?rid=4)
Do a simple ping test:
1. Deploy two pod s in Shanghai
cat<<EOF | kubectl apply -f -
apiVersion: apps/v1
kind: Deployment
metadata:
  name: nginx
spec:
  selector:
    matchLabels:
      app: nginx
  template:
    metadata:
      labels:
        app: nginx
    spec:
      containers:
      - image: nginx:alpine
        name: nginx
        ports:
        - containerPort: 80
---
apiVersion: v1
kind: Service
metadata:
  name: nginx
spec:
  selector:
    app: nginx
  ports:
    - protocol: TCP
      port: 80
      targetPort: 80
---
apiVersion: v1
kind: Pod
metadata:
  name: busybox
  namespace: default
spec:
  containers:
  - name: busybox
    image: busybox:1.28.4
    command:
      - sleep
      - "3600"
    imagePullPolicy: IfNotPresent
  restartPolicy: Always
EOF
Well, they all run in Shanghai
[root@sh-master-01 ~]# kubectl get pods -o wide
NAME                     READY   STATUS    RESTARTS   AGE   IP              NODE         NOMINATED NODE   READINESS GATES
busybox                  1/1     Running   14         14h   172.31.45.132   sh-work-01   <none>           <none>
nginx-7fb7fd49b4-zrg77   1/1     Running   0          14h   172.31.45.131   sh-work-01   <none>           <none>
2. nodeSelector dispatcher starts a pod in Beijing
Then I want to start a pod running in Beijing. What's the matter? Steal a lazy tag and schedule nodeSelector!
kubectl label node bj-work-01 zone=beijing
cat nginx1.yaml
apiVersion: v1
kind: Pod
metadata:
  creationTimestamp: null
  labels:
    run: nginx1
  name: nginx1
spec:
  nodeSelector:              #Deploy the pod to the node with the specified label of zone and beijing
    zone: "beijing"
  containers:
  - image: nginx
    name: nginx1
    resources: {}
  dnsPolicy: ClusterFirst
  restartPolicy: Always
status: {}
kubectl apply -f nginx1.yaml
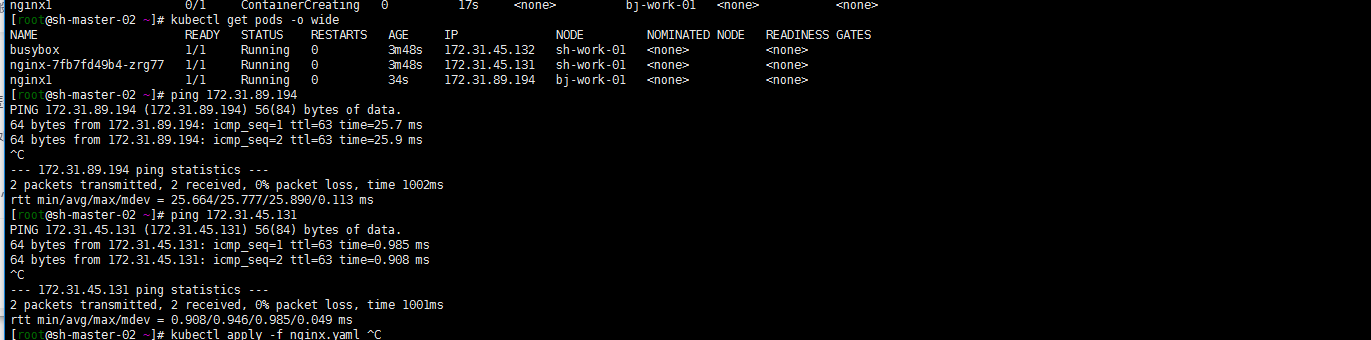
[root@sh-master-01 ~]# kubectl get pods -o wide
NAME                     READY   STATUS    RESTARTS   AGE   IP              NODE         NOMINATED NODE   READINESS GATES
busybox                  1/1     Running   14         14h   172.31.45.132   sh-work-01   <none>           <none>
nginx-7fb7fd49b4-zrg77   1/1     Running   0          14h   172.31.45.131   sh-work-01   <none>           <none>
nginx1                   1/1     Running   0          14h   172.31.89.194   bj-work-01   <none>           <none>
3. ping test
ping the Beijing pod and Shanghai pod at the sh-master-02 node
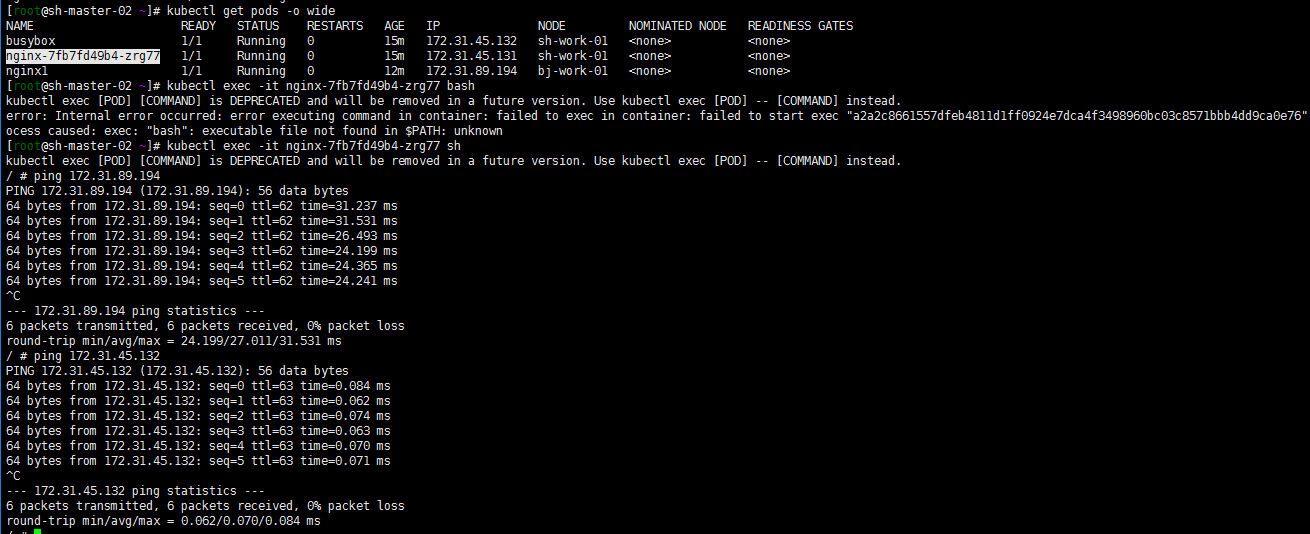
 ping the pod values of exec Shanghai and Beijing
It's basically the same. The main purpose is to verify the feasibility of building kubernetes clusters across regional VPCs. I haven't figured out how to test the network quality. Just throwing a brick to attract jade. The clouds are very big, and there are many above Chengdu. At least bgp configuration is relatively omitted. If there are cross regional kubernetes clusters on the cloud, you can refer to it.