I. Ant Installation
After successful download, copy the extracted directory to disk and configure environment variables
ant_home: File storage directory
2,path:%ant_home%\bin
3,classpath: %ant_home%\lib
Open cmd and enter ant-version validation 
2. Connect ant and jmeter (Notes)
1. Copy the ant-jmeter-1.1.1.jar package from the JMeter extras directory to the lib directory under the ant installation directory (will)
2. If the user who installs jmeter3.0 generates test reports with empty data, it is due to jmeter-results-detail-report.xsl in the extras directory. The data in jmeter2.1.3 will be empty.
jmeter-results-detail-report_21.xsl file is copied to the directory and pointed to in the xml file to solve the problem of empty data (aggregate report xsl)

3. The generated test report may have three indicators to display NAN, so copy xalan-2.7.2.jar and serializer-2.7.2.jar copy from jmeter's lib directory to Ant's lib package, and the regeneration will be successful!

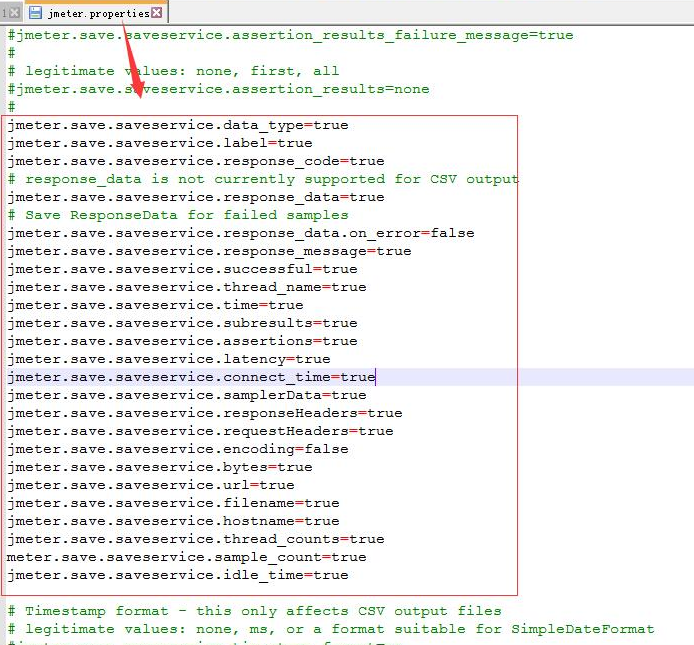
4. For problems associated with running error codes sometimes in ant: configuration of jmeter.properties file in bin directory of JMeter requiring revision: jmeter.save.saveservice.output_format=xml
5. The configuration of jmeter.properties file in the bin directory of JMeter is required for generating test data for detailed reports:
III. Project Start
1. Using jmeter visualization tool to create an interface script, not to mention in detail
2. Create build.xml code:
<?xml version="1.0" encoding="UTF-8"?>
<project name="ant-jmeter-test" default="run" basedir=".">
<tstamp>
<format property="time" pattern="yyyyMMddhhmm" />
</tstamp>
<!-- Need to change to your local one Jmeter Catalog-->
<property name="jmeter.home" value="F:\xxx\apache-jmeter-3.0" />
<!-- jmeter generate jtl Path of results report in format-->
<property name="jmeter.result.dir" value="TestReport/results/TestReport_all/Report" />
<property name="jmeter.detail_result.dir" value="TestReport/results/TestReport_all/DetailReport" />
<!-- Prefixes for generated reports-->
<property name="jmeter.result.jtlName" value="${jmeter.result.dir}/${jtl_Report}.jtl" />
<!-- Generate aggregate reports as a whole-->
<property name="jmeter.result.htmlName" value="${jmeter.result.dir}/${time}.html" />
<!-- Generate detailed reports for a single interface-->
<property name="jmeter.result.htmlName-detail" value="${jmeter.detail_result.dir}/${time}.html" />
<target name="run">
<echo message="start..."/>
<antcall target="clean" />
<antcall target="test" />
<antcall target="report" />
<antcall target="report_detail" />
</target>
<target name="clean">
<mkdir dir="TestReport/results/TestReport_all/Report" />
<mkdir dir="TestReport/results/TestReport_all/DetailReport" />
</target>
<target name="test">
<taskdef name="jmeter" classname="org.programmerplanet.ant.taskdefs.jmeter.JMeterTask" />
<jmeter jmeterhome="${jmeter.home}" resultlog="${jmeter.result.jtlName}">
<!-- A script that declares to run"*.jmx"Refers to all that is contained in this directory. jmeter Script-->
<testplans dir="F:\xxxx\apache-jmeter-3.0\demo" includes="*.jmx" />
<property name="jmeter.save.saveservice.output_format" value="xml"/>
</jmeter>
</target>
<!-- Generate aggregate reports as a whole-->
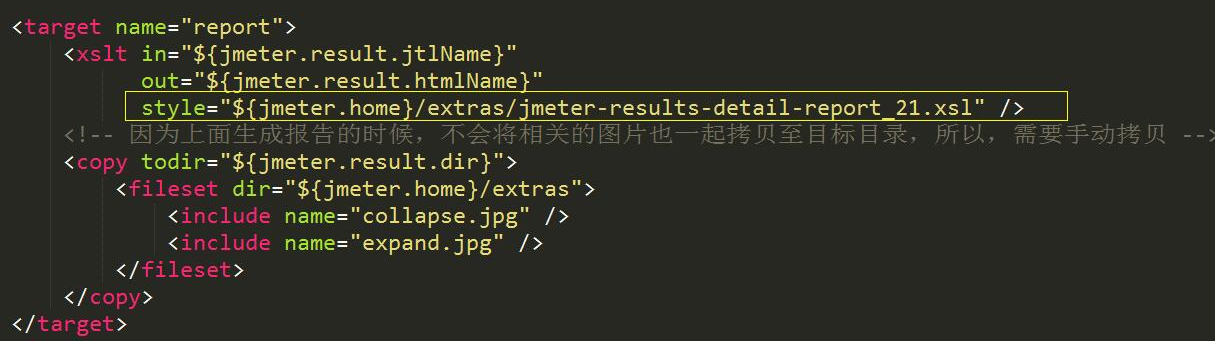
<target name="report">
<xslt in="${jmeter.result.jtlName}"
out="${jmeter.result.htmlName}"
style="${jmeter.home}/extras/jmeter-results-detail-report_21.xsl" /><!-- Generating aggregated reports as a whole xsl file-->
<!-- Because when the report is generated above, the relevant pictures will not be copied to the target directory, so you need to copy them manually. -->
<copy todir="${jmeter.result.dir}">
<fileset dir="${jmeter.home}/extras">
<include name="collapse.jpg" />
<include name="expand.jpg" />
</fileset>
</copy>
</target>
<!-- Generate detailed reports for a single interface-->
<target name="report_detail">
<xslt in="${jmeter.result.jtlName}"
out="${jmeter.result.htmlName-detail}"
style="${jmeter.home}/extras/jmeter.results.shanhe.me.xsl" /><!-- Generating detailed reports for a single interface xsl file-->
<!-- Because when the report is generated above, the relevant pictures will not be copied to the target directory, so you need to copy them manually. -->
<copy todir="${jmeter.result.dir}">
<fileset dir="${jmeter.home}/extras">
<include name="collapse.jpg" />
<include name="expand.jpg" />
</fileset>
</copy>
</target>
</project>3. Enter cmd to build.xml file directory and run ant to generate test report successfully.
(1) Polymerization Report 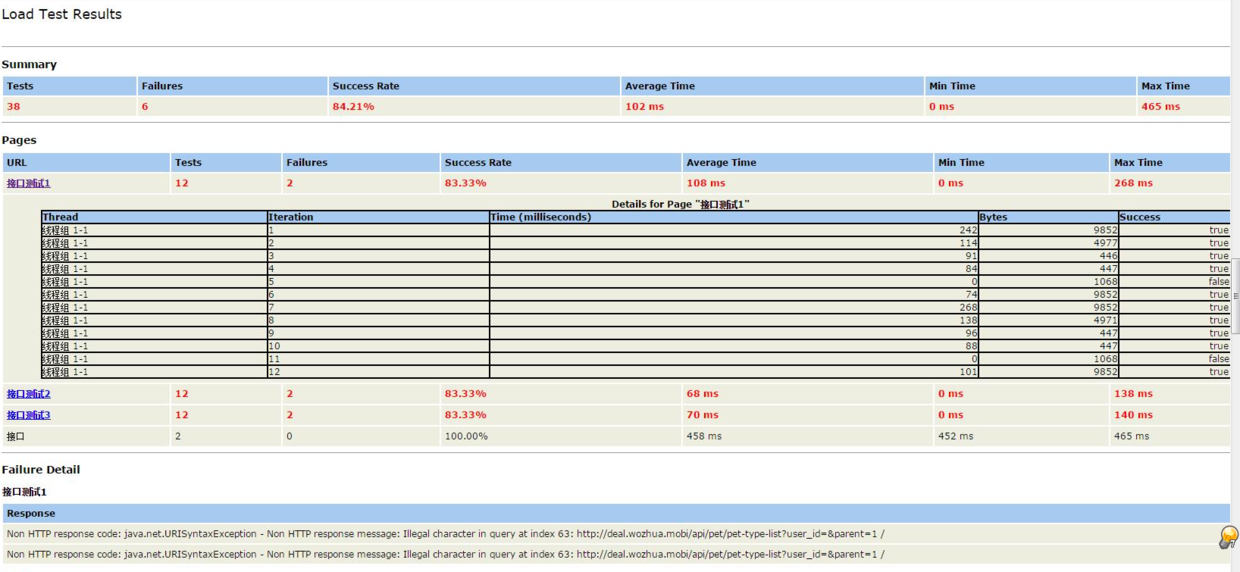
2. Detailed Report 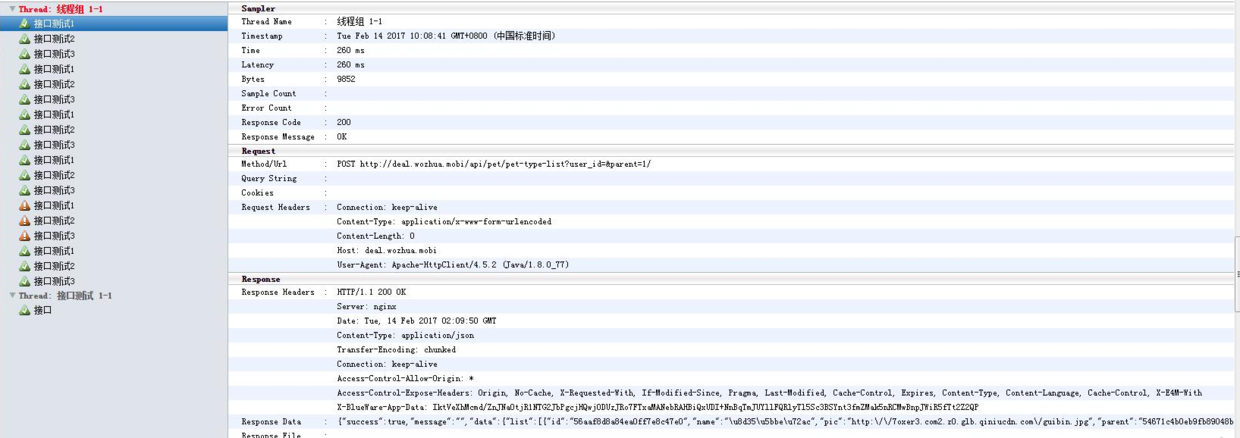
IV. Configuring jenkins
1. Download and install jenkins. Without change, the default address is: localhost:8080. Enter user name and password to the Jenkins homepage.
Click on a new project and go to the configuration page. For jmeter, you need to download professional plungin
System Management --- Download Plug-ins --- Find the Performance Plug-in Plug-ins and click Download. After successful installation, restart the service successfully.
