For the working principle and overview of LVS load balancing, please visit: LVS load balancing cluster of Centos 7
For detailed configuration of load balancing cluster in address translation (NAT) mode, please visit: Building load balancing cluster based on address translation (LVS-NAT) mode
I. start to configure DR mode LVS
preparation:
Four Centos 7 operating systems;
Centos01 simulated Web1 server: IP address / 192.168.100.10
Centos02 simulated Web 2 server: IP address / 192.168.100.20
Centos03 simulated NFS server: IP address / 192.168.100.30
Centos05 analog LVS server: IP address / 192.168.100.50
One Windows client;
1. Configure load scheduler
1) configure virtual IP address (VIP)
[root@centos05 ~]# cp /etc/sysconfig/network-scripts/ifcfg-ens32
/etc/sysconfig/network-scripts/ifcfg-ens32:0   <!--Copy network card profile-->
[root@centos05 ~]# vim /etc/sysconfig/network-scripts/ifcfg-ens32:0
                                    <!--To configure VIP Address network card, setting VIP The address is 192..168.100.253-->
TYPE=Ethernet
PROXY_METHOD=none
BROWSER_ONLY=no
BOOTPROTO=static
DEFROUTE=yes
NAME=ens32:0   <!--Modify name-->
DEVICE=ens32:0   <!--Modify name-->
ONBOOT=yes
IPADDR=192.168.100.253    <!--modify IP address-->
NATEMASK=255.255.255.0
[root@centos05 ~]# Systemctl restart network <! -- restart network card service -- >
[root@centos05 ~]# Ifconfig <! -- check whether the configuration is successful -- >
ens32: flags=4163<UP,BROADCAST,RUNNING,MULTICAST>  mtu 1500
        inet 192.168.100.50  netmask 255.255.255.0  broadcast 192.168.100.255
        inet6 fe80::20c:29ff:fe16:c54b  prefixlen 64  scopeid 0x20<link>
        ether 00:0c:29:16:c5:4b  txqueuelen 1000  (Ethernet)
        RX packets 2795  bytes 1095013 (1.0 MiB)
        RX errors 0  dropped 0  overruns 0  frame 0
        TX packets 1371  bytes 182001 (177.7 KiB)
        TX errors 0  dropped 0 overruns 0  carrier 0  collisions 0

ens32:0: flags=4163<UP,BROADCAST,RUNNING,MULTICAST>  mtu 1500
        inet 192.168.100.253  netmask 255.255.255.0  broadcast 192.168.100.255
        ether 00:0c:29:16:c5:4b  txqueuelen 1000  (Ethernet)
2) adjust the corresponding parameters of / proc
[root@centos05 ~]# vim /etc/sysctl.conf
                  <!--modify LVS Kernel profile support for server DR Pattern-->
net.ipv4.ip_forward = 1
net.ipv4.conf.all.send_redirects = 0
net.ipv4.conf.default.send_redirects = 0
net.ipv4.conf.ens32.send_redirects = 0

[root@centos05 ~]# Sysctl - P <! -- refresh -- >
3) configure load distribution strategy
[root@centos05 ~]# Modprobe IP vs <! -- load IP vs module -- >
[root@centos05 ~]# Yum - y install ipvsadm <! -- install ipvsadm tool -- >
[root@centos05 ~]# Ipvsadm - C <! -- clear old policy -- >
[root@centos05 ~]# Ipvsadm - A - t 192.168.100.253:80 - s RR <! -- configure scheduling server IP address -- >
[root@centos05 ~]# ipvsadm -a -t 192.168.100.253:80 -r 192.168.100.10:80 -g -w 1
                                                   <!--Add physical server-->
[root@centos05 ~]# ipvsadm -a -t 192.168.100.253:80 -r 192.168.100.20:80 -g -w 1
                                                      <!--Add physical server-->
[root@centos05 ~]# Ipvsadm save > / etc / sysconfig / ipvsadm <! -- export policy backup -- >
[root@centos04 ~]# Ipvsadm - ln <! -- confirm current cluster policy -- >
IP Virtual Server version 1.2.1 (size=4096)
Prot LocalAddress:Port Scheduler Flags
  -> RemoteAddress:Port           Forward Weight ActiveConn InActConn
TCP  192.168.100.253:80 rr
  -> 192.168.100.10:80            Route   1      0          0
  -> 192.168.100.20:80            Route   1      0          0
2. Configure the web node 1 server
[root@centos01 ~]# Yum - y install httpd <! -- install http Service -- >
[root@centos01 ~]# echo "www.benet.com" > /var/www/html/index.html
             <!--Prepare the test page, wait until you see the effect of load balancing, and then mount the shared storage device-->
[root@centos01 ~]# Systemctl start httpd <! -- start http Service -- >
[root@centos01 ~]# Systemctl enable httpd <! -- set to power on and start up -- >
[root@centos01 ~]# cp /etc/sysconfig/network-scripts/ifcfg-lo
/etc/sysconfig/network-scripts/ifcfg-lo:0     <!--Generate virtual network card-->
[root@centos01 ~]# vim /etc/sysconfig/network-scripts/ifcfg-lo:0
                                      <!--Edit the listening address of virtual network card as lvs Server VIP address-->
DEVICE=lo:0
IPADDR=192.168.100.253
NETMASK=255.255.255.255
ONBOOT=yes
[root@centos01 ~]# Systemctl restart network <! -- restart network card service -- >
[root@centos01 ~]# Ifconfig <! -- check whether the configuration is effective -- >
lo:0: flags=73<UP,LOOPBACK,RUNNING>  mtu 65536
        inet 192.168.100.253  netmask 255.255.255.255
        loop  txqueuelen 1  (Local Loopback)
[root@centos01 ~]# VIM / etc / sysctl.conf <! -- modify web server ARP response -- >
net.ipv4.conf.all.arp_ignore = 1
net.ipv4.conf.all.arp_announce = 2
net.ipv4.conf.default.arp_ignore = 1
net.ipv4.conf.default.arp_announce = 2
net.ipv4.conf.lo.arp_ignore = 1
net.ipv4.conf.lo.arp_announce = 2
[root@centos01 ~]# Sysctl - P <! -- refresh -- >
3. Configure web node 2 server
[root@centos02 ~]# Yum - y install httpd <! -- install http Service -- >
[root@centos02 ~]# echo "www.accp.com" > /var/www/html/index.html
             <!--Prepare the test page, wait until you see the effect of load balancing, and then mount the shared storage device-->
[root@centos02 ~]# Systemctl start httpd <! -- start http Service -- >
[root@centos02 ~]# Systemctl enable httpd <! -- set to power on and start up -- >
[root@centos01 ~]# scp /etc/sysctl.conf root@192.168.100.20:/etc/
 <!--Copy the first web The server/etc/sysctl.conf Profile to second web Server/etc/Directory-->
The authenticity of host '192.168.100.30 (192.168.100.20)' can't be established.
ECDSA key fingerprint is SHA256:PUueT9fU9QbsyNB5NC5hbSXzaWxxQavBxXmfoknXl4I.
ECDSA key fingerprint is MD5:6d:f7:95:0e:51:1a:d8:9e:7b:b6:3f:58:51:51:4b:3b.
Are you sure you want to continue connecting (yes/no)? yes
Warning: Permanently added '192.168.100.20' (ECDSA) to the list of known hosts.
root@192.168.100.20's password:
sysctl.conf
[root@centos01 ~]# scp /etc/sysconfig/network-scripts/ifcfg-lo:0
                           <!--Copy lo:0 Network card profile to the second web The server--> root@192.168.100.20:/etc/sysconfig/network-scripts/
root@192.168.100.20's password:
ifcfg-lo:0                                                          100%   70   177.3KB/s   00:00
[root@centos02 ~]# Sysctl - P <! -- update the configuration on the second web server -- >
net.ipv4.conf.all.arp_ignore = 1
net.ipv4.conf.all.arp_announce = 2
net.ipv4.conf.default.arp_ignore = 1
net.ipv4.conf.default.arp_announce = 2
net.ipv4.conf.lo.arp_ignore = 1
net.ipv4.conf.lo.arp_announce = 2
[root@centos02 ~]# Systemctl restart network <! -- the second web server restarts the network card service -- >
4. Client access
The IP address of the same network segment of the client configuration and the server is accessed by the browser at http://192.168.100.253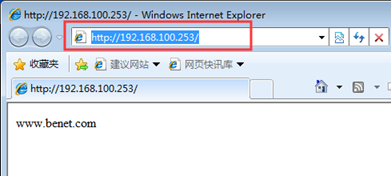
Close the browser and delete the cache, and you will get a new page when you visit it again, which realizes load balancing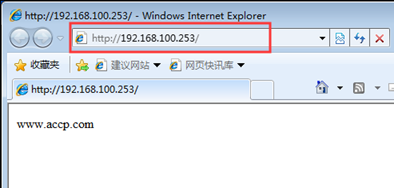
II. Install NFS shared storage
1. Configure NFS
[root@centos03 ~]# Yum - y install rpcbind NFS utils <! -- install NFS system -- >
[root@centos03 ~]# MKDIR / Web <! -- create shared site root file -- >
[root@centos03 ~]# Echo "www.nfs. Com" >
[root@centos03 ~]# VIM / etc / exports <! -- modify the nfs primary profile share / web directory,
//Allow 100.10 to read shared directory, 100.20 to read and write shared directory -- >
/web    192.168.100.10(ro) 192.168.100.20(rw)
[root@centos03 ~]# Systemctl start rpcbind <! -- start rpcbind -- >
[root@centos03 ~]# Systemctl start nfs <! -- start nfs Service -- >
[root@centos03 ~]# Systemctl enable rpcbind <! -- set auto start after power on -- >
[root@centos03 ~]# Systemctl enable NFS <! -- set power on auto start -- >
[root@centos03 ~]# Showmount - e 192.168.100.30 <! -- view shared directory -- >
Export list for 192.168.100.30:
/web 192.168.100.20,192.168.100.10
2. Mount the shared directory on the server of Web node 1
[root@centos01 ~]# mount 192.168.100.30:/web /var/www/html/
                             <!--Mount the shared directory to the root of the web server-->
[root@centos01 ~]# Cat / var / www / HTML / index. HTML <! -- check whether the mount is successful -- >
www.nfs.com
[root@centos01 ~]# Systemctl restart httpd <! -- restart httpd Service -- >
3. Web node 2 server mounts shared directory
[root@centos02 ~]# mount 192.168.100.30:/web /var/www/html/
                                            <!--Mount the shared directory to the root of the web server-->
[root@centos02 ~]# Cat / var / www / HTML / index. HTML <! -- check whether the mount is successful -- >
www.nfs.com
[root@centos02 ~]# Systemctl restart httpd <! -- restart httpd Service -- >
4. Client access
Use tail -f /var/log/httpd/access.log to view the access success log. You must listen before accessing to see the effect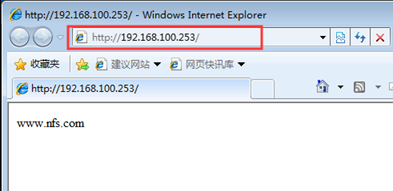


5. Configure auto mount NFS
1) web node 1 server
[root@centos01 ~]# vim /etc/fstab
192.168.100.30:/web /var/www/html/                                nsf     defaults        0 0
2) web node 2 server
[root@centos02 ~]# vim /etc/fstab
192.168.100.30:/web /var/www/html/                                nsf     defaults        0 0
——————Thank you for reading——————