This post is a case post. For an overview of the principles and related overviews of LVS Load Balancing Clusters, please refer to the post: LVS Load Balancing Cluster for Centos 7
1. Introduction to Cases
1. Case Environment
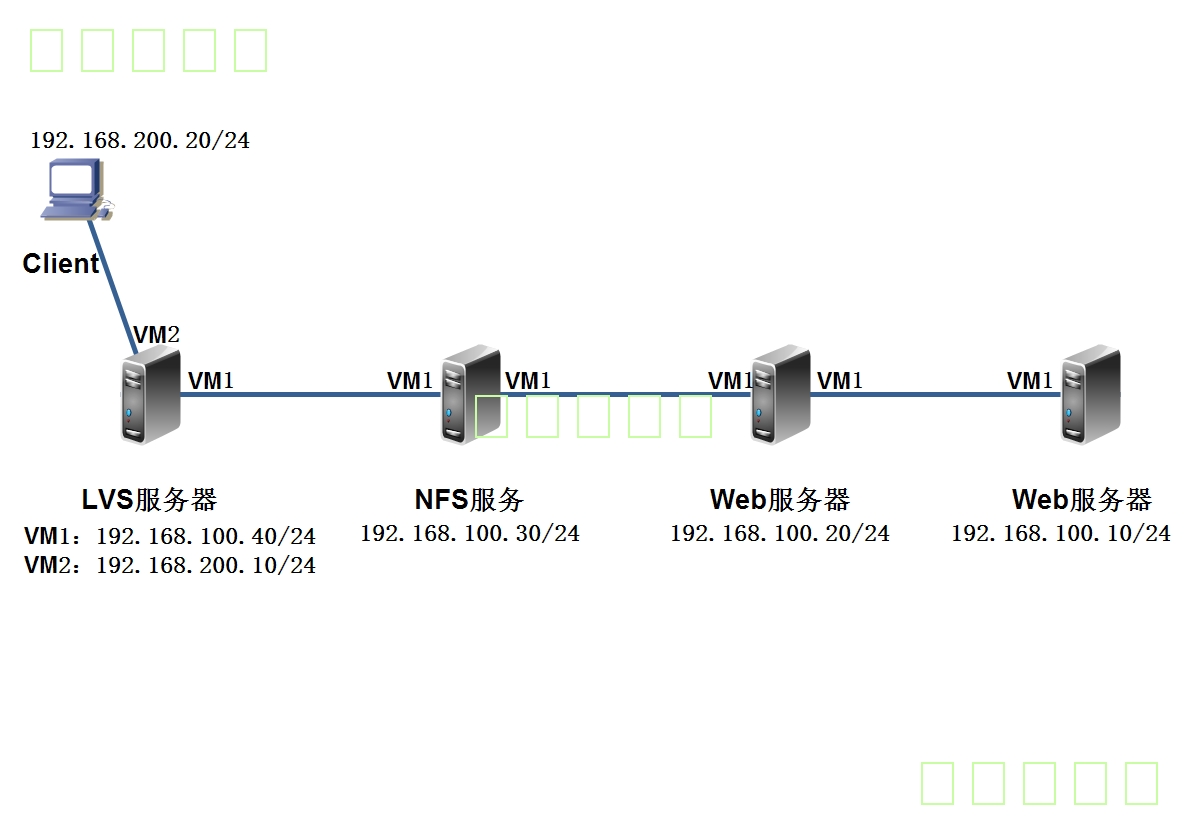
2. Experimental results
-
Using NAT-mode clustering technology, the LVS load dispatcher is a gateway server where all nodes access the Internet and 192.168.200.10 serves as the VIP address for the entire cluster.
-
Use a polling (rr) scheduling algorithm.
-
web1 and web2 set up Web services to prepare different web page files for client access to determine 192.168.200.10 for client access to the LVS server and access to two web servers.
- After the client test succeeds, web1 and web2 can mount the shared directory provided by the NFS server to provide the same web page file for the client.
2. Start building replication balanced clusters
1. Deploy the Web1 server:
[root@centos01 ~]# Yum-y install httpd <!--Install httpd service-->
[root@centos01 ~]# echo "www.benet.com" >
/var/www/html/index.html   <!--Create a site home page test page-->
[root@centos01 ~]# Systemctl start httpd <!--Start httpd service-->
[root@centos01 ~]# Systemctl enable httpd <!--Set startup autostart-->
[root@centos01 ~]# vim /etc/sysconfig/network-scripts/ifcfg-ens32
      <!--Edit Network Card Profile-->
GATEWAY=192.168.100.40   <!--Add Gateway-->
[root@centos01 ~]# Systemctl restart network<!--Restart network card service-->
2. Deploy a Web2 server:
[root@centos02 ~]# Yum-y install httpd <!--Install httpd service-->
[root@centos02 ~]# echo "www.accp.com" >
/var/www/html/index.html    <!--Create a site home page test page-->
[root@centos02 ~]# Systemctl start httpd <!--Start httpd service-->
[root@centos02 ~]# Systemctl enable httpd <!--Set startup autostart-->
[root@centos02 ~]# vim /etc/sysconfig/network-scripts/ifcfg-ens32
          <!--Edit Network Card Profile-->
GATEWAY=192.168.100.40   <!--Add Gateway-->
[root@centos02 ~]# Systemctl restart network <!--Restart network card service-->
3. Deploy Gateway/LVS Server:
[root@centos04 ~]# cp /etc/sysconfig/network-scripts/ifcfg-ens32
/etc/sysconfig/network-scripts/ifcfg-ens34
<!--Copy Network Card Profile-->
[root@centos04 ~]# vim /etc/sysconfig/network-scripts/ifcfg-ens34
        <!--edit ens34 Network Card Profile-->
TYPE=Ethernet
PROXY_METHOD=none
BROWSER_ONLY=no
BOOTPROTO=static
DEFROUTE=yes
NAME=ens34      <!--Modify Name-->
DEVICE=ens34   <!--Modify Name-->
ONBOOT=yes
IPADDR=192.168.200.10   <!--To configure IP address-->
NATEMASK=255.255.255.0
[root@centos04 ~]# Systemctl restart network <!--Restart network card service-->
[root@centos04 ~]# Vim/etc/sysctl.conf <!--Turn on routing forwarding-->
net.ipv4.ip_forward = 1

[root@centos04 ~]# Sysctl-p <!--Verification-->
net.ipv4.ip_forward = 1
[root@centos04 ~]# Modprobe ip_vs <!--Load ip_vs module-->
[root@centos04 ~]# Yum-y install ipvsadm<!--Install ipvsadm package-->
[root@centos04 ~]# Ipvsadm-C <!--Empty ipvsadm rules-->
[root@centos04 ~]# ipvsadm -A -t 192.168.200.10:80 -s rr
             <!--Create a virtual server, clustered VIP Address 192.168.200.10-->
[root@centos04 ~]# ipvsadm -a -t 192.168.200.10:80 -r
192.168.100.10:80 -m -w 1   <!--Add Server Node-->
[root@centos04 ~]# ipvsadm -a -t 192.168.200.10:80 -r
192.168.100.20:80 -m -w 1   <!--Add Server Node-->
[root@centos04 ~]# Ipvsadm-save <!--Save Policy-->
-A -t centos04:http -s rr
-a -t centos04:http -r 192.168.100.10:http -m -w 1
-a -t centos04:http -r 192.168.100.20:http -m -w 1
[root@centos04 ~]# ipvsadm-save >
/etc/sysconfig/ipvsadm.bak<!--Export Policy Backup Policy-->
[root@centos04 ~]# Cat/etc/sysconfig/ipvsadm.bak <!--View backup strategies-->
-A -t centos04:http -s rr
-a -t centos04:http -r 192.168.100.10:http -m -w 1
-a -t centos04:http -r 192.168.100.20:http -m -w 1
4. Configure Client
1) Client Configuration IP Address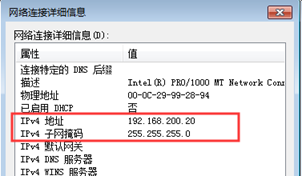
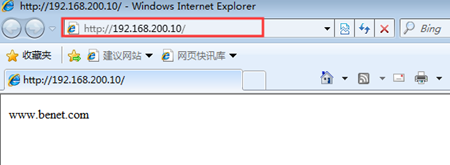
2) Test if the LVS load balancing server is working properly (you can get two different pages by visiting 192.168.200.10 multiple times):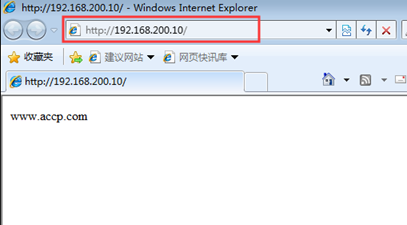
5. Configure NFS Shared Storage
[root@centos03 ~]# Yum-y install nfs-utils rpcbind <!--Install NFS related packages-->
[root@centos03 ~]# Systemctl enable NFS <!--Set to Start Automatically-->
[root@centos03 ~]# Systemctl enable rpcbind <!--Set to Start Automatically-->
[root@centos03 ~]# Mkdir-p/opt/wwwroot <!--Create shared directory-->
[root@centos03 ~]# echo "www.wangyi.com" >
/opt/wwwroot/index.html   <!--Create a new site home page to write content-->
[root@centos03 ~]# Vim/etc/exports <!--Set Shared Directory-->
/opt/wwwroot    192.168.100.0/24(rw,sync,no_root_squash)  <!--Add this line-->
[root@centos03 ~]# Systemctl restart rpcbind <!--Restart Service-->
[root@centos03 ~]# Systemctl restart NFS <!--Restart service-->
[root@centos03 ~]# Showmount-e <!--View shared directories-->
Export list for centos03:
/opt/wwwroot 192.168.100.0/24
1) Web server 1 mounts shared directories
[root@centos01 ~]# Yum-y install rpcbind nfs-utils<!--Install related packages-->
[root@centos01 ~]# systemctl enable rpcbind
                       <!--Set Service Start Automatically-->
[root@centos01 ~]# Systemctl start rpcbind <!--Start service-->
[root@centos01 ~]# showmount -e 192.168.100.30
                           <!--query NFS Server Shared Directory-->
Export list for 192.168.100.30:
/opt/wwwroot 192.168.100.0/24
[root@centos01 ~]# mount 192.168.100.30:/opt/wwwroot
/var/www/html/   <!--Mount Shared Directory-->
[root@centos01 ~]# Df-hT/var/www/html/ <!--Check to see if the mount was successful-->
//File System Type Capacity Used Available%Mountpoint
192.168.100.30:/opt/wwwroot nfs4   76G  3.7G   73G    5% /var/www/html
[root@centos01 ~]# Vim/etc/fstab <!--Set automount-->
192.168.100.30:/opt/wwwroot     /var/www/html                     nfs     defaults,_netdev 0 0
2) Web server 2 mounts shared directories
[root@centos02 ~]# Yum-y install rpcbind nfs-utils <!--Install related packages-->
[root@centos02 ~]# systemctl enable rpcbind
                                     <!--Set Service Start Automatically-->
[root@centos02 ~]# Systemctl start rpcbind <!--Start service-->
[root@centos02 ~]# showmount -e 192.168.100.30
                             <!--query NFS Server Shared Directory-->
Export list for 192.168.100.30:
/opt/wwwroot 192.168.100.0/24
[root@centos02 ~]# mount 192.168.100.30:/opt/wwwroot
/var/www/html/     <!--Mount Shared Directory-->
[root@centos02 ~]# Df-hT/var/www/html/ <!--Check to see if the mount was successful-->
//File System Type Capacity Used Available%Mountpoint
192.168.100.30:/opt/wwwroot nfs4   76G  3.7G   73G    5% /var/www/html
[root@centos02 ~]# Vim/etc/fstab <!--Set automount-->
192.168.100.30:/opt/wwwroot     /var/www/html                     nfs     defaults,_netdev 0 0
6. Client Access
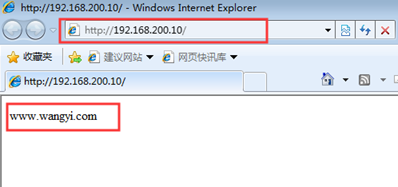
At this point, however you refresh your access, you will see the same page.The final LVS load balancing effect is also achieved.
When the LVS server is restarted, the LVS rules will be lost, which requires backup. It is important to note that the host name at backup and restore must be the same, and that the network card priority issue should be noted. Otherwise, VIP (clustered virtual IP) will become another IP address of the LVS server after recovery.
[root@centos04 ~]# Ipvsadm-ln <!--View policy after restart-->
IP Virtual Server version 1.2.1 (size=4096)
Prot LocalAddress:Port Scheduler Flags
  -> RemoteAddress:Port           Forward Weight ActiveConn InActConn

[root@centos04 ~]# ipvsadm-restore <
/etc/sysconfig/ipvsadm.bak    <!--Recovery Policy-->
[root@centos04 ~]# Ipvsadm-ln <!--Check to see if the policy is restored-->
IP Virtual Server version 1.2.1 (size=4096)
Prot LocalAddress:Port Scheduler Flags
  -> RemoteAddress:Port           Forward Weight ActiveConn InActConn
TCP  192.168.100.40:80 rr
  -> 192.168.100.10:80            Masq    1      0          0
  -> 192.168.100.20:80            Masq    1      0          0
- This is the end of the article. Thank you for reading ---