1. Install OpenLDAP
yum install openldap openldap-clients openldap-servers
Start directly after installation
```
systemctl start  slapd
```
Set Administrator Password```

slappasswd -h {SSHA}
    ```

You will then be asked to enter a clear text password and return to you an encrypted password, remembering the password that was returned
Use the ldapsearch command to query the administrator's dn:
ldapsearch -LLL -Y EXTERNAL -H ldapi:/// -b cn=config "olcRootDN=cn=Manager,dc=my-domain,dc=com" dn olcRootDN olcRootPW
The dn returned here is olcDatabase={2}hdb,cn=config, password, and so on.What's useful here is the encryption of dn and passwords, such as SSHA, where dn is the Entry DN that was later modified, and knowing how the password is encrypted allows you to generate a new password.
Modify entries using ldapmodify
vim chrootpw.ldif
#This is the administrator dn obtained in step 1
dn: olcDatabase={2}hdb,cn=config
changetype: modify
replace: olcSuffix
#The suffix of the domain name you want to change to
olcSuffix: dc=xinniu,dc=com
#Always add these lines to olcSuffix, otherwise an error will occur after modification and subsequent restarts of openldap will fail

dn: olcDatabase={2}hdb,cn=config
changetype: modify
replace: olcRootDN
#The domain name you want to change to
olcRootDN: cn=admin,dc=xinniu,dc=com

dn: olcDatabase={2}hdb,cn=config
changetype: modify
replace: olcRootPW
#Here's the encrypted password you just saved
olcRootPW: {SSHA}uYnICxla0NrUC5b/ha4i1JeOTCoUchV+
Figure: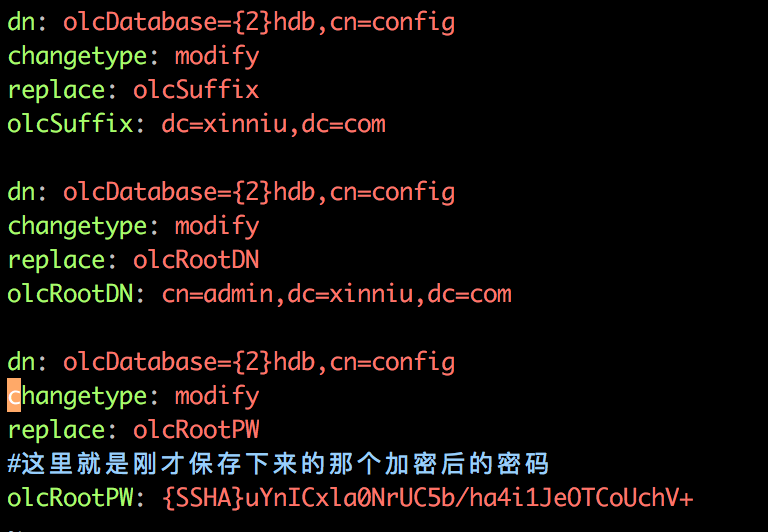
Use the following command to modify an administrator entry:
ldapmodify -Y EXTERNAL -H ldapi:/// -f chrootpw.ldif
If present:
modifying entry "olcDatabase={2}bdb,cn=config"Import Basic Data Structure
We need to import some basic Schemas into LDAP.These Schema files are located in the / etc/openldap/schema/directory, and the schema controls which object classes and attributes the entry has
ldapadd -Y EXTERNAL -H ldapi:/// -D "cn=config" -f /etc/openldap/schema/cosine.ldif
ldapadd -Y EXTERNAL -H ldapi:/// -D "cn=config" -f /etc/openldap/schema/nis.ldif
ldapadd -Y EXTERNAL -H ldapi:/// -D "cn=config" -f /etc/openldap/schema/collective.ldif
ldapadd -Y EXTERNAL -H ldapi:/// -D "cn=config" -f /etc/openldap/schema/corba.ldif
ldapadd -Y EXTERNAL -H ldapi:/// -D "cn=config" -f /etc/openldap/schema/core.ldif
ldapadd -Y EXTERNAL -H ldapi:/// -D "cn=config" -f /etc/openldap/schema/duaconf.ldif
ldapadd -Y EXTERNAL -H ldapi:/// -D "cn=config" -f /etc/openldap/schema/dyngroup.ldif
ldapadd -Y EXTERNAL -H ldapi:/// -D "cn=config" -f /etc/openldap/schema/inetorgperson.ldif
ldapadd -Y EXTERNAL -H ldapi:/// -D "cn=config" -f /etc/openldap/schema/java.ldif
ldapadd -Y EXTERNAL -H ldapi:/// -D "cn=config" -f /etc/openldap/schema/misc.ldif
ldapadd -Y EXTERNAL -H ldapi:/// -D "cn=config" -f /etc/openldap/schema/openldap.ldif
ldapadd -Y EXTERNAL -H ldapi:/// -D "cn=config" -f /etc/openldap/schema/pmi.ldif
ldapadd -Y EXTERNAL -H ldapi:/// -D "cn=config" -f /etc/openldap/schema/ppolicy.ldif
Open ldap log
mkdir -p /var/log/slapd
chown ldap:ldap /var/log/slapd/
touch /var/log/slapd/slapd.log
chown ldap . /var/log/slapd/slapd.log
echo "local4.* /var/log/slapd/slapd.log" >> /etc/rsyslog.conf
The administrator's password is set here.openldap can be managed with the client
It is intended to use phpldapadmin to manage openldap. This tool is used by many people, has many documents on the Internet and is easy to solve problems.
2. Install phpldapadmin (ldap management tool)
First install Apache and PHP:
yum -y install httpd php php-ldap php-gd php-mbstring php-pear php-bcmath php-xml
Then install phpldapadmin:
yum -y install phpldapadmin
httpd is integrated with phpldapadmin:
Modify profile:
[root@localhost ~]# vim /etc/phpldapadmin/config.php
Line # uncomment, line 398 comment
    $servers->setValue('login','attr','dn');
    // $servers->setValue('login','attr','uid');
This needs to be modified. If not, phpldapadmin will use uid to search for entries, not dn to search for entries, resulting in a password error.
[root@localhost ~]# phpldapadmin's ip filtering rule denies all ip access by default. Modify the rule before we can access it
vim /etc/httpd/conf.d/phpldapadmin.conf
##This is Apache 2.2 and previous modifications
//Modify Configuration
Change the following Deny from all to Allow from all
##This is Apache 2.4 and later modifications
#Allow 172.16.10.16 access
Require ip 172.16.10.16
#Allow 172.16 access to this segment
Require ip 172.16.0.0/16
#Allow all ip access
Require all granted
We can modify it to suit our needs
Start after modification:
systemctl restart httpd
Interface:
Land
User name, default is cn=Manager, dc=my-domain, dc=com (this can be changed, follow the steps for password change)
Password Enter the password you just set
When I log in, my management interface reports this message:
This base cannot be created with PLA
The results are as follows: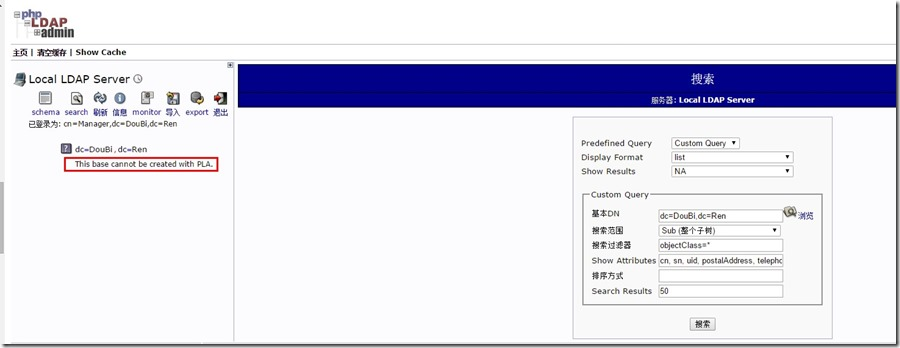
After querying, because the root node needs to be initialized before it can be used, the final processing is as follows:
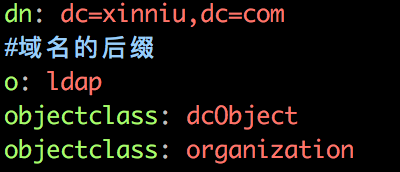
1. Create an initroot.ldif file to prepare for the creation of an initialization root node, as follows:
dn: dc=xinniu,dc=com
#Suffix of domain name
o: ldap
objectclass: dcObject
objectclass: organization
2. After executing ldapadd-f initroot.ldif-x-D cn=admin, dc=xinniu, dc=com-W before entering the password for OpenLDAP, you can complete the creation of the LDAP root node, as shown in the following figure:
When you return to the phpldapadmin page, you can see that the root node has normally appeared and you can create related OU, Group, Account, and so on, as shown in the following figure: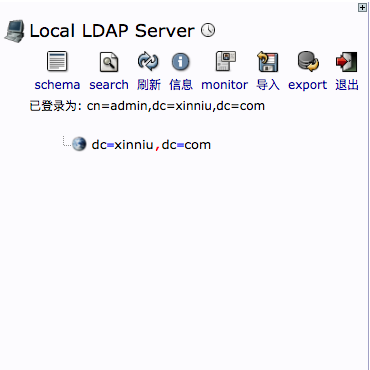
At this point, a server openldap+phpldapadmin is set up, and another one is set up according to this procedure.
3. Configure dual master replication to perform the following steps on Master 1 and Master 2
The implementation of ldap dual master replication depends on the syncprov module, which is located in the / usr/lib64/openldap directory
1.mod_syncprov.ldif
[root@server1] vim mod_syncprov.ldif
# create new
dn: cn=module,cn=config
objectClass: olcModuleList
cn: module
olcModulePath: /usr/lib64/openldap
olcModuleLoad: syncprov.la
Import Configuration
[root@server1 ~]# ldapadd -Y EXTERNAL -H ldapi:/// -f mod_syncprov.ldif
2.syncprov.ldif
[root@server1] vim syncprov.ldif
# create new
dn: olcOverlay=syncprov,olcDatabase={2}hdb,cn=config
objectClass: olcOverlayConfig
objectClass: olcSyncProvConfig
olcOverlay: syncprov
olcSpSessionLog: 100
Import Configuration
[root@server1 ~]# ldapadd -Y EXTERNAL -H ldapi:/// -f syncprov.ldif
Perform the following steps on Masters 1 and 2, simply replacing the values of olcServerID and provider
[root@server1] ~/ldif$ vim master01.ldif
# create new
dn: cn=config
changetype: modify
replace: olcServerID
# specify uniq ID number on each server
olcServerID: 1
# Unique value, replaced by 2 on main 2

dn: olcDatabase={2}hdb,cn=config
changetype: modify
add: olcSyncRepl
olcSyncRepl: rid=001
  provider=ldap://basic-server-2:389/
    ##This is the primary 2 server address, and primary 2 is replaced by the primary 1 server address accordingly
  bindmethod=simple
  binddn="cn=admin,dc=xinniu,dc=com"
  credentials=bigdata123!
    #Administrator's clear text password
  searchbase="dc=xinniu,dc=com"
  scope=sub
  schemachecking=on
  type=refreshAndPersist
  retry="30 5 300 3"
  interval=00:00:05:00
-
add: olcMirrorMode
olcMirrorMode: TRUE

dn: olcOverlay=syncprov,olcDatabase={2}hdb,cn=config
changetype: add
objectClass: olcOverlayConfig
objectClass: olcSyncProvConfig
olcOverlay: syncprov
Import Configuration
root@SERVER ~]# ldapmodify -Y EXTERNAL -H ldapi:/// -f master01.ldif
4. Verification
When this is done, we create an entry on the management interface of master 1 and open the management interface of master 2. If you can see the entry we just created, the dual master has been successfully configured.