Every system needs an entrance for users to enter, which is generally used to connect the public network and the internal network. It is the total entrance of system traffic and the front guard of the system. This paper mainly introduces the design from user initiated request to load balancing layer.
background
System entry business
There are two scenarios in which the current system interacts with the outside world:
1. Interaction with terminal
At present, there are app (Android, ios) web terminals in the system. All terminals mainly interact with the server through http protocol.
2. Interaction with external system
In a sense, the current system is also a big data center. It may be that the interface is provided by the external system, which calls our interface, or we need to provide the interface for the external system to access the data
Flow volume analysis
At present, the flow instillation of the system mainly includes the following aspects:
1. Import of external data
External data will be gathered to the system from various places at a fixed time. In this scenario, the traffic is stable and there will be no traffic surge. The frequency of data aggregation depends on the provider of each kind of data, but generally speaking, there will not be a lot of traffic. The only place with high traffic is receiving the information designed by the Internet of things. It is tentatively determined that this block will generate 100 times of concurrency per second.
2. User behavior
The traffic generated by the use of this product by users at C, B and G ends should be analyzed from two aspects, one is the traffic generated by expected behavior, the other is the traffic generated by unexpected behavior.
Expected behavior refers to the traffic generated by users when using products normally, such as viewing the homepage, modifying personal information, viewing drug information, etc. these behaviors rarely generate sudden increase in traffic, which generally depends on the growth of the number of users. According to the information provided by the business side, the enterprise has served about 100 million people, and there are about three loyal users with multiple consumption Millions. After business calculation and considering the future growth, we designed the system with a volume of 10 times, temporarily determined that the user base of the system is 3000 W, generating 20 million pv per day
Unexpected behavior refers to the uncertain user behavior caused by seckill, money explosion and star divorce, which may suddenly surge at some time. These traffic may be predicted by us, such as seckill. It may also be something we don't know, such as a sudden burst of money. The flow of these behaviors is not easy to measure, but our system is required to have emergency response methods in case of emergency.
Outline design
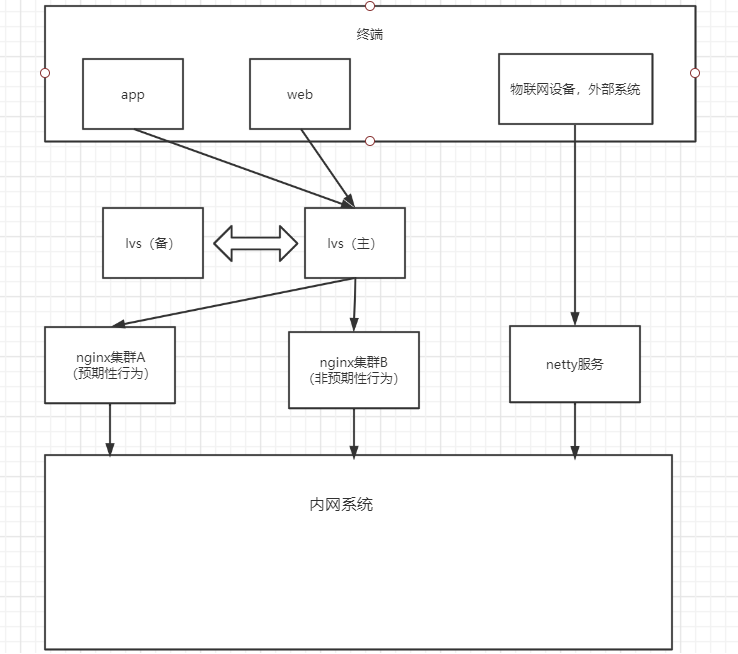
Here we mainly discuss the process after the request arrives at the back end, without considering the front end and app end.
For the above requirements, my design is that the entrance layer is divided into two parts: the first step is the input of http request, which is mainly the traffic generated by user behavior, including expected and unexpected behavior. The request first reaches lvs of the first layer load balancer, and then it is forwarded to nginx of different second layer load balancers by lvs. The nginx part is divided into cluster A and cluster B The second part is netty service, which is used to receive the Internet of things data of various protocol types.
detailed design
The business requires that the architecture be able to adapt to the savage growth of the system, so I adopted the two-tier load scheme to design as a whole. The detailed design is divided into three modules: 1. The first layer load lvs 2. The second layer load nginx 3.netty service
lvs of the first layer load
I believe that many people know about nginx, but many people may not be familiar with lvs. It is the same as nginx, which is an open source software, but the difference is that it is based on the four layer load, while nginx is based on the seven layer load. We use lvs as the first layer load, and load the request to different nginx. In this way, the nginx of the second layer can be expanded horizontally. In addition, each nginx can be differentiated in function. For example, nginx1 is responsible for business 1, and nginx2 loads business 2. In this way, the architecture is more flexible, so that each business does not affect each other. For example, when a seckill scenario occurs, you can add a seckill scenario nginx before the start of the seckill. Even if you don't have time to add devices, the current nginx hangs up, and other business lines can run stably.
*Here is a brief explanation of the four layer load and the seven layer load:
osi network layer divides network protocol into seven layers: physical layer, data link layer, network layer, transport layer, session layer, presentation layer and application layer. Each layer has different protocols. The four layer load refers to that the load balancer decides how to distribute the request according to the protocols of the first four layers, that is, based on IP, TCP, IP and other protocols, and according to IP plus port, it decides how to distribute the request. lvs and f5 are common. It's faster than the seven layer load, because there's no need to parse the five, six, seven layer protocol of the request. The seven layer load refers to that the load balancer decides how to distribute the request according to the protocol of the first seven layers. The common ones are nginx and apache. According to the specific application layer protocol, we can decide how to forward the request. The function is more flexible, but the efficiency is lower than the four layer load.
In this layer, we prepare two Tencent cloud servers and use lvs+keepalive to build a highly available first layer load.
Second layer load balancing nginx
Here we need to configure two sets of nginx, one for receiving the expected behavior of users and the other for receiving the unexpected behavior. Because lvs is used in the upper layer, our nginx in this layer can be expanded horizontally. Its scalability is particularly good. You can add nginx according to the business type (if you want to isolate this business line from other business lines, you can add a new set of nginx for this business line), or expand the existing nginx cluster horizontally according to the traffic size.
Let's start to build our nginx:
1. The environment required to install nginx
yum -y install gcc pcre-devel zlib-devel openssl openssl-devel
2. Install nginx
Because nginx is a source package, you need to compile and install it, and execute the following commands in turn
./configure --prefix=/usr/local/nginx
make
make install
After installation, the following directory will be generated under the directory / usr/local/nginx
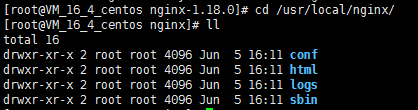
cd /usr/loca/nginx / --- enter the installation directory
 . / sbin/nginx -t -- check whether the installation is successful
If the following output appears, the installation is successful

After the installation, we can start nginx
/usr/local/nginx/sbin/nginx -- start nginx
After the startup is successful, we can enter the ip address of the machine where nginx is located in the browser to access it (nginx listens to port 80 by default, so direct ip access is OK)
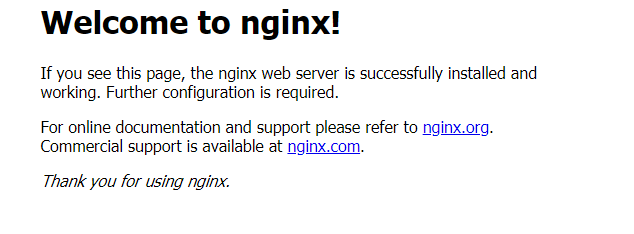
The above figure shows the page after accessing ip, indicating that our nginx has no problem.
Next, in order to make our nginx more reliable, we need to make some configuration for nginx, and attach my nginx configuration file (the number of load balancing servers has not been determined, and the final node number will be determined according to the pressure test results later).
Cluster A's nginx.conf file
#######################################################################################
################There is only one server here for the time being. I'm sorry#######################################
#######################################################################################
#user  nobody;

#Set the number of worker processes, which is the same as the cpu
worker_processes  2;

##Set the output level of error log to warn to relieve the pressure of log output
error_log  logs/error.log warn;
##Set pid file path
pid        logs/nginx.pid;


events {
    ##Using epoll model, epoll is recommended under linux
    use epoll;
	##Maximum number of connections per worker Metro
    worker_connections  50000;
	##Set the network connection serialization to prevent the occurrence of swarm alarm. The default is on.
	##If there are many workers in the current machine, you can choose to set it to off. However, if there are only a few workers, it is recommended to set it to on, which is currently set to on.
    accept_mutex on;

}


####################################################################################################################
################For the selection of polling algorithm, it is recommended to use polling when the machine configuration in the cluster is consistent##################################
################If the configuration is different, the weight algorithm is used to adjust the weight of the machine with high configuration. At the same time, if it is sent to##################################
################There are many time-consuming service requests, and third-party modules can be used nginx-upstream-fair#####################################
####################################################################################################################

##Vaccine cluster address. There are 5 machines set for vaccine service, because this is the main business.
upstream vaccine-cluster{
	##The default polling algorithm can be used here
	server 172.17.16.4:8021 max_fails=5 fail_timeout=600s;
	server 172.17.16.4:8022 max_fails=5 fail_timeout=600s;
	server 172.17.16.4:8023 max_fails=5 fail_timeout=600s;
	server 172.17.16.4:8024 max_fails=5 fail_timeout=600s;
	server 172.17.16.4:8025 max_fails=5 fail_timeout=600s;
}
##Sample cluster address
upstream specimen-cluster{
	##The default polling algorithm can be used here
	server 172.17.16.4:8031 max_fails=5 fail_timeout=600s;
	server 172.17.16.4:8032 max_fails=5 fail_timeout=600s;
}

##Blood cluster address
upstream blood-cluster{
	##The default polling algorithm can be used here
	server 172.17.16.4:8041 max_fails=5 fail_timeout=600s;
	server 172.17.16.4:8042 max_fails=5 fail_timeout=600s;
}

##Health management cluster address, where 5 machines are set for health management service, because this is the main business.
upstream healthy-cluster{
	##The default polling algorithm can be used here
	server 172.17.16.4:8051 max_fails=5 fail_timeout=600s;
	server 172.17.16.4:8052 max_fails=5 fail_timeout=600s;
	server 172.17.16.4:8053 max_fails=5 fail_timeout=600s;
	server 172.17.16.4:8054 max_fails=5 fail_timeout=600s;
	server 172.17.16.4:8055 max_fails=5 fail_timeout=600s;
}


##There are many user cluster addresses and user bases. Three sets are set
upstream user-cluster{
	##The default polling algorithm can be used here
	server 172.17.16.4:8061 max_fails=5 fail_timeout=600s;
	server 172.17.16.4:8062 max_fails=5 fail_timeout=600s;
	server 172.17.16.4:8063 max_fails=5 fail_timeout=600s;
}

##Static resource server
upstream static-cluster{
	##The default polling algorithm can be used here
	server 172.17.16.4:8071 max_fails=5 fail_timeout=600s;
	server 172.17.16.4:8072 max_fails=5 fail_timeout=600s;
}

http {
    ##Set MIME type, which is set by mime.type Document definition
    include       mime.types;
    default_type  application/octet-stream;

    sendfile        on;
    #tcp_nopush     on;

    #keepalive_timeout  0;
    keepalive_timeout  65;

	##Only 80 port listening is provided
    server {
        listen       80;
        server_name  localhost;

		##Set the encoding to utf-8
        charset utf-8;

		##Turn on the access log for better statistics of user access data
        access_log  logs/host.access.log  main;

		##Match vaccine service related requests
        location ^~/vaccine {
            proxy_pass http://vaccine-cluster;
			proxy_set_header Host $host;
			proxy_set_header X-Real-IP $remote_addr;
			proxy_set_header X-Forwarded-For $proxy_add_x_forwarded_for;
			proxy_connection_timeout 30s;
			proxy_send_timeout 30s;
			proxy_read_timeout 30s;
        }

		##Match sample service related requests
        location ^~/specimen {
            proxy_pass http://specimen-cluster;
			proxy_set_header Host $host;
			proxy_set_header X-Real-IP $remote_addr;
			proxy_set_header X-Forwarded-For $proxy_add_x_forwarded_for;
			proxy_connection_timeout 30s;
			proxy_send_timeout 30s;
			proxy_read_timeout 30s;
        }

		##Matching blood service related requests
        location ^~/blood {
            proxy_pass http://blood-cluster;
			proxy_set_header Host $host;
			proxy_set_header X-Real-IP $remote_addr;
			proxy_set_header X-Forwarded-For $proxy_add_x_forwarded_for;
			proxy_connection_timeout 30s;
			proxy_send_timeout 30s;
			proxy_read_timeout 30s;
        }

		##Match health management service related requests
        location ^~/healthy {
            proxy_pass http://healthy-cluster;
			proxy_set_header Host $host;
			proxy_set_header X-Real-IP $remote_addr;
			proxy_set_header X-Forwarded-For $proxy_add_x_forwarded_for;
			proxy_connection_timeout 30s;
			proxy_send_timeout 30s;
			proxy_read_timeout 30s;
        }

		##Match user service related requests
        location ^~/user {
            proxy_pass http://user-cluster;
			proxy_set_header Host $host;
			proxy_set_header X-Real-IP $remote_addr;
			proxy_set_header X-Forwarded-For $proxy_add_x_forwarded_for;
			proxy_connection_timeout 30s;
			proxy_send_timeout 30s;
			proxy_read_timeout 30s;
        }

		##Matching data pull service related requests
        location ^~/transfer {
            proxy_pass http://172.17.16.4:8010;
			proxy_set_header Host $host;
			proxy_set_header X-Real-IP $remote_addr;
			proxy_set_header X-Forwarded-For $proxy_add_x_forwarded_for;
			proxy_connection_timeout 30s;
			proxy_send_timeout 30s;
			proxy_read_timeout 30s;

        }

		##Status monitoring
		location /status {
          stub_status                 on;
          access_log                  off;
		  ##Only 127.0.0.1 and 172.16.100.71 servers can access the status monitoring
          allow                       127.0.0.1;
		  ##Only 127.0.0.1 and 172.16.100.71 servers can access the status monitoring
          allow                       172.16.100.71;
		  ##Access is forbidden. With allow, the effect of white list can be achieved
          deny                        all;
		}

		##To match the static resource server, the static resource is not placed in the local nginx. Considering that nginx may be extended horizontally in the later stage, the static resource is stored independently.
		location ~ .*\.(js|css|html|svg|ico|png|jpg|gif) {
            proxy_pass http://static-cluster;
			root static;
			proxy_connection_timeout 30s;
			proxy_send_timeout 30s;
			proxy_read_timeout 30s;
        }

		##No access if none match
		location / {
		  ##No access
          deny                        all;
		}

        #error_page  404              /404.html;

        # redirect server error pages to the static page /50x.html
        #
        error_page   500 502 503 504  /50x.html;
        location = /50x.html {
            root   html;
        }

    }


}
#user  nobody;

#Set the number of worker processes, which is the same as the cpu
worker_processes  2;

##Set the output level of error log to warn to relieve the pressure of log output
error_log  logs/error.log warn;
##Set pid file path
pid        logs/nginx.pid;


events {
    ##Using epoll model, epoll is recommended under linux
    use epoll;
	##Maximum number of connections per worker Metro
    worker_connections  10240;
	##Set the network connection serialization to prevent the occurrence of swarm alarm. The default is on.
	##If there are many workers in the current machine, you can choose to set it to off. However, if there are only a few workers, it is recommended to set it to on, which is currently set to on.
    accept_mutex on;

}


##Vaccine reservation cluster address. There are 5 machines set for vaccine service, because this is the main business.
upstream vaccine-order-cluster{
	server 172.17.16.4:8091 max_fails=5 fail_timeout=60s;
	server 172.17.16.4:8092 max_fails=5 fail_timeout=60s;
	server 172.17.16.4:8093 max_fails=5 fail_timeout=60s;
	server 172.17.16.4:8094 max_fails=5 fail_timeout=60s;
	server 172.17.16.4:8095 max_fails=5 fail_timeout=60s;
}


http {
    ##Set MIME type, which is set by mime.type Document definition
    include       mime.types;
    default_type  application/octet-stream;

    sendfile        on;
    #tcp_nopush     on;

    #keepalive_timeout  0;
    keepalive_timeout  65;

	##Only 80 port listening is provided
    server {
        listen       80;
        server_name  localhost;

		##Set the encoding to utf-8
        charset utf-8;

		##Turn on the access log for better statistics of user access data
        access_log  logs/host.access.log  main;

		##Matching vaccine reservation order service related requests
        location ^~/vaccine/order {
            proxy_pass http://vaccine-order-cluster;
        }

        error_page   500 502 503 504  /50x.html;
        location = /50x.html {
            root   html;
        }

        location / {
            deny  all;
        }
    }


}
*: http needs to be installed for nginx_ stub_ status_ Module module
*: nginx is easy to install and start. It is worth mentioning that all operations of nginx are encapsulated in nginx script under sbin directory. No matter what we need to do with nginx, we can run this script directly. Here are some common commands
. / nginx -- start nginx without parameters. Default to find the nginx.conf configuration file
./nginx -c /usr/local/nginx/conf/nginx.conf -- start nginx with the specified configuration file
. / nginx -s stop -- stop nginx
/nginx -s reload -- reloads the configuration file of nginx. If you modify the nginx configuration, you can use this command to refresh the configuration