It's 8102. Now I'm going to talk about the configuration of webpack. Well, it's a bit late. Moreover, the project generated based on vue-cli or create-react-app has already configured webpack for us with one key, which does not seem to require our in-depth understanding.
However, it is necessary to build a simple development environment from scratch in order to learn and understand what pain webpack has solved in the front end. The web pack configuration in this article refers to the web pack-simple template provided by vue-cli, which is the simplest web pack configuration in vue-cli and is very suitable for learning from scratch.
Note: This web pack is based on 3.10.0, part of the content of Web Pack 4 may no longer apply!!!
Demo Code Download
Install webpack
npm i webpack -g
webpack4 also needs to be installed separately
npm i webpack-cli -g
Project Initialization
Create a new folder vue-webpack-simple
New package.json
npm init -y
Install vue webpack webpack-dev-server
npm i vue --save
npm i webpack webpack-dev-server --save-dev
New index.html under the root directory
<!DOCTYPE html>
<html lang="en">
<head>
    <meta charset="UTF-8">
    <meta name="viewport" content="width=device-width, initial-scale=1.0">
    <meta http-equiv="X-UA-Compatible" content="ie=edge">
    <title>Document</title>
</head>
<body>

</body>
</html>
New webpack.config.js under the root directory
var path = require('path');
var webpack = require('webpack');

module.exports = {};
New src folder, new main.js under src folder
At present, the structure of the whole project is as follows: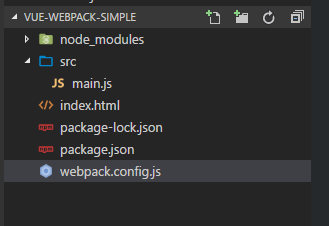
js modularization
Before ES6 came into being, there was no unified module system for js.
The server side uses the CommonJS specification, while the browser side has two specifications, AMD and CMD.
The idea of webpack is that everything is modular. The official recommendation is to use the commonJS specification, which makes it possible for browsers to use the modular writing of commonJS.
module.exports = {}Create a new util.js under src directory
module.exports = function say() {
    console.log('hello world');
}
main.js
var say = require('./util');
say();
Modify webpack.config.js
var path = require('path');
var webpack = require('webpack');

module.exports = {
    entry: './src/main.js', // The entry file for the project, webpack starts with main.js and loads and packages all dependent js
    output: {
        path: path.resolve(__dirname, './dist'), // Packing file path for project
        publicPath: '/dist/', // Access paths through devServer
        filename: 'build.js' // Packed file name
    },
    devServer: {
        historyApiFallback: true,
        overlay: true
    }
};
Modify package.josn
"scripts": {
    "dev": "webpack-dev-server --open --hot",
    "build": "webpack --progress --hide-modules"
  },
Note: webpack-dev-server automatically starts a static resource web server -- the hot parameter indicates that hot updates are started
Modify index.html to introduce packaged files
<!DOCTYPE html>
<html lang="en">

<head>
    <meta charset="UTF-8">
    <meta name="viewport" content="width=device-width, initial-scale=1.0">
    <meta http-equiv="X-UA-Compatible" content="ie=edge">
    <title>Document</title>
</head>

<body>
    <script src="/dist/build.js"></script>
</body>

</html>
Function
npm run dev
You can find a page that the browser opens automatically. Look at the console. hello world typed it out.
We can modify util.js at will, and we can find that the browser will refresh automatically, which is very convenient.
If we want to see the packaged bundle.js file, run
npm run build
You can see that a dist directory has been generated with packaged bundles. JS in it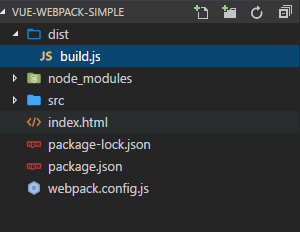
By default, webpack does not support transcoding es6, but import export is supported separately. So we can rewrite the previous modular writing
util.js
export default function say() {
    console.log('hello world ');
}
main.js
import say from './util';

say();
Introducing vue
Let's try to introduce Vue (single file. Vue is not considered at present)
main.js
import Vue from 'vue';

var app = new Vue({
  el: '#app',
  data: {
    message: 'Hello Vue!'
  }
});
index.html
<!DOCTYPE html>
<html lang="en">

<head>
    <meta charset="UTF-8">
    <meta name="viewport" content="width=device-width, initial-scale=1.0">
    <meta http-equiv="X-UA-Compatible" content="ie=edge">
    <title>Document</title>
</head>

<body>
    <div id="app">
        {{message}}
    </div>
    <script src="/dist/build.js"></script>

</body>

</html>
Also note that you need to modify the webpack.config.js file
var path = require('path');
var webpack = require('webpack');

module.exports = {
    entry: './src/main.js',
    output: {
        path: path.resolve(__dirname, './dist'),
        publicPath: '/dist/',
        filename: 'build.js'
    },
    devServer: {
        historyApiFallback: true,
        overlay: true
    },
    resolve: {
        alias: {
            'vue$': 'vue/dist/vue.esm.js'
        }
    }
};
Rerun npm run dev and you can see that Hello World is normally displayed on the page
Introducing scss and css
webpack only supports js modularization by default, and if you need to introduce other files as modules, you need the corresponding loader parser
npm i node-sass css-loader vue-style-loader sass-loader --save-dev
webpack.config.js
var path = require('path');
var webpack = require('webpack');

module.exports = {
    entry: './src/main.js',
    output: {
        path: path.resolve(__dirname, './dist'),
        publicPath: '/dist/',
        filename: 'build.js'
    },
    devServer: {
        historyApiFallback: true,
        overlay: true
    },
    resolve: {
        alias: {
            'vue$': 'vue/dist/vue.esm.js'
        }
    },
    module: {
        rules: [
            {
                test: /\.css$/,
                use: [
                    'vue-style-loader',
                    'css-loader'
                ],
            }
        ]
    }
};
Interpretation:
{
    test: /\.css$/,
    use: [
        'vue-style-loader',
        'css-loader'
    ],
}
This code means: match the file with the suffix css, and then use css-loader, vue-style-loader to parse it.
The parser execution sequence is from bottom to top (first css-loader and then vue-style-loader)
Note: Because we are developing with Vue here, we use vue-style-loader and style-loader in other cases.
css-loader allows us to introduce css in a modular way, and vue-style-loader inserts the introduced css into the style tag on the html page
To introduce scss is also the same configuration.
module: {
        rules: [
            {
                test: /\.css$/,
                use: [
                    'vue-style-loader',
                    'css-loader'
                ],
            },
            {
                test: /\.scss$/,
                use: [
                    'vue-style-loader',
                    'css-loader',
                    'sass-loader'
                ],
            },
            {
                test: /\.sass$/,
                use: [
                    'vue-style-loader',
                    'css-loader',
                    'sass-loader?indentedSyntax'
                ],
            }]
    }
Let's try it now.
Create a new style directory in the src directory and a new common.scss in the style directory
body {
    background: #fed;
}
main.js
import './style/common.scss';
Find css style useful
Using babel transcoding
ES6 grammar is still not supported by most browsers. bable can transcode ES6 into ES5 grammar, so that we can boldly use the latest features in our project.
npm i babel-core babel-loader babel-preset-env babel-preset-stage-3 --save-dev
Create a new. babelrc file in the project root directory
{
  "presets": [
    ["env", { "modules": false }],
    "stage-3"
  ]
}
webpack.config.js adds a loader
{
    test: /\.js$/,
    loader: 'babel-loader',
    exclude: /node_modules/
}
exclude means ignoring files under the node_modules folder without transcoding
Now let's try the async await grammar.
util.js
export default function getData() {
    return new Promise((resolve, reject) => {
        resolve('ok');
    })
}
main.js
import getData from './util';
import Vue from 'vue';

import './style/common.scss';

var app = new Vue({
  el: '#app',
  data: {
    message: 'Hello Vue!'
  },
  methods: {
    async fetchData() {
      const data = await getData();
      this.message = data;
    }
  },
  created() {
    this.fetchData();
  }
});
At this point, the console will report an error regenerator Runtime is not defined because we did not install babel-polyfill.
npm i babel-polyfill --save-dev
Then modify the entry to webpack.config.js
entry: ['babel-polyfill', './src/main.js'],
Re-npm run dev, you can find the normal operation
Introducing Photo Resources
Introduce pictures as modules
npm i file-loader --save-dev
webpack.config.js adds a loader
{
    test: /\.(png|jpg|gif|svg)$/,
    loader: 'file-loader',
    options: {
        name: '[name].[ext]?[hash]'
    }
}
Create a new img directory under src directory and store a picture logo.png
Modify main.js
import getData from './util';
import Vue from 'vue';

import './style/common.scss';


Vue.component('my-component', {
  template: '<img :src="url" />',
  data() {
    return {
      url: require('./img/logo.png')
    }
  }
})

var app = new Vue({
  el: '#app',
  data: {
    message: 'Hello Vue !'
  },
  methods: {
    async fetchData() {
      const data = await getData();
      this.message = data;
    }
  },
  created() {
    this.fetchData()
  }
});
Modify index.html
<!DOCTYPE html>
<html lang="en">

<head>
    <meta charset="UTF-8">
    <meta name="viewport" content="width=device-width, initial-scale=1.0">
    <meta http-equiv="X-UA-Compatible" content="ie=edge">
    <title>Document</title>
</head>

<body>
    <div id="app">
        {{message}}
        <my-component/>
    </div>
    <script src="/dist/build.js"></script>

</body>

</html>
As you can see, the pictures were loaded correctly.
Single file component
In the previous example, we used Vue.component to define global components
In practical projects, single file components are more recommended.
npm i vue-loader vue-template-compiler --save-dev
Add a loader
{
    test: /\.vue$/,
    loader: 'vue-loader',
    options: {
        loaders: {
            'scss': [
                'vue-style-loader',
                'css-loader',
                'sass-loader'
            ],
            'sass': [
                'vue-style-loader',
                'css-loader',
                'sass-loader?indentedSyntax'
            ]
        }
    }
}
Create a new App.vue in the src directory
<template>
  <div id="app">
    <h1>{{ msg }}</h1>
    <img src="./img/logo.png">
    <input type="text" v-model="msg">
  </div>
</template>

<script>

import getData from './util';

export default {
  name: 'app',
  data () {
    return {
      msg: 'Welcome to Your Vue.js'
    }
  },
  created() {
    this.fetchData();
  },
  methods: {
     async fetchData() {
      const data = await getData();
      this.msg = data;
    }
  }
}
</script>

<style lang="scss">
#app {
  font-family: "Avenir", Helvetica, Arial, sans-serif;

  h1 {
    color: green;
  }
}
</style>
main.js
import Vue from 'vue';
import App from './App.vue';

import './style/common.scss';

new Vue({
  el: '#app',
  template: '<App/>',
  components: { App }
})
index.html
<!DOCTYPE html>
<html lang="en">

<head>
    <meta charset="UTF-8">
    <meta name="viewport" content="width=device-width, initial-scale=1.0">
    <meta http-equiv="X-UA-Compatible" content="ie=edge">
    <title>Document</title>
</head>

<body>
    <div id="app"></div>
    <script src="/dist/build.js"></script>
</body>

</html>
npm run dev, you can find that the single file is loaded correctly
source-map
In the development phase, debugging is also a very important requirement.
App.vue
created() {
    this.fetchData();
    console.log('23333');
}
We deliberately called a console and opened the console.
We Click to enter the console's detailed address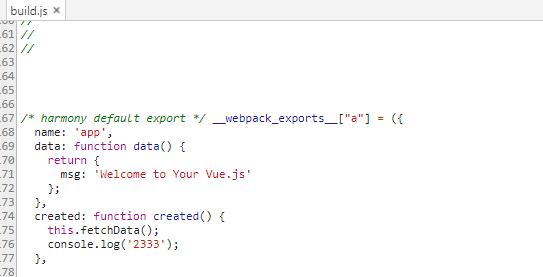
It's packaged build.js, and I don't know which component it was written in, which makes debugging difficult.
Modify webpack.config.js
module.exports = {
    entry: ['babel-polyfill', './src/main.js'],
    // Elimination of other ____________.

    devtool: '#eval-source-map'
};
Re-npm run dev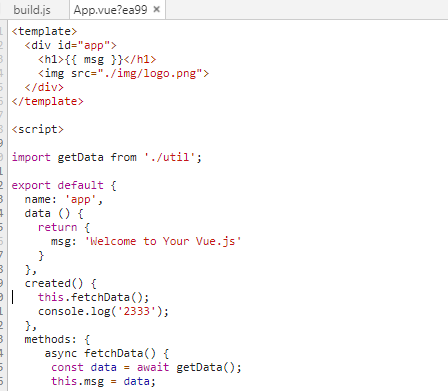
This debugging, it directly returns to the source code of that component, this is not packaged!
Package release
Let's try npm run build to package the files first.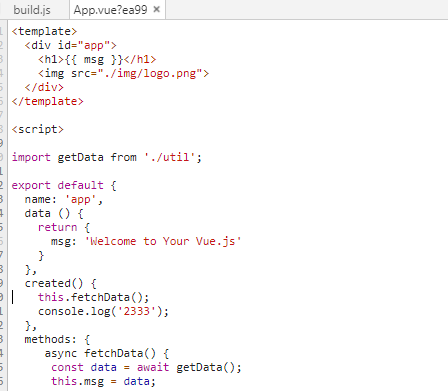
You will find that the packaged build.js is very large, more than 500 k
In actual publishing, files will be compressed, cached, segregated, and so on.
npm i cross-env --save-dev
Modify package.json
"scripts": {
    "dev": "cross-env NODE_ENV=development webpack-dev-server --open --hot",
    "build": "cross-env NODE_ENV=production webpack --progress --hide-modules"
}
This time we set up the environment variable, when packaging, NODE_ENV is production.
Then modify webpack.config.js to compress js code when NODE_ENV is production
var path = require('path');
var webpack = require('webpack');

module.exports = {
    // Omission...
}

if (process.env.NODE_ENV === 'production') {
    module.exports.devtool = '#source-map';
    module.exports.plugins = (module.exports.plugins || []).concat([
      new webpack.DefinePlugin({
        'process.env': {
          NODE_ENV: '"production"'
        }
      }),
      new webpack.optimize.UglifyJsPlugin(),
    ])
  }
repackaging
As you can see, the compression effect is very obvious!
So far, a very simple vue development environment has been successfully built.
Note: There are many other configurations that can be optimized in this article, such as separating js from css
Readers can learn about it on their own, but here's just a guide to the most basic web pack configuration.
Change from: https://segmentfault.com/a/1190000012789253?utm_source=tag-newest