
Introduction to live broadcasting technology
The live broadcasting technology covers a wide range. Now, it is widely known that the live broadcasting technology will be used in personal live broadcasting of video websites, mobile live broadcasting, security camera monitoring, etc.
Introduce various technical links in the live broadcast process. It can be understood that it is divided into acquisition end, streaming media server and playback end; We also need to understand what is push flow and what is pull flow.
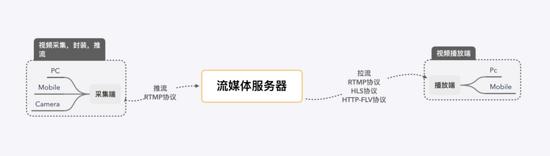
- Acquisition end: as the name suggests, it is the source of video. Video acquisition is generally obtained from real cameras. For example, mobile devices, cameras of PC devices and some camera devices
- Streaming media server: streaming media server is a very important part of the whole live broadcast technology framework. It needs to receive the video stream pushed from the collection end, and then push the video stream to the playback end
- Playback end: the playback end is the player in various app s and web pages. It pulls the video stream from the streaming media server, transcodes it, and finally plays it out
- Streaming: the process of encapsulating the data collected in the collection stage and transmitting it to the server
- Streaming: the process of pulling live content from the server with the specified address
Since it is necessary to push and pull streams, it must involve the transmission of video streams. Next, we introduce the common streaming media transmission protocols, including RTMP, RTSP, HLS and http-flv
- RTMP: (available for streaming and streaming) Real Time Messaging Protocol. In RTMP protocol, video must be H264 encoded, audio must be AAC or MP3 encoded, and most packets are in FLV format. Because the RTMP protocol basically transmits FLV format stream files, flash player must be used to play them
- RTSP: (for streaming end) real time stream protocol. RTSP has very good real-time effect and is suitable for video chat, video monitoring and other directions
- HLS (for streaming end) Http Live Streaming, a real-time streaming media transmission protocol based on HTTP defined by Apple. The transmission content includes two parts: 1.M3U8 description file and 2.TS media file. The video in TS media files must be H264 encoded, and the audio must be AAC or MP3 encoded. Data is transmitted through HTTP protocol. At present, the video.js library supports the playback of files in this format
- http-flv (for streaming end) this protocol is http+flv, which encapsulates audio and video data into FLV format and then transmits it to the client through http protocol. This protocol greatly facilitates the browser client to play live video stream. At present, flv.js library supports file playback in this format
1. Install homebro
Homebrew, abbreviated as brew, is a software package management tool on Mac OSX. It can easily install or uninstall software on Mac.
/usr/bin/ruby -e "$(curl -fsSL https://raw.githubusercontent.com/Homebrew/install/master/install)"
Uninstall command:
/usr/bin/ruby -e "$(curl -fsSL https://raw.githubusercontent.com/Homebrew/install/master/uninstall)"
2. Install Nginx server
brew tap homebrew/nginx
3. Install Nginx server and rtmp module
brew install nginx-full --with-rtmp-module
View nginx information
brew info nginx-full
After executing the above command, we can see the information
Execute the command to start the nginx service
nginx
Browser address bar input: http://localhost:8080

Welcome to nginx appears, which means that nginx installation is successful.
4. Configure rtmp
Edit the nginx.conf file

cd /opt/homebrew/etc/nginx/
vim nginx.conf
Configure the following two fields
server {
        listen       8080;
        server_name  localhost;

        location / {
            root   html;
            index  index.html index.htm;
        }

        location /hls {
            types{
               application/vnd.apple.mpegurl m3u8;
               video/mp2t ts;
            }
            root /usr/local/var/www;
            add_header Cache-Control no-cache;
        }
}
rtmp{
    server {
      listen 1935;
      chunk_size 4000;

      application rtmplive {
         live on;
         max_connections 1024;
        }
      application zbcs {
         live on;
         record off;
        }

      application hls{
         live on;
         hls on;
            hls_path/usr/local/var/www/hls;
         hls_fragment 5s;
        }
    }
}
rtmp is the protocol name
The server description contains server related configurations
listen listens to the port number. The default port number of rtmp protocol is 1935
The application path accessed by the application is zbcs``
live on; Turn on real time
record off; Do not record data
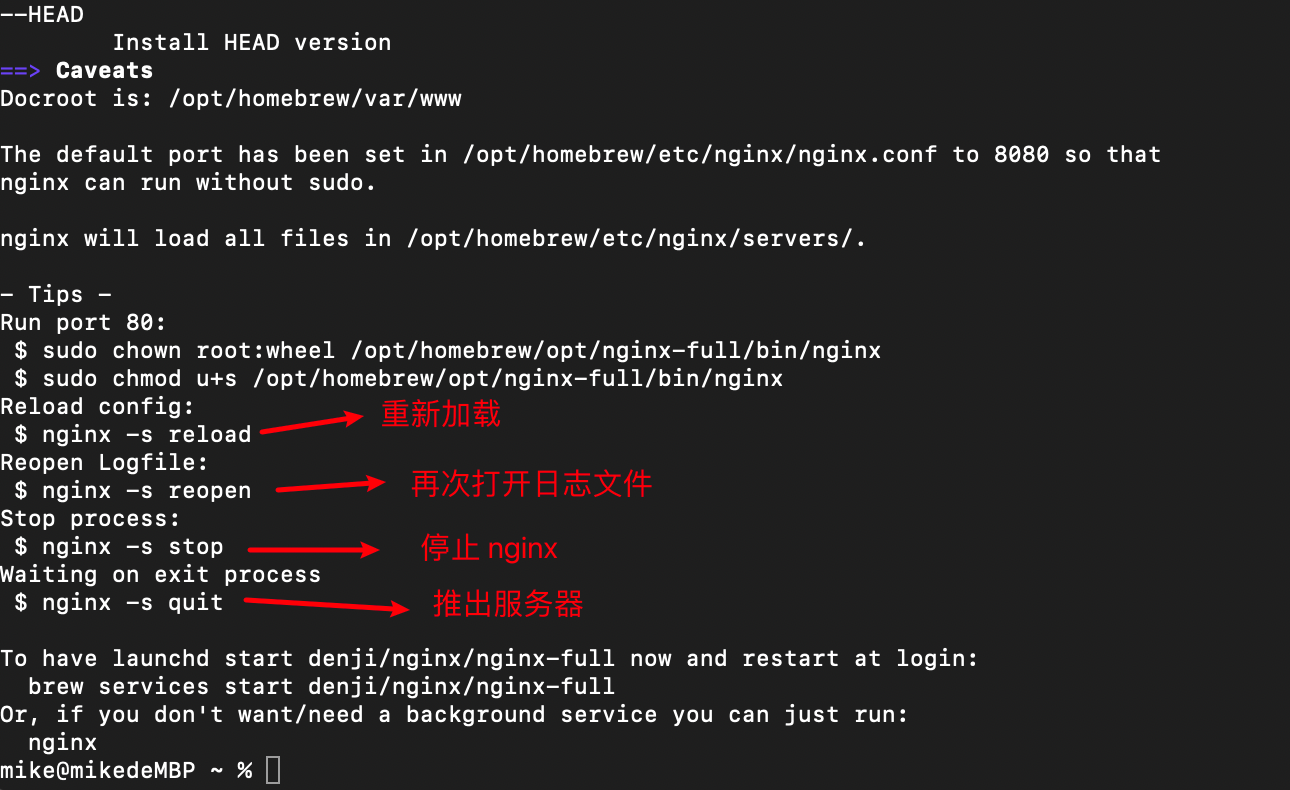
5. After saving the file, reload the configuration file of nginx
nginx -s reload
6. Install ffmepg tools
brew install ffmpeg
7. Install VLC
Search VLC directly in the browser, download and install it
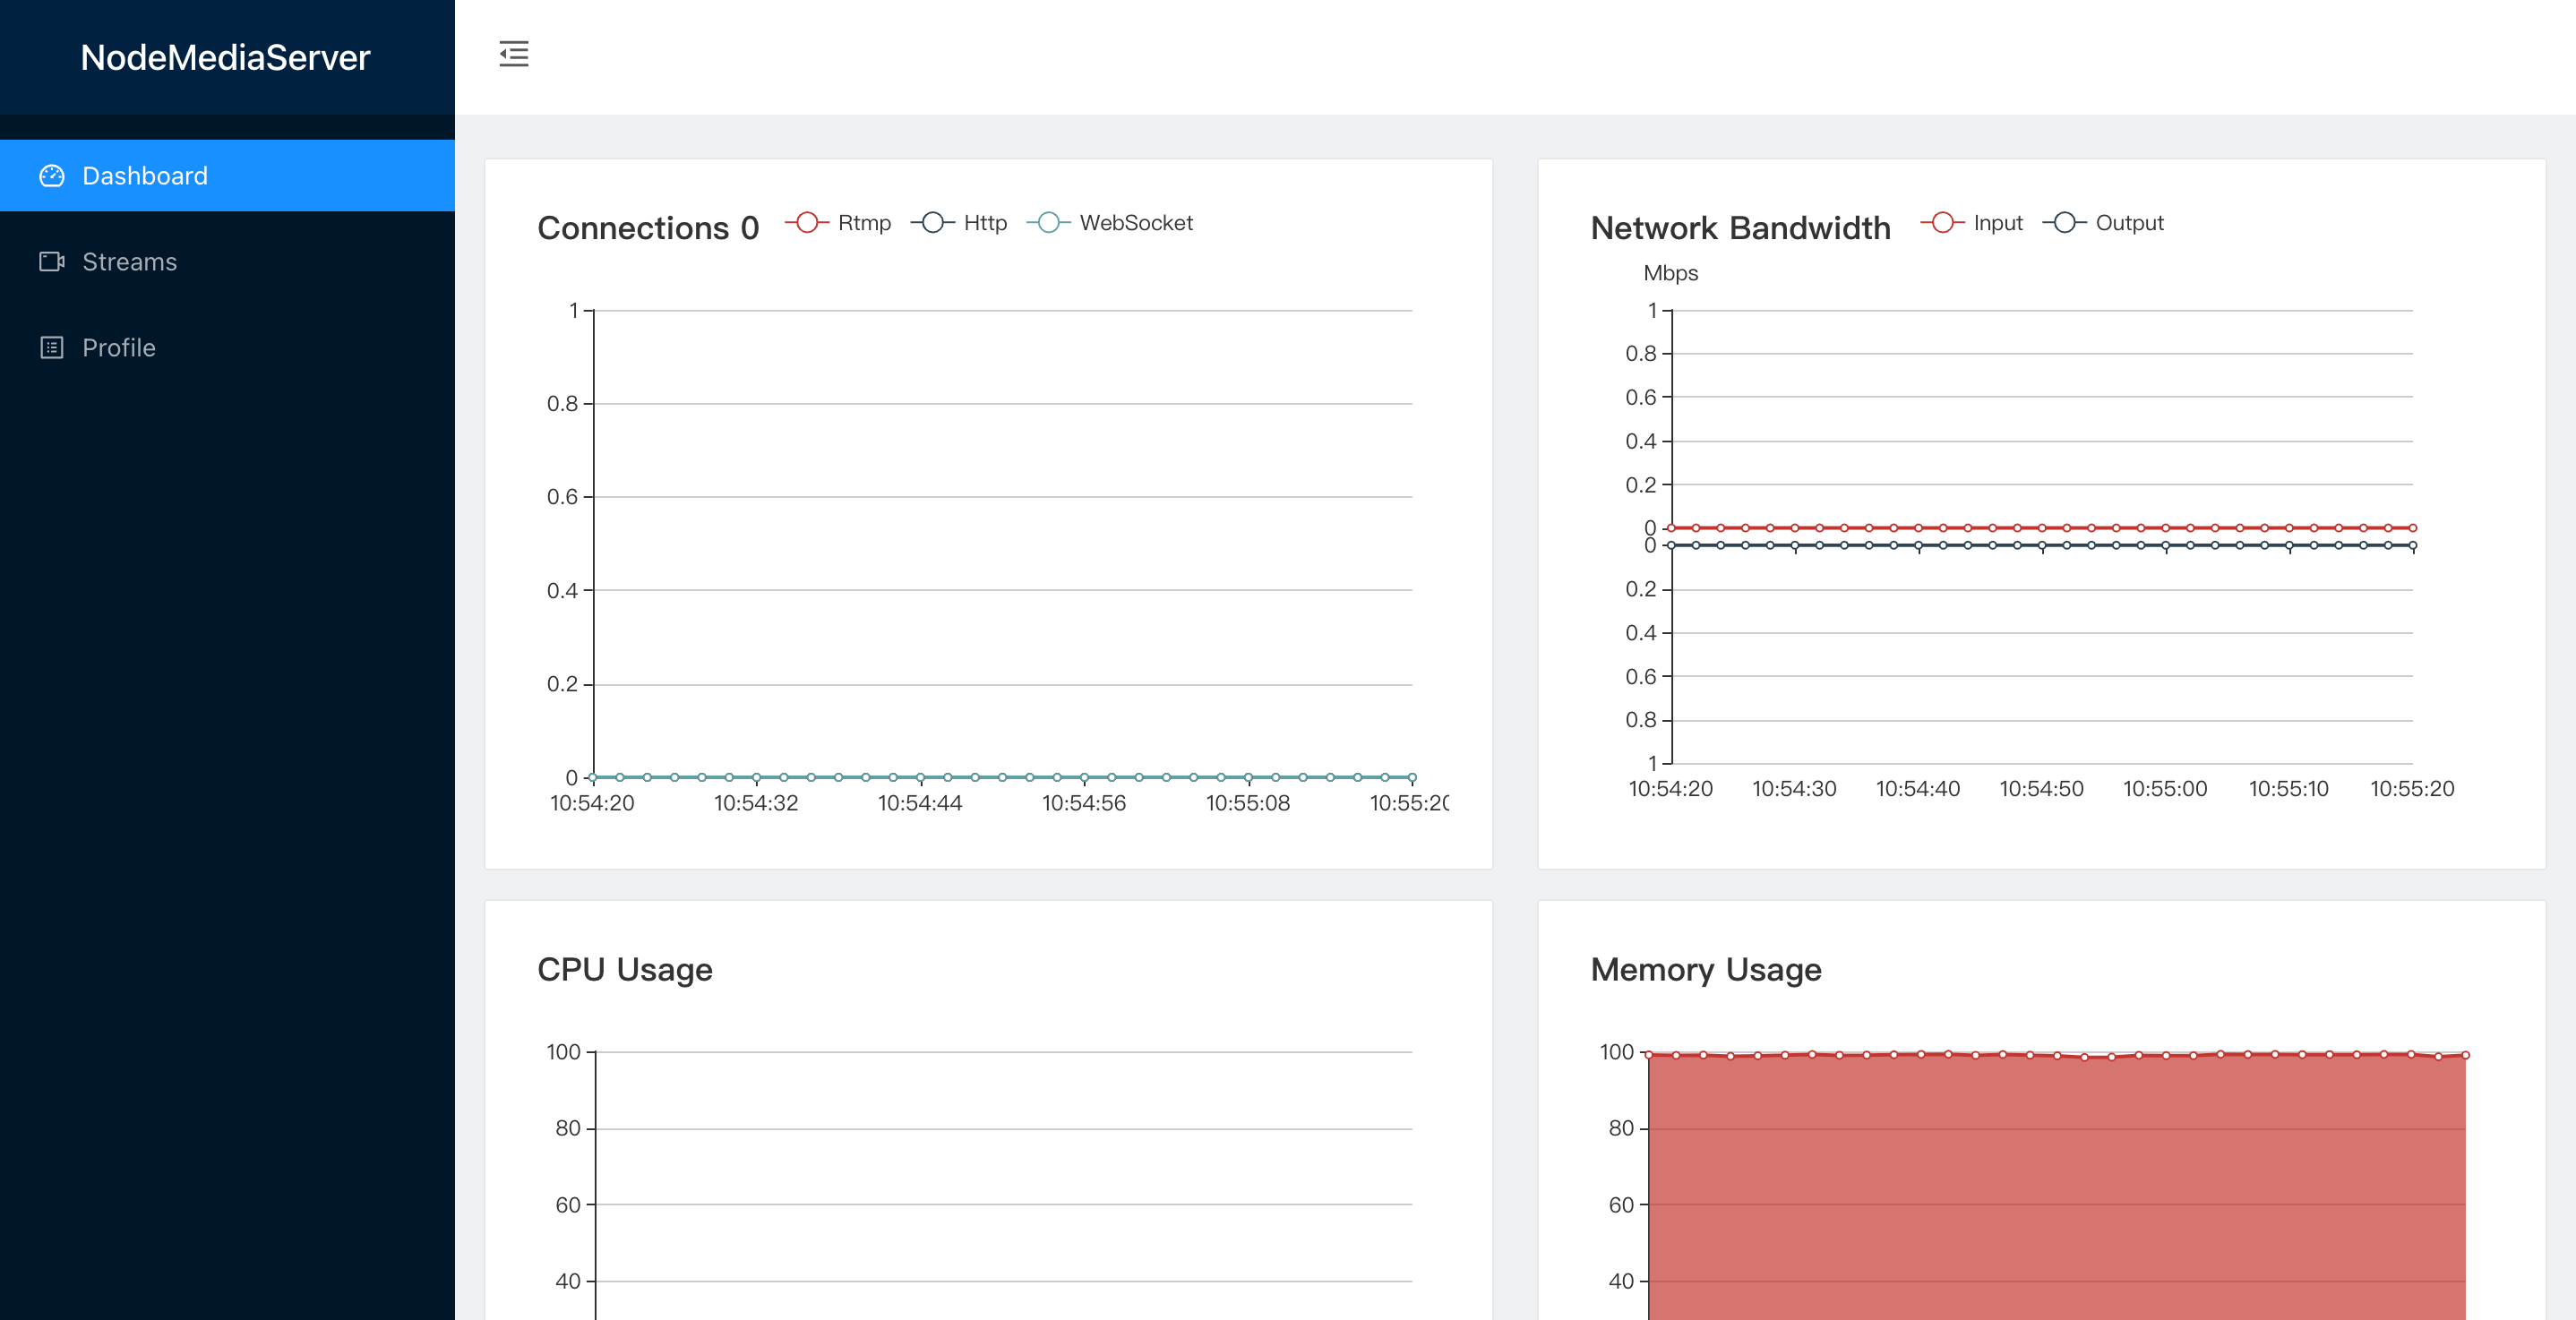
8. Install node media server
NodeMediaServer supports streaming with RTMP, RTSP and HLS protocols and streaming with http flv and WS flv, that is, it supports the browser to transmit video streams in FLV format using http or websocket for playback.
npm install node-media-server
New app.js
const NodeMediaServer= require('node-media-server');

const config = {
  rtmp: {
    port: 1935,
    chunk_size: 60000,
    gop_cache: true,
    ping: 60,
    ping_timeout: 30
  },
  http: {
    port: 8000,
    allow_origin: '*',
  }
};

var nms = new NodeMediaServer(config)
nms.run();
Run app.js
Access the localhost:8000/admin address and the management side interface of node media server
9. Use the FFmpeg command to push the address
Streaming camera
ffmpeg -f avfoundation -framerate 30 -video_size 1280x720 -i "0" -vcodec libx264 -acodec libfaac -f flv rtmp://localhost:1935/zbcs/room
Streaming desktop - only desktop content
ffmpeg -f avfoundation -pixel_format uyvy422 -i "1" -f flv rtmp://localhost:1935/zbcs/room
Streaming only microphone
ffmpeg -f avfoundation -i ":0" -vcodec libx264 -preset ultrafast -acodec libmp3lame -ar 44100 -ac 1 -f flv rtmp://localhost:1935/zbcs/room
10. Verification video
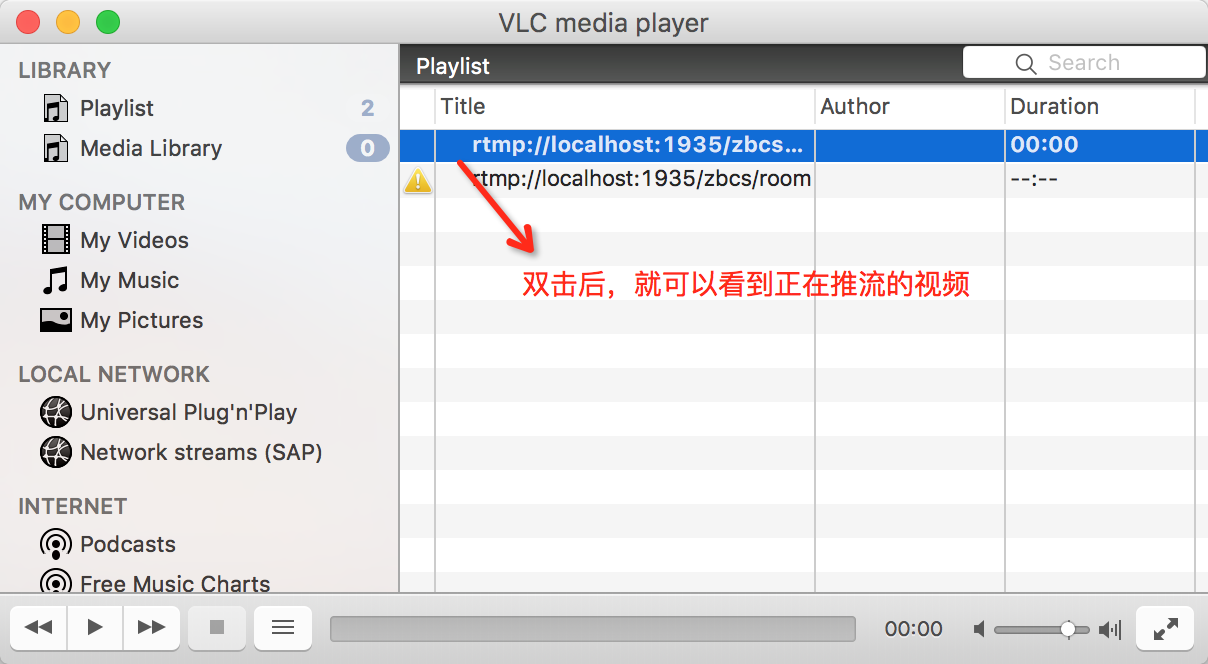
Open vlc the player software, click file - > open Network, select Network in the pop-up box, and then enter the URL:
rtmp://localhost:1935/zbcs/room
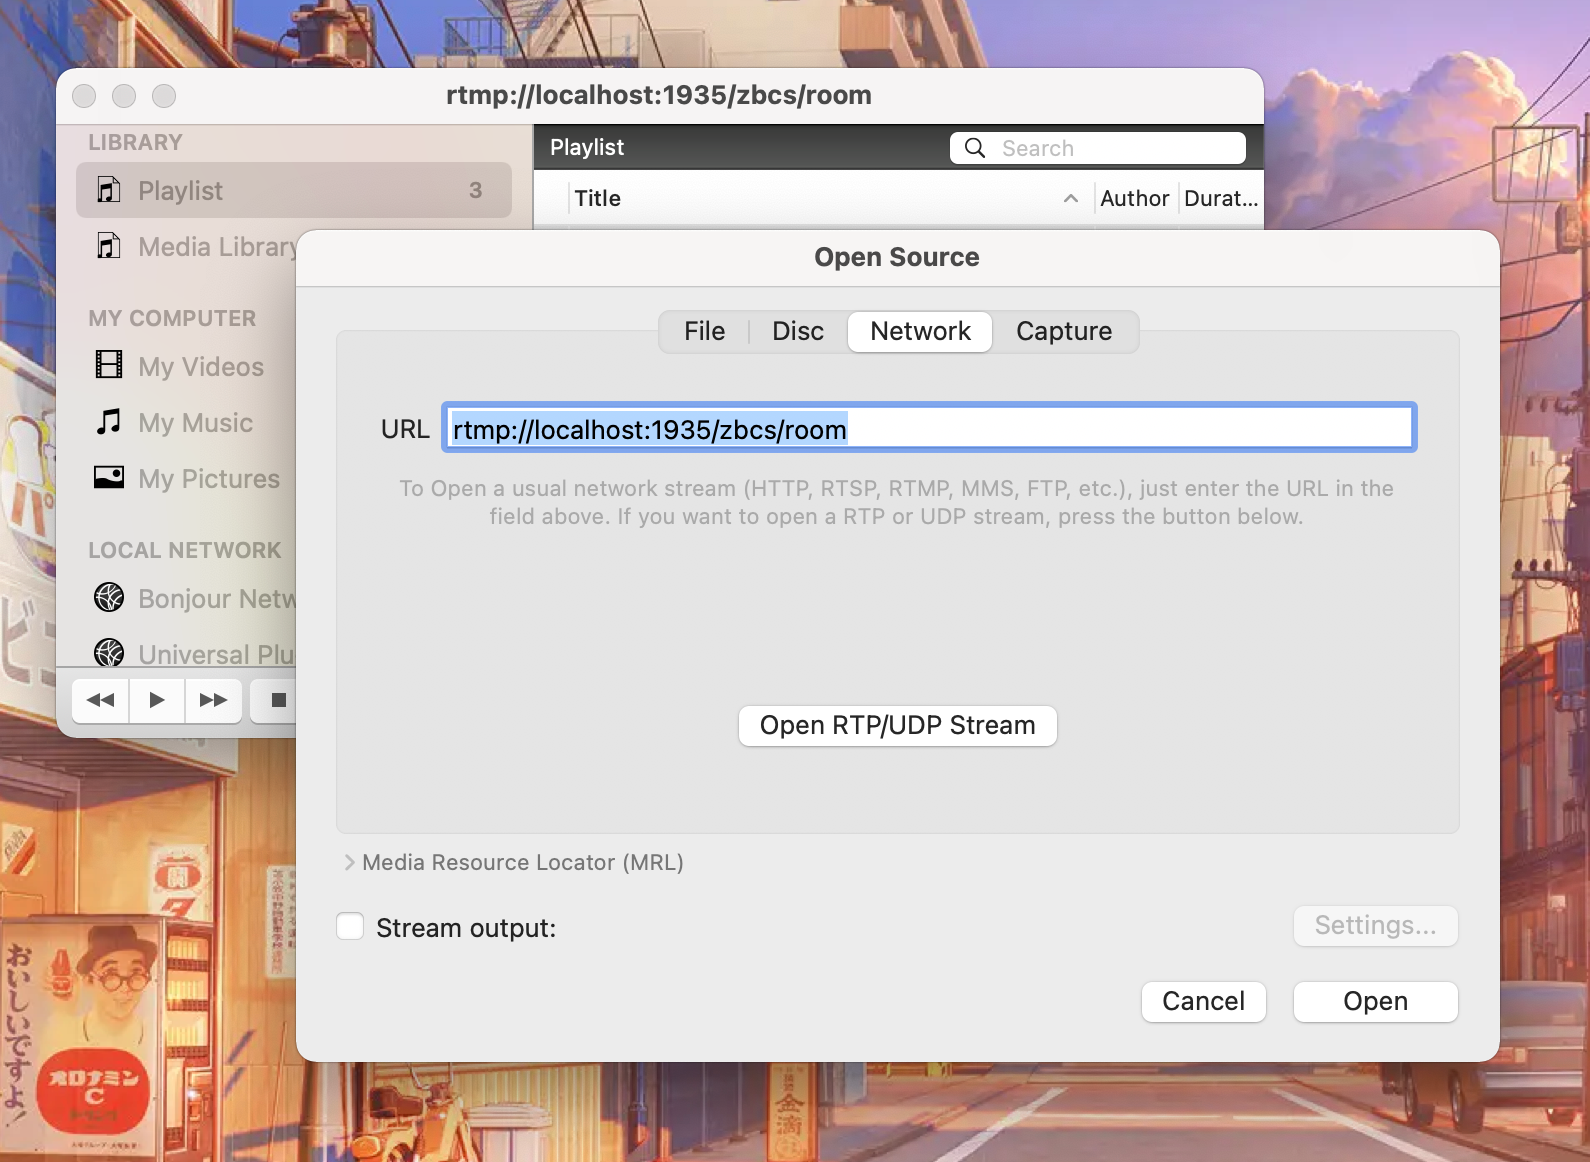
Double click play
Play interface

Reference article:
How to realize the whole set of video live broadcasting technology process at the front end
Use node media server to build a simple streaming media server