Code Splitting is an important feature of webpack s that allows you to package code to generate multiple bundles.For multi-page applications, it is necessary because multiple entries must be configured to generate multiple bundles; for single-page applications, packaging a bundle alone can be very bulky, making it impossible to take advantage of the browser's ability to download in parallel, and a long time on the white screen can also result in downloading a lot of code that may not be needed, and every time an online user downloads all the code, Code SpLitting can split code to load multiple bundles on demand or in parallel. It can take advantage of the concurrent download capability, reduce the first time to access the white screen, and only upload the necessary files.
Three Code Splitting modes
webpack provides three ways to cut code:
- Multiple entries
- Public Extraction
- Dynamic Loading
This article will briefly introduce multiple entries and common extraction, with emphasis on dynamic loading.These methods can be combined as needed.Here is the official document. Chinese English
Multiple entries
This is done by specifying multiple packaging entries, starting from the entry, to package all the dependencies into one bundle, one bundle for each entry.This method is especially suitable for multi-page applications where we can specify an entry for each page and generate a js for each page.The core configuration code for this approach is as follows:
const path = require('path');

module.exports = {
  mode: 'development',
  entry: {
    page1: './src/page1.js',
    page2: './src/page2.js'
  },
  output: {
    filename: '[name].bundle.js',
    path: path.resolve(__dirname, 'dist')
  }
};
The configuration above will eventually generate two bundles, page1.bundle.js and page2.bundle.js.
Public Extraction
This method extracts public modules to generate a bundle, which means there may be many places to use them, and each generated bundle may contain code generated by the public module packaging, which is wasteful. Extracting public modules to generate a bundle separately can solve this problem effectively.Here is an example of the configuration given in an official document:
  const path = require('path');

  module.exports = {
    mode: 'development',
    entry: {
      index: './src/index.js',
      another: './src/another-module.js'
    },
    output: {
      filename: '[name].bundle.js',
      path: path.resolve(__dirname, 'dist')
    },
    // crux
    optimization: {
      splitChunks: {
        chunks: 'all'
      }
    }
  };
In this example, loadsh is import ed in both index.js and another-module.js. If optimization is not configured, two bundles will be generated, both containing the loadsh code.After optimizationconfiguration, the loadsh code is extracted separately into a vendors~another~index.bundle.js.
Dynamic Loading
Dynamic loading means that code is packaged into bundles and loaded when which bundle is needed.The advantage of this is that it allows users to download the code they need, avoiding unnecessary code downloads.It is certain that the experience may be worse because there may be a download process after the operation.On dynamic loading, detailed below.
Implement a simple dynamic load
Dynamic loading implements that other js can be loaded inside the code. This is too simple. Insert a new script tag into the dom, as follows:
function loadScript(url) {
    const script = document.createElement('script');
    script.src = url;
    document.head.appendChild(script);
}
You just need to call it when you need to load a js, such as when you need to click a button.
btn.onClick = function() {
    console.log('1');
    loadScript('http://abc.com/a.js');
}
It looks very simple, and in fact the webpack does the same, but its processing is more general and refined.
webpack dynamic loading
How to execute the packaged code from webpak
There is an existing file, test2.js, where the code is
console.log('1')The output of this file packaged in a webpack is as follows, with some code removed. The full version can either try to compile one itself or view it web-test (This project is based on react,express,webpack for web-related experiments, which uses the code splitting scheme to split code based on routing, and the code splitting-related experiments are placed in the test-code-split branch).
(function (modules) { // webpackBootstrap
  // The module cache
  var installedModules = {};

  // The require function
  function __webpack_require__(moduleId) {

    // Check if module is in cache
    if (installedModules[moduleId]) {
      return installedModules[moduleId].exports;
    }
    // Create a new module (and put it into the cache)
    var module = installedModules[moduleId] = {
      i: moduleId,
      l: false,
      exports: {}
    };

    // Execute the module function
    modules[moduleId].call(module.exports, module, module.exports, __webpack_require__);

    // Flag the module as loaded
    module.l = true;

    // Return the exports of the module
    return module.exports;
  }
  return __webpack_require__(__webpack_require__.s = "./test2.js");
})
  ({

    "./test2.js":
      (function (module, exports, __webpack_require__) {

        "use strict";
        eval("\n\nconsole.log('1');\n\n//# sourceURL=webpack:///./test2.js?");

      })

  });
I don't know if you've never seen the code compiled and produced by webpack before, like Daxiong.It's interesting to see that our code was executed in eval.Looking at this code, it is not really complex.It is a self-executing function, the parameter is an object, the key is a module ID (moduleId), the value is a function, this function is the code that executes what we write inside, directly calls a u webpack_require_u in the body of the self-executing function, the parameter is the entry module Id, u webpack_require_ method value executes the function corresponding to the given module id, the core code is modules[moduleId].call (module.exports, module, module.exports, u webpack_require_u);.
The above is the case without the import command. For the case with the import command, the output is similar to the above except that the parameters of the self-executing function change.For example:
// Entry file test2.js
import './b.js'
console.log('1')
// b.js
console.log('b')
The parameters inside the self-executing function produced by this code are as follows:
// Parameters inside self-executing functions
{

  "./b.js":
  (function (module, exports, __webpack_require__) {

    "use strict";
    eval("\n\nconsole.log('b');\n\n//# sourceURL=webpack:///./b.js?");
  }),

    "./test2.js":
  (function (module, exports, __webpack_require__) {

    "use strict";
    eval("\n\n__webpack_require__(/*! ./b.js */ \"./b.js\");\n\nconsole.log('1');\n\n//# sourceURL=webpack:///./test2.js?");
  })
}
The u webpack_require_u method is called inside eval of the function corresponding to the module Id. /test2.js. For convenience, take out the string from eval as follows
__webpack_require__("./b.js");
console.log('1');
The original import command was converted into a call to u webpack_require_u in the webpack.That's fantastic, but Daxiong is still confused when it comes to what's inside the module and what's inside the module to use eval to execute the code we've written.
webpack dynamic code splitting scheme
After a bit of padding, it finally comes to the topic of how Web packs are dynamically loaded.In the previous section, Daxiong gives a crude dynamic loading method, loadScript, which simply creates script tags dynamically.The same is true in webpack, except that he does some detailed work.This article only introduces the main process, the specific implementation details you can compile and output a code to study.
The first step is to show you how to use code splitting in a webpack, which is as simple as the following
import('lodash').then(_ => {
    // Do something with lodash (a.k.a '_')...
  });
We used an import() method, which is packaged in a webpack and resembles the loadScript mentioned earlier. You can refer to the code below:
__webpack_require__.e = function requireEnsure(chunkId) {
    var promises = [];


    // JSONP chunk loading for javascript

    var installedChunkData = installedChunks[chunkId];
    if(installedChunkData !== 0) { // 0 means "already installed".

        // a Promise means "currently loading".
        if(installedChunkData) {
            promises.push(installedChunkData[2]);
        } else {
            // setup Promise in chunk cache
            var promise = new Promise(function(resolve, reject) {
                installedChunkData = installedChunks[chunkId] = [resolve, reject];
            });
            promises.push(installedChunkData[2] = promise);

            // start chunk loading
            var script = document.createElement('script');
            var onScriptComplete;

            script.charset = 'utf-8';
            script.timeout = 120;
            if (__webpack_require__.nc) {
                script.setAttribute("nonce", __webpack_require__.nc);
            }
            script.src = jsonpScriptSrc(chunkId);

            onScriptComplete = function (event) {
                // avoid mem leaks in IE.
                script.onerror = script.onload = null;
                clearTimeout(timeout);
                var chunk = installedChunks[chunkId];
                if(chunk !== 0) {
                    if(chunk) {
                        var errorType = event && (event.type === 'load' ? 'missing' : event.type);
                        var realSrc = event && event.target && event.target.src;
                        var error = new Error('Loading chunk ' + chunkId + ' failed.\n(' + errorType + ': ' + realSrc + ')');
                        error.type = errorType;
                        error.request = realSrc;
                        chunk[1](error);
                    }
                    installedChunks[chunkId] = undefined;
                }
            };
            var timeout = setTimeout(function(){
                onScriptComplete({ type: 'timeout', target: script });
            }, 120000);
            script.onerror = script.onload = onScriptComplete;
            document.head.appendChild(script);
        }
    }
    return Promise.all(promises);
};
Are you familiar with it? The code also calls document.createElement('script') to create a script tag and insert it into the head er.What this code does is dynamically load the js, reject if the load fails, and load a successful resolution. There is no way to see resolve, which is implemented by calling a global function in the split code.The split JS are as follows:
(window["webpackJsonp"] = window["webpackJsonp"] || []).push([[0],{

/***/ "./b.js":
/*!**************!*\
  !*** ./b.js ***!
  \**************/
/*! no static exports found */
/***/ (function(module, exports, __webpack_require__) {

"use strict";
eval("\n\nconsole.log('b');\n\n//# sourceURL=webpack:///./b.js?");

/***/ })

}]);
The corresponding resolve is called in the webpackJsonp method as follows:
function webpackJsonpCallback(data) {
    var chunkIds = data[0];
    var moreModules = data[1];


    // add "moreModules" to the modules object,
    // then flag all "chunkIds" as loaded and fire callback
    var moduleId, chunkId, i = 0, resolves = [];
    for(;i < chunkIds.length; i++) {
        chunkId = chunkIds[i];
        if(installedChunks[chunkId]) {
            resolves.push(installedChunks[chunkId][0]);
        }
        installedChunks[chunkId] = 0;
    }
    for(moduleId in moreModules) {
        if(Object.prototype.hasOwnProperty.call(moreModules, moduleId)) {
            modules[moduleId] = moreModules[moduleId];
        }
    }
    if(parentJsonpFunction) parentJsonpFunction(data);

    while(resolves.length) {
        resolves.shift()();
    }

};
Here, the global webpackJsonp is an array whose push method is changed to the array of webpackJsonpCallback methods.So each time you execute a webpackJsonp, you are actually calling the webpackJsonpCallback method.
var jsonpArray = window["webpackJsonp"] = window["webpackJsonp"] || [];
var oldJsonpFunction = jsonpArray.push.bind(jsonpArray);
jsonpArray.push = webpackJsonpCallback;
jsonpArray = jsonpArray.slice();
for(var i = 0; i < jsonpArray.length; i++) webpackJsonpCallback(jsonpArray[i])
To summarize, the dynamic loading process of the webpack is as follows:
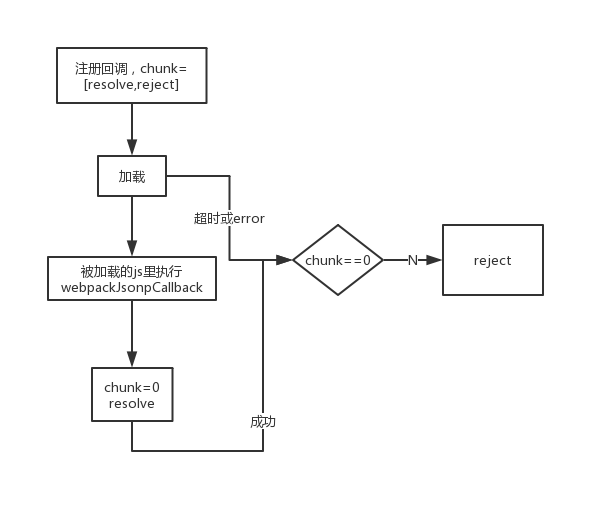
summary
This paper makes a simple analysis of the structure and execution of the code packaged by webpack, introduces several ways of code splitting in webpack, and focuses on the process of dynamic loading.The analysis is not necessarily correct. You can use the webpack package output code to do your own research, and you will certainly get some results.At least Daxiong knows roughly how the codes compiled by the original webpack were executed and how flexible Promise was.
Daxiong often needs to do some experimentation when he is learning web development or encountering problems in his projects, and he often knows what new features react has. At first, he often does experiments directly in his company's projects, pulling a test branch directly to start it, which has the following shortcomings:
- Experimenting on a company project is a bad thing in itself
- There is only a front-end part of the company's project and it is not convenient to do interface-related experiments. For example, to test the cross-domain response header Access-Control-Allow-Origin, you have to start another web server
- The experimented things are scattered, and after a while I tried to find them, I couldn't find them.
For these reasons, we have set up a project based on react,webpack,express for web development related experiments. web-test Welcome.