- Functional Hierarchy of Classes
- Class Implementation Level
- Specific examples of bridging modes
- Summary
Bridge means bridge. Its function is to connect two sides. The function of bridge mode is also the same. Bridge mode is connected by function level and implementation level of each class.
There are two words that may be a little strange, the functional level of the class and the implementation level of the class.
So let's introduce the two hierarchies first, because the bridge mode is to connect the two hierarchies.
Functional Hierarchy of Classes
For adding new functions, if there is a class now, we want to add a new function in this class without changing the original class, then we can inherit from this class by inheritance method, and then add a specific new method in the inherited class. This is the functional level of the class.
- Parents have basic functions
- Subclasses extend the functions of classes and add new functions
Note: The functional level of a class should not be too deep
Class Implementation Level
Used to add new implementations. If we now have an abstract class or interface, which defines the corresponding methods, but does not implement, for different specific implementations we need to inherit the abstract class or implementation interface, which is the implementation level of the class.
- Parents define interfaces by declaring abstract methods
- Subclasses implement interfaces by implementing specific methods
Hybridization and Separation of Class Hierarchy
So after learning the functional level and implementation level of a class, we can consider a question when we write subclasses, whether we want to add functions or implementations. When the class hierarchy has only one layer, the functional hierarchy and the implementation hierarchy are mixed together, which makes it easy for the class hierarchy to become complex and difficult to understand.
Therefore, we need to separate the functional and implementation levels of classes into two separate hierarchies, but we can not simply separate them. After separation, we need to add some connection. This connection is the bridge, which is the bridge mode we will talk about in this paper.
Concrete examples of bridge mode
The function of this example is to print and display something.
- Let's first consider the functional hierarchy of classes.
The functional level of a class only needs to consider what specific needs to be considered, and the specific implementation is given to the implementation level to implement. In order to invoke the implementation level, the functional level needs to hold an object of the implementation level, that is, delegation.
Functional Level Base Class Display
package Bridge;

public class Display {
    private DisplatImpl impl;

    public Display(DisplatImpl impl) {
        this.impl = impl;
    }

    public void open() {
        impl.rawOpen();
    }

    public void print() {
        impl.rawPrint();
    }

    public void close() {
        impl.rawClose();
    }

    public final void display() {
        open();
        print();
        close();
    }
}
Then we add functionality to this class, which can be displayed many times.
COuntPlay:
package Bridge;

public class CountDisplay extends Display{

    public CountDisplay(DisplatImpl impl) {
        super(impl);
    }

    public void multiDisplay(int times) {
        open();
        for(int i=0;i<times;i++)
            print();
        close();
    }
}
- Class Implementation Level
First, the base class of the implementation level of a class should be an interface or abstract class, which defines the method to be implemented.
package Bridge;

public abstract class DisplatImpl {
    public abstract void rawOpen();
    public abstract void rawPrint();
    public abstract void rawClose();
}
Then we look at a real implementation that implements the above interface.
public class StringDisplayImpl extends DisplayImpl {
    private String string;                              // String to display
    private int width;                                  // The width of a string calculated in byte units
    public StringDisplayImpl(String string) {           // The constructor receives the string to be displayed
        this.string = string;                           // Save it in a field
        this.width = string.getBytes().length;          // Save the width of the string in the field for use.
    }
    public void rawOpen() {
        printLine();
    }
    public void rawPrint() {
        System.out.println("|" + string + "|");         // Add "|" around and display
    }
    public void rawClose() {
        printLine();
    }
    private void printLine() {
        System.out.print("+");                          // Displays the "+" used to represent the corner of the box
        for (int i = 0; i < width; i++) {               // Display width "-"
            System.out.print("-");                      // Use it as the border of a box
        }
        System.out.println("+");                        // Displays the "+" used to represent the corner of the box
    }
}
Finally, we call these two levels:
public class Main {
    public static void main(String[] args) {
        Display d1 = new Display(new StringDisplayImpl("Hello, China."));
        Display d2 = new CountDisplay(new StringDisplayImpl("Hello, World."));
        CountDisplay d3 = new CountDisplay(new StringDisplayImpl("Hello, Universe."));
        d1.display();
        d2.display();
        d3.display();
        d3.multiDisplay(5);
    }
}
Operation results:
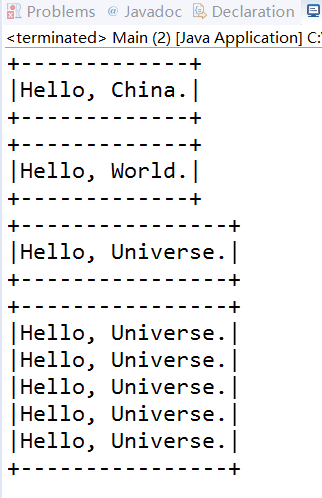
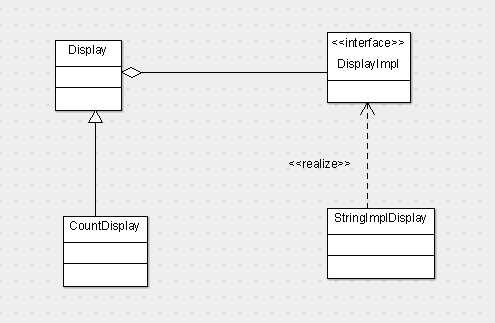
Class diagrams of the above examples:
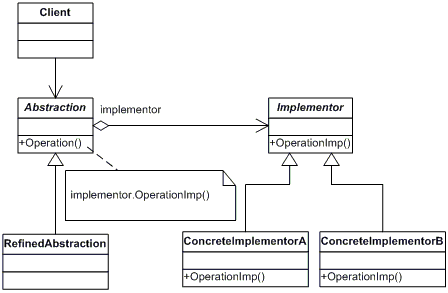
The class diagram of the Bridge pattern is similar:
Summary
- It's easier to expand after separation
Bridging mode is characterized by separating the functional level of the class from the implementation level. The advantage of separation is that it is beneficial to extend them. When new functions are added, it is only necessary to add classes at the functional level. There is no need to make any changes to the implementation level of the class. And the added functionality can be used by all implementations.
For example, if we divide the OS-dependent parts of our program into max, windows and linux versions, we can use the implementation hierarchy in the class bridging hierarchy to represent those OS-dependent parts.