The main contents are: boundary filling cv2.copyMakeBorder(), numerical calculation cv2.add(), change size cv2.resize(), image fusion cv2.addWeighted(), image threshold cv2.threshold()
Before we start, let's import the images, which we need in the img. An image display function is defined to facilitate the next drawing.
# Import opencv Library
import cv2
# Define image display functions
def cv_show(name,img):
    # Incoming (custom window name, image data)
    cv2.imshow(name,img)
    # Wait time set to 0 so that the image does not disappear by itself
    cv2.waitKey(0)
    # cv2.waitKey(1000)  # The image disappears after 1000 milliseconds
    # Press any image on the keyboard to disappear
    cv2.destroyAllWindows()

# Specify the folder where the image is located
filepath = 'C:\\...\\opencv\\img'
# Extract an image from a question folder
img = cv2.imread(filepath+'\\wise3.jpg')
1. Boundary Filling
Set bounding box method: cv2.copyMakeBorder(src, top, bottom, left, right, borderType, value)
src: Input picture
top, bottom, left, right: the width of the border in the corresponding direction
borderType: Defines how borders are added
Value: If borderType is cv2.BORDER_CONSTANT value to fill when CONSTANT
The borderType method is as follows:
cv2.BORDER_REPLICATE: Copy method, copy the most edge pixels
cv2.BORDER_REFLECT: Reflectometry in which reflection copies are made on both sides of a specified pixel in an image, such as gfedcba|abcdefgh|hgfedcb
cv2.BORDER_REFLECT_101: Reflectometry, with the axis at the most edge pixel, e.g. dcba|abcd|dcba
cv2.BORDER_WRAP: Outpacking method, e.g. cdefgh|abcdefgh|abcdefg
cv2.BORDER_CONSTANT: Constant Value Fill
Let's look at each of these approaches:
#(1) Boundary Filling
# First specify the size to fill left and right
top_size,bottom_size,left_size,right_size = (50,50,50,50)
# Fill function cv2.copyMakeBorder (input image, how much to fill, borderType=fill method)

# copy
img1 = cv2.copyMakeBorder(img,top_size,bottom_size,left_size,right_size,borderType=cv2.BORDER_REPLICATE)
# reflex
img2 = cv2.copyMakeBorder(img,top_size,bottom_size,left_size,right_size,borderType=cv2.BORDER_REFLECT)
# Reflection 101
img3 = cv2.copyMakeBorder(img,top_size,bottom_size,left_size,right_size,borderType=cv2.BORDER_REFLECT_101)
# Outpack
img4 = cv2.copyMakeBorder(img,top_size,bottom_size,left_size,right_size,borderType=cv2.BORDER_WRAP)
# Constant Fill, value=0
img5 = cv2.copyMakeBorder(img,top_size,bottom_size,left_size,right_size,borderType=cv2.BORDER_CONSTANT,value=0)

# Mapping
import matplotlib.pyplot as plt
# Show Chinese Song Style
plt.rcParams['font.sans-serif'] = ['SimSun']
# Set the drawing board size
plt.figure(figsize=(10,7))
# Original Map
plt.subplot(231),plt.imshow(img),plt.title('Original Map')
# copy
plt.subplot(232),plt.imshow(img1),plt.title('copy')
# reflex
plt.subplot(233),plt.imshow(img2),plt.title('reflex')
# Reflection 101
plt.subplot(234),plt.imshow(img3),plt.title('Reflection 101')
# Outpack
plt.subplot(235),plt.imshow(img4),plt.title('Outpack')
# Constant Fill
plt.subplot(236),plt.imshow(img5),plt.title('Constant 0 Fill')
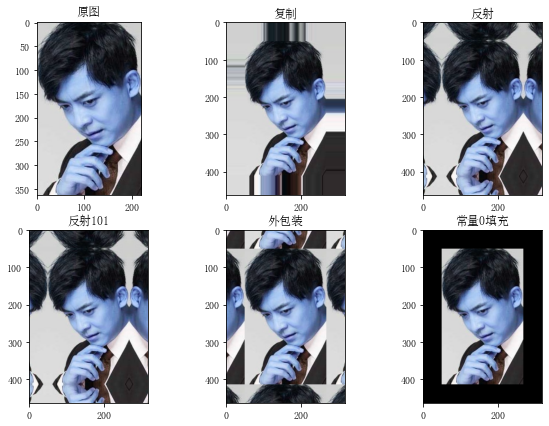
We can see the difference between different methods from the diagram. Maybe your classmates might ask you why the color is so strange. Note that the color channel of the image in opencv is composed of BGR, while the color channel in matplot is composed of RGB. When displaying the image, there will be color differences, so try to use the image display method of opencv.
2. Numeric calculation
2.1 Direct Addition
To add two pictures directly, the sizes of the two images are the same size, and the corresponding pixel points are added together. Since the size of each pixel point value is between 0 and 255, the added pixel value greater than 255 is automatically reduced to 255, for example, 150+150=300, without 300 pixel values, it automatically becomes 45. If a constant is added to an image as a whole, that is, a constant value is added to each element to increase the brightness.
# Read in 2 pictures first
img1 = cv2.imread(filepath+'\\sit1.jpg')
img2 = cv2.imread(filepath+'\\wise2.jpg')
# ==1==Adding directly more than 255 pixels automatically subtracts 255
# Add 10 to all the pixel points on img1, leaving the overall shape unchanged
img3 = img1+10
cv_show('img3',img3)
# Add the two pictures together and they need to have the same shape
img4 = img1+img2
cv_show('img4',img4)
# Since each pixel point in the graph is between 0 and 255, 255 is automatically subtracted if it exceeds 255
When two images with the same size are added directly, the result is
2.2 Use functions to add cv2.add()
cv2.add(src1, src2)
Requires the same size and number of channels for both images. The corresponding pixel values are added together, and when added, a value greater than 255 equals 255
src1, src2: add two images together, or add a value to one image
Mask: an image mask, an 8-bit, single-channel grayscale image, used to specify the elements of the output image array to be changed, i.e. the output image pixels are only output if the corresponding position element of the mask is not 0, otherwise all channel components of the location pixels are set to 0
dtype: The depth of the output image array, which is the number of bits of a single pixel value of the image (24 bits if RGB is expressed in three bytes).
# ==2== cv2.add()
# If the sum exceeds 255, the value of the pixel point is 255
img5 = cv2.add(img1,img2)
cv_show('img5',img5)
3. Image Fusion
Fusing two images together at a certain scale requires two images with the same size and channel number
#(3) Image fusion, two maps mixed together
# Read two pictures
img1 = cv2.imread(filepath+'\\sit2.jpg')
img2 = cv2.imread(filepath+'\\wise2.jpg')
# ==1==Look at the shape s of the two graphs first
img1.shape  #(503,1201,3)
img2.shape  #(1080,1440,3)
3.1 Change image size
Specify specific length and height: cv2.resize (image, (long, high))
Specify zoom ratio: cv2.resize (image, (0,0), fx = zoom ratio along x axis, fy = zoom ratio along y axis)
Note that when specifying specific lengths and heights, you must first specify the width and then the length, as follows cv2.resize(img2,(1201,503)), turning img2 high to 503 and long to 1201, and what we. shape s found was (high, long)
# ==2==Change size cv2.resize (image, specified size), receive return value
# Note that you specify the width before the height
# Make img2 the same size as img1
img2 = cv2.resize(img2,(1201,503))
img2.shape
# No specific value is specified, only a multiple relationship is given, that is, the scale of the image along the x- and y-axes
img4 = cv2.resize(img2,(0,0),fx=3,fy=3)
cv_show('name', img4)
3.2 Image Fusion
Two images are fused at a certain scale: Cv2.addWeighted (Image 1, Weight 1, Image 2, Weight 2, Brightness Offset)
Equivalent to y = a x1 + b x2 + c, where a, b represent weight and C represent how much brightness is raised
img5 = cv2.addWeighted(img1,0.5,img3,0.4,0)
cv_show('img5',img5)
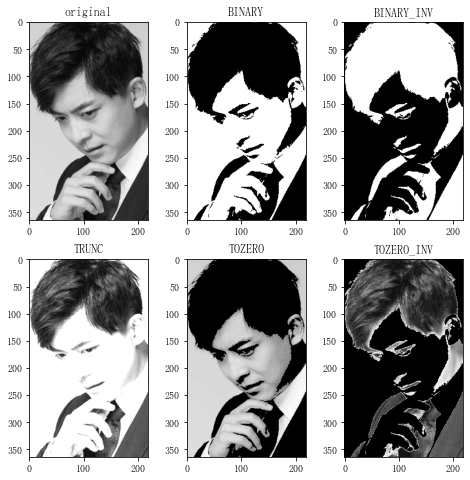
4. Image Threshold
First we'll import the images and libraries we need
import cv2
import matplotlib.pyplot as plt
# Specify the folder where the image is located
filepath = 'C:\\...\\opencv\\img'
# convert to grayscale
img = cv2.imread(filepath+'\\wise3.jpg',cv2.IMREAD_GRAYSCALE)
Image Threshold Processing Function: ret, dst = cv2.threshold(src, thresh, maxval, type)
Parameters:
src: Input graph, which can only enter a single channel image, usually a grayscale image
dst: Output Diagram
Threshold: Threshold, is a value, usually 127
maxval: The value assigned when the image exceeds or falls below the threshold (determined by type)
Type: The type of binarization operation that contains:
cv2.THRESH_BINARY For binary method, take maxval (the maximum value set) for the part beyond threshold thresholds, otherwise take 0
cv2.THRESH_BINARY_INV 0 for parts above threshold and maxval for parts below threshold
cv2.THRESH_TRUNC Truncate, set the threshold above the threshold and keep it constant below the threshold
cv2.THRESH_TOZERO The parts greater than the threshold do not change, and the parts less than the threshold become 0. Bright parts remain unchanged, dark parts become black spots
cv2.THRESH_TOZERO_INV The value greater than the threshold becomes 0 and the value less than the threshold remains unchanged. Dark parts remain unchanged, bright parts become black spots
Return value
ret: threshold
dst: Output Diagram
# Method 1: Input grayscale image, threshold 127, greater than threshold 255, less than threshold 0
ret,thresh1 = cv2.threshold(img,127,255,cv2.THRESH_BINARY)
# Method 2: Beyond threshold 127 becomes 0, below threshold becomes 255. From brighter to black, from dark to white
ret,thresh2 = cv2.threshold(img,127,255,cv2.THRESH_BINARY_INV)
# Method 3: Set a threshold value greater than 127 and keep it constant below the threshold value
ret,thresh3 = cv2.threshold(img,127,255,cv2.THRESH_TRUNC)
# Method 4: Value greater than threshold 127 becomes 127, value less than 127 remains unchanged
ret,thresh4 = cv2.threshold(img,127,255,cv2.THRESH_TOZERO)
# Method 5: Values less than 127 remain unchanged, values greater than 127 become 0
ret,thresh5 = cv2.threshold(img,127,255,cv2.THRESH_TOZERO_INV)

# Mapping
titles=['original','BINARY','BINARY_INV','TRUNC','TOZERO','TOZERO_INV']
images=[img,thresh1,thresh2,thresh3,thresh4,thresh5]
plt.figure(figsize=(8,8))
for i in range(6):
    plt.subplot(2,3,i+1)
    plt.imshow(images[i],'gray')
    plt.title(titles[i])
plt.show()