Learning objectives
- Configuration of login page
- Login successful jump implementation
- Implementation of settlement page query
- Order implementation
- Change stock
- Add points
- Introduction to payment process
- Introduction to wechat code scanning payment
1 login page configuration
The previous use is to use Postman login, and then we implement a oauth custom login.
1.1 preparations
Changgou shopping mall - upgraded and restored version -. md courseware, Chuanzhi health care - 13 days full version, black horse headline
Valley Shopping Mall - September, Xuecheng online, Leyou shopping mall, Qingcheng shopping mall, hospitable rental, 10th power 2.0,
Kaixueba 11, code has the fifth class Java microservices project, etc,
The latest quality interview questions No encryption,
Open the website at http://www.cx1314.cn/forum.php? Mod = Forum display & FID = 61 to collect
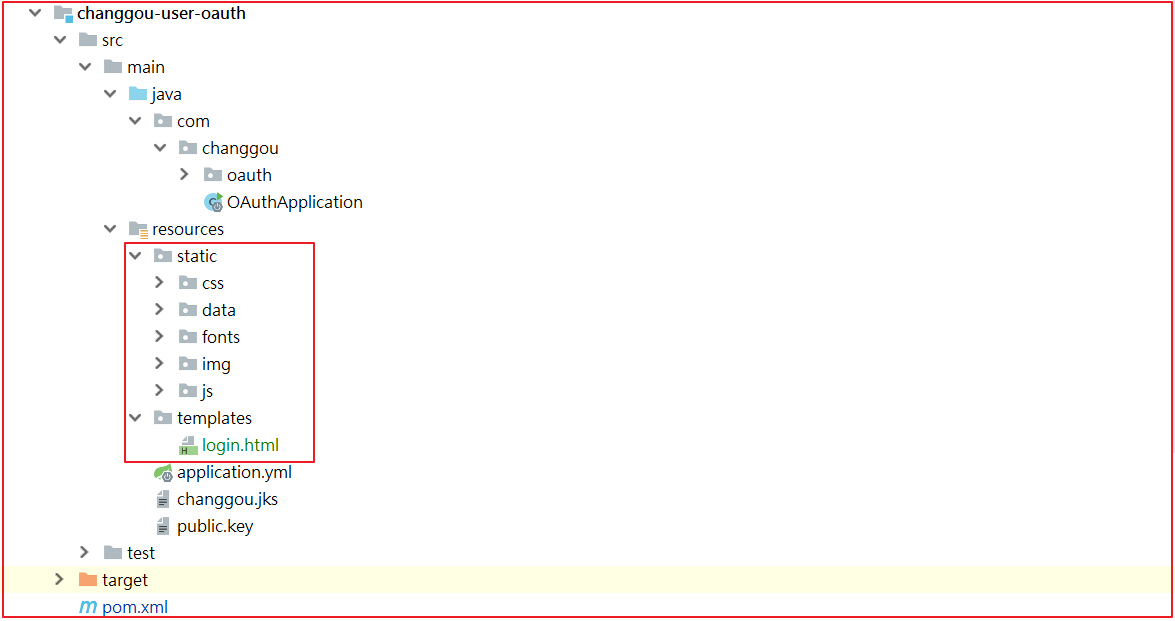
(1) Static resource import
Import the static resources related to data / page / front-end login into Changgou user OAuth, as shown below.
(2) Introducing thymeleaf
Modify Changgou user OAuth and introduce thymeleaf template engine
1 2 3 4 5<!--thymeleaf--> <dependency> <groupId>org.springframework.boot</groupId> <artifactId>spring-boot-starter-thymeleaf</artifactId> </dependency>
(3) Login configuration
Modify Changgou user OAuth, write a controller com.changgou.oauth.controller.LoginRedirect, and realize the jump of login page. The code is as follows:
1 2 3 4 5 6 7 8 9 10 11 12 13@Controller @RequestMapping(value = "/oauth") public class LoginRedirect { /*** * Jump to login page * @return */ @GetMapping(value = "/login") public String login(){ return "login"; } }
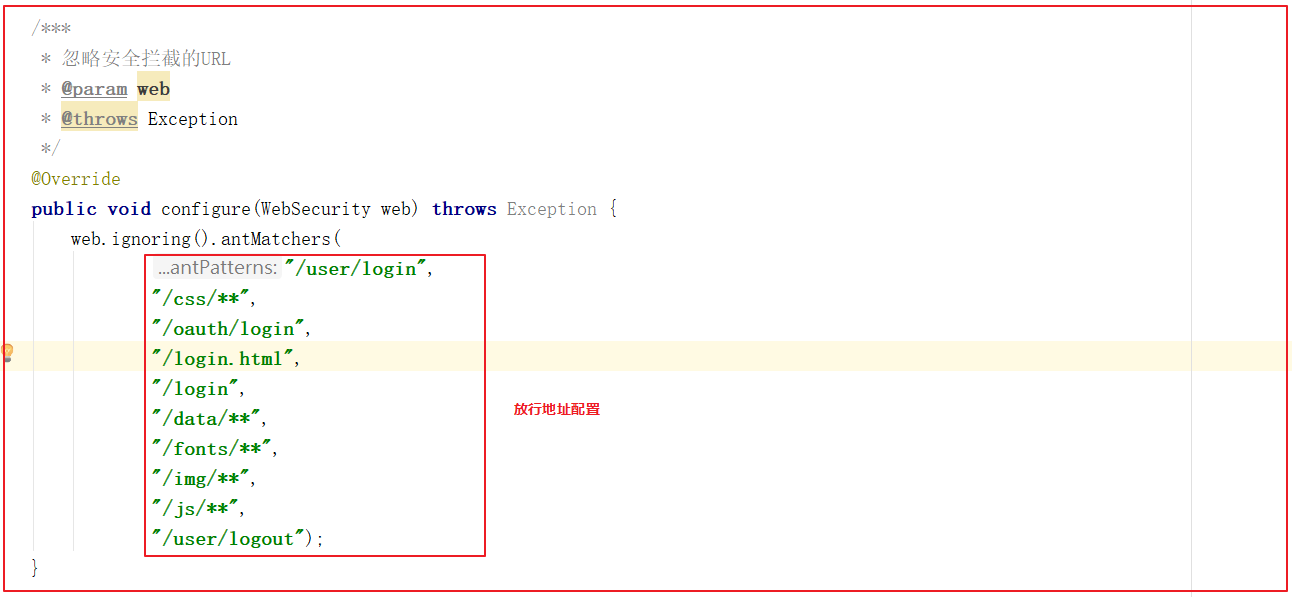
(4) Login page configuration
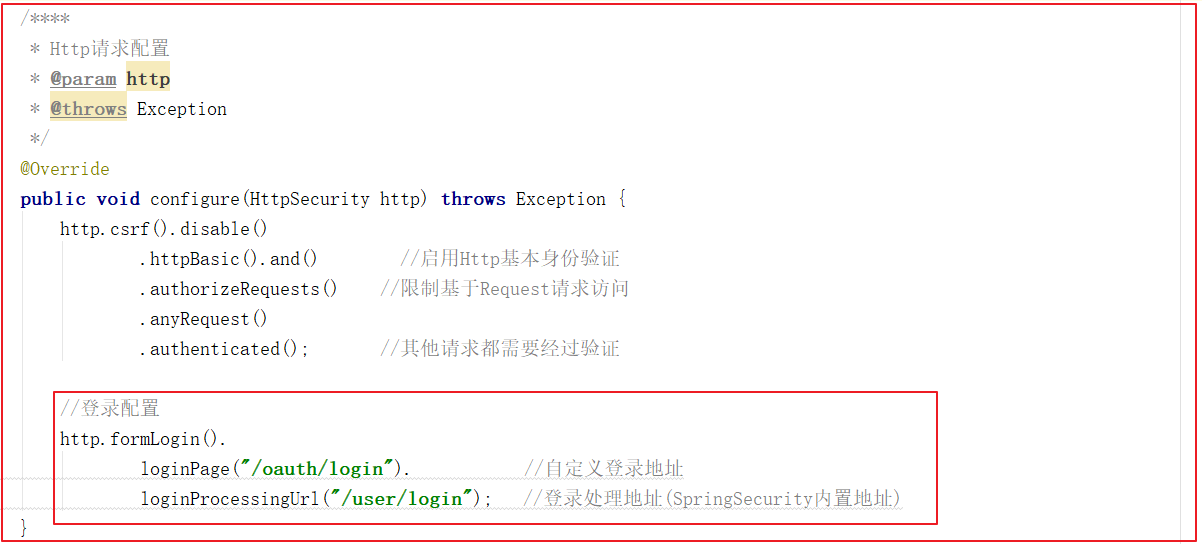
For static resources and login pages, we need to ignore the security configuration and specify the login page. Modify the two configure methods of com.changgou.oauth.config.WebSecurityConfig. The code is as follows:
The first configure configuration:
Configuration 2:
test
1.2 login implementation
Changgou mall full set - upgrade and repair version -. md courseware, etc
-
Network disk link: https://pan.baidu.com/s/1uRYMRXxjRw6BOy7IMOYcQA
Extraction code: o8df - In case of failure, - > Open http://www.cx1314.cn/forum.php?mod=forum61 Reacquire
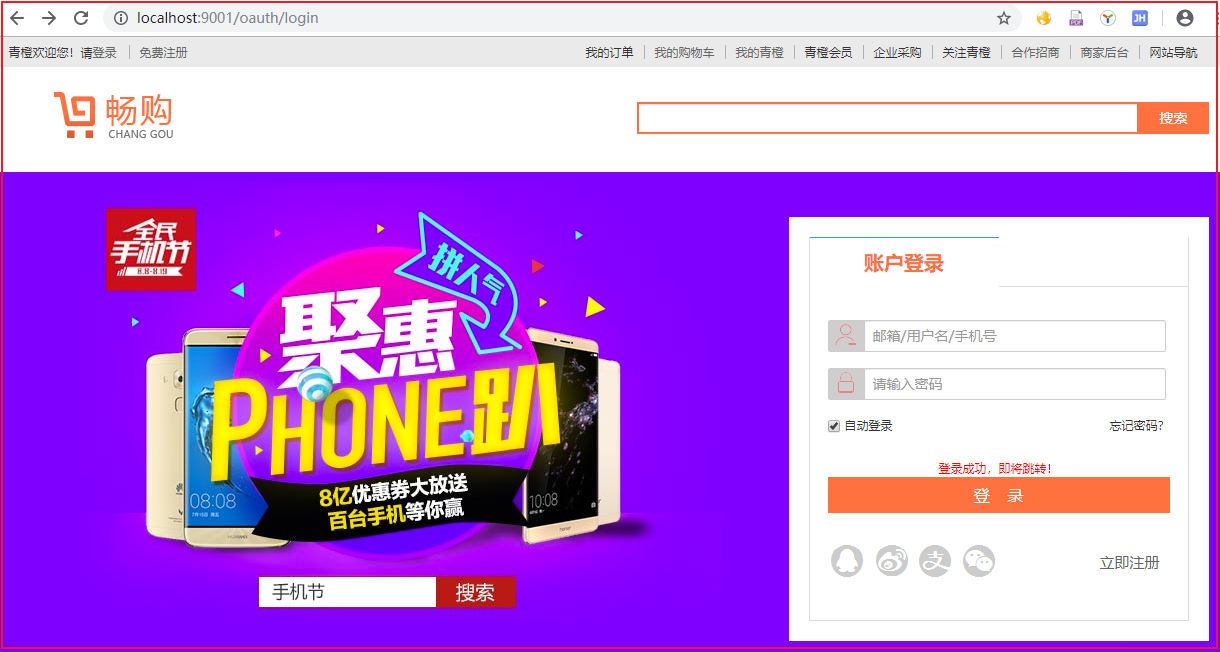
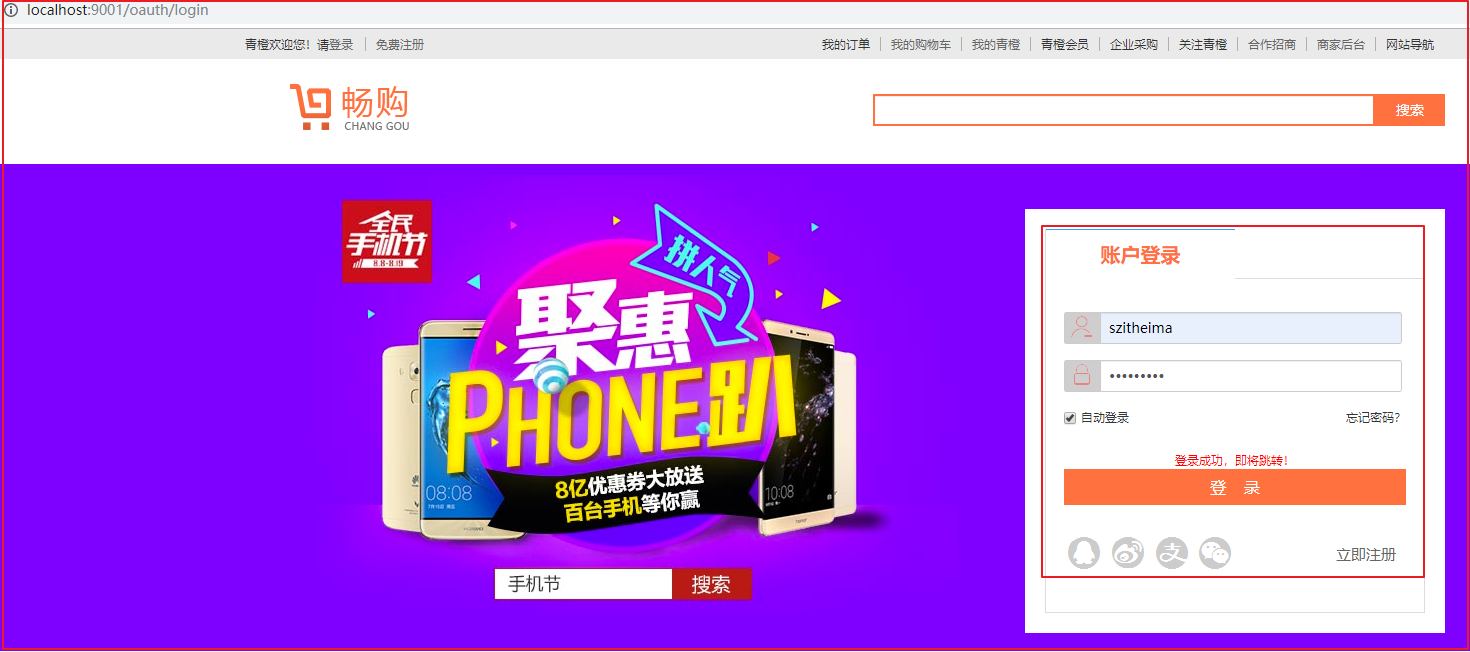
Click the login button to access the previous login method to log in. We need to adjust the login page.
(1) Introducing the thmeleaf namespace
Modify login.html and introduce namespace

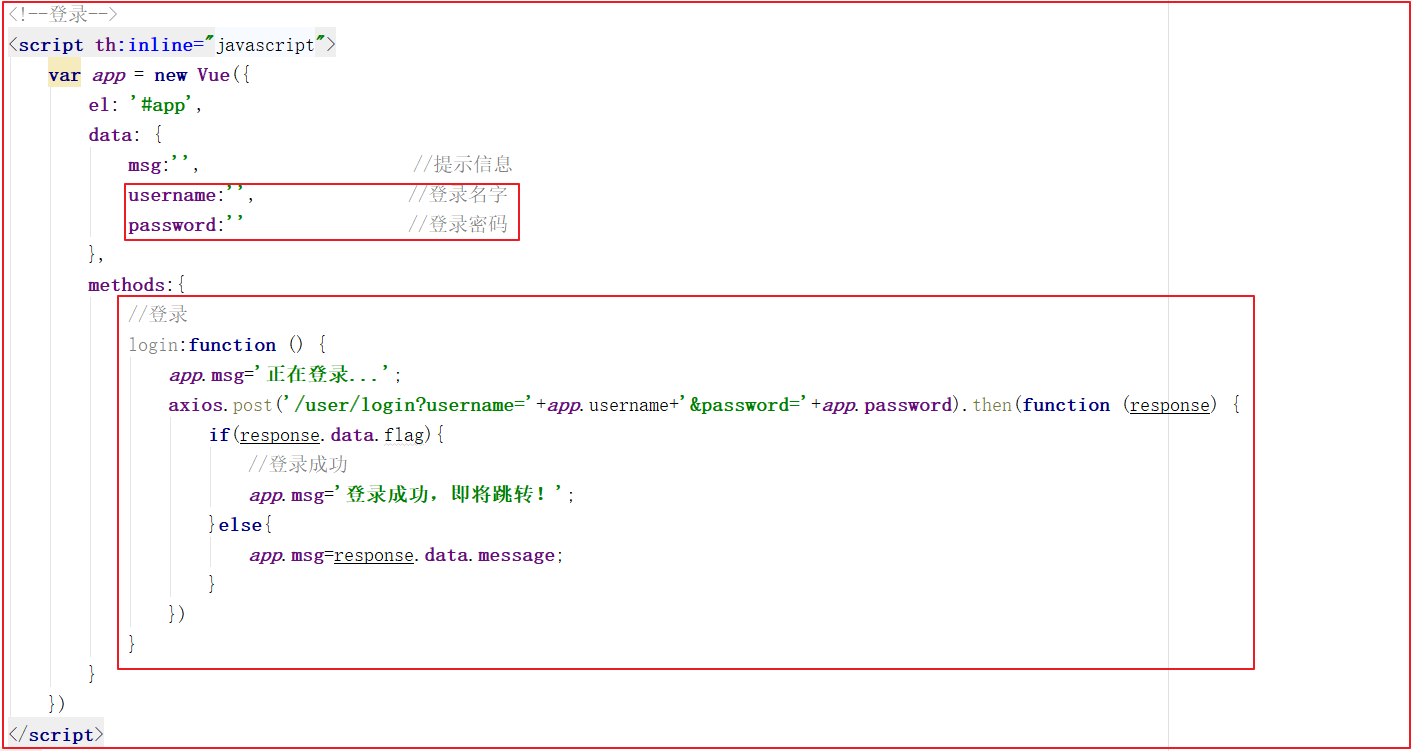
(2) Login script
Click the login button and use vue+axios to log in. We need to define script access background login method.
First, add the vue entry tag: modify login.html, and add id = "app" on the tag around 73 lines. The code is as follows:

Introducing js
1 2<script src="/js/vue.js"></script> <script src="/js/axios.js"></script>
Login script implementation:
(3) Form modification

(4) Testing
1.3 login jump
When the user does not log in, we directly access the shopping cart, and the effect is as follows:

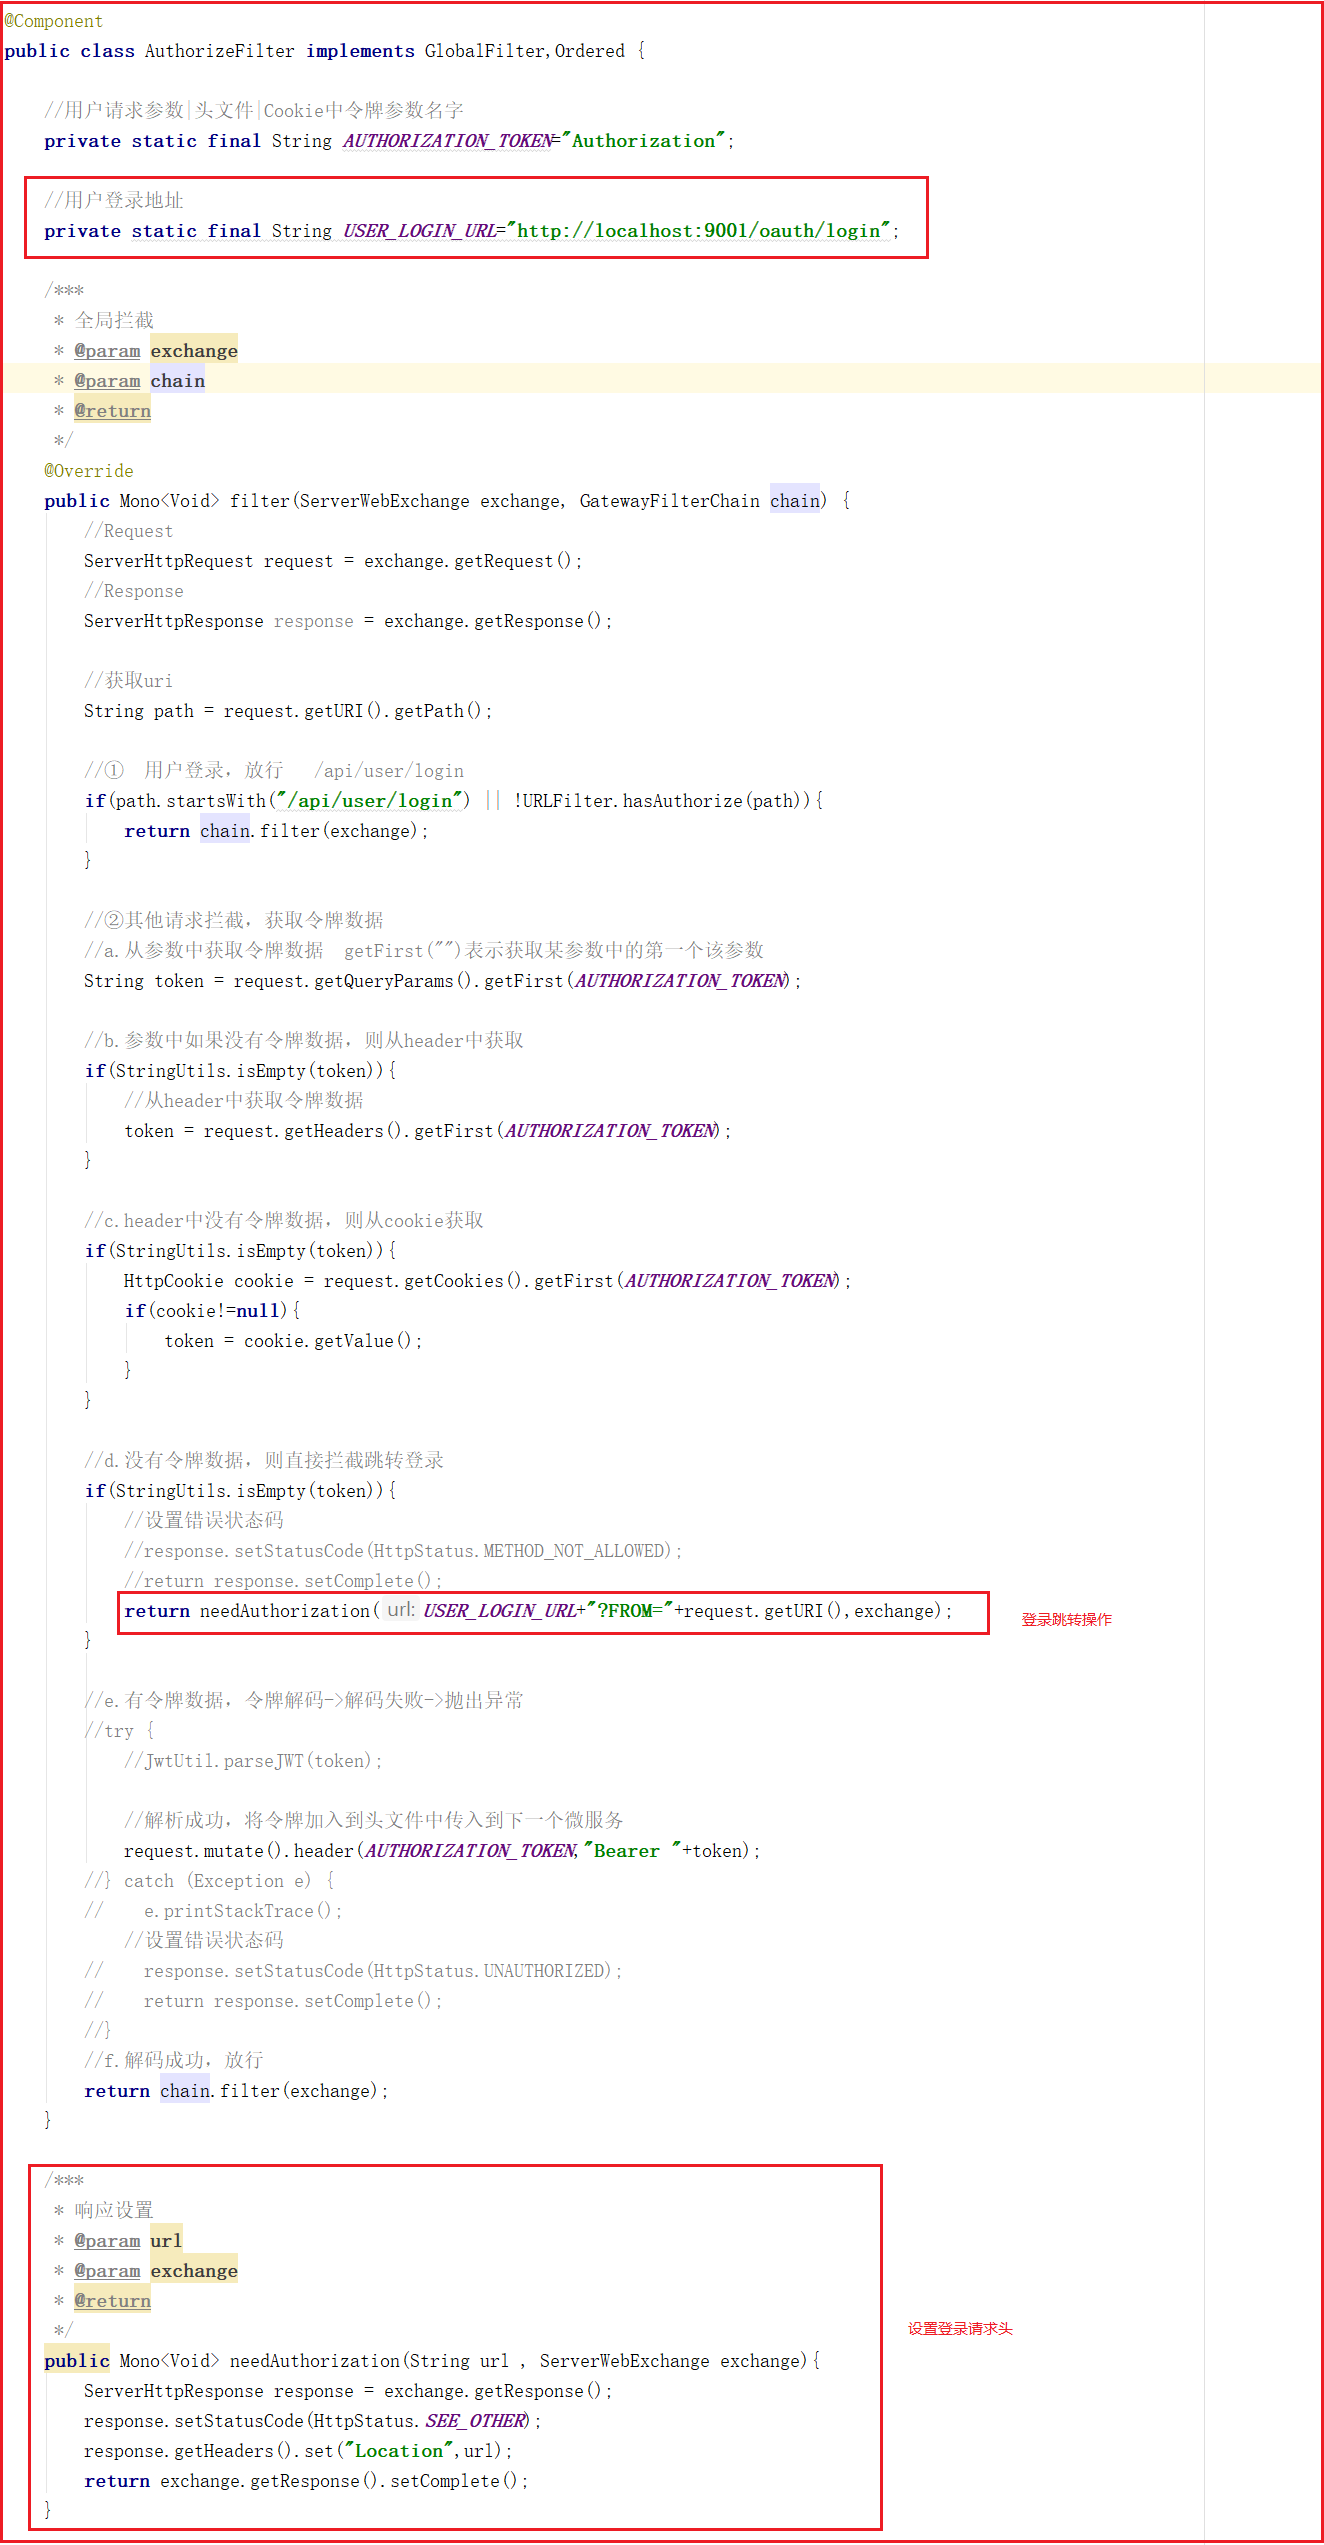
We can find that the returned error status code is not convenient for testing. We can redirect it to the login page to let the user log in. We can modify the header file of the gateway to let the user jump to the login page every time they do not log in.
Modify com.changgou.filter.AuthorizeFilter of changgou-gateway-web, and the code is as follows:
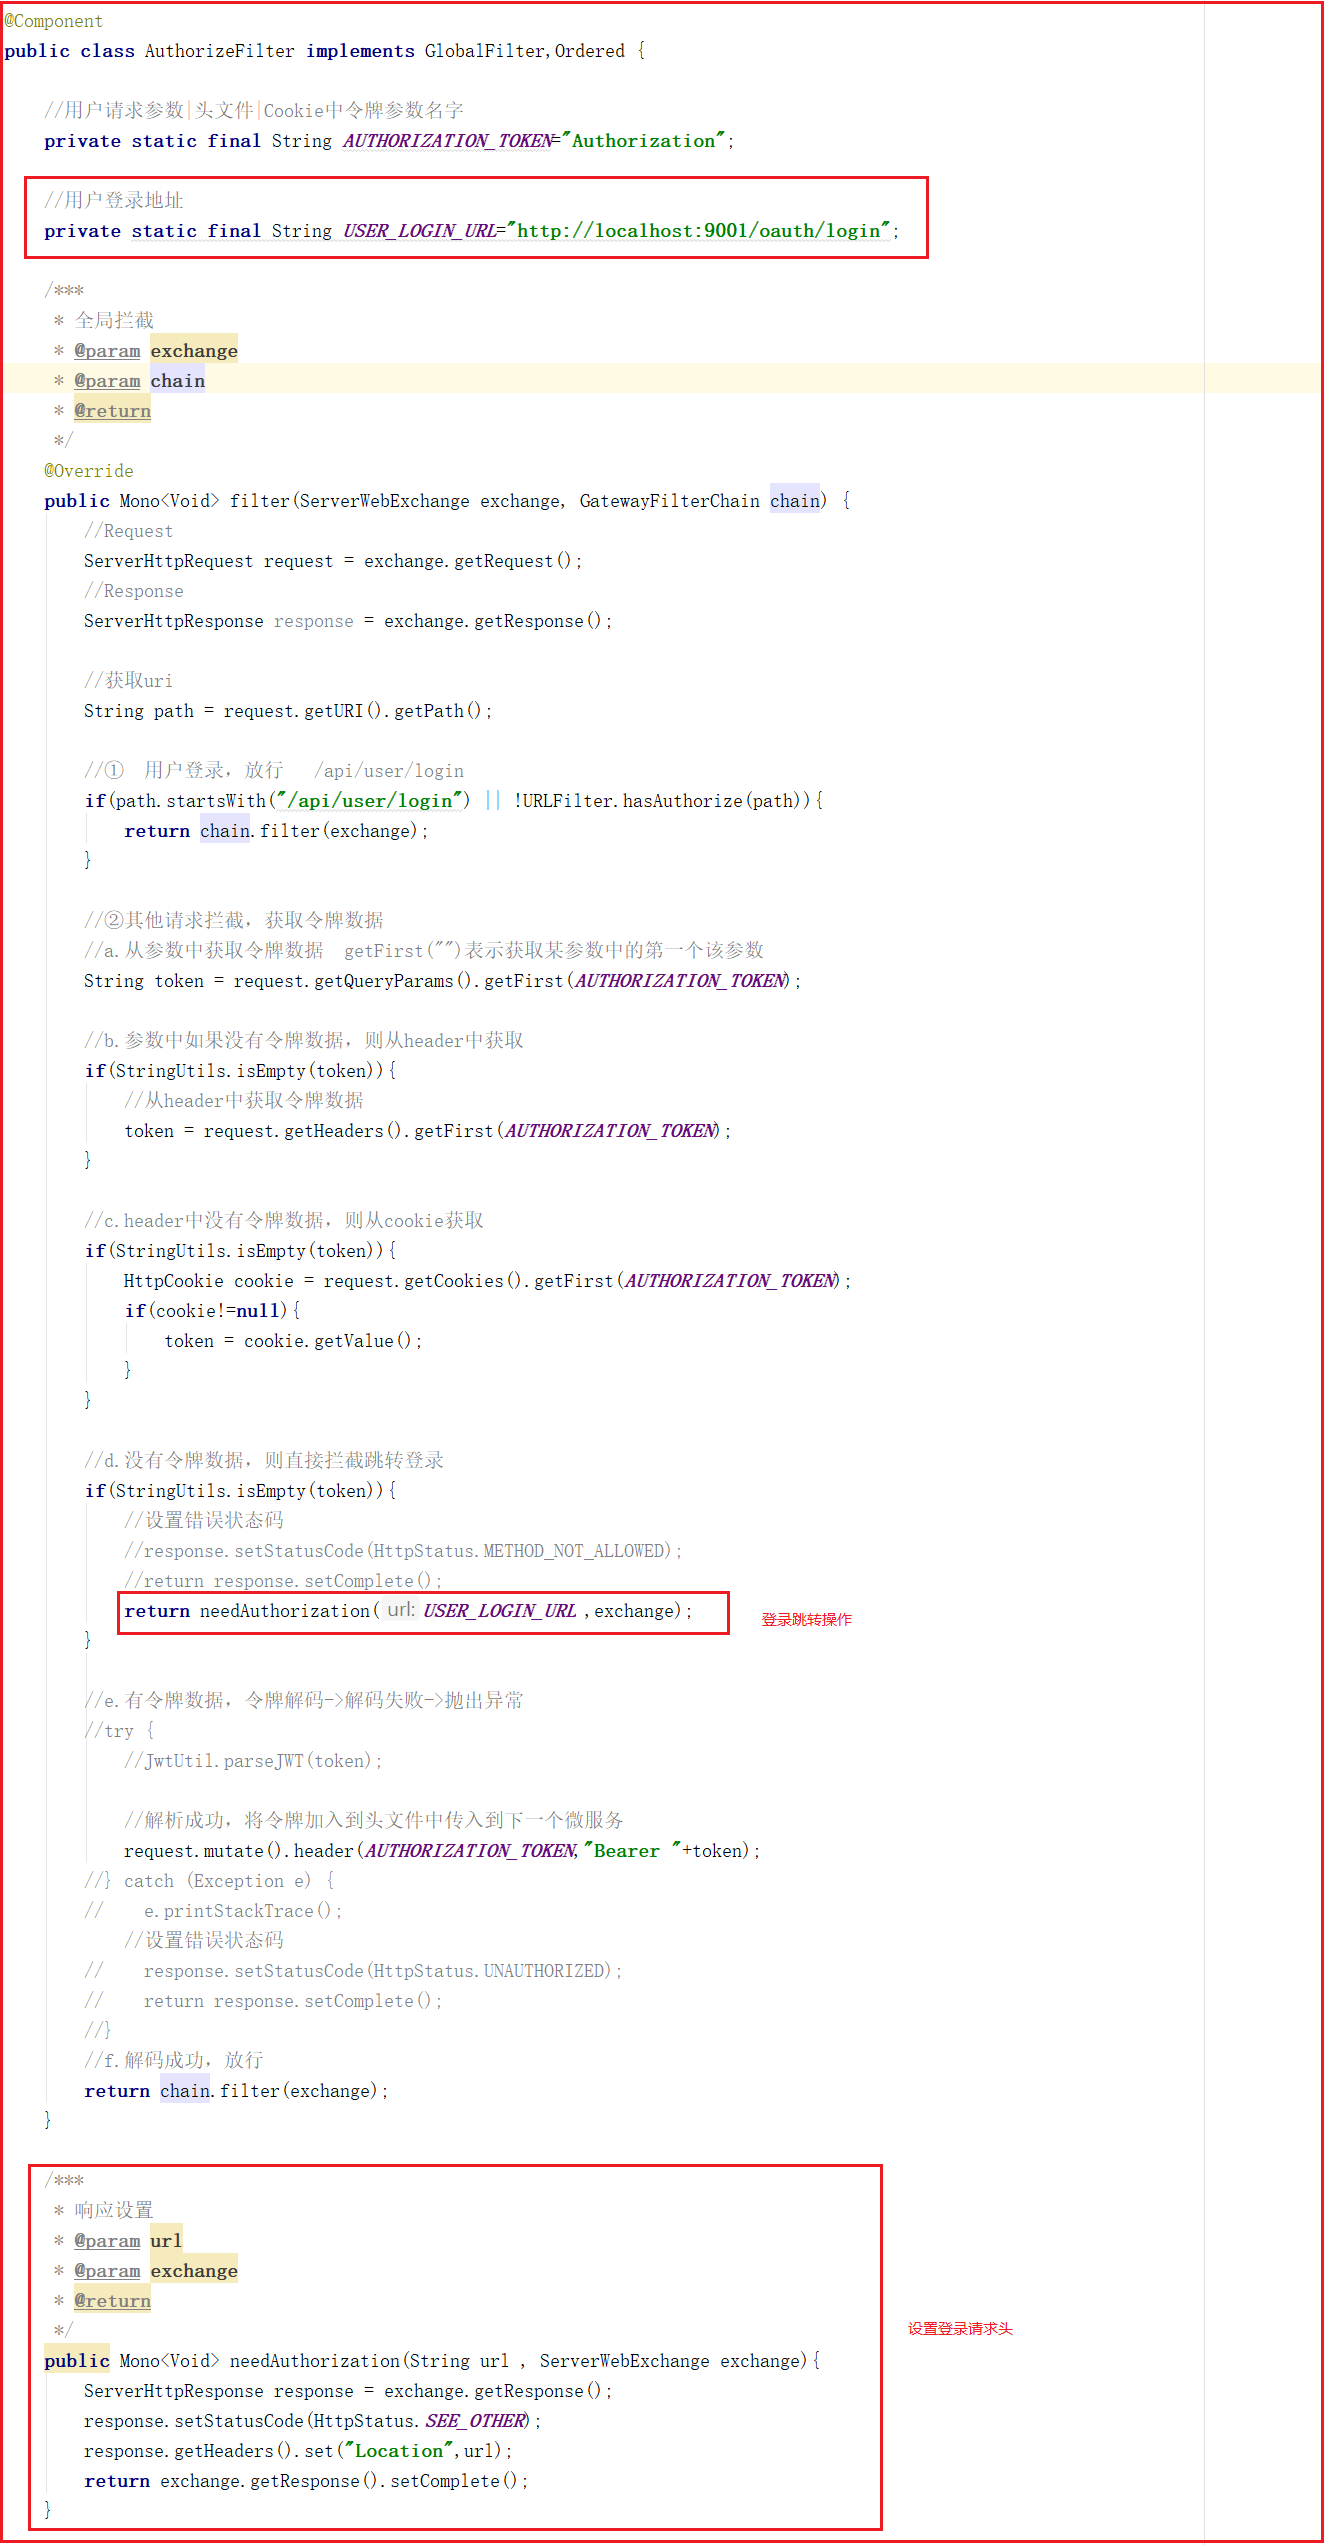
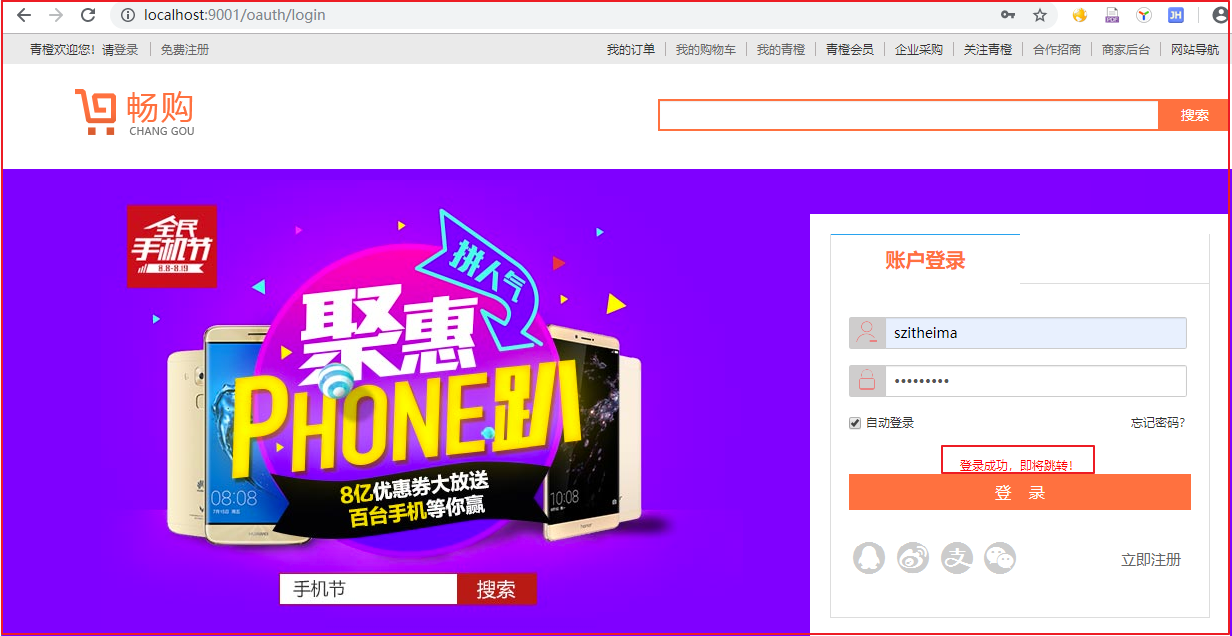
At this point, you can test again and jump to the login page. Of course, in the work, you can't jump to the login page directly, you should prompt the status to the page, let the page Jump according to the judgment, here is just for the convenience of testing.
1.4 successfully log in and jump to the original access page
Although the above login jump is realized, it does not return to the shopping cart page to be visited after the login is successful. We can pass the page to be visited by the user to the login controller as a parameter, and the login controller records it. After each successful login, we can jump to the page specified by the query parameters.
(1) Modify the gateway to carry the current URI
Modify the com.changgou.filter.AuthorizeFilter of changgou-gateway-web, add the FROM parameter after the previous URL, and the value of the FROM parameter is request.getURI(), the code is as follows:
(2) Authentication server get FROM parameter
Modify the com.changgou.oauth.controller.LoginRedirect record access source page of changgou-user-oauth. The code is as follows:
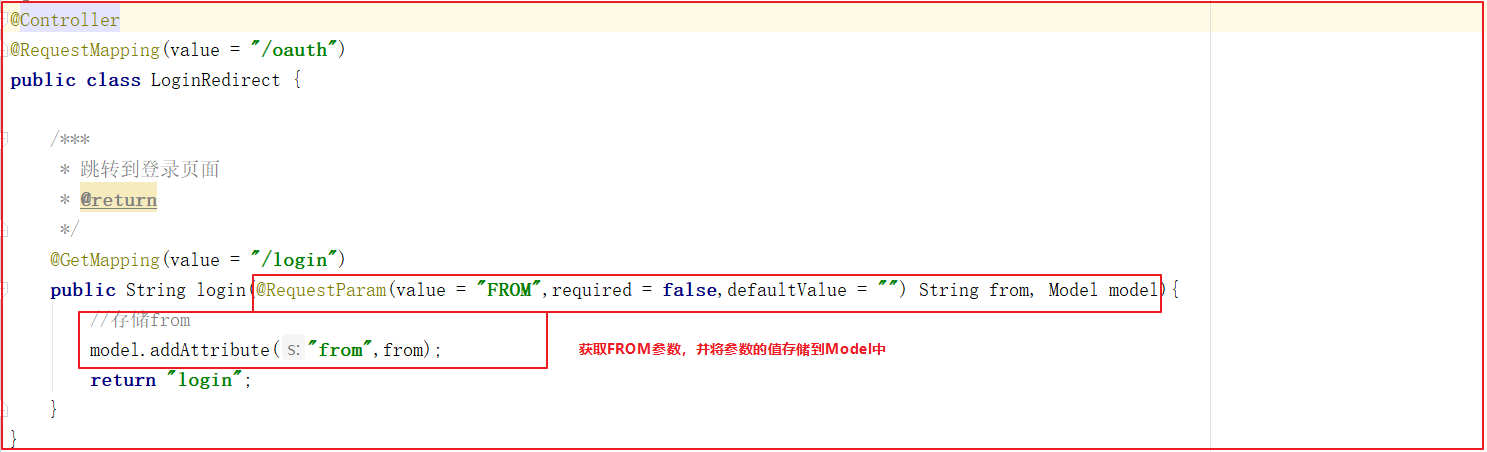
Modify the page, get the source page information, and put it in the from variable. After login, jump to the address.
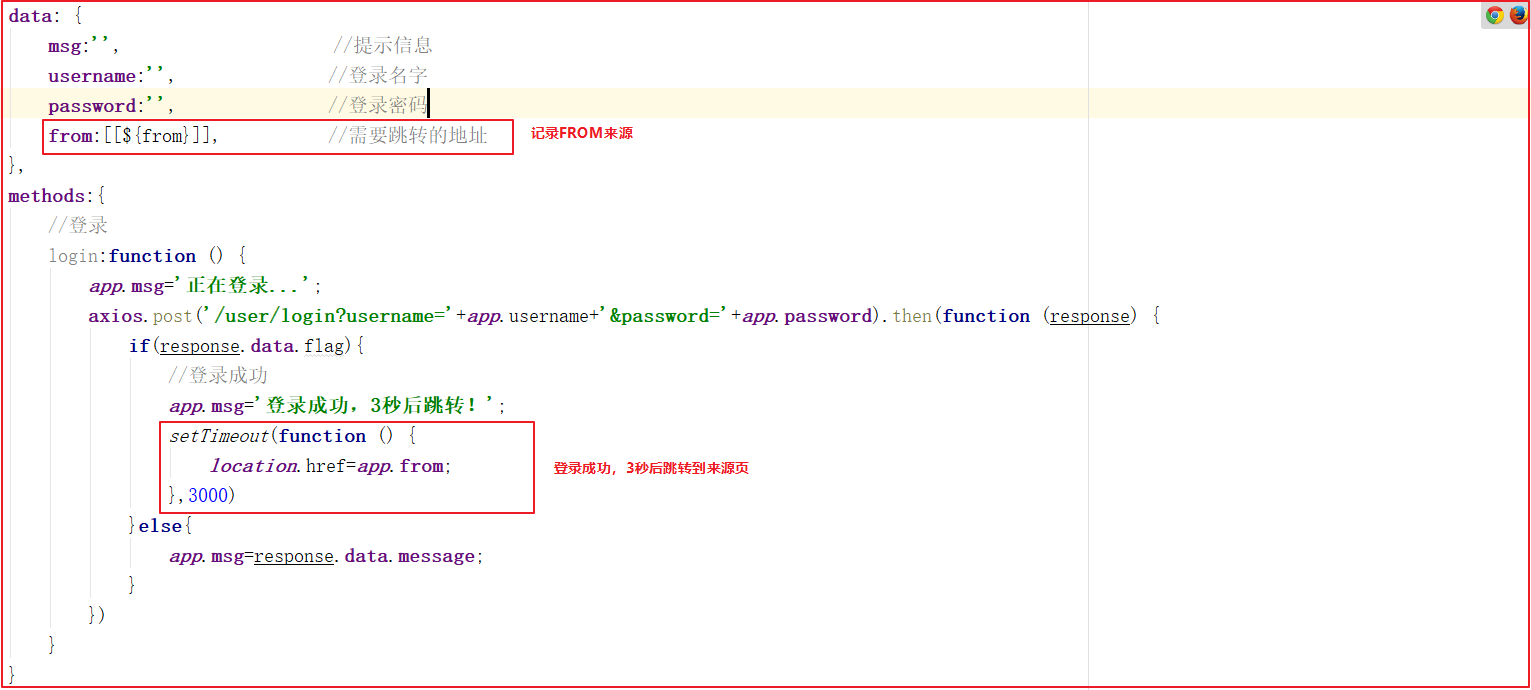
At this time, retest can identify the user who is not logged in, jump to the login page, and then jump to the source page according to the login status, if the login is successful.
2 order closing page
Changgou mall full set - upgrade and repair version -. md courseware, etc
-
Network disk link: https://pan.baidu.com/s/1uRYMRXxjRw6BOy7IMOYcQA
Extraction code: o8df - In case of failure, - > Open http://www.cx1314.cn/forum.php?mod=forum61 Reacquire
2.1 analysis of receiving address
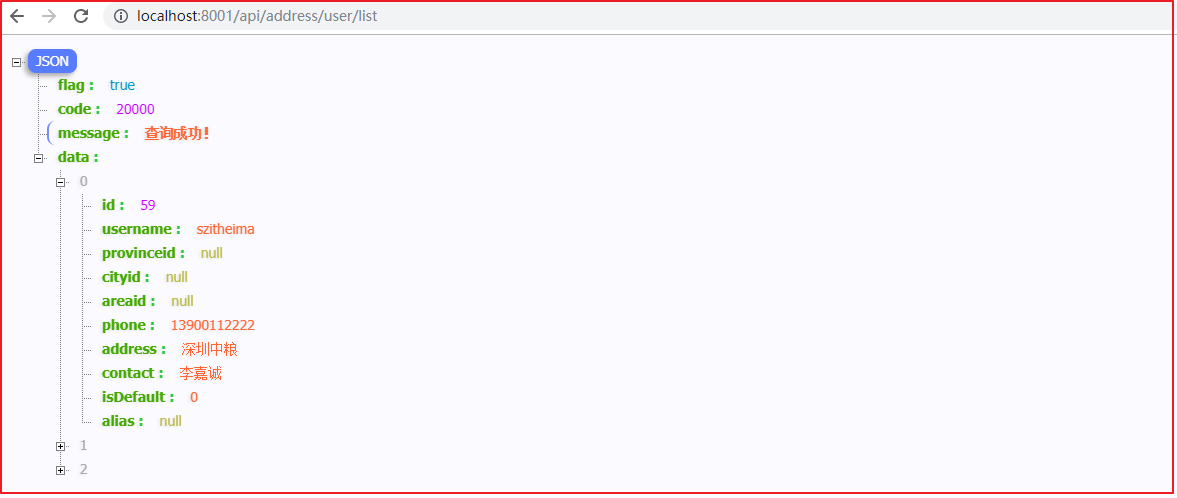
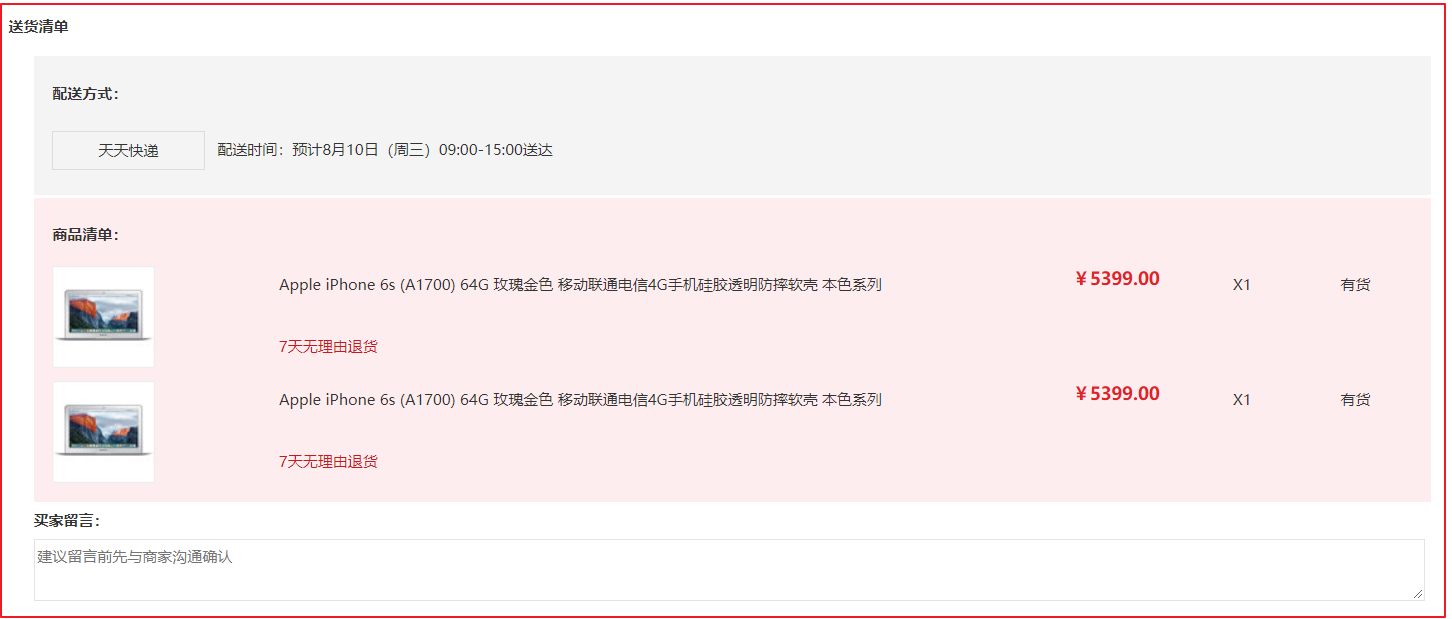
The user clicks settlement from the shopping cart page to jump to the order settlement page. The settlement page needs to load the corresponding receiving address of the user, as shown in the following figure:

Table structure analysis:
1 2 3 4 5 6 7 8 9 10 11 12 13CREATE TABLE `tb_address` ( `id` int(11) NOT NULL AUTO_INCREMENT, `username` varchar(50) DEFAULT NULL COMMENT 'User name', `provinceid` varchar(20) DEFAULT NULL COMMENT 'province', `cityid` varchar(20) DEFAULT NULL COMMENT 'city', `areaid` varchar(20) DEFAULT NULL COMMENT 'county/area', `phone` varchar(20) DEFAULT NULL COMMENT 'Telephone', `address` varchar(200) DEFAULT NULL COMMENT 'Detailed address', `contact` varchar(50) DEFAULT NULL COMMENT 'Contacts', `is_default` varchar(1) DEFAULT NULL COMMENT 'Is it the default 1 default 0 no', `alias` varchar(50) DEFAULT NULL COMMENT 'alias', PRIMARY KEY (`id`) ) ENGINE=InnoDB AUTO_INCREMENT=66 DEFAULT CHARSET=utf8;
We can query the corresponding data in TB u address table according to the user login name.
2.2 realize the inquiry of the user's receiving address
2.2.1 code implementation
(1) business level
Business layer interface
To modify the Changgou service user microservice, you need to change the com.changgou.user.service.AddressService interface and add the following code to query the user's receiving address information according to the user's name:
1 2 3 4 5 6/*** * Receiving address query * @param username * @return */ List<Address> list(String username);
Business layer interface implementation class
Modify the Changgou service user microservice, modify the com.changgou.user.service.impl.AddressServiceImpl class, and add the implementation method of querying the user's receiving address information according to the user, as follows:
1 2 3 4 5 6 7 8 9 10 11/*** * Receiving address query * @param username * @return */ @Override public List<Address> list(String username) { Address address = new Address(); address.setUsername(username); return addressMapper.select(address); }
(2) control layer
Modify the Changgou service user microservice, modify com.changgou.user.controller.AddressController, and add the method to query the user's receiving information according to the user name. The code is as follows:
1 2 3 4 5 6 7 8 9 10 11 12/**** * Receiving address of user */ @GetMapping(value = "/user/list") public Result<List<Address>> list(){ //Get user login information Map<String, String> userMap = TokenDecode.getUserInfo(); String username = userMap.get("username"); //Query user's receiving address List<Address> addressList = addressService.list(username); return new Result(true, StatusCode.OK,"Query succeeded!",addressList); }
2.2.2 test
Visit http://localhost:8001/api/address/user/list
2.2.3 delivery list
The delivery list is actually the shopping cart list. You can directly query the previous shopping cart list, which will not be explained here.
3 order
3.1 business analysis
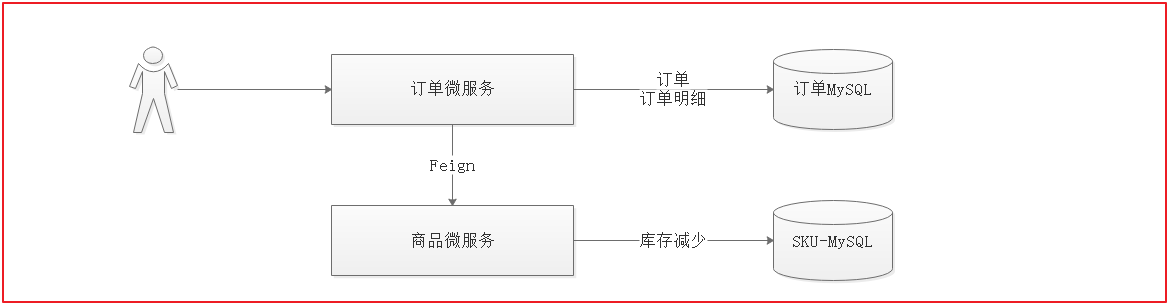
When you click the settlement page, the order data will be created immediately. When you create the order data, the data will be stored in two tables, namely the order table and the order detail table. Here, you need to modify the inventory quantity corresponding to the goods.
The order table structure is as follows:
1 2 3 4 5 6 7 8 9 10 11 12 13 14 15 16 17 18 19 20 21 22 23 24 25 26 27 28 29 30 31 32 33CREATE TABLE `tb_order` ( `id` varchar(50) COLLATE utf8_bin NOT NULL COMMENT 'Order id', `total_num` int(11) DEFAULT NULL COMMENT 'Total quantity', `total_money` int(11) DEFAULT NULL COMMENT 'Total amount', `pre_money` int(11) DEFAULT NULL COMMENT 'Preferential amount', `post_fee` int(11) DEFAULT NULL COMMENT 'Postage', `pay_money` int(11) DEFAULT NULL COMMENT 'Actual amount paid', `pay_type` varchar(1) COLLATE utf8_bin DEFAULT NULL COMMENT 'Payment type: 1. Online payment, 0. Cash on delivery', `create_time` datetime DEFAULT NULL COMMENT 'Order creation time', `update_time` datetime DEFAULT NULL COMMENT 'Order update time', `pay_time` datetime DEFAULT NULL COMMENT 'Payment time', `consign_time` datetime DEFAULT NULL COMMENT 'Delivery time', `end_time` datetime DEFAULT NULL COMMENT 'Transaction completion time', `close_time` datetime DEFAULT NULL COMMENT 'Transaction closing time', `shipping_name` varchar(20) COLLATE utf8_bin DEFAULT NULL COMMENT 'Logistics name', `shipping_code` varchar(20) COLLATE utf8_bin DEFAULT NULL COMMENT 'Logistics number', `username` varchar(50) COLLATE utf8_bin DEFAULT NULL COMMENT 'User name', `buyer_message` varchar(1000) COLLATE utf8_bin DEFAULT NULL COMMENT 'Buyer message', `buyer_rate` char(1) COLLATE utf8_bin DEFAULT NULL COMMENT 'Whether to evaluate', `receiver_contact` varchar(50) COLLATE utf8_bin DEFAULT NULL COMMENT 'Consignee', `receiver_mobile` varchar(12) COLLATE utf8_bin DEFAULT NULL COMMENT 'Consignee's mobile phone', `receiver_address` varchar(200) COLLATE utf8_bin DEFAULT NULL COMMENT 'Consignee address', `source_type` char(1) COLLATE utf8_bin DEFAULT NULL COMMENT 'Order source: 1:web,2: app,3: The official account of WeChat, 4: WeChat applet 5 H5 Mobile phone page', `transaction_id` varchar(30) COLLATE utf8_bin DEFAULT NULL COMMENT 'Transaction serial number', `order_status` char(1) COLLATE utf8_bin DEFAULT NULL COMMENT 'Order status,0:Hang in the air,1:Completed, 2: returned', `pay_status` char(1) COLLATE utf8_bin DEFAULT NULL COMMENT 'Payment status,0:Unpaid, 1: paid, 2: failed to pay', `consign_status` char(1) COLLATE utf8_bin DEFAULT NULL COMMENT 'Delivery status,0:Not shipped, 1: shipped, 2: received', `is_delete` char(1) COLLATE utf8_bin DEFAULT NULL COMMENT 'Delete', PRIMARY KEY (`id`), KEY `create_time` (`create_time`), KEY `status` (`order_status`), KEY `payment_type` (`pay_type`) ) ENGINE=InnoDB DEFAULT CHARSET=utf8 COLLATE=utf8_bin;
The order list structure is as follows:
1 2 3 4 5 6 7 8 9 10 11 12 13 14 15 16 17 18 19 20 21CREATE TABLE `tb_order_item` ( `id` varchar(50) COLLATE utf8_bin NOT NULL COMMENT 'ID', `category_id1` int(11) DEFAULT NULL COMMENT '1 Class classification', `category_id2` int(11) DEFAULT NULL COMMENT '2 Class classification', `category_id3` int(11) DEFAULT NULL COMMENT '3 Class classification', `spu_id` varchar(20) COLLATE utf8_bin DEFAULT NULL COMMENT 'SPU_ID', `sku_id` bigint(20) NOT NULL COMMENT 'SKU_ID', `order_id` bigint(20) NOT NULL COMMENT 'Order ID', `name` varchar(200) COLLATE utf8_bin DEFAULT NULL COMMENT 'Trade name', `price` int(20) DEFAULT NULL COMMENT 'Unit Price', `num` int(10) DEFAULT NULL COMMENT 'Number', `money` int(20) DEFAULT NULL COMMENT 'Total sum', `pay_money` int(11) DEFAULT NULL COMMENT 'Actual amount paid', `image` varchar(200) COLLATE utf8_bin DEFAULT NULL COMMENT 'Picture address', `weight` int(11) DEFAULT NULL COMMENT 'weight', `post_fee` int(11) DEFAULT NULL COMMENT 'freight', `is_return` char(1) COLLATE utf8_bin DEFAULT NULL COMMENT 'Do you return goods?,0:Not returned, 1: returned', PRIMARY KEY (`id`), KEY `item_id` (`sku_id`), KEY `order_id` (`order_id`) ) ENGINE=InnoDB DEFAULT CHARSET=utf8 COLLATE=utf8_bin;
3.2 order fulfillment
Changgou mall full set - upgrade and repair version -. md courseware, etc
-
Network disk link: https://pan.baidu.com/s/1uRYMRXxjRw6BOy7IMOYcQA
Extraction code: o8df - In case of failure, - > Open http://www.cx1314.cn/forum.php?mod=forum61 Reacquire
When placing an order, first add the order to add data to the TB order table, then add the order details, and then add data to the TB order item table.
3.2.1 code implementation
First, modify the Changgou service order microservice to implement the order placing operation. The order number will be generated here. First, we need to create an IdWorker object in the startup class.
Create IdWorker in com.changgou.OrderApplication. The code is as follows:
1 2 3 4@Bean public IdWorker idWorker(){ return new IdWorker(1,1); }
(1) business level
Modify the Changgou service order microservice and com.changgou.order.service.impl.OrderServiceImpl. The code is as follows:
Modify the order microservice and add com.changgou.order.service.impl.OrderServiceImpl. The code is as follows:
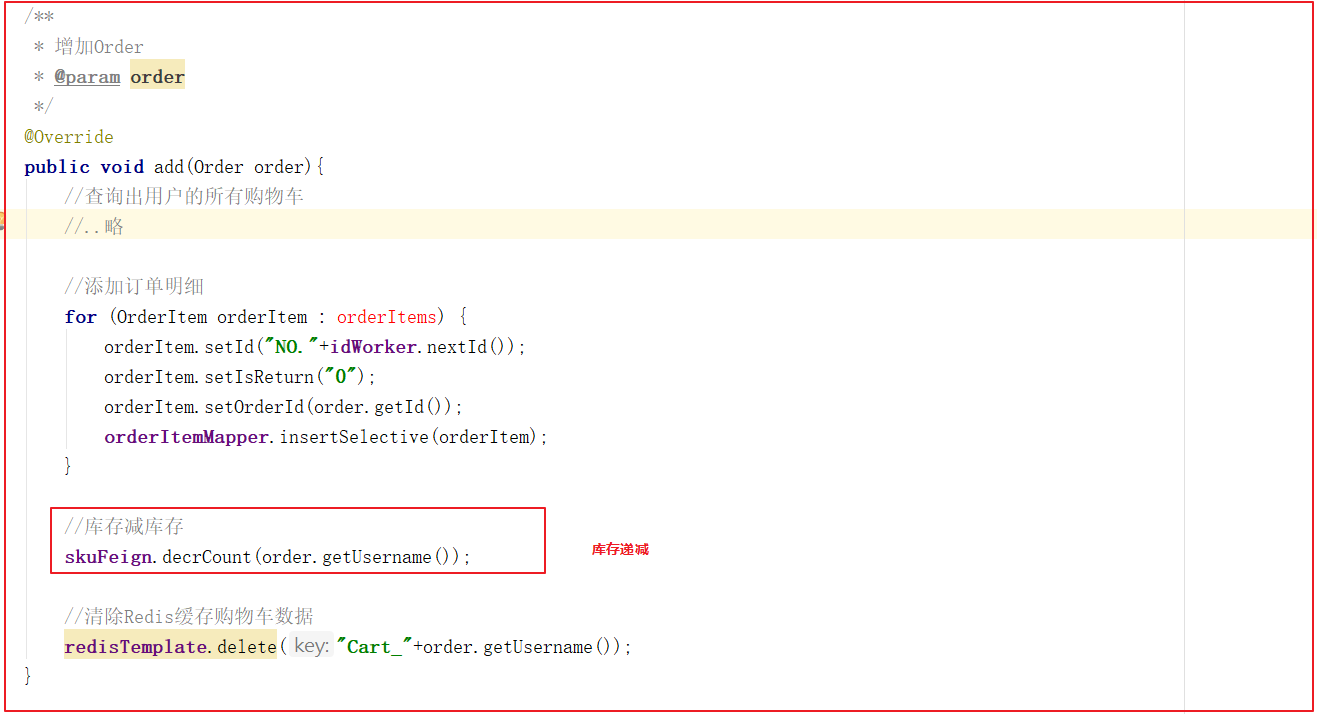
@Service
public class OrderServiceImpl implements OrderService {

    @Autowired
    private OrderMapper orderMapper;

    @Autowired
    private OrderItemMapper orderItemMapper;

    @Autowired
    private CartService cartService;

    @Autowired
    private IdWorker idWorker;

    @Autowired
    private RedisTemplate redisTemplate;

    /***
     * Add order
     * @param order
     * @return
     */
    @Override
    public int add(Order order) {
        //Find out all shopping carts of users
        List<OrderItem> orderItems = cartService.list(order.getUsername());

        //Statistical calculation
        int totalMoney = 0;
        int totalPayMoney=0;
        int num = 0;
        for (OrderItem orderItem : orderItems) {
            //Total sum
            totalMoney+=orderItem.getMoney();

            //Actual payment amount
            totalPayMoney+=orderItem.getPayMoney();
            //Total quantity
            num+=orderItem.getNum();
        }
        order.setTotalNum(num);
        order.setTotalMoney(totalMoney);
        order.setPayMoney(totalPayMoney);
        order.setPreMoney(totalMoney-totalPayMoney);

        //Other data improvement
        order.setCreateTime(new Date());
        order.setUpdateTime(order.getCreateTime());
        order.setBuyerRate("0");        //0: not evaluated, 1: evaluated
        order.setSourceType("1");       //Source, 1: WEB
        order.setOrderStatus("0");      //0: incomplete, 1: completed, 2: returned
        order.setPayStatus("0");        //0: unpaid, 1: paid, 2: failed to pay
        order.setConsignStatus("0");    //0: not shipped, 1: shipped, 2: received
        order.setId("NO."+idWorker.nextId());
        int count = orderMapper.insertSelective(order);

        //Add order details
        for (OrderItem orderItem : orderItems) {
            orderItem.setId("NO."+idWorker.nextId());
            orderItem.setIsReturn("0");
            orderItem.setOrderId(order.getId());
            orderItemMapper.insertSelective(orderItem);
        }

        //Clear Redis cache shopping cart data
        redisTemplate.delete("Cart_"+order.getUsername());
        return count;
    }
}
(2) control layer
Modify the Changgou service order microservice and the com.changgou.order.controller.OrderController class. The code is as follows:
1 2 3 4 5 6 7 8 9 10 11 12 13 14 15 16 17 18@Autowired private TokenDecode tokenDecode; /*** * Add Order data * @param order * @return */ @PostMapping public Result add(@RequestBody Order order){ //Get user name Map<String, String> userMap = tokenDecode.getUserInfo(); String username = userMap.get("username"); //Set up purchase users order.setUsername(username); orderService.add(order); return new Result(true,StatusCode.OK,"Add success"); }
3.2.2 test
Save the order test. The table data changes as follows:
TB? Order table data:

TB > order > item table data:

3.3 inventory change
3.3.1 business analysis
The above operation only implements the order operation, but the corresponding inventory has not been reduced together. After the order is placed, we should call the product micro service to reduce the inventory of the ordered goods and increase the sales volume. Each order micro service only needs to transfer the user name to the commodity micro service. The commodity micro service queries the corresponding shopping cart data in Redis through the user name, and then performs inventory reduction. Inventory reduction needs to control the current commodity inventory > = sales quantity.

How to control inventory quantity > = sales quantity? In fact, it can be realized through SQL statements. Each time the quantity is reduced, a condition judgment is added.
Where num > = {num} is enough.
In this project, you need to query the shopping cart data for a while, so you need to introduce the order api, and add the following dependencies in pom.xml:
1 2 3 4 5 6<!--order api rely on--> <dependency> <groupId>com.changgou</groupId> <artifactId>changgou-service-order-api</artifactId> <version>1.0-SNAPSHOT</version> </dependency>
3.3.2 code implementation
To call other microservices, the token data in the header file needs to be carried to other microservices for fetching. Therefore, we cannot use the multithreading mode of hystrix to modify the application.yml configuration of Changgou service goods. The code is as follows:
1 2 3 4 5 6 7 8 9#hystrix configuration hystrix: command: default: execution: isolation: thread: timeoutInMilliseconds: 10000 strategy: SEMAPHORE
Each time, you need to use the interceptor to add header information. Modify the configuration class com.changgou.goodsappplication to add the interceptor. The code is as follows:
1 2 3 4@Bean public FeignInterceptor feignInterceptor(){ return new FeignInterceptor(); }
(1)Dao level
Modify the com.changgou.goods.dao.SkuMapper interface of changgou-service-goods microservice, and add the inventory decline method. The code is as follows:
1 2 3 4 5 6 7/** * Decreasing stock * @param orderItem * @return */ @Update("UPDATE tb_sku SET num=num-#{num},sale_num=sale_num+#{num} WHERE id=#{skuId} AND num>=#{num}") int decrCount(OrderItem orderItem);
(2) business level
Modify the com.changgou.goods.service.SkuService interface of changgou-service-goods microservice, and add the following method:
1 2 3 4 5/*** * Inventory decline * @param username */ void decrCount(String username);
Modify the com.changgou.goods.service.impl.SkuServiceImpl implementation class of changgou-service-goods microservice, and add an implementation method. The code is as follows:
1 2 3 4 5 6 7 8 9 10 11 12 13 14 15 16 17 18 19 20 21@Autowired private RedisTemplate redisTemplate; /*** * Inventory decline * @param username */ @Override public void decrCount(String username) { //Get cart data List<OrderItem> orderItems = redisTemplate.boundHashOps("Cart_" + username).values(); //Cyclic decline for (OrderItem orderItem : orderItems) { //Decreasing stock int count = skuMapper.decrCount(orderItem); if(count<=0){ throw new RuntimeException("Insufficient inventory, decline failed!"); } } }
(3) control layer
Modify the com.changgou.goods.controller.SkuController class of changgou-service-goods and add the inventory decline method. The code is as follows:
1 2 3 4 5 6 7 8 9 10 11/*** * Inventory decline * @param username * @return */ @PostMapping(value = "/decr/count") public Result decrCount(String username){ //Inventory decline skuService.decrCount(username); return new Result(true,StatusCode.OK,"Inventory decline succeeded!"); }
(4) Create feign
At the same time, add the implementation of com.changgou.goods.feign.SkuFeign in the changgou-service-goods-api project. The code is as follows:
1 2 3 4 5 6 7/*** * Inventory decline * @param username * @return */ @PostMapping(value = "/decr/count") Result decrCount(@RequestParam(value = "username") String username);
3.3.3 call inventory decline
Modify the add method of the com.changgou.order.service.impl.OrderServiceImpl class of the changgou-service-order microservice to increase the call of decreasing inventory.
Inject SkuFeign first
1 2@Autowired private SkuFeign skuFeign;
Call inventory decline method again
1 2//Inventory minus inventory skuFeign.decrCount(order.getUsername());
The complete code is as follows:
3.3.4 test
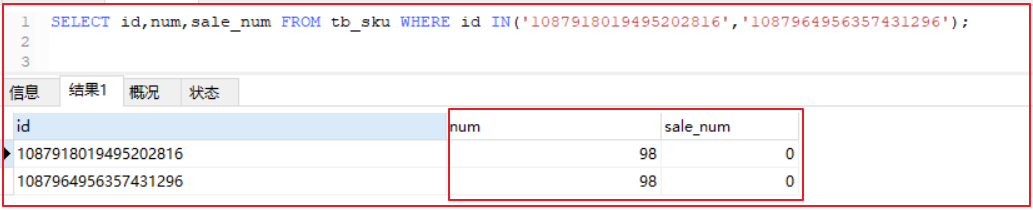
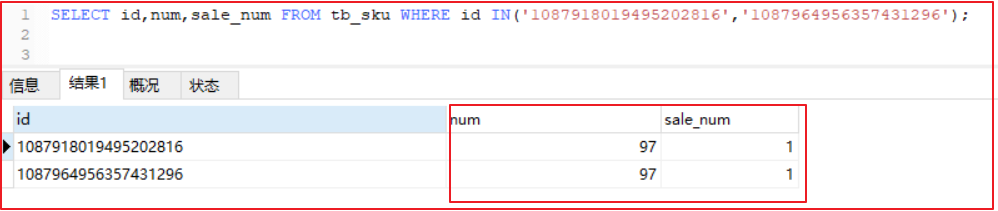
Before inventory reduction, query Sku data of database as follows: number 98, sales volume 0
Using Postman to execute http://localhost:18081/api/order/add
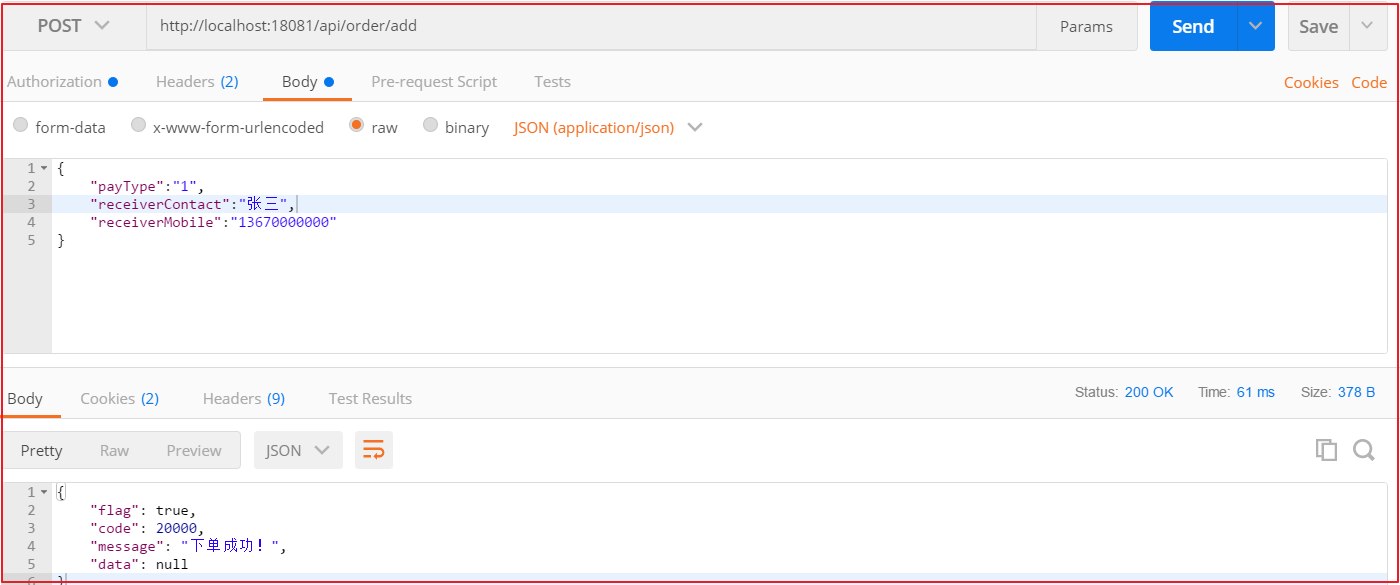
After the test, the remaining inventory is 97 and the sales volume is 1
3.4 add points
Changgou mall full set - upgrade and repair version -. md courseware, etc
-
Network disk link: https://pan.baidu.com/s/1uRYMRXxjRw6BOy7IMOYcQA
Extraction code: o8df - In case of failure, - > Open http://www.cx1314.cn/forum.php?mod=forum61 Reacquire
For example, after each order is completed, 10 points will be added to the user, and a coupon will be given after the payment is completed. The coupon can be used to deduct again during the payment. Let's finish the function of adding points first. The following table: points represents user points
1 2 3 4 5 6 7 8 9 10 11 12 13 14 15 16 17 18 19 20 21 22 23 24CREATE TABLE `tb_user` ( `username` varchar(50) NOT NULL COMMENT 'User name', `password` varchar(100) NOT NULL COMMENT 'Password, encrypted storage', `phone` varchar(20) DEFAULT NULL COMMENT 'Register mobile number', `email` varchar(50) DEFAULT NULL COMMENT 'Registered mailbox', `created` datetime NOT NULL COMMENT 'Creation time', `updated` datetime NOT NULL COMMENT 'Modification time', `source_type` varchar(1) DEFAULT NULL COMMENT 'Member source: 1:PC,2: H5,3: Android,4: IOS', `nick_name` varchar(50) DEFAULT NULL COMMENT 'Nickname?', `name` varchar(50) DEFAULT NULL COMMENT 'Real name', `status` varchar(1) DEFAULT NULL COMMENT 'Usage status (1 normal 0 abnormal)', `head_pic` varchar(150) DEFAULT NULL COMMENT 'Head address', `qq` varchar(20) DEFAULT NULL COMMENT 'QQ number', `is_mobile_check` varchar(1) DEFAULT '0' COMMENT 'Is the phone verified (0 No 1 yes)', `is_email_check` varchar(1) DEFAULT '0' COMMENT 'Check mailbox (0 No 1 yes)', `sex` varchar(1) DEFAULT '1' COMMENT 'Gender, 1 male, 0 female', `user_level` int(11) DEFAULT NULL COMMENT 'Membership level', `points` int(11) DEFAULT NULL COMMENT 'integral', `experience_value` int(11) DEFAULT NULL COMMENT 'Empirical value', `birthday` datetime DEFAULT NULL COMMENT 'Date Of Birth ', `last_login_time` datetime DEFAULT NULL COMMENT 'Last login time', PRIMARY KEY (`username`), UNIQUE KEY `username` (`username`) USING BTREE ) ENGINE=InnoDB DEFAULT CHARSET=utf8 COMMENT='User table';
3.4.1 code implementation
(1)dao level
Modify the com.changgou.user.dao.UserMapper interface of changgou-service-user microservice, and add the user integration method. The code is as follows:
1 2 3 4 5 6 7 8/*** * Increase user points * @param username * @param pint * @return */ @Update("UPDATE tb_user SET points=points+#{point} WHERE username=#{username}") int addUserPoints(@Param("username") String username, @Param("point") Integer pint);
(2) business level
Modify the com.changgou.user.service.UserService interface of the Changgou service user microservice. The code is as follows:
1 2 3 4 5 6 7/*** * Add user points * @param username * @param pint * @return */ int addUserPoints(String username,Integer pint);
Modify com.changgou.user.service.impl.UserServiceImpl of changgou-service-user microservice, and add the method of adding integral. The code is as follows:
1 2 3 4 5 6 7 8 9 10/*** * Modify user points * @param username * @param pint * @return */ @Override public int addUserPoints(String username, Integer pint) { return userMapper.addUserPoints(username,pint); }
(3) control layer
Modify com.changgou.user.controller.UserController of Changgou service user microservice, and add the method of adding user points. The code is as follows:
1 2 3 4 5 6 7 8 9 10 11 12 13 14 15 16 17@Autowired private TokenDecode tokenDecode; /*** * Increase user points * @param points:Points to add */ @GetMapping(value = "/points/add") public Result addPoints(Integer points){ //Get user name Map<String, String> userMap = tokenDecode.getUserInfo(); String username = userMap.get("username"); //Add integral userService.addUserPoints(username,points); return new Result(true,StatusCode.OK,"Add points successfully!"); }
(4)Feign add
Modify the Changgou service user API project, modify com.changgou.user.feign.UserFeign, and add the method of adding user points. The code is as follows:
1 2 3 4 5 6 7/*** * Add user points * @param points * @return */ @GetMapping(value = "/points/add") Result addPoints(@RequestParam(value = "points")Integer points);
3.4.2 add integral call
Modify Changgou service order, add the dependency of Changgou service user API, modify pom.xml, and add the following dependency:
1 2 3 4 5 6<!--user api rely on--> <dependency> <groupId>com.changgou</groupId> <artifactId>changgou-service-user-api</artifactId> <version>1.0-SNAPSHOT</version> </dependency>
When adding an order, add user points at the same time, modify the com.changgou.order.service.impl.OrderServiceImpl order method of changgou-service-order microservice, and add the call to add points method. The code is as follows:
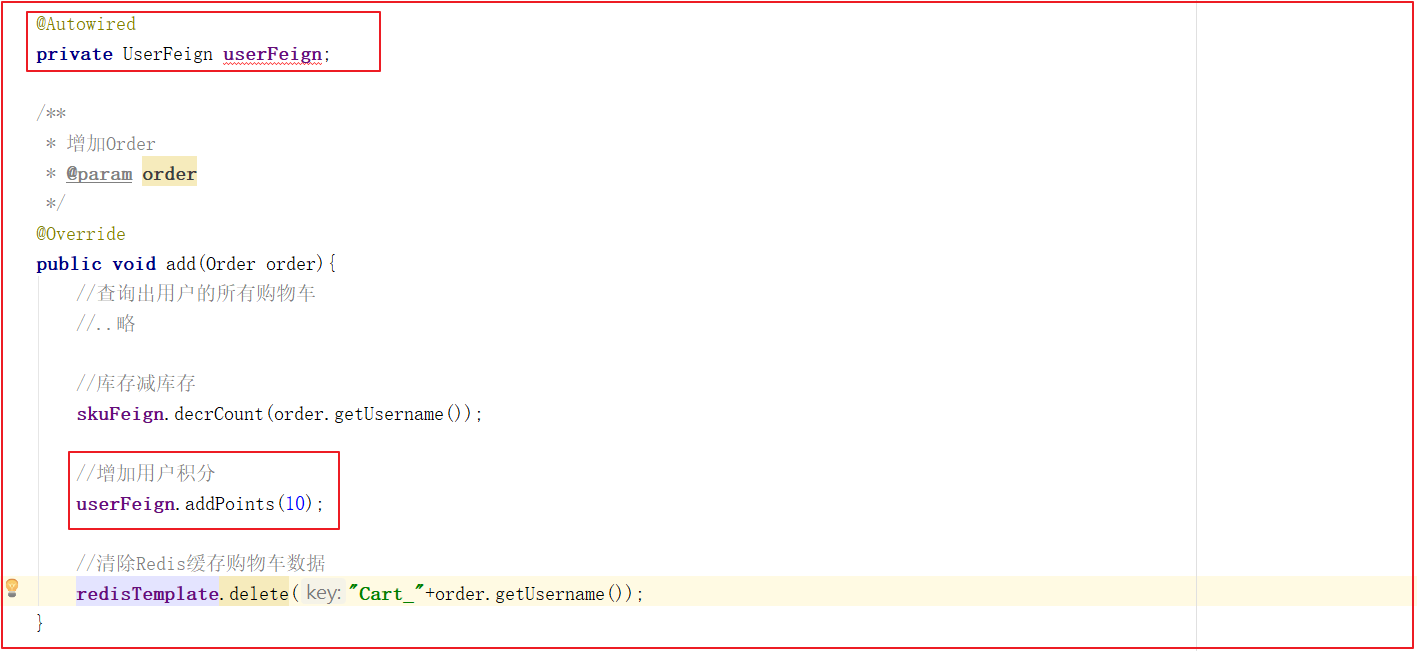
Modify the startup class com.changgou.OrderApplication of changgou-service-order, and add the package path of feign:

4 payment process analysis
4.1 order payment analysis
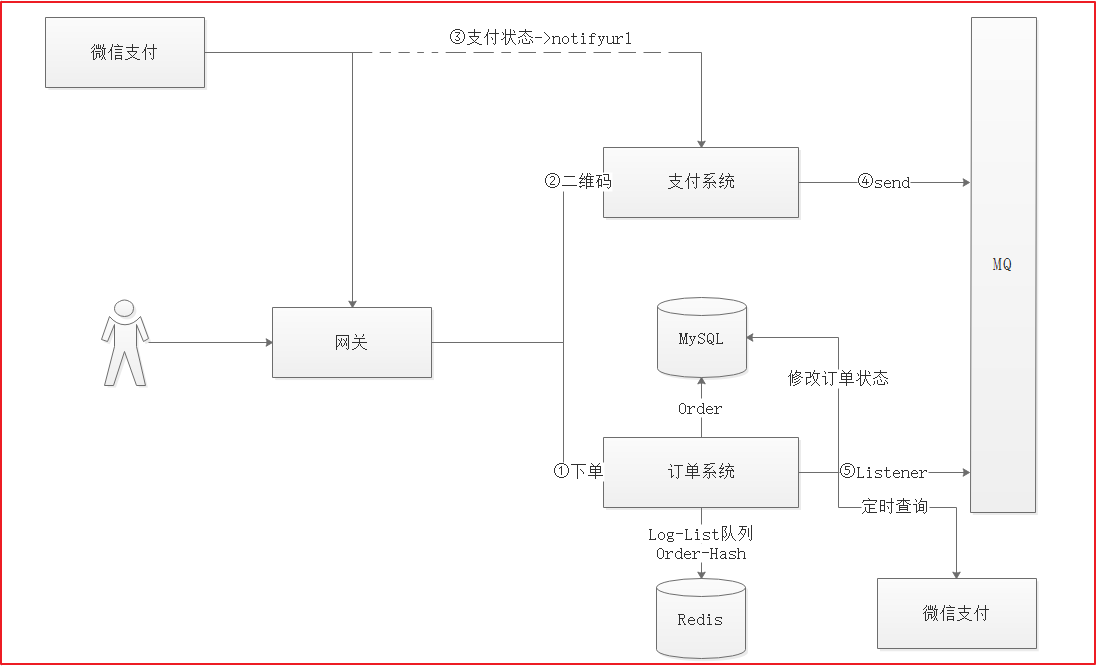
As shown in the figure above, the steps are as follows:
1
2
3
4
5
6
 1. After the user places an order, the order data will be saved in MySQL, and the payment log corresponding to the order will be saved in Redis in the form of queue.
2. After placing an order, the user enters the payment page, which calls the payment system, obtains the QR code data from wechat payment, and generates the payment QR code on the page.
3. After the user scans the code for payment, the wechat payment server will send the pre call callback address and carry the payment status information.
4. After receiving the payment status information, the payment system will send the payment status information to RabbitMQ
 5. The order system listens to the message in RabbitMQ to obtain the payment status, and modifies the order status according to the payment status
 6. In order to prevent the notifyurl from receiving the corresponding data due to network problems, the scheduled task obtains the queue data of Redis regularly to query the status of wechat payment interface, and updates the corresponding status regularly.
4.2 QR code creation (understanding)
Today, we mainly talk about wechat payment. Later, in order to see the effect, let's simply say that we use qrious to make a QR code plug-in.
Qrious is a pure JS QR code generation plug-in based on HTML5 Canvas. Through qrious.js, you can quickly generate various QR codes. You can control the size and color of QR codes, and you can also encode the generated QR codes in Base64.
The configuration parameters available for qrious.js QR code plug-in are as follows:
| parameter | type | Default value | describe |
|---|---|---|---|
| background | String | "white" | The background color of the QR code. |
| foreground | String | "black" | The foreground color of the QR code. |
| level | String | "L" | Error correction level of QR code (L, M, Q, H). |
| mime | String | "image/png" | The MIME type when the QR code is output as a picture. |
| size | Number | 100 | The size of the QR code, in pixels. |
| value | String | "" | Value to be encoded as QR code |
The following code can generate a QR code
1 2 3 4 5 6 7 8 9 10 11 12 13 14 15 16 17<html> <head> <title>Introduction to QR code demo</title> </head> <body> <img id="qrious"> <script src="qrious.js"></script> <script> var qr = new QRious({ element:document.getElementById('qrious'), size:250, level:'H', value:'http://www.itheima.com' }); </script> </body> </html>
Operation effect:
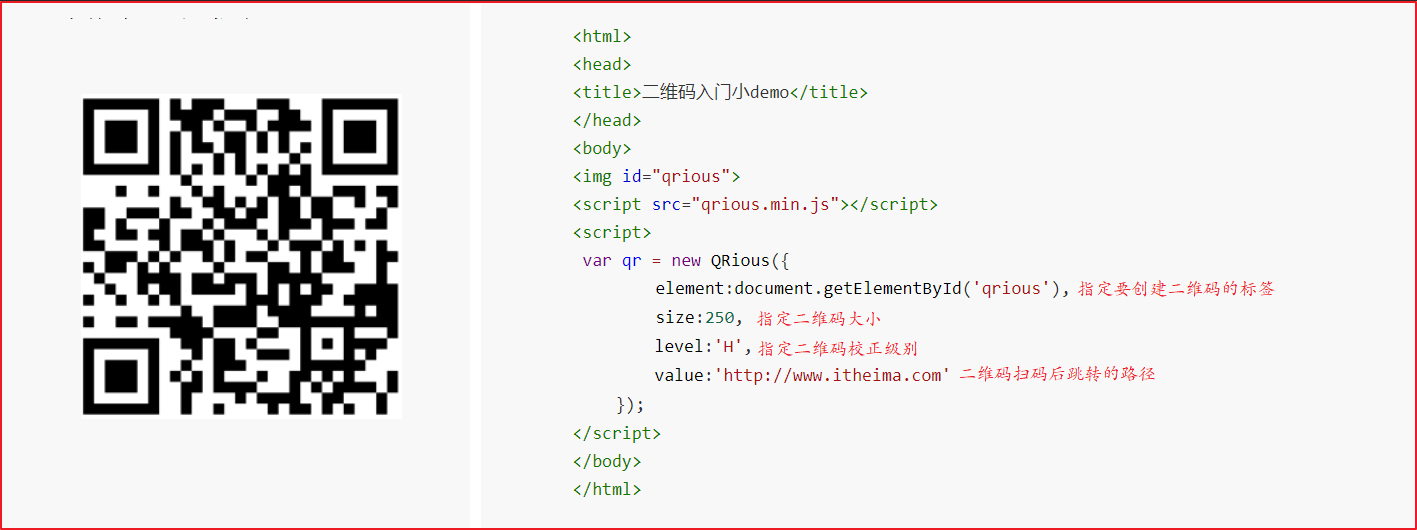
Take out your mobile phone and scan to see if you can see the official website of black horse?
5 introduction to wechat code scanning payment
Changgou mall full set - upgrade and repair version -. md courseware, etc
-
Network disk link: https://pan.baidu.com/s/1uRYMRXxjRw6BOy7IMOYcQA
Extraction code: o8df - In case of failure, - > Open http://www.cx1314.cn/forum.php?mod=forum61 Reacquire
5.1 wechat code scanning payment application
Wechat code scanning payment is a mode in which the merchant system generates payment QR code according to wechat payment protocol and the user uses wechat "scan and scan" to complete the payment. This mode is applicable to PC website payment, physical store single product or order payment, media advertising payment and other scenarios.
Application steps: (understand)
Step 1: official account number (type: service number)
Please select the following entities to register according to the type of business license: Individual business| Enterprise / company| government| media| Other types.
Second step: certification of official account number
The official account is only valid for WeChat payment. The certification fee is 300 yuan / time.
Step 3: submit materials to apply for wechat payment
Log in to the public platform, click the menu on the left [wechat Payment], start to fill in the data and wait for review, and the review time is 1-5 working days.
Step 4: successfully open an account and log in to the merchant platform for verification
After the data is approved, please log in to the contact email to check the merchant number and password, and log in to the merchant platform to fill in the small amount of the provision of TenPay and complete the account verification.
Step 5: sign the agreement Online
This agreement is an online electronic agreement. The transaction and capital settlement can only be carried out after signing, and it will take effect immediately after signing.
The wechat payment account of "smart podcast" has been provided for this course, and students do not need to apply.
5.2 development documents
The overall idea of wechat payment interface call:
Assemble parameters according to API requirements, send (POST) to wechat payment interface (URL) in XML mode, and wechat payment interface also responds in XML mode. The program generates a QR code or judges the order status based on the returned results (including the payment URL).
Online wechat payment development document:
https://pay.weixin.qq.com/wiki/doc/api/index.html
If you can't connect to the Internet, please refer to the handout supporting resources (resources \ supporting software \ wechat scanning payment \ development documents)
In this chapter, we will use the API of "unified order" and "query order"
1
2
3
4
 1. appid: the unique identification of wechat public account or open platform APP
 2. mch_id: merchant number (partner in configuration file)
3. partnerkey: merchant key
 4. sign: digital signature, an encrypted message generated according to the key provided by wechat official and a set of algorithms, is to ensure the security of transactions
5.3 introduction to wechat payment mode
5.3.1 mode 1
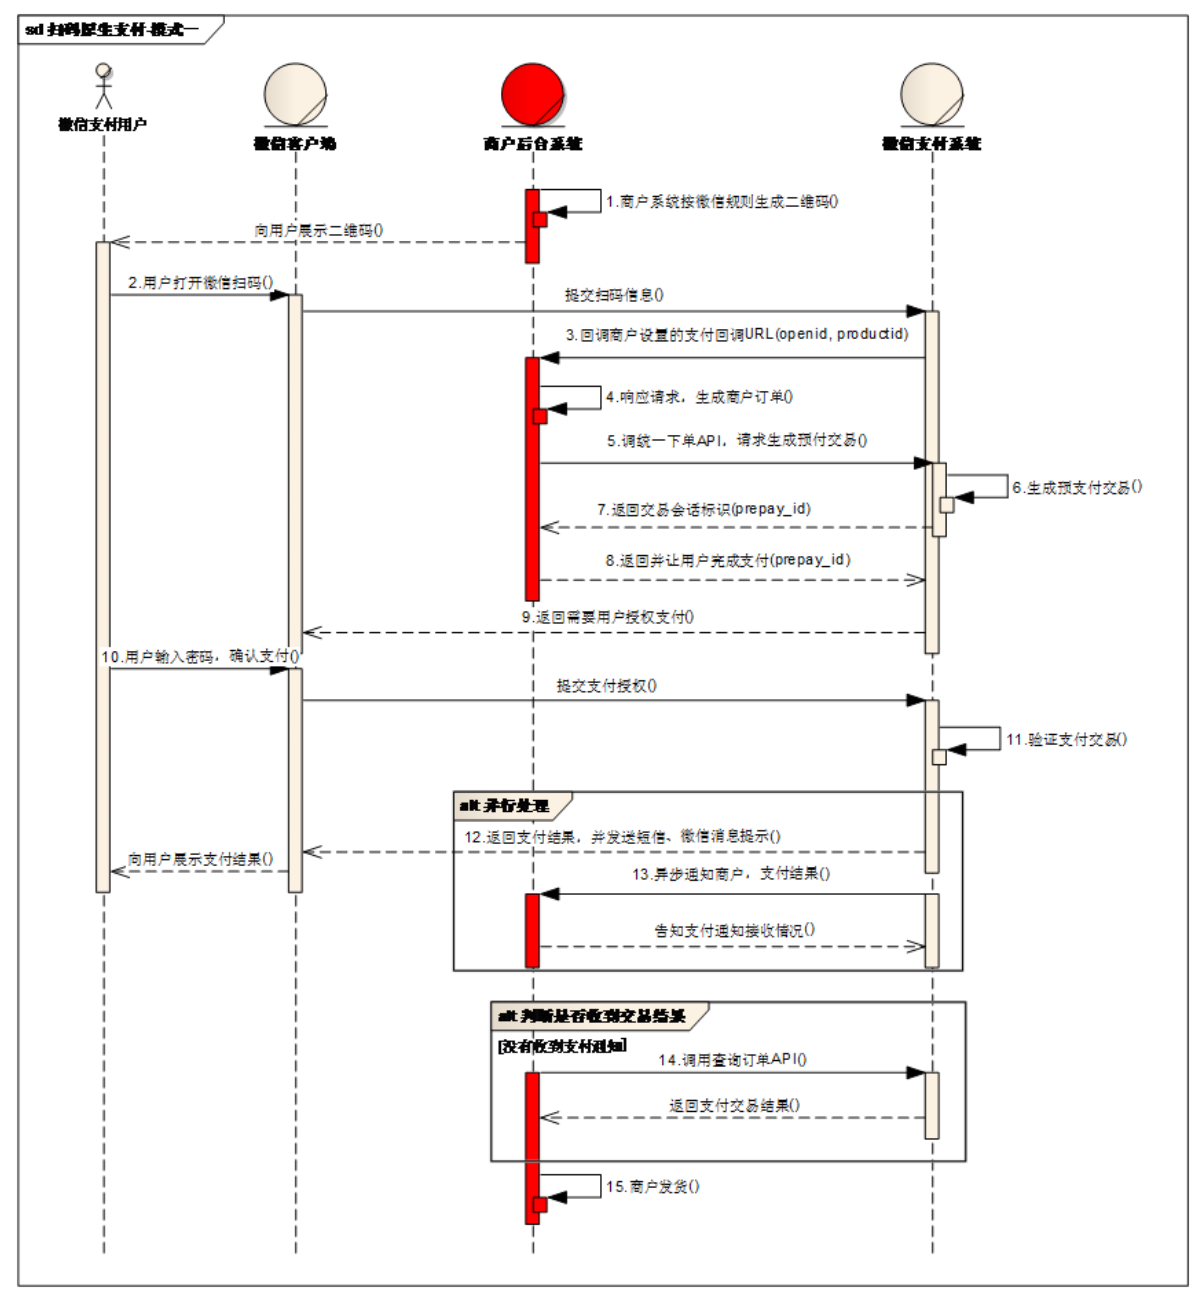
Business Process Description:
1
2
3
4
5
6
7
8
9
10
11
12
13
14
15
 1. The merchant background system generates a QR code according to the specified format of wechat payment (see the rules below) and displays it to the user to scan the code.
2. The user opens wechat "scan" to scan QR code, and the wechat client sends the scanned content to wechat payment system.
3. The wechat payment system receives the client's request and initiates the call to the payment callback URL of the merchant background system. The call request will take parameters such as productid and user's openid, and require the merchant system to return the delivery data package. Please refer to "3.1 callback data input parameters in this section" for details
 4. The merchant background system receives the callback request from the wechat payment system and generates the order of the merchant system according to the productid.
5. The merchant system calls wechat payment [unified order API] to request an order and obtain the transaction session ID
 6. The wechat payment system generates the pre payment transaction according to the request of the merchant system and returns the transaction session ID.
7. The back office system of the merchant obtains the transaction session ID "pay" ID (valid within 2 hours).
8. The merchant's back office system will return the prepay ﹣ ID to the wechat payment system. See "3.2 callback data output parameters" for return data
 9. Wechat payment system initiates the authorized payment process of the client according to the transaction session ID.
10. After the user enters the password in the wechat client and confirms the payment, the wechat client submits the payment authorization.
11. After the wechat payment system is verified, the payment is deducted and the payment transaction is completed.
12. After the wechat payment system completes the payment transaction, it will return the transaction result to the wechat client and prompt the user of the transaction result through SMS and wechat message. Wechat client displays the payment transaction result page.
13. Wechat payment system informs the merchant's background system of payment results by sending asynchronous message. The merchant background system needs to reply to the receiving situation and inform the wechat background system not to send the payment notice of this order.
14. If the payment notice is not received, the merchant background system calls the [query order API].
15. The merchant confirms that the order has been paid and then delivers the goods to the user.
5.3.2 mode II
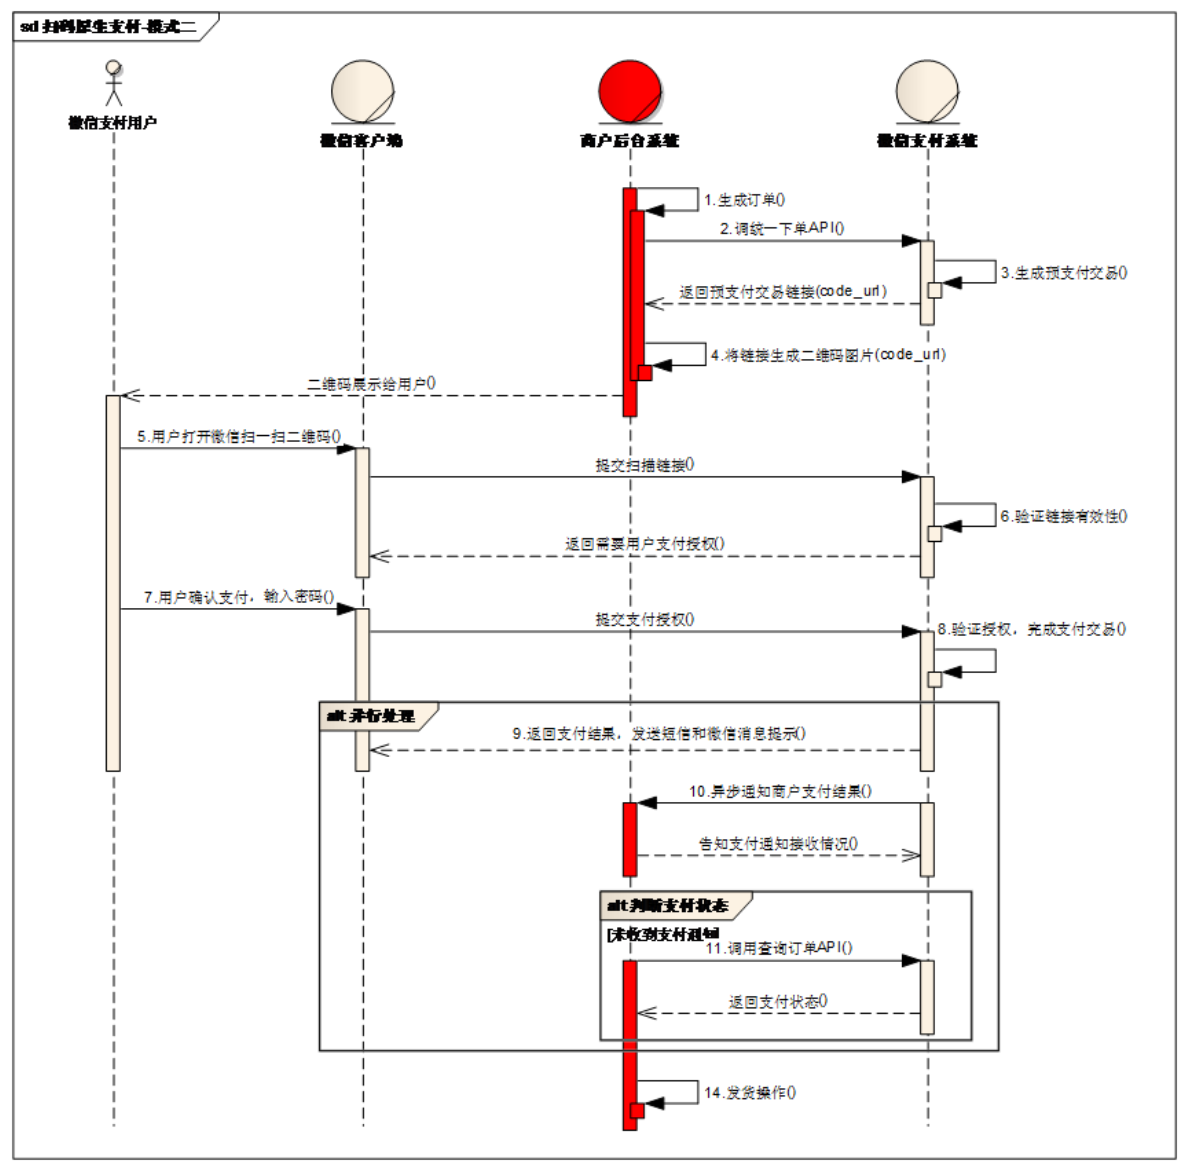
Business Process Description:
Changgou mall full set - upgrade and repair version -. md courseware, etc
-
Network disk link: https://pan.baidu.com/s/1uRYMRXxjRw6BOy7IMOYcQA
Extraction code: o8df - In case of failure, - > Open http://www.cx1314.cn/forum.php?mod=forum61 Reacquire
1. The merchant background system generates an order based on the goods purchased by the user.
2. users confirm payment and call WeChat payment [unified API] to generate pre paid transactions.
3. After receiving the request, wechat payment system generates the pre payment transaction form and returns the QR code link code "URL of the transaction session.
4. The merchant background system generates two-dimensional code according to the returned code "URL.
5. The user opens wechat "scan" to scan QR code, and the wechat client sends the scanned content to wechat payment system.
6. The wechat payment system receives the client's request, verifies the validity of the link, and then initiates the user payment, requiring the user to authorize.
7. After the user enters the password in the wechat client and confirms the payment, the wechat client submits the authorization.
8. Wechat payment system completes payment transaction according to user authorization.
9. After the wechat payment system completes the payment transaction, it will return the transaction result to the wechat client and prompt the user of the transaction result through SMS and wechat message. Wechat client displays the payment transaction result page.
10. Wechat payment system informs the merchant's background system of payment results by sending asynchronous message. The merchant background system needs to reply to the receiving situation and inform the wechat background system not to send the payment notice of this order.
11. If the payment notice is not received, the merchant background system calls the [query order API].
12. The merchant confirms that the order has been paid and then delivers the goods to the user.

