Black horse customer management system
1 System Overview
1.1 system function introduction
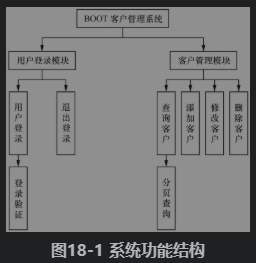
The background of the system is written with SSM framework, and the front page uses the current mainstream Bootstrap and jQuery framework to complete the page information display function (for the knowledge of Bootstrap, interested readers can refer to the responsive Web development project tutorial compiled by black horse programmers). The system mainly implements two functional modules: user login module and customer management module. The main functions of these two modules are shown in figure 18-1.
1.2 system architecture design
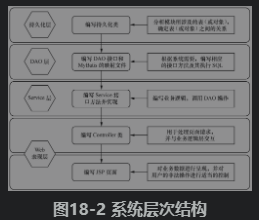
According to the different functions of the system, the project structure can be divided into the following levels.
·Persistent object layer (also known as persistence layer or persistence layer): this layer consists of several persistent classes (entity classes).
·Data access layer (Dao layer): this layer consists of several Dao interfaces and MyBatis mapping files. The name of the interface uniformly ends with Dao, and the mapping file name of MyBatis should be the same as the name of the interface.
·Business logic layer (Service layer): this layer consists of several Service interfaces and implementation classes. In this system, the interface of the business logic layer uses the Service end uniformly, and its implementation class name is added with Impl after the interface name uniformly. This layer is mainly used to realize the business logic of the system.
·Web presentation layer: this layer mainly includes Controller class and JSP page in Spring MVC. The Controller class is mainly responsible for intercepting user requests, calling the business logic methods of the corresponding components in the business logic layer to process user requests, and then returning the corresponding results to the JSP page. In order to make the reader understand the relationship between all levels more clearly, the following describes the relationship and role of each level through a diagram, as shown in Figure 18-2.
1.3 document organization structure
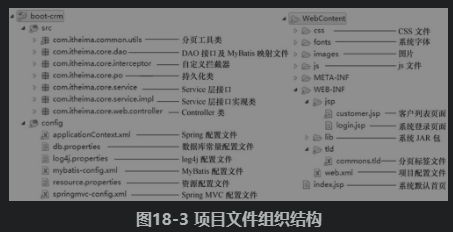
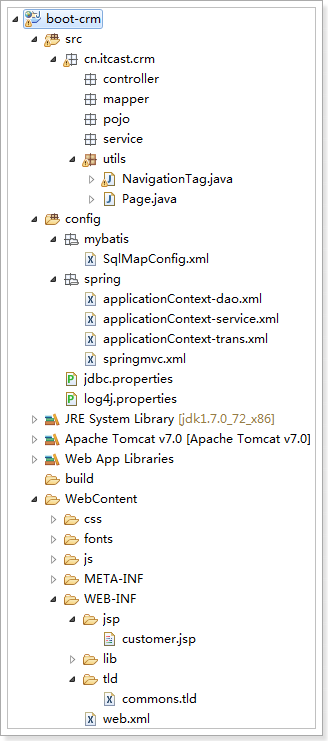
Before formally explaining the preparation of the project, first understand the organization structure of package files, configuration files and page files involved in the project, as shown in figure 18-3.
1.4 system development and operation environment
The development environment of BOOT customer management system is as follows.
·Operating system: Windows
·Web server: Tomcat 8.0
·Java development package: JDK8
·Development tool: Eclipse Java EE IDE for Web Developers
·Database: MySQL 5.5
·Browser: Firefox or IE 8.0 or above
2 database design
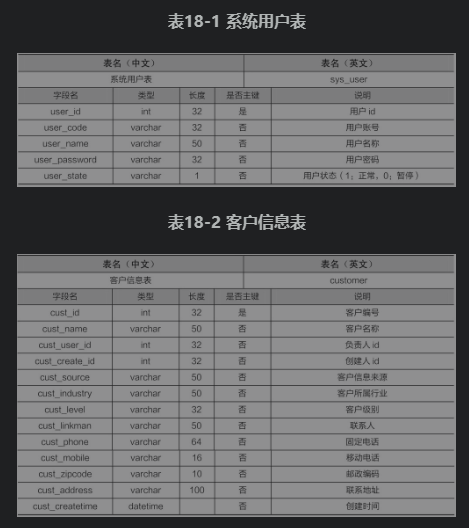
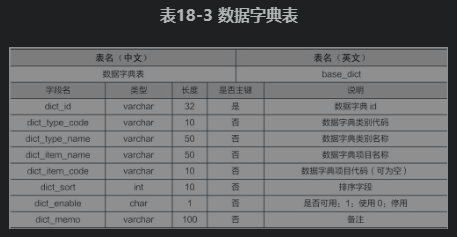
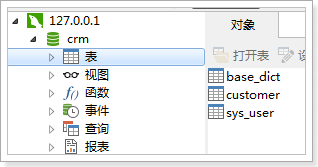
The system mainly involves user login and customer management functions, so the system user table and customer information table will be involved in the system. In addition, the customer source and industry in the customer information are queried according to the information in the data dictionary table, so a data dictionary table is also involved. The table structure of these three tables is shown in table 18-1, table 18-2 and table 18-3.
3 system environment construction
3.1 prepare the required JAR package
Because this system uses SSM framework development, we need to prepare the JAR package of these three frameworks. In addition, database connection, JSTL tag, etc. are also involved in the project, so other JAR packages should be prepared. The total number of jars to be prepared for the whole system is 35, as shown below.
1. JAR packages required by spring framework (10)
It mainly includes four core modules JAR, JAR used in AOP development, JDBC and transaction JAR.
· aopalliance-1.0.jar
· aspectjweaver-1.8.10.jar
· spring-aop-4.3.6.RELEASE.jar
· spring-aspects-4.3.6.RELEASE.jar
· spring-beans-4.3.6.RELEASE.jar
· spring-context-4.3.6.RELEASE.jar
· spring-core-4.3.6.RELEASE.jar
· spring-expression-4.3.6.RELEASE.jar
· spring-jdbc-4.3.6.RELEASE.jar
· spring-tx-4.3.6.RELEASE.jar
2. JAR packages required by spring MVC framework (2)
· spring-web-4.3.6.RELEASE.jar
· spring-webmvc-4.3.6.RELEASE.jar
3. The JAR packages required by mybatis framework (13 packages) mainly include the core package mybatis-3.4.2.jar, as well as all jars under the lib directory in its decompression folder.
· ant-1.9.6.jar
· ant-launcher-1.9.6.jar
· asm-5.1.jar· cglib-3.2.4.jar
· commons-logging-1.2.jar
· javassist-3.21.0-GA.jar
· log4j-1.2.17.jar
· log4j-api-2.3.jar
· log4j-core-2.3.jar
· mybatis-3.4.2.jar
· ognl-3.1.12.jar
· slf4j-api-1.7.22.jar
· slf4j-log4j12-1.7.22.jar
4. An intermediate JAR integrated by mybatis and Spring (1)
· mybatis-spring-1.3.1.jar
5. Database driven JAR package (1)
· mysql-connector-java-5.1.40-bin.jar
6. JAR packages required for dbcp of data source (2)
· commons-dbcp2-2.1.1.jar
· commons-pool2-2.4.2.jar
7.JSTL tag library JAR package (2)
· taglibs-standard-impl-1.2.5.jar
· taglibs-standard-spec-1.2.5.jar
8. JAR packages required by Jackson framework (3)
· jackson-annotations-2.8.6.jar
· jackson-core-2.8.6.jar
· jackson-databind-2.8.6.jar
9.Java tool class JAR (1)
· commons-lang3-3.4.jar
The above JAR packages (except for the two JAR packages of JSTL and commons-lang3-3.4.jar) are all used in the previous chapters of this book. When you learn this chapter, you can download the project source code directly and use the JAR package in the source code.
Tips
The version of JSTL used in this book is 1.2.5. The JAR package to be introduced in this version is taglibs-standard-spec-1.2.5.jar (equivalent to the previous jstl.jar, belonging to the interface definition class) and taglibs-standard-impl-1.2.5.jar jar JAR (equivalent to the previous standard.jar, belonging to the implementation class). The two JAR packages can be downloaded from the website "http://tomcat.apache.org/download-taglibs.cgi ා standard-1.2.5".
3.2 preparing database resources
After logging in to the database through MySQL 5.5 Command Line Client, create a database named boot? CRM and select the database. Through SQL command, import the boot_crm.sql file provided in the book resources into the boot_crm database, and then import all the data used in the system. The specific implementation of SQL command is as follows.
(1) Create a database.
create database boot_crm;
(2) Select the database you created.
use boot_crm;
(3) Import the database file. Suppose the file is in the root directory of F disk. The Import command is as follows.
source F:\boot_crm.sql;
In addition, you can also import sql files through other client software, such as sqllog.
Create crm database and execute sql
3.3 preparation of project environment
1 create project and introduce JAR package
In Eclipse, create a Web project named boot CRM, copy all JAR packages prepared by the system to the lib directory of the project, and publish them to the classpath.
2 write configuration file
(1) Create a source folder config under the project directory, and create database constant configuration file, Spring configuration file, MyBatis configuration file, log4j configuration file, resource configuration file and Spring MVC configuration file under the config folder. The configuration of log4j configuration file log4j.properties, database constant configuration file jdbc.properties and MyBatis configuration file mybatis-config.xml are basically the same as the configuration code when the integration is explained in Chapter 17 (pay attention to modifying the database name and package name), which will not be repeated here. The codes of the other three configuration files are shown in files 18-1, 18-2, and 18-3, respectively.
mybatis-config.xml
<?xml version="1.0" encoding="UTF-8" ?>
<!DOCTYPE configuration PUBLIC "-//mybatis.org//DTD Config 3.0//EN"
"http://mybatis.org/dtd/mybatis-3-config.dtd">
<configuration>

    <!-- alias -->
    <typeAlises>
        <package name="com.itheima.core.pojo"/>
    </typeAlises>

</configuration>
jdbc.properties
Configuration database information
jdbc.driver=com.mysql.jdbc.Driver
jdbc.url=jdbc:mysql://localhost:3306/crm?characterEncoding=utf-8
jdbc.username=root
jdbc.password=root
log4j.properties
Configure log information
# Global logging configuration
log4j.rootLogger=DEBUG, stdout
# Console output...
log4j.appender.stdout=org.apache.log4j.ConsoleAppender
log4j.appender.stdout.layout=org.apache.log4j.PatternLayout
log4j.appender.stdout.layout.ConversionPattern=%5p [%t] - %m%n
applicationContext.xml
Configuration required:
Load properties file, data source, SqlSessionFactory, Mapper scan
<?xml version="1.0" encoding="UTF-8"?>
<beans xmlns="http://www.springframework.org/schema/beans"
    xmlns:context="http://www.springframework.org/schema/context" xmlns:p="http://www.springframework.org/schema/p"
    xmlns:aop="http://www.springframework.org/schema/aop" xmlns:tx="http://www.springframework.org/schema/tx"
    xmlns:xsi="http://www.w3.org/2001/XMLSchema-instance"
    xsi:schemaLocation="http://www.springframework.org/schema/beans http://www.springframework.org/schema/beans/spring-beans-4.0.xsd
    http://www.springframework.org/schema/context http://www.springframework.org/schema/context/spring-context-4.0.xsd
    http://www.springframework.org/schema/aop http://www.springframework.org/schema/aop/spring-aop-4.0.xsd http://www.springframework.org/schema/tx http://www.springframework.org/schema/tx/spring-tx-4.0.xsd
    http://www.springframework.org/schema/util http://www.springframework.org/schema/util/spring-util-4.0.xsd">

    <!-- Configuration read properties file jdbc.properties -->
    <context:property-placeholder location="classpath:jdbc.properties" />

    <!-- Configure data sources -->
    <bean id="dataSource" class="com.alibaba.druid.pool.DruidDataSource">
        <!-- Database driven -->
        <property name="driverClassName" value="${jdbc.driver}" />
        <!-- Connected to the database url -->
        <property name="url" value="${jdbc.url}" />
        <!-- User name to connect to the database -->
        <property name="username" value="${jdbc.username}" />
        <!-- Password to connect to the database -->
        <property name="password" value="${jdbc.password}" />
    </bean>

    <!-- To configure Mybatis Factory SqlSessionFactory -->
    <bean class="org.mybatis.spring.SqlSessionFactoryBean">
        <!-- Set up MyBatis Location of core profile -->
        <property name="configLocation" value="classpath:mybatis/SqlMapConfig.xml" />
        <!-- set up data sources -->
        <property name="dataSource" ref="dataSource" />
    </bean>

        <!-- Transaction manager -->
    <bean id="transactionManager"   class="org.springframework.jdbc.datasource.DataSourceTransactionManager">
        <!-- data source -->
        <property name="dataSource" ref="dataSource" />
    </bean>

    <!-- notice -->
    <tx:advice id="txAdvice" transaction-manager="transactionManager">
        <tx:attributes>
            <!-- Communication behavior -->
            <tx:method name="save*" propagation="REQUIRED" />
            <tx:method name="insert*" propagation="REQUIRED" />
            <tx:method name="add*" propagation="REQUIRED" />
            <tx:method name="create*" propagation="REQUIRED" />
            <tx:method name="delete*" propagation="REQUIRED" />
            <tx:method name="update*" propagation="REQUIRED" />
            <tx:method name="find*" propagation="SUPPORTS" read-only="true" />
            <tx:method name="select*" propagation="SUPPORTS" read-only="true" />
            <tx:method name="get*" propagation="SUPPORTS" read-only="true" />
            <tx:method name="query*" propagation="SUPPORTS" read-only="true" />
        </tx:attributes>
    </tx:advice>

    <!-- section -->
    <aop:config>
        <aop:advisor advice-ref="txAdvice"
            pointcut="execution(* cn.itcast.crm.service.*.*(..))" />
    </aop:config>

        <!-- To configure Mapper scanning -->
    <bean class="org.mybatis.spring.mapper.MapperScannerConfigurer">
        <!-- Set up Mapper Scanning package -->
        <property name="basePackage" value="com.itheima.crm.mapper" />
    </bean>

    <!-- To configure Service scanning -->
    <context:component-scan base-package="com.itheima.crm.service" />

</beans>
The difference between the above code and the configuration file code in the previous chapter is that the transaction propagation behavior and aspect configuration are increased. In the propagation behavior of transaction, only the transaction of query method is read-only, and the operations of adding, modifying and deleting must be included in the transaction management.
resource.properties
#Customer source
CUSTOMER_FROM_TYPE=002
#Customer industry
CUSTOMER_INDUSTRY_TYPE=001
#Customer level
CUSTOMER_LEVEL_TYPE=006
The above configuration codes represent the customer source, industry and customer level respectively. Their values correspond to the values of the dict type code field in the data dictionary table.
springmvc-config.xml
<?xml version="1.0" encoding="UTF-8"?>
<beans xmlns="http://www.springframework.org/schema/beans"
    xmlns:xsi="http://www.w3.org/2001/XMLSchema-instance" xmlns:p="http://www.springframework.org/schema/p"
    xmlns:context="http://www.springframework.org/schema/context"
    xmlns:mvc="http://www.springframework.org/schema/mvc"
    xsi:schemaLocation="http://www.springframework.org/schema/beans http://www.springframework.org/schema/beans/spring-beans-4.0.xsd
        http://www.springframework.org/schema/mvc http://www.springframework.org/schema/mvc/spring-mvc-4.0.xsd
        http://www.springframework.org/schema/context http://www.springframework.org/schema/context/spring-context-4.0.xsd">

    <!-- To configure Controller scanning -->
    <context:component-scan base-package="com.itheima.crm.controller" />

    <!-- Load properties file controller Required configuration information -->
    <context:property-placeholder location="classpath:resource.properties" />

    <!-- Configure annotation driver:Processor mapper and adapter-->
    <mvc:annotation-driven />

    <!-- For static resource release, the files in this configuration will not be blocked by the front-end controller-->
    <mvc:resources location="/css/" mapping="/css/**"/>
    <mvc:resources location="/js/" mapping="/js/**"/>
    <mvc:resources location="/fonts/" mapping="/fonts/**"/>

    <!-- Another way to solve the problem that static resources cannot be springMVC Issues dealt with -->
    <mvc:default-servlet-handler />


    <!-- Configure view resolver -->
    <bean   class="org.springframework.web.servlet.view.InternalResourceViewResolver">
        <!-- prefix -->
        <property name="prefix" value="/WEB-INF/jsp/" />
        <!-- Suffix -->
        <property name="suffix" value=".jsp" />
    </bean>

</beans>
The above code not only configures the package, annotation driver and view parser to be scanned, but also adds the configuration of loading attribute files and accessing static resources.
(2) In web.xml, configure Spring's listener, encoding filter, Spring MVC's front-end controller and other information, as shown in file 18-4.
web.xml
<?xml version="1.0" encoding="UTF-8"?>
<web-app xmlns:xsi="http://www.w3.org/2001/XMLSchema-instance"
    xmlns="http://java.sun.com/xml/ns/javaee"
    xsi:schemaLocation="http://java.sun.com/xml/ns/javaee http://java.sun.com/xml/ns/javaee/web-app_2_5.xsd"
    id="WebApp_ID" version="2.5">
    <display-name>ssm</display-name>
    <!-- System default page-->
    <welcome-file-list>
        <welcome-file>index.jsp</welcome-file>
    </welcome-file-list>
    <!-- To configure spring -->
    <context-param>
        <param-name>contextConfigLocation</param-name>
        <param-value>classpath:spring/applicationContext.xml</param-value>
    </context-param>

    <!-- Configure listener loading spring -->
    <listener>
        <listener-class>org.springframework.web.context.ContextLoaderListener</listener-class>
    </listener>

    <!-- Configure coding filter, solve post The random code problem of -->
    <filter>
        <filter-name>encoding</filter-name>
        <filter-class>org.springframework.web.filter.CharacterEncodingFilter</filter-class>
        <init-param>
            <param-name>encoding</param-name>
            <param-value>UTF-8</param-value>
        </init-param>
    </filter>
    <filter-mapping>
        <filter-name>encoding</filter-name>
        <url-pattern>/*</url-pattern>
    </filter-mapping>

    <!-- To configure SpringMVC Front end core controller -->
    <servlet>
        <servlet-name>crm</servlet-name>
        <servlet-class>org.springframework.web.servlet.DispatcherServlet</servlet-class>
        <init-param>
            <param-name>contextConfigLocation</param-name>
            <param-value>classpath:spring/springmvc.xml</param-value>
        </init-param>
        <!-- To configure springmvc When to start, the parameter must be an integer -->
        <!-- If 0 or greater then springMVC Start as container starts -->
        <!-- If it is less than 0, it will start when the first request comes in -->
        <load-on-startup>1</load-on-startup>
    </servlet>
    <servlet-mapping>
        <servlet-name>crm</servlet-name>
        <!-- All requests in springMVC -->
        <url-pattern>/</url-pattern>
    </servlet-mapping>
</web-app>
3. Introduce the page resource to introduce the CSS file, font, picture, JS, custom label file and JSP file needed for project operation into the project according to the structure in figure 18-3.
At this point, the environment preparation before the development of the system has been completed. At this time, if you publish the project to the Tomcat server and visit the home page of the project at http://localhost:8080/boot-crm/index.jsp, as shown in figure 18-4.
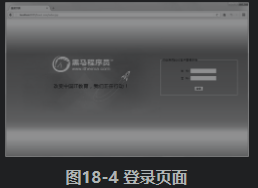
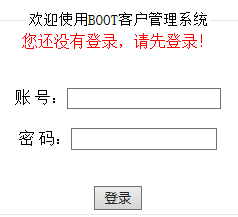
As can be seen from figure 18-4, when visiting the system home page, the page displays the system login page. In the next section, we will explain the login function of the system in detail.
4 user login module
4.1 user login
The implementation flow of user login function of BOOT customer management system is shown in figure 18-5.
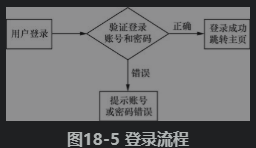
It can be seen from figure 18-5 that in the process of user login, first verify whether the user name and password are correct. If they are correct, they can log in to the system successfully, and the system will automatically jump to the home page; if they are wrong, they will give error prompt information on the login page.
Next, according to the flow in figure 18-5, the system login function is realized, and the specific steps are as follows.
1 create persistent class
In the src directory, create a com.itheima.crm.pojo package, create the User persistence class User in the package, and define the User related properties and corresponding getter/setter methods in the User class, as shown in file 18-5.
File 18-5 User.java
package com.itheima.core.pojo;
import java.io.Serializable;
public class User implements Serializable {
    private static final long serialVersionUID = 1L;
    private Integer user_id; // User id
    private String user_code; // User account
    private String user_name; // User name
    private String use_password; // User password
    // getter/setter method
}
2 implementation of DAO
(1) Create user DAO layer interface. In the src directory, create a com.itheima.crm.dao package, create a user interface UserDao in the package, and write a method to query users by account and password in the interface, as shown in file 18-6.
File 18-6 UserDao.java
public interface UserDao {

    /**
     * Query users by account and password
     * @param usercode
     * @param password
     * @return
     */
    public User findUser(@Param("usercode") String usercode,@Param("password")String password);
}
In the parameters of the above method code, @ Param("usercode") is named as the parameter usercode. After naming, in the SQL of the mapping file, you can use {usercode} to get the parameter value of usercode.
(2) Create a mapping file. In the package com.itheima.core.dao, create a MyBatis mapping file UserDao.xml, and write the execution statement to query user information in the mapping file, as shown in file 18-7.
<?xml version="1.0" encoding="UTF-8" ?>
<!DOCTYPE mapper
PUBLIC "-//mybatis.org//DTD Mapper 3.0//EN"
"http://mybatis.org/dtd/mybatis-3-mapper.dtd">
<mapper namespace="com.itheima.core.dao.UserDao">
    <!-- Query users -->
    <select id="findUser" parameterType="String" resultType="User">
        select *
        from sys_user
        where user_code = #{usercode}
        and user_password = #{password}
        and user_state = '1'
    </select>
</mapper>
The above code queries the available users in the system user table by mapping query statements.
3 implement Service
(1) Create user Service layer interface. In the src directory, create a com.itheima.core.service package, create a UserService interface in the package, and write a method to query users through account and password in the interface, as shown in file 18-8.
File 18-8 UserService.java
public interface UserService {
    /**
     * Query users by account and password
     * @param usercode
     * @param password
     * @return
     */
    public User findUser(String usercode,String password);
}
(2) Create the implementation class of the user Service layer interface. In the src directory, create a com.itheima.core.Service.impl package, and create the implementation class UserServiceImpl of the UserService interface in the package. Edit and implement the methods in the interface in the class, as shown in file 18-9.
File 18-9 UserServiceImpl.java
@Service
@Transactional
public class UserServiceImpl implements UserService {
    // Inject Userdao
    @Autowired
    private UserDao userdao;
    @Override
    public User findUser(String usercode, String password) {
        User user=this.userdao.findUser(usercode, password);
        return user;
    }
}
In the findUser() method of the above code, the findUser() method in the UserDao object is called to query the user information and return the queried information.
4 implement Controller
In the src directory, create a com.itheima.core.web.controller package, and create the user controller class UserController in the package. The edited code is shown in file 18-10.
File 18-10 UserController.java
public class UserController {

    @Autowired
    private UserService userService;

    /**
     * User login
     * @param usercode
     * @param password
     * @param model
     * @param session
     * @return
     */
    @RequestMapping(value="/login",method=RequestMethod.POST)
    public String login(String usercode,String password,Model model,HttpSession session) {

        User user= userService.findUser(usercode,password);

        if(user!=null) {
            //Add user object to Session
            session.setAttribute("USER_SESSION", user);
            // Jump to main page
            return "customer";
        }
        model.addAttribute("msg", "Wrong account or password, please login again!");
        // Return to login page
        return "login";
    }
}
In the file 18-10, the user service object is injected into this class through @ Autowired annotation, and then a login() method for user login is created. Since all forms will be submitted in POST mode when users log in, set the method property value of @ RequestMapping annotation to RequestMethod.POST. In the login() method, first query the user through the account and password passed from the page, and then judge whether the user exists through the if statement. If it exists, the user information will be stored in the Session and jump to the main page of the system; if it does not exist, the error message will be prompted and the login page will be returned.
5 realize page function
(1) index.jsp, the default home page of the system, mainly implements a forwarding function, which will be forwarded to the login page when visiting. In fact, the modern code is shown in file 18-11.
File 18-11 index.jsp
<%@ page language="java" contentType="text/html; charset=UTF-8"
    pageEncoding="UTF-8"%>
<!DOCTYPE html>
<html>
<head>
<meta charset="UTF-8">
<title>Insert title here</title>
</head>
<body>
    <!-- Forward to login page -->
    <jsp:forward page="/WEB-INF/jsp/login.jsp"></jsp:forward>
</body>
</html>
(2) The login page mainly contains a login form, and its page implementation code is shown in file 18-12.
File 18-12 login.jsp
In file 18-12, the core code is the form form of user login operation. When the form is submitted, it will check whether the account or password is empty through the check() method. If it is empty, the user will be prompted by the label "account or password cannot be empty!" ; if both account and password are filled in, submit the form to the request ending with "/ login.action".
6 start project, test login
Publish the project to Tomcat server and start it. After successfully accessing the login page, you can enter the account and password to log in to the system. Before performing the login operation, check the data in the sys user table in the database, as shown in figure 18-6.
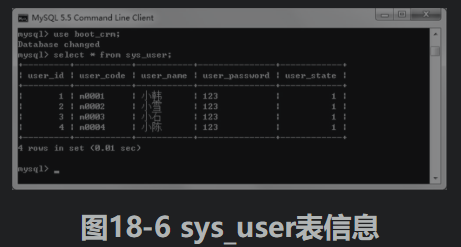
As can be seen from figure 18-6, the table sys ﹣ user contains four user information whose user ﹣ code starts with M. At this time, enter the account "m0001" and password "123" in the login page, and click the "login" button, the display result of the browser is as shown in figure 18-7.
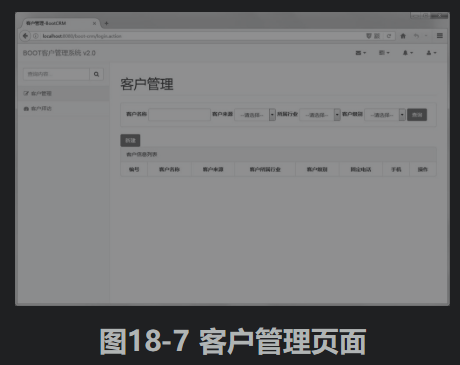
As can be seen from figure 18-7, the system has successfully entered the customer management page, which indicates that the system has successfully logged in. At this time, the customer query function is not implemented in the project, so there is no data in the customer list.
4.2 implementation of login verification
Although the user login function has been implemented in section 18.4.1, this function is not perfect. Assuming that there is also a method to access the customer management page in other controller classes, users can bypass the login step and directly access the customer management page by accessing the method. To verify the above, we can write a method to jump to the customer management page in the user controller class UserController, and the code is as follows.
    /**
     * Simulate the method of jumping to customer management page in other classes
     * @return
     */
    @RequestMapping(value="/toCustomer.action")
    public String toCustomer() {
        return "customer";
    }
At this time, if you access the address http: / / localhost: 8080 / boot CRM / tocustomer.action through a browser, the browser will directly display the customer management page
Obviously, it is not safe to let the users who are not logged in directly access the customer management page. In order to avoid this situation and improve the security of the system, we can create a login interceptor to intercept all requests. Only the request of the logged in user can pass. For the request of the non logged in user, the system will forward the request to the login page and prompt the user to log in. The execution flow is shown in figure 18-9.
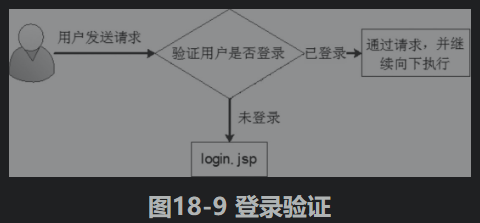
The specific process of user login authentication is as follows.
1 create login interceptor class
In the src directory, create a com.itheima.core.interceptor package, and create the login interceptor class LoginInterceptor in the package to realize the interception function of user login, as shown in file 18-13 after editing.
File 18-13 LoginInterceptor.java
public class LoginInterceptor implements HandlerInterceptor {

    @Override
    public void afterCompletion(HttpServletRequest request, HttpServletResponse response, Object handler, Exception ex)
            throws Exception {

    }

    @Override
    public void postHandle(HttpServletRequest request, HttpServletResponse response, Object handler, ModelAndView modelAndView)
            throws Exception {

    }

    @Override
    public boolean preHandle(HttpServletRequest request, HttpServletResponse response, Object handler) throws Exception {
        // Get requested URL
        String url=request.getRequestURI();
        // URL: except for login request, other URLs are blocked and controlled
        if(url.indexOf("/login.action")>=0) {
            return true;
        }
        // Get session
        HttpSession session = request.getSession();
        User user = (User)session.getAttribute("USER_SESSION");
        // Judge whether there is user data in the Session. If yes, return true and continue to execute downward
        if(user!=null) {
            return true;
        }
        // If the conditions are not met, give a prompt message and forward it to the login page
        request.setAttribute("msg", "You are not logged in yet. Please log in first!");
        request.getRequestDispatcher("/WEB_INF/jsp/login.jsp").forward(request, response);
        return false;
    }
}
In the preHandle() method of file 18-13, the user URL request is obtained first, and then the user login operation is judged by the request. Only the user login request is not intercepted. Next, we get the Session object and the user information in the Session. If the user information in the Session is not empty, it means the user has logged in, and the interceptor will release; if the user information in the Session is empty, it means the user has not logged in, and the system will forward it to the login page and prompt the user to log in.
2 configure interceptor
In the spring mvc-config.xml file, configure the login interceptor information with the following configuration code.
<!-- Configuring Interceptors  -->
<mvc:interceptors>
    <mvc:interceptor>
        <mvc:mapping path="/**"/>
        <bean class="com.itheima.core.interceptor.LoginInterceptor"/>
    </mvc:interceptor>
</mvc:interceptors>
The above configuration code will submit all user requests to the login interceptor for processing. At this point, the implementation of login interceptor has been completed.
After publishing the project and starting the Tomcat server, and accessing the address http://localhost:8080/boot-crm/toCustomer.action through the browser again, the browser's display result is shown in figure 18-10.
It can be seen from figure 18-10 that after the method of accessing the customer management page is implemented, the user who has not logged in does not successfully jump to the customer management page, but forwards it to the system login page, and also gives the prompt information in the login window of the page. This also shows that the user login authentication function has been successfully implemented.
4.3 log out
The user login module also includes a function - logout. After successful login, the user will jump to the customer management page, and the logged in user name will be displayed in the page, as shown in figure 18-11.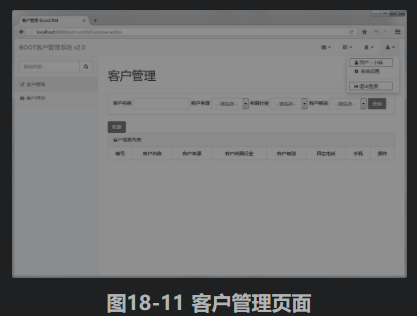
As can be seen from figure 18-11, the login user "Xiaohan" has been displayed in the upper right corner of the page, and the bottom of the pop-up list box is "log out". So how to achieve the "log out" function?
In the customer.jsp page, the implementation code of the pop-up list box in figure 18-11 is as follows.
            <ul class="dropdown-menu dropdown-user">
                <li><a href="#"><i class="fa fa-user fa-fw"></i>
                               User: ${USER_SESSION.user_name}
                    </a>
                </li>
                <li><a href="#"> < I class =" Fa FA gear FA FW "></a></li>
                <li class="divider"></li>
                <li>
                    <a href="${pageContext.request.contextPath }/logout.action">
                    <i class="fa fa-sign-out fa-fw"></i>Logout
                    </a>
                </li>
            </ul>
As can be seen from the above code, the displayed login user name is obtained from the Session through the EL expression. When clicking the "exit login" link, a request ending with "/ logout.action" will be submitted. In order to complete the login exit function, we need to write a login exit method in the user controller class. When the method is executed, the user information in the Session needs to be cleared, and after logging out, the system will return to the login page. Therefore, it is necessary to write methods to exit login and return to login page in user controller class UserController. The implementation codes of these two methods are as follows.
    /**
     * Logout
     * @param session
     * @return
     */
    @RequestMapping(value="/logout.action")
    public String logout(HttpSession session) {
        // Clear Session
        session.invalidate();
        // Jump method of redirecting to login page
        return "redirect:login.action";
    }

    /**
     * Jump to user login page
     * @return
     */
@RequestMapping(value="/logout.action",method= RequestMethod.GET)
    public String tologin() {
        return "login";
    }
At this point, the function code of "log out" has been written. After restarting the project and logging in to the system, click "log out" in figure 18-11 to log out of the system.
5 customer management module
Customer management module is the core module of the system, which realizes the function of querying, adding, modifying and deleting customers. In the next few sections, the implementation of these functions will be explained in detail.
5.1 querying customers
In practical application, no matter enterprise level project or internet project, query operation is the most used. Whether displaying all data operations in the list, or modifying or deleting a single data, you need to query and display the data in the database first.
Generally, query operations can be divided into query by criteria and query all, but in practice, we can write these two queries in one method, that is, when there is a condition, query by criteria; when there is no condition, query all. At the same time, because there may be a lot of data in the database, if we make these data displayed in a page, it will make the readability of the page data very poor, so we also need to consider paging query and display these data.
Based on the above analysis and the display function of the customer page, the functions to be realized for the query function of the BOOT customer management system are shown in figure 18-12.
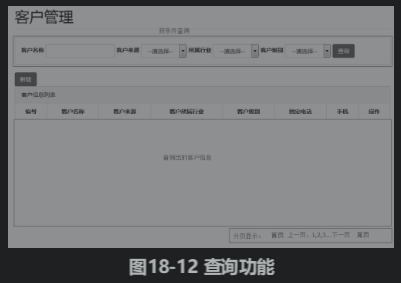
As can be seen from figure 18-12, the query in the customer management module can be divided into query by criteria and query by page, and the data queried by these two query operations will be displayed in the customer information list. If no condition is selected, the customer information list will display all the data by page query. How do we realize the customer's condition query and paging query? Next, the implementation of query function in customer management will be explained in detail, and the specific steps are as follows.
Analysis:
- When the foreground initiates a request, it needs to receive the requested query condition data. You can use pojo to receive the data and write QueryVo, which contains the query condition properties and paging data.
- The foreground needs paging display. According to the prepared paging implementation, the paging class Page should be returned, and the total number of data is required to create the Page paging class, so the logic of querying the total number of data is also required.
According to the analysis, DAO needs to write two methods:
- You need to query customer information by page according to conditions
- Need to query the total number of data according to the criteria
1 create persistent class
In the package com.itheima.core.pojo, create the customer persistence class, data dictionary persistence class, and query condition wrapper class, as shown in files 18-14 and 18-15 after editing.
File 18-14 Customer.java
public class Customer implements Serializable{
    private static final long serialVersionUID = 1L;
    private Long cust_id;// Customer number
    private String cust_name;// Customer name
    private Long cust_user_id;// Responsible person id
    private Long cust_create_id;// Founder id
    private String cust_source;// Customer information source
    private String cust_industry;// Customer industry
    private String cust_level;// Customer level
    private String cust_linkman;// Contacts
    private String cust_phone;// Fixed telephone
    private String cust_mobile;// Mobile phone
    private String cust_zipcode;// Postal Code
    private String cust_address;// Contact address
    private Date cust_createtime;// Creation time
    //getter setter method
}
In the file 18-14, the properties corresponding to the customer data table are declared and the getter/setter methods of each property are defined.
File 18-15 BaseDict.java
public class BaseDict implements Serializable {

    private static final long serialVersionUID = 1L;
    private String dict_id;// Data dictionary id
    private String dict_type_code;// Data dictionary category code
    private String dict_type_name;// Data dictionary category name
    private String dict_item_name; // Data dictionary item name
    private String dict_item_code;// Data dictionary project code
    private Integer dict_sort;// sort field
    private String dict_enable;//  Availability
    private String dict_memo;// Remarks
     //getter setter method
}
In the file 18-15, the properties corresponding to the data dictionary table are declared and the getter/setter methods of each property are defined.
QueryVo.java
public class QueryVo {
    private String custName;// Customer name
    private String custSource; // Customer source
    private String custIndustry;// Industry
    private String custLevel;// Customer level
    private Integer page = 1;// Current page number default query page 1
    private Integer start;// From which data does the starting row database start to query
    private Integer rows = 10; // Number of rows fetched number of data displayed per page
    //getter setter method
}
QueryVo of the requested parameter, which contains the query criteria property and paging data. It should be noted that the star and rows in the attribute are used to perform paging operation, where start represents the starting row in paging operation, and rows represents the number of selected rows in paging operation.
2 implementation of DAO layer
(1) Create customer DAO layer interface and mapping files.
In the com.itheima.core.dao package, create a CustomerDao interface, write a method to query the customer list and the total number of customers in the interface, and then create a mapping file with the same name as the interface, as shown in files 18-16 and 18-17.
File 18-16 CustomerDao.java
public interface CustomerDao {
    /**
     * Query data by page according to queryVo
     *
     * @param queryVo
     * @return
     */
    List<Customer> queryCustomerByQueryVo(QueryVo queryVo);

    /**
     * Query the number of data pieces according to queryVo
     *
     * @param queryVo
     * @return
     */
    Integer queryCountByQueryVo(QueryVo queryVo);
}
File 18-17 CustomerDao.xml
<?xml version="1.0" encoding="UTF-8" ?>
<!DOCTYPE mapper
PUBLIC "-//mybatis.org//DTD Mapper 3.0//EN"
"http://mybatis.org/dtd/mybatis-3-mapper.dtd">
<mapper namespace="com.itheima.core.dao.CustomerDao">
    <!-- SQL fragment-->
    <sql id="customerQueryVo">
        <where>
            <if test="custName != null and custName != ''">
                AND a.cust_name LIKE '%${custName}%'
            </if>
            <if test="custSource != null and custSource != ''">
                AND a.cust_source = #{custSource}
            </if>
            <if test="custIndustry != null and custIndustry != ''">
                AND a.cust_industry = #{custIndustry}
            </if>
            <if test="custLevel != null and custLevel != ''">
                AND a.cust_level = #{custLevel}
            </if>
        </where>
    </sql>

    <!-- according to queryVo Paging query data -->
    <select id="queryCustomerByQueryVo" parameterType="com.itheima.core.pojo.QueryVo"
        resultType="com.itheima.core.pojo.Customer">
      SELECT
        a.cust_id,
        a.cust_name,
        a.cust_user_id,
        a.cust_create_id,
        b.dict_item_name cust_source,
        c.dict_item_name cust_industry,
        d.dict_item_name cust_level,
        a.cust_linkman,
        a.cust_phone,
        a.cust_mobile,
        a.cust_zipcode,
        a.cust_address,
        a.cust_createtime
      FROM
        customer a
        LEFT JOIN base_dict b ON a.cust_source = b.dict_id
        LEFT JOIN base_dict c ON a.cust_industry = c.dict_id
        LEFT JOIN base_dict d ON a.cust_level = d.dict_id
        <include refid="customerQueryVo" />
        <!-- Execute paging query-->
        <if test="start != null">
            LIMIT #{start}, #{rows}
        </if>
    </select>

    <!-- according to queryVo Number of query data -->
    <select id="queryCountByQueryVo" parameterType="com.itheima.core.pojo.QueryVo"
        resultType="integer">
        SELECT count(1) FROM customer a
        <include refid="customerQueryVo" />
    </select>
</mapper>
In file 18-17, we first write a SQL fragment as the condition of mapping and querying customer information, and then write a mapping and querying method to query all customers. In the SQL of the method, the corresponding category information is queried from the category code field in the data dictionary table base dict through the left outer connection, and the paging query of data is realized through the limit. Finally, a mapping query statement is written to query the total number of customers for paging.
(2) Create data dictionary DAO layer interface and mapping file.
In the com.itheima.core.dao package, create a BaseDictDao interface, write a method to query the data dictionary according to the category code in the interface, and then create a mapping file with the same name as the interface, as shown in files 18-18 and 18-19
File 18-18 BaseDictDao.java
public interface BaseDictDao {

    /**
     * Query data by category code
     * @param dictTypecode
     * @return
     */
    public List<BaseDict> queryBaseDictByDictTypeCode(String dictTypecode);

}
File 18-19 BaseDictDao.xml
<?xml version="1.0" encoding="UTF-8" ?>
<!DOCTYPE mapper
PUBLIC "-//mybatis.org//DTD Mapper 3.0//EN"
"http://mybatis.org/dtd/mybatis-3-mapper.dtd">
<mapper namespace="com.itheima.core.dao.BaseDictDao">
    <!-- Query data by category code -->
    <select id="queryBaseDictByDictTypeCode" parameterType="String"
        resultType="com.itheima.core.pojo.BaseDict">
        SELECT * FROM base_dict WHERE dict_type_code =
        #{dict_type_code}
    </select>
</mapper>
3 implement the Service layer
(1) Introduce paging label class. In the src directory, create a com.itheima.common.utils package. In the package, the tag class files Page.java and NavigationTag.java used for paging are introduced. These two files can be obtained directly from the source code. The specific implementation code is shown in files 18-20 and 18-21.
File 18-20 Page.java
public class Page<T> {

    private int total;// Total number
    private int page; // Current page
    private int size; // Number per page
    private List<T> rows; // Result set
    // getter setter method
  }
File 18-21 NavigationTag.java
/**
* Display format: first page Previous page 1 2 3 4 5 next page last page
*/
public class NavigationTag extends TagSupport {
static final long serialVersionUID = 2372405317744358833L;
/**
* request The variable name used to save the page < E > object in. The default is "page"
*/
private String bean = "page";
/**
* url address of paging jump, this property must
*/
private String url = null;
/**
* Show page number
*/
private int number = 5;
@Override
public int doStartTag() throws JspException {
JspWriter writer = pageContext.getOut();
HttpServletRequest request =
(HttpServletRequest) pageContext.getRequest();
Page page = (Page) request.getAttribute(bean);
if (page == null)
return SKIP_BODY;
url = resolveUrl(url, pageContext);
try {
// Calculate total pages
int pageCount = page.getTotal() / page.getSize();
if (page.getTotal() % page.getSize() > 0) {
pageCount++;
}
writer.print("<nav><ul class=\"pagination\">");
//Homepage link path
String homeUrl = append(url, "page", 1);
//Last link path
String backUrl = append(url, "page", pageCount);
// Show previous button
if (page.getPage() > 1) {
String preUrl = append(url, "page", page.getPage() - 1);
preUrl = append(preUrl, "rows", page.getSize());
writer.print("<li><a href=\"" + homeUrl + "\">" + "home page</a></li>");
writer.print("<li><a href=\"" + preUrl + "\">" + "Previous page</a></li>");
} else {
writer.print("<li class=\"disabled\"><a href=\"#\">" + "homepage < / a > < / Li >");
writer.print("<li class=\"disabled\"><a href=\"#\">" + "previous page < / a > < / Li >");
}
// Display the first two and the last two pages of the current page number
// 1 2 3 4 5 if 1, 1 2 3 4 5 if 2, 1 2 3 4 5 if 3,
// 2 3 4 5 6 if 4, 8 9 10 11 12
int indexPage =1;
if(page.getPage() - 2 <=0){
indexPage=1;
}else if(pageCount-page.getPage() <=2){
indexPage=pageCount-4;
}else{
indexPage= page.getPage() - 2;
}
for (int i= 1;i <= number && indexPage <= pageCount;indexPage++,i++){
if (indexPage == page.getPage()) {
writer.print("<li class=\"active\"><a href=\"#\">" + indexPage
+"<spanclass=\"sr-only\"></span></a></li>");
continue;
}
String pageUrl = append(url, "page", indexPage);
pageUrl = append(pageUrl, "rows", page.getSize());
writer.print("<li><a href=\"" + pageUrl + "\">" + indexPage + "</a></li>");
}
// Show next button
if (page.getPage() < pageCount) {
String nextUrl = append(url, "page", page.getPage() + 1);
nextUrl = append(nextUrl, "rows", page.getSize());
writer.print("<li><a href=\"" + nextUrl + "\">" + "next page</a></li>");
writer.print("<li><a href=\"" + backUrl + "\">" + "Tail page</a></li>");
} else {
writer.print("<li class=\"disabled\"><a href=\"#\">" + "next page < / a > < / Li >");
writer.print("<li class=\"disabled\"><a href=\"#\">" + "last page < / a > < / Li >");
}
writer.print("</nav>");
} catch (IOException e) {
e.printStackTrace();
}
return SKIP_BODY;
}
private String append(String url, String key, int value) {
return append(url, key, String.valueOf(value));
}
/**
* Join parameter pair for url
*/
private String append(String url, String key, String value) {
if (url == null || url.trim().length() == 0) {
return "";
}
if (url.indexOf("?") == -1) {
url = url + "?" + key + "=" + value;
} else {
if (url.endsWith("?")) {
url = url + key + "=" + value;
} else {
url = url + "&" + key + "=" + value;
}
}
return url;
}
/**
* Add page turning request parameter for url
*/
private String resolveUrl(String url,
javax.servlet.jsp.PageContext pageContext) throws JspException {
Map params = pageContext.getRequest().getParameterMap();
for (Object key : params.keySet()) {
if ("page".equals(key) || "rows".equals(key)){
continue;
}
Object value = params.get(key);
if (value == null){
continue;
}
if (value.getClass().isArray()) {
url = append(url, key.toString(), ((String[]) value)[0]);
} else if (value instanceof String) {
url = append(url, key.toString(), value.toString());
}
}
return url;
}
public String getBean() {
return bean;
}
public void setBean(String bean) {
this.bean = bean;
}
public String getUrl() {
return url;
}
public void setUrl(String url) {
this.url = url;
}
public void setNumber(int number) {
this.number = number;
}
} (2) Create data dictionary and customer Service layer interface. Create an interface named BaseDictService and CustomerService in the com.itheima.core.service package, and edit it as shown in files 18-22 and 18-23.
File 18-22 BaseDictService.java
public interface BaseDictService {
    /**
     * Query by category code
     *
     * @param dictTypeCode
     * @return
     */
    List<BaseDict> queryBaseDictByDictTypeCode(String dictTypeCode);
}
File 18-23 CustomerService.java
public interface CustomerService {

    /**
     * Query customer by condition page
     *
     * @param queryVo
     * @return
     */
    Page<Customer> queryCustomerByQueryVo(QueryVo queryVo);

}
3) Create the implementation class of data dictionary and customer Service layer interface. In the package com.itheima.core.service.impl, create the implementation classes BaseDictServiceImpl and CustomerServiceImpl of data dictionary and customer Service layer interface respectively. The edited code is shown in files 18-24 and 18-25.
File 18-24 BaseDictServiceImpl.java
@Service
public class BaseDictServiceImpl implements BaseDictService{

    @Autowired
    private BaseDictDao baseDictDao;

    @Override
    public List<BaseDict> queryBaseDictByDictTypeCode(String dictTypeCode) {

        return baseDictDao.queryBaseDictByDictTypeCode(dictTypeCode);
    }

}
File 18-23 CustomerServiceImpl.java
@Service
public class CustomerServiceImpl implements CustomerService {

    @Autowired
    private CustomerDao customerDao;

    @Override
    public Page<Customer> queryCustomerByQueryVo(QueryVo queryVo) {

        // Judge parameter object
        if(null != queryVo) {
            if(StringUtils.isNotBlank(queryVo.getCustName())) {
                queryVo.setCustName(queryVo.getCustName());
            }
            if(StringUtils.isNotBlank(queryVo.getCustSource())) {
                queryVo.setCustSource(queryVo.getCustSource());
            }
            if(StringUtils.isNotBlank(queryVo.getCustIndustry())) {
                queryVo.setCustIndustry(queryVo.getCustIndustry());
            }
            if(StringUtils.isNotBlank(queryVo.getCustLevel())) {
                queryVo.setCustLevel(queryVo.getCustLevel());
            }
            if(StringUtils.isNotBlank(queryVo.getCustName())) {
                queryVo.setCustName(queryVo.getCustName());
            }
            if(StringUtils.isNotBlank(queryVo.getCustName())) {
                queryVo.setCustName(queryVo.getCustName());
            }

        }

        // Set query criteria, and start from which data to check whether page and rows have initial values
        queryVo.setStart((queryVo.getPage() - 1) * queryVo.getRows());

        // Query data result set
        List<Customer> list = this.customerDao.queryCustomerByQueryVo(queryVo);

        // Total number of data queried
        int total = this.customerDao.queryCountByQueryVo(queryVo);

        // Encapsulate the returned page object
        Page<Customer> page = new Page<Customer>();
        page.setPage(queryVo.getPage());// The current page is the same as the parameter
        page.setRows(list);// Result set
        page.setSize(queryVo.getRows());// Number of pages and parameters are the same
        page.setTotal(total);// Total number
        return page;
    }
In the implementation method of file 18-25, first judge whether the parameter is empty, then judge whether the customer name, information source, industry and customer level in the condition query are empty. Only when it is not empty can it be added to the parameter object. Next, get the current page and the number of rows of each page passed from the page, and get the start line start. Then query all customer information and the total number of customers. Finally, all the information queried is encapsulated in the page object and returned.
4 implement Controller
In the package com.itheima.core.controller, create the customer controller class CustomerController, as shown in file 18-26 after editing.
File 18-26 CustomerController.java
@Controller
public class CustomerController {

    // Customer source
    @Value("${CUSTOMER_FROM_TYPE}")
    private String CUSTOMER_FROM_TYPE;
    // Customer industry
    @Value("${CUSTOMER_INDUSTRY_TYPE}")
    private String CUSTOMER_INDUSTRY_TYPE;
    // Customer level
    @Value("${CUSTOMER_LEVEL_TYPE}")
    private String CUSTOMER_LEVEL_TYPE;


    @Autowired
    private BaseDictService baseDictService;

    @Autowired
    private CustomerService customerService;

    /**
     * Show user list
     * @return
     */
    @RequestMapping(value="/customer/list")
    public String list(Model model,QueryVo queryVo) {

//      The uri code has been modified to UTF-8 in tomcat's server.xml, where the code does not write < connector uriencoding = "UTF-8" / >
//      try {
//          //Solve the problem of get request scrambling
//          if (StringUtils.isNotBlank(queryVo.getCustName())) {
//              queryVo.setCustName(new String(queryVo.getCustName().getBytes("ISO-8859-1"), "UTF-8"));
//          }
//      } catch (Exception e) {
//          e.printStackTrace();
//      }

        // Customer source
        List<BaseDict> fromType = baseDictService.queryBaseDictByDictTypeCode(CUSTOMER_FROM_TYPE);
        // Industry
        List<BaseDict> industryType =baseDictService.queryBaseDictByDictTypeCode(CUSTOMER_INDUSTRY_TYPE);
        // Customer level
        List<BaseDict> levelType = baseDictService.queryBaseDictByDictTypeCode(CUSTOMER_LEVEL_TYPE);

        // Put the data to be displayed on the front page into the model
        model.addAttribute("fromType", fromType);
        model.addAttribute("industryType", industryType);
        model.addAttribute("levelType", levelType);

        // Condition, paging query data
        Page<Customer> page = this.customerService.queryCustomerByQueryVo(queryVo);
        // Put the results of paging query into the model
        model.addAttribute("page", page);

        // Data display
        model.addAttribute("custName", queryVo.getCustName());
        model.addAttribute("custSource", queryVo.getCustSource());
        model.addAttribute("custIndustry", queryVo.getCustIndustry());
        model.addAttribute("custLevel", queryVo.getCustLevel());


        return "customer";
    }
In the customer controller class, the customerService and baseDictService properties are declared first, and these two objects are injected into this class through @ Autowired annotation; then the customer source, industry and customer level properties are defined respectively, and the property values in the resource.properties file are assigned to these three properties through @ Value annotation; finally, the method of querying customer list is written To perform query operation, the default Value of the first parameter page is 1, which means starting from the first parameter, and the default Value of the second parameter is 10, which means each page displays 10 pieces of data.
5 realize page display
(1) When preparing the project environment in section 18.3.3, it has been explained that the user-defined label file needs to be introduced. In this project, the user-defined tag file is mainly used to realize paging function, and its tag name is commons.tld. The implementation code in the tag is shown in file 18-27.
File 18-27 commons.tld
<?xml version="1.0" encoding="UTF-8" ?>
<!DOCTYPE taglib
   PUBLIC "-//Sun Microsystems, Inc.//DTD JSP Tag Library 1.2//EN"
   "http://java.sun.com/dtd/web-jsptaglibrary_1_2.dtd">
<taglib>
    <!-- Specify the version number of the label Library -->
    <tlib-version>2.0</tlib-version>
    <!-- Appoint JSP Version number -->
    <jsp-version>1.2</jsp-version>
    <!-- Specify the name of the label Library -->
    <short-name>common</short-name>
    <!-- Specify the URI -->
    <uri>http://itheima.com/common/</uri>
    <!-- Specifies the display name of the label Library -->
    <display-name>Common Tag</display-name>
    <!-- Specifies the description of the label Library -->
    <description>Common Tag library</description>
    <!-- Register a custom label -->
    <tag>
        <!-- Specify the registered custom label name -->
        <name>page</name>
        <!-- Specifies the label handler class for a custom label -->
        <tag-class>com.itheima.common.utils.NavigationTag</tag-class>
        <!-- Specify label body type -->
        <body-content>JSP</body-content>
        <!-- describe -->
        <description>create navigation for paging</description>
        <!-- Specify the properties in the label -->
        <attribute>
            <!-- Specify property name -->
            <name>url</name>
            <!-- This property is true Indicates that the specified property is required -->
            <required>true</required>
            <!-- This property is used to specify whether an expression can be used to dynamically specify data. It is true Time means yes -->
            <rtexprvalue>true</rtexprvalue>
        </attribute>
        <attribute>
            <name>bean</name>
            <rtexprvalue>true</rtexprvalue>
        </attribute>
        <attribute>
            <name>number</name>
            <rtexprvalue>true</rtexprvalue>
        </attribute>
    </tag>
</taglib>
In the file 18-27, line 13 is the URI we introduced when using the custom tag. Line 23 specifies the processor class of the custom tag. For other contents, see the code annotation information. In the actual development, the paging function is usually implemented by using common tool classes or paging components. Generally, these tool classes and components do not need to be written by developers themselves, but only need to learn how to use them. Therefore, the users of the paging tool class and the paging label file above in this book only need to introduce them directly and master how to use them without writing them by themselves.
(2) In the customer.jsp, write the code of condition query and display customer list and paging query, as shown in file 18-28.
File 18-28 customer.jsp
<%@ page language="java" contentType="text/html; charset=UTF-8"
    pageEncoding="UTF-8"%>
<%@ page trimDirectiveWhitespaces="true"%>
<%@ taglib prefix="c" uri="http://java.sun.com/jsp/jstl/core"%>
<%@ taglib prefix="itheima" uri="http://itcast.cn/common/"%>
<%
    String path = request.getContextPath();
    String basePath = request.getScheme() + "://" + request.getServerName()
                       + ":" + request.getServerPort() + path + "/";
%>
<!DOCTYPE HTML>
<html>
<head>
    <meta http-equiv="Content-Type" content="text/html; charset=UTF-8">
    <title>customer management-BootCRM</title>
    <!-- Introduce css Style file -->
    <!-- Bootstrap Core CSS -->
    <link href="<%=basePath%>css/bootstrap.min.css" rel="stylesheet" />
    <!-- MetisMenu CSS -->
    <link href="<%=basePath%>css/metisMenu.min.css" rel="stylesheet" />
    <!-- DataTables CSS -->
    <link href="<%=basePath%>css/dataTables.bootstrap.css" rel="stylesheet" />
    <!-- Custom CSS -->
    <link href="<%=basePath%>css/sb-admin-2.css" rel="stylesheet" />
    <!-- Custom Fonts -->
    <link href="<%=basePath%>css/font-awesome.min.css" rel="stylesheet" type="text/css" />
    <link href="<%=basePath%>css/boot-crm.css" rel="stylesheet" type="text/css" />
</head>
<body>
...
    <!-- Customer list query section  start-->
    <div id="page-wrapper">
        <div class="row">
            <div class="col-lg-12">
                <h1 class="page-header">customer management</h1>
            </div>
            <!-- /.col-lg-12 -->
        </div>
        <!-- /.row -->
        <div class="panel panel-default">
            <div class="panel-body">
                <form class="form-inline" method="get"
                      action="${pageContext.request.contextPath }/customer/list.action">
                    <div class="form-group">
                        <label for="customerName">Customer name</label>
                        <input type="text" class="form-control" id="customerName"
                                           value="${custName }" name="custName" />
                    </div>
                    <div class="form-group">
                        <label for="customerFrom">Customer source</label>
                        <select class="form-control" id="customerFrom" name="custSource">
                            <option value="">--Please choose--</option>
                            <c:forEach items="${fromType}" var="item">
                                <option value="${item.dict_id}"
                                       <c:if test="${item.dict_id == custSource}">selected</c:if>>
                                    ${item.dict_item_name }
                                </option>
                            </c:forEach>
                        </select>
                    </div>
                    <div class="form-group">
                        <label for="custIndustry">Industry</label>
                        <select class="form-control" id="custIndustry"  name="custIndustry">
                            <option value="">--Please choose--</option>
                            <c:forEach items="${industryType}" var="item">
                                <option value="${item.dict_id}"
                                        <c:if test="${item.dict_id == custIndustry}"> selected</c:if>>
                                    ${item.dict_item_name }
                                </option>
                            </c:forEach>
                        </select>
                    </div>
                    <div class="form-group">
                        <label for="custLevel">Customer level</label>
                        <select class="form-control" id="custLevel" name="custLevel">
                            <option value="">--Please choose--</option>
                            <c:forEach items="${levelType}" var="item">
                                <option value="${item.dict_id}"
                                        <c:if test="${item.dict_id == custLevel}"> selected</c:if>>
                                    ${item.dict_item_name }
                                </option>
                            </c:forEach>
                        </select>
                    </div>
                    <button type="submit" class="btn btn-primary">query</button>
                </form>
            </div>
        </div>
        <a href="#" class="btn btn-primary" data-toggle="modal"
                   data-target="#Newcustomerdialog "onclick =" clearcustomer() "> New</a>
        <div class="row">
            <div class="col-lg-12">
                <div class="panel panel-default">
                    <div class="panel-heading">Customer information list</div>
                    <!-- /.panel-heading -->
                    <table class="table table-bordered table-striped">
                        <thead>
                            <tr>
                                <th>number</th>
                                <th>Customer name</th>
                                <th>Customer source</th>
                                <th>Customer industry</th>
                                <th>Customer level</th>
                                <th>Fixed telephone</th>
                                <th>Mobile phone</th>
                                <th>operation</th>
                            </tr>
                        </thead>
                        <tbody>
                            <c:forEach items="${page.rows}" var="row">
                                <tr>
                                    <td>${row.cust_id}</td>
                                    <td>${row.cust_name}</td>
                                    <td>${row.cust_source}</td>
                                    <td>${row.cust_industry}</td>
                                    <td>${row.cust_level}</td>
                                    <td>${row.cust_phone}</td>
                                    <td>${row.cust_mobile}</td>
                                    <td>
                                        <a href="#" class="btn btn-primary btn-xs" data-toggle="modal" data-target="#Customereditdialog "onclick =" editcustomer (${row. Custom [ID}) "" > Modify</a>
                                        <a href="#"Class =" BTN BTN danger BTN XS "onclick =" deletecustomer (${row. Cust [ID}) "" > delete</a>
                                    </td>
                                </tr>
                            </c:forEach>
                        </tbody>
                    </table>
                    <div class="col-md-12 text-right">
                        <itheima:page url="${pageContext.request.contextPath }/customer/list.action" />
                    </div>
                    <!-- /.panel-body -->
                </div>
                <!-- /.panel -->
            </div>
            <!-- /.col-lg-12 -->
        </div>
    </div>
    <!-- Customer list query section  end-->
</div>
...
In the above page code, line 4 and line 5 introduce JSTL label and custom paging label; line 17-62 is a form form of condition query, which will be submitted to a "list.action" request after clicking the "query" button; line 72-105 is a form that displays the list of customer information, and the queried customer information will be displayed in this form; line 107 ~ 108 lines of code are custom pagination labels, which will display the content according to the number of customers and the set number of pages.
6 test condition query and paging
After publishing the project and starting the Tomcat server, enter the customer management page, and then click the "query" button to query all the customer information, which has been displayed in pages, as shown in figure 18-13.
Careful readers will surely find that when entering the customer management page, the customer information list does not have any display, and only after clicking the "query" button, the data will be displayed. So what is the way to let it enter the page when the default display data?
To display the list of customer information after login is very simple, you only need to change the statement jumping to the main page in the user login method (login()) in the user controller class (UserController) to the jump method redirecting to the main page. The modified statement is as follows.
    @RequestMapping(value="/login",method=RequestMethod.POST)
    public String login(String usercode,String password,Model model,HttpSession session) {

        User user= userService.findUser(usercode,password);

        if(user!=null) {
            //Add user object to Session
            session.setAttribute("USER_SESSION", user);
            // Redirect to the home page to display the customer list information after paging
            // return "customer";
            return "redirect:customer/list.action";
        }
        model.addAttribute("msg", "Wrong account or password, please login again!");
        // Return to login page
        return "login";

    }
In this way, after successful login, the customer management page will directly display the customer list information after paging.
5.2 add customer
In this system, the operation of adding customers is realized through the pop-up window of the page. When you click the "new" button, the "new customer information" window will pop up, as shown in figure 18-16.
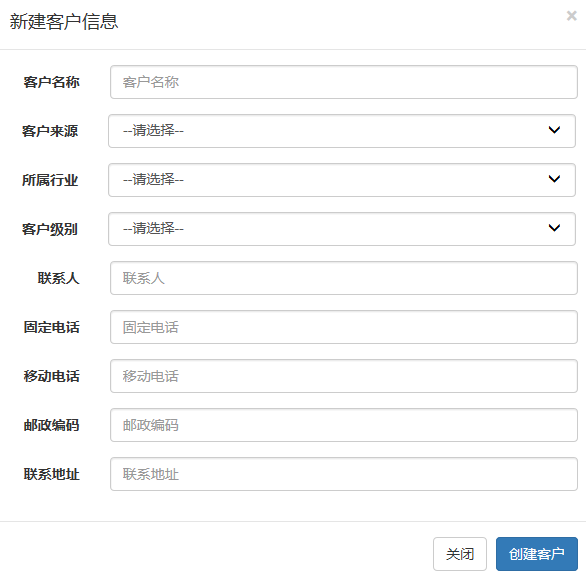
After filling in all the customer information in figure 18-16, click the "create customer" button to add the customer. So how is this operation implemented? Next, we will explain the function of adding customers in the system in detail. The specific steps are as follows. 1. The code to realize the page function is in the page. The code to realize the "new" button link is as follows.
1 realize page function code
In the page, the implementation code of the "new" button link is as follows.
<a href="#" class="btn btn-primary" data-toggle="modal" data-target="#Newcustomerdialog "onclick =" clearcustomer() "> New</a>
In the above code, data toggle = "modal" and data target = "ා newCustomerDialog" are the modal box codes of Bootstrap. When you click the "new" button, a window with the id of newCustomerDialog will pop up. At the same time, you can clear all the data in the window by executing the clearCustomer() method through onclick property. In customer.jsp, the display code of the new customer mode box is shown in file 18-29.
<!-- Create customer mode box -->
<div class="modal fade" id="newCustomerDialog" tabindex="-1" role="dialog"
aria-labelledby="myModalLabel">
<div class="modal-dialog" role="document">
<div class="modal-content">
<div class="modal-header">
<button type="button" class="close" data-dismiss="modal" aria-label="Close">
<span aria-hidden="true">×</span>
</button>
<h4 class="modal-title" id="myModalLabel">New customer information</h4>
</div>
<div class="modal-body">
<form class="form-horizontal" id="new_customer_form">
<div class="form-group">
<label for="new_customerName" class="col-sm-2 control-label">
Customer name
</label>
<div class="col-sm-10">
<input type="text" class="form-control" id="new_customerName" placeholder="Customer name" name="cust_name" />
</div>
</div>
<div class="form-group">
<label for="new_customerFrom" style="float:left;padding:7px 15px 0 27px;">Customer source</label>
<div class="col-sm-10">
<select class="form-control" id="new_customerFrom" name="cust_source">
<option value="">--Please choose--</option>
<c:forEach items="${fromType}" var="item">
<option value="${item.dict_id}"<c:if test="${item.dict_id == custSource}">selected</c:if>>
${item.dict_item_name }
</option>
</c:forEach>
</select>
</div>
</div>
<div class="form-group">
<label for="new_custIndustry" style="float:left;padding:7px 15px 0 27px;">Industry</label>
<div class="col-sm-10">
<select class="form-control" id="new_custIndustry" name="cust_industry">
<option value="">--Please choose--</option>
<c:forEach items="${industryType}" var="item">
<option value="${item.dict_id}"<c:if test="${item.dict_id == custIndustry}"> selected</c:if>>
${item.dict_item_name }
</option>
</c:forEach>
</select>
</div>
</div>
<div class="form-group">
<label for="new_custLevel" style="float:left;padding:7px 15px 0 27px;">Customer level</label>
<div class="col-sm-10">
<select class="form-control" id="new_custLevel" name="cust_level">
<option value="">--Please choose--</option>
<c:forEach items="${levelType}" var="item">
<option value="${item.dict_id}"<c:if test="${item.dict_id == custLevel}"> selected</c:if>>${item.dict_item_name }</option>
</c:forEach>
</select>
</div>
</div>
<div class="form-group">
<label for="new_linkMan" class="col-sm-2 control-label">Contacts</label>
<div class="col-sm-10">
<input type="text" class="form-control" id="new_linkMan" placeholder="Contacts" name="cust_linkman" />
</div>
</div>
<div class="form-group">
<label for="new_phone" class="col-sm-2 control-label">Fixed telephone</label>
<div class="col-sm-10">
<input type="text" class="form-control" id="new_phone" placeholder="Fixed telephone" name="cust_phone" />
</div>
</div>
<div class="form-group">
<label for="new_mobile" class="col-sm-2 control-label">Mobile phone</label>
<div class="col-sm-10">
<input type="text" class="form-control" id="new_mobile" placeholder="Mobile phone" name="cust_mobile" />
</div>
</div>
<div class="form-group">
<label for="new_zipcode" class="col-sm-2 control-label">Postal Code</label>
<div class="col-sm-10">
<input type="text" class="form-control" id="new_zipcode" placeholder="Postal Code" name="cust_zipcode" />
</div>
</div>
<div class="form-group">
<label for="new_address" class="col-sm-2 control-label">Contact address</label>
<div class="col-sm-10">
<input type="text" class="form-control" id="new_address" placeholder="Contact address" name="cust_address" />
</div>
</div>
</form>
</div>
<div class="modal-footer">
<button type="button" class="btn btn-default" data-dismiss="modal">Close</button>
<button type="button" class="btn btn-primary" onclick="createCustomer()">Create customer</button>
</div>
</div>
</div>
</div>In the above code, the implementation code in the form form form of lines 15-121 is the customer information that the user needs to fill in.
To ensure that there is no data in the pop-up modal box after clicking the "new" button every time, you need to create a clearCustomer() method in the page to clear the contents of the modal box. The implementation code of the clearCustomer() method is as follows.
    //Clear data in new customer window
    function clearCustomer() {
        $("#new_customerName").val("");
        $("#new_customerFrom").val("")
        $("#new_custIndustry").val("")
        $("#new_custLevel").val("")
        $("#new_linkMan").val("");
        $("#new_phone").val("");
        $("#new_mobile").val("");
        $("#new_zipcode").val("");
        $("#new_address").val("");
    }
After filling in the information in the modal box, click the "create customer" button, and the createCustomer() method will be executed. The implementation code of this method is as follows.
    // Create customer
    function createCustomer() {
    $.post("<%=basePath%>customer/create.action",
    $("#new_customer_form").serialize(),function(data){
            if(data =="OK"){
                alert("Customer created successfully!");
                window.location.reload();
            }else{
                alert("Customer creation failed!");
                window.location.reload();
            }
        });
    }
The create customer() method will serialize the form with the id of new customer form through the POST request of jQuery Ajax, and then submit it to the request ending with "/ create.action". If its return value is "OK", it means that the customer creation is successful, otherwise, the customer creation fails.
2 implementation of Controller layer
Write a method to create a customer in the customer controller class CustomerController, as shown below.
    /**
     * Create customer
     * @param customer
     * @param session
     * @return
     */
    @RequestMapping("/customer/create.action")
    @ResponseBody
    public String customerCreate(Customer customer,HttpSession session) {
        // Get current user information in Session
        User user=(User)session.getAttribute("USER_SESSION");
        // Store the current user id in the customer object
        customer.setCust_create_id(user.getUser_id());
        // Creating Date Objects
        Date date = new Date();
        // Get a time in the format of Timestamp and store it in mysql in the format of "yyyy/MM/dd HH:mm:ss"
//      Timestamp timeStamp = new Timestamp(date.getTime());
        customer.setCust_createtime(date);
        // Execute the creation method in the Service layer and return the number of affected rows
        int rows = customerService.createCustomer(customer);
        if(rows >0) {
            return "ok";
        }else {
            return "FAIL";
        }
    }
In the above method code, first obtain the current user information in the Session, and then add the current user id information to the creator id attribute of the Customer object. Next, the Date object is created and the formatted time information is added to the cust? Createtime property of the Customer object. Finally, execute the createCustomer() method in the Service layer. Its return value is the number of affected rows in the database. If its value is greater than 0, it means the creation is successful, and it returns the "OK" string information. Otherwise, it returns the "FAIL" string.
Tips
@Responsebody annotation
It is generally used when obtaining data asynchronously. After the @ RequestMapping annotation is used, the return value of the method will usually be resolved to a jump path (such as a page or a method). After the @ Responsebody annotation is added, the return result will not be resolved to a jump path, but will be directly written to the body of the HTTP Response object through the HttpMessageConverter after the conversion to the specified format (such as json, xml, etc.) The method in the sample page can get its return value.
3 implementation of Service layer method
(1) Create interface methods. In the CustomerService interface, create a createCustomer() method with the following code.
    /**
     * Create customer
     * @param customer
     * @return
     */
    int createCustomer(Customer customer);
(2) Create implementation class methods. In CustomerServiceImpl, implement the createCustomer() method, and the edited code is as follows.
    @Override
    public int createCustomer(Customer customer) {
        return customerDao.createCustomer(customer);
    }
4 implementation of DAO layer
(1) Create interface methods. In CustomerDao, write a method to create a customer, as shown below.
    /**
     * Create customer
     * @param customer
     * @return
     */
    int createCustomer(Customer customer);
(2) Create a map insert statement. In CustomerDao.xml, write a map insert statement that performs the insert operation, as shown below.
    <!-- Add customer -->
    <insert id="createCustomer" parameterType="com.itheima.core.pojo.Customer">
        insert into customer(
            cust_name,
            cust_user_id,
            cust_create_id,
            cust_source,
            cust_industry,
            cust_level,
            cust_linkman,
            cust_phone,
            cust_mobile,
            cust_zipcode,
            cust_address,
            cust_createtime
        )
        values(#{cust_name}),
            #{cust_user_id},
            #{cust_create_id},
            #{cust_source},
            #{cust_industry},
            #{cust_level},
            #{cust_linkman},
            #{cust_phone},
            #{cust_mobile},
            #{cust_zipcode},
            #{cust_address},
            #{cust_createtime}
        )
    </insert>
5. Add customer test so far, the implementation code of adding customer has been written. After publishing and launching the project, enter the customer management page, click the "new" button, and fill in the new customer information, as shown in figure 18-17.
Click the "create customer" button in figure 18-17. If the program is executed correctly, the "customer created successfully" will pop up After clicking OK again, the browser will refresh the current page. To query whether the created customer has been created successfully is very simple, you only need to find the customer with the customer name "Xiaocheng" in the condition query, as shown in figure 18-18.
As can be seen from figure 18-18, the information of the newly created customer "Xiaocheng" has been found correctly. So far, the function of adding customers has been successfully implemented.
5.3 modify customer
The modification operation is realized through the pop-up window of the page as well as the adding operation. When you click the "modify" button of the corresponding data of the page, the "modify customer information" window will pop up, as shown in Figure 18-19.
It can be seen from figure 18-19 that the display content of the window of modifying customer information is basically the same as that of the window of creating new customer information, but the customer information to be modified is displayed in the window of modifying customer information. After modifying the customer information, click Save modification to perform the modification. The following is a detailed explanation of the function implementation of modifying customers in this system. The specific steps are as follows.
1 realize page function code
In the page, the implementation code of the "modify" button link is as follows.
<a href="#" class="btn btn-primary btn-xs" data-toggle="modal" data-target="#Customereditdialog "onclick =" editcustomer (${row. Custom [ID}) "" > Modify</a>As with the new method, when you click Modify, a modal window with the id of customerEditDialog will pop up. At the same time, you can obtain all the data of the customer to be modified by executing the editCustomer() method of onclick property. In customer.jsp, modify the display code of the customer mode box as shown in file 18-30. File 18-30 customer.jsp
<!-- Modify customer mode box -->
<div class="modal fade" id="customerEditDialog" tabindex="-1" role="dialog"
aria-labelledby="myModalLabel">
<div class="modal-dialog" role="document">
<div class="modal-content">
<div class="modal-header">
<button type="button" class="close" data-dismiss="modal" aria-label="Close">
<span aria-hidden="true">×</span>
</button>
<h4 class="modal-title" id="myModalLabel">Modify customer information</h4>
</div>
<div class="modal-body">
<form class="form-horizontal" id="edit_customer_form">
<input type="hidden" id="edit_cust_id" name="cust_id"/>
<div class="form-group">
<label for="edit_customerName" class="col-sm-2 control-label">Customer name</label>
<div class="col-sm-10">
<input type="text" class="form-control" id="edit_customerName" placeholder="Customer name" name="cust_name" />
</div>
</div>
<div class="form-group">
<label for="edit_customerFrom" style="float:left;padding:7px 15px 0 27px;">Customer source</label>
<div class="col-sm-10">
<select class="form-control" id="edit_customerFrom" name="cust_source">
<option value="">--Please choose--</option>
<c:forEach items="${fromType}" var="item">
<option value="${item.dict_id}"<c:if test="${item.dict_id == custSource}"> selected</c:if>>${item.dict_item_name }</option>
</c:forEach>
</select>
</div>
</div>
<div class="form-group">
<label for="edit_custIndustry" style="float:left;padding:7px 15px 0 27px;">Industry</label>
<div class="col-sm-10">
<select class="form-control" id="edit_custIndustry" name="cust_industry">
<option value="">--Please choose--</option>
<c:forEach items="${industryType}" var="item">
<option value="${item.dict_id}"<c:if test="${item.dict_id == custIndustry}"> selected</c:if>>${item.dict_item_name }</option>
</c:forEach>
</select>
</div>
</div>
<div class="form-group">
<label for="edit_custLevel" style="float:left;padding:7px 15px 0 27px;">Customer level</label>
<div class="col-sm-10">
<select class="form-control" id="edit_custLevel" name="cust_level">
<option value="">--Please choose--</option>
<c:forEach items="${levelType}" var="item">
<option value="${item.dict_id}"<c:if test="${item.dict_id == custLevel}"> selected</c:if>>${item.dict_item_name }</option>
</c:forEach>
</select>
</div>
</div>
<div class="form-group">
<label for="edit_linkMan" class="col-sm-2 control-label">Contacts</label>
<div class="col-sm-10">
<input type="text" class="form-control" id="edit_linkMan" placeholder="Contacts" name="cust_linkman" />
</div>
</div>
<div class="form-group">
<label for="edit_phone" class="col-sm-2 control-label">Fixed telephone</label>
<div class="col-sm-10">
<input type="text" class="form-control" id="edit_phone" placeholder="Fixed telephone" name="cust_phone" />
</div>
</div>
<div class="form-group">
<label for="edit_mobile" class="col-sm-2 control-label">Mobile phone</label>
<div class="col-sm-10">
<input type="text" class="form-control" id="edit_mobile" placeholder="Mobile phone" name="cust_mobile" />
</div>
</div>
<div class="form-group">
<label for="edit_zipcode" class="col-sm-2 control-label">Postal Code</label>
<div class="col-sm-10">
<input type="text" class="form-control" id="edit_zipcode" placeholder="Postal Code" name="cust_zipcode" />
</div>
</div>
<div class="form-group">
<label for="edit_address" class="col-sm-2 control-label">Contact address</label>
<div class="col-sm-10">
<input type="text" class="form-control" id="edit_address" placeholder="Contact address" name="cust_address" />
</div>
</div>
</form>
</div>
<div class="modal-footer">
<button type="button" class="btn btn-default" data-dismiss="modal">Close</button>
<button type="button" class="btn btn-primary" onclick="updateCustomer()">Save and modify</button>
</div>
</div>
</div>
</div>In the above code, the form form form in lines 15-125 is the implementation code for modifying customer information. When modifying the customer information, you need to obtain all the information of the customer first and display it in the window of modifying the information. Therefore, you need to write a method to obtain the customer information editCustomer() in the page, and the implementation code of this method is as follows.
    // Get modified customer information through id
    function editCustomer(id) {
        $.ajax({
            type:"get",
            url:"<%=basePath%>customer/queryCustomerById.action",
            data:{"id":id},
            success:function(data) {
                $("#edit_cust_id").val(data.cust_id);
                $("#edit_customerName").val(data.cust_name);
                $("#edit_customerFrom").val(data.cust_source)
                $("#edit_custIndustry").val(data.cust_industry)
                $("#edit_custLevel").val(data.cust_level)
                $("#edit_linkMan").val(data.cust_linkman);
                $("#edit_phone").val(data.cust_phone);
                $("#edit_mobile").val(data.cust_mobile);
                $("#edit_zipcode").val(data.cust_zipcode);
                $("#edit_address").val(data.cust_address);

            }
        });
    }
The above method code uses jQuery Ajax to obtain the customer information that needs to be modified. After the success, the customer information will be added to the corresponding location in the modify customer mode box.
2 implementation of Controller layer
In the CustomerController class, write a method to obtain customer information and update customers through id, and the code is as follows.
    /**
     * Query the customer according to the id and return the json format data
     *
     * @param id
     * @return
     */
    @RequestMapping("/customer/getCustomerById.action")
    @ResponseBody
    public Customer queryCustomerById(Long id) {
        Customer customer = this.customerService.queryCustomerById(id);
        return customer;
    }

    /**
     * Update customers
     *
     * @param id
     * @return
     */
    @RequestMapping("/customer/update")
    @ResponseBody
    public String updateCustomerById(Customer customer) {
        int rows = this.customerService.updateCustomerById(customer);
        if(rows >0) {
            return "ok";
        }else {
            return "FAIL";
        }
    }
In the above two methods, only the corresponding methods in the Service layer are called, and the corresponding execution results are returned.
3 implementation of Service layer method
(1) Create interface methods.
In the CustomerService interface, create a method to obtain customer information and update customers through id, as shown below.
    /**
     * Edit customer data according to id
     *
     * @param customer
     * @return
     */
    int updateCustomerById(Customer customer);

    /**
     * Delete customer by id
     *
     * @param id
     */
    void deleteCustomerById(Long id);
(2) Create implementation class methods.
In CustomerServiceImpl, implement the methods in the interface. The edited code is as follows.
    @Override
    public Customer queryCustomerById(Long id) {
        Customer customer = this.customerDao.queryCustomerById(id);
        return customer;
    }

    @Override
    public int updateCustomerById(Customer customer) {
        return customerDao.updateCustomerById(customer);
    }
In the above code, getCustomerById() method returns the customer object to be modified, while updateCustomer() method returns the number of affected rows in the database after execution.
4 implementation of DAO layer
(1) Create interface methods.
In the CustomerDao interface, write a method to obtain customer information and update customers through id, and the code is as follows.
    /**
     * Query users by id
     *
     * @param id
     * @return
     */
    Customer queryCustomerById(Long id);

    /**
     * Edit customer data according to id
     *
     * @param customer
     * @return
     */
    int updateCustomerById(Customer customer);
(2) Create a mapping statement.
In CustomerDao.xml, write the map insert statement to perform the insert operation, as shown below.
    <!-- according to id Query users -->
    <select id="queryCustomerById" parameterType="Integer"
        resultType="com.itheima.core.pojo.Customer">
        SELECT * FROM customer WHERE cust_id = #{id}
    </select>

    <!-- Update customers -->
    <update id="updateCustomerById"
        parameterType="com.itheima.core.pojo.Customer">
        UPDATE customer
        <set>
            <if test="cust_name !=null and cust_name != ''">
                cust_name = #{cust_name},
            </if>
            <if test="cust_user_id !=null">
                cust_user_id = #{cust_user_id},
            </if>
            <if test="cust_create_id !=null">
                cust_create_id = #{cust_create_id},
            </if>
            <if test="cust_source !=null and cust_source != ''">
                cust_source = #{cust_source},
            </if>
            <if test="cust_industry !=null and cust_industry != ''">
                cust_industry = #{cust_industry},
            </if>
            <if test="cust_level !=null and cust_level != ''">
                cust_level = #{cust_level},
            </if>
            <if test="cust_linkman !=null and cust_linkman != ''">
                cust_linkman = #{cust_linkman},
            </if>
            <if test="cust_phone !=null and cust_phone != ''">
                cust_phone = #{cust_phone},
            </if>
            <if test="cust_mobile !=null and cust_mobile != ''">
                cust_mobile = #{cust_mobile},
            </if>
            <if test="cust_zipcode !=null and cust_zipcode != ''">
                cust_zipcode = #{cust_zipcode},
            </if>
            <if test="cust_address !=null and cust_address != ''">
                cust_address = #{cust_address},
            </if>
            <if test="cust_createtime !=null andcust_createtime != ''">
                cust_createtime = #{cust_createtime},
            </if>
        </set>
        WHERE cust_id = #{cust_id}
    </update>
5 modify customer test
At this point, the modification of the customer's implementation code has been completed. After the project is published and launched, enter the customer management page, click the "modify" button after the number 14 customer in the list, change the industry to "foreign trade", and change the customer level to "VIP customer", as shown in Figure 18-20.
After clicking the "save modification" button in Figure 18-20, if the program is executed correctly, a prompt box "customer information is updated successfully" will appear. After confirmation, it will return to the customer management list page, and the information in the page is as shown in Figure 18-21.
As can be seen from figure 18-21, the modified information of customer No. 14 has been displayed in the list, which indicates that the modified customer function of the system has been successfully implemented.
5.4 delete customer
Deleting a customer is the last function in the customer management module. After clicking a delete link in the operation column of the customer information list, a delete confirmation box will pop up, as shown in Figure 18-22.
Click OK to delete the customer. Next, this section will explain the implementation of deleting customer function in detail. The specific steps are as follows.
1 realize page function code
On the page, the implementation code for deleting the customer link is shown below.
<a href="#"Class =" BTN BTN danger BTN XS "onclick =" deletecustomer (${row. Cust [ID}) "" > delete</a>In the above code, when you click delete, the deleteCustomer() method in the onclick property will be executed, and the parameter ${row.cust_id} in the method will get the customer ID of the current row. On the page, write the method deletecustomer () to delete the customer, and the method code is as follows.
    // Delete customer
    function deleteCustomer(id) {
        if(confirm('Are you sure you want to delete this customer?')) {
    $.post("<%=basePath%>customer/delete.action",{"id":id},
    function(data){
                if(data =="OK"){
                    alert("Customer deleted successfully!");
                    window.location.reload();
                }else{
                    alert("Failed to delete customer!");
                    window.location.reload();
                }
            });
        }
    }
When the above method is executed, a request ending with "/ delete.action" will be sent through jQuery Ajax, which will pass the customer id to be deleted into the background processing method.
2 implementation of Controller layer
In the CustomerController class, create a method customerDelete() to delete customers, and the edited implementation code is as follows.
    /**
     * Delete customer
     *
     * @param id
     * @return
     */
    @RequestMapping("/customer/delete")
    @ResponseBody
    public String deleteCustomerById(Long id) {
        int rows = this.customerService.deleteCustomerById(id);
        if(rows >0) {
            return "ok";
        }else {
            return "FAIL";
        }
    }
The customerDelete() method does not perform too many operations. Instead, it calls the deleteCustomer() method in the Service layer to get the number of affected rows in the database. If its value is greater than 0, it means the deletion is successful. Otherwise, it means the deletion fails.
3 implementation of Service layer method
(1) Create interface methods. In CustomerService, write a method to delete the customer, as shown below.
int deleteCustomerById(Long id);
(2) Create implementation class methods. In CustomerServiceImpl, the deletion method in the interface is implemented. The edited code is as follows. [illustration]
    @Override
    public int deleteCustomerById(Long id) {
        return customerDao.deleteCustomerById(id);
    }
4 implementation of DAO layer
(1) Create interface methods. In the CustomerDao interface, write a method to delete the customer by id, as shown below.
int deleteCustomerById(Long id);
(2) Create a mapping statement. Write a mapping statement in CustomerDao.xml to perform the delete operation, as shown below.
    <!-- according to id Delete customer -->
    <delete id="deleteCustomerById" parameterType="Long">
        DELETE FROM
        customer WHERE cust_id = #{id}
    </delete>
5 delete customer test
At this point, the implementation code to delete the customer function has been written. Take the deletion of customer "Xiaozhang" with No. 14 as an example to test the deletion function of the system.
Click the "delete" link of the line with No. 14 customer, and the deletion confirmation box will pop up. Click the "OK" button, and a prompt box will pop up, as shown in Figure 18-23. After confirmation, the system will refresh the current page. The data displayed in the customer information list on the page is shown in Figure 18-24. As can be seen from figure 18-24, after the deletion, the customer "Xiaozhang" No. 14 is not displayed in the customer information list, which indicates that the deletion is successful.