A pre knowledge point
####1.1 environmental preparation
Server requirements
• recommended minimum hardware configuration: 2-core CPU, 2G memory, 30G hard disk
software environment
| Software | edition |
|---|---|
| operating system | CentOS7.x_x64 |
| Container engine | Docker CE 19 |
| Kubernetes | Kubernetes v1.20 |
Overall server planning
| role | IP | assembly |
|---|---|---|
| k8s-matser1 | 172.21.51.71 | kube-apiserver,kube-controller-manager,kube-scheduler,kubelet,kube-proxy,docker,etcd,nginx,keepalived |
| k8s-master2 | 172.21.51.74 | kube-apiserver,kube-controller-manager,kube-scheduler,kubelet,kube-porxy,docker,nginx,Keepalived |
| k8s-node1 | 172.21.51.72 | kubelet,kubeproxy,docker,etcd |
| k8s-node2 | 172.31.51.73 | kubelet,kube-porxy,docker,etcd |
| Load Balancer | 172.21.51.88(VIP) | |
| etcd cluster and load balancing can also be separated separately |
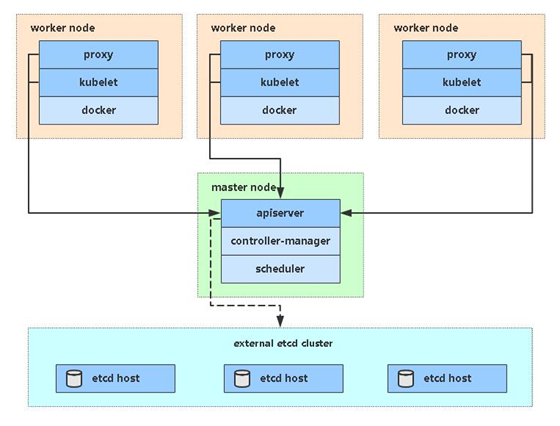
Single master architecture diagram
Single master server planning
| role | IP | assembly |
|---|---|---|
| k8s-master | 172.21.51.71 | kube-apiserver,kube-controller-manager,kube-scheduler,etcd,docker |
| k8s-node1 | 172.21.51.72 | kubelet,kube-proxy,docker,etcd |
| k8s-node2 | 172.21.51.73 | kubelet,kube-proxy,docker,etcd |
1.2 operating system initialization configuration
# Turn off firewall
systemctl stop firewalld
systemctl disable firewalld

# Close selinux
sed -i 's/enforcing/disabled/' /etc/selinux/config  # permanent
setenforce 0  # temporary

# Close swap
swapoff -a  # temporary
sed -ri 's/.*swap.*/#&/' /etc/fstab    # permanent

# Set the host name according to the plan
hostnamectl set-hostname <hostname>

# Add hosts in master
cat >> /etc/hosts << EOF
172.21.51.71 k8s-master1
172.21.51.72 k8s-node1
172.21.51.73 k8s-node2
EOF

# Deliver bridged IPV4 traffic to iptables chain
cat > /etc/sysctl.d/k8s.conf << EOF
net.bridge.bridge-nf-call-ip6tables = 1
net.bridge.bridge-nf-call-iptables = 1
EOF
sysctl --system  # take effect


# Configure yum source
cd /etc/yum.repos.d/   && mkdir backup_$(date +%F)
mv ./*.repo  backup_
wget -O /etc/yum.repos.d/CentOS-Base.repo https://mirrors.aliyun.com/repo/Centos-7.repo
wget -O /etc/yum.repos.d/epel.repo http://mirrors.aliyun.com/repo/epel-7.repo
yum makecache && cd

# Common installation
yum install -y ntpdate vim wget tree httpd-tools  lrzsz  net-tools bridge-utils  unzip telnet

# time synchronization
ntpdate time.windows.com

# Shut down the networkmanager service
systemctl enable NetworkManager
systemctl stop  NetworkManager
###II. Deploy ETCD cluster
Etcd is a distributed key value storage system. kubernetes uses etcd for data storage, so an etcd database is prepared. In order to solve the single point of failure of etcd, cluster deployment should be adopted. The number of tolerable machine failures is equal to the total number divided by two minus one.
| Node name | IP |
|---|---|
| etcd-1 | 172.21.51.71 |
| etcd-2 | 172.21.51.72 |
| etcd-3 | 172.21.51.73 |
In order to save machines, it is reused with k8s node machines. It can also be deployed independently of the k8s cluster, as long as the apiserver can connect to it.
2.1 prepare cfssl certificate generation tool
cfssl is an open source certificate management tool. It uses JSON files to generate certificates, which is more convenient to use than openssl.
In any service operation, the master node deployment is used here.
wget https://pkg.cfssl.org/R1.2/cfssl_linux-amd64
wget https://pkg.cfssl.org/R1.2/cfssljson_linux-amd64
wget https://pkg.cfssl.org/R1.2/cfssl-certinfo_linux-amd64
chmod +x cfssl_linux-amd64 cfssljson_linux-amd64 cfssl-certinfo_linux-amd64
mv cfssl_linux-amd64 /usr/local/bin/cfssl
mv cfssljson_linux-amd64 /usr/local/bin/cfssljson
mv cfssl-certinfo_linux-amd64 /usr/bin/cfssl-certinfo
2.2 generate ETCD certificate
1. Self signed certification authority (CA)
# prepare directory
mkdir -p ~/TLS/{etcd,k8s}
cd ~/TLS/etcd
Self signed CA
cat > ca-config.json << EOF
{
  "signing": {
    "default": {
      "expiry": "87600h"
    },
    "profiles": {
      "www": {
         "expiry": "87600h",
         "usages": [
            "signing",
            "key encipherment",
            "server auth",
            "client auth"
        ]
      }
    }
  }
}
EOF
cat > ca-csr.json << EOF
{
    "CN": "etcd CA",
    "key": {
        "algo": "rsa",
        "size": 2048
    },
    "names": [
        {
            "C": "CN",
            "L": "Beijing",
            "ST": "Beijing"
        }
    ]
}
EOF
Generate certificate
cfssl gencert -initca ca-csr.json | cfssljson -bare ca -

# As follows: ca.pem and ca-key.pem files will be generated
[root@k8s-master1 etcd]# ll
total 8
-rw-r--r--. 1 root root 287 Aug 14 14:12 ca-config.json
-rw-r--r--. 1 root root 209 Aug 14 14:13 ca-csr.json
[root@k8s-master1 etcd]# cfssl gencert -initca ca-csr.json | cfssljson -bare ca -
2021/08/14 14:13:17 [INFO] generating a new CA key and certificate from CSR
2021/08/14 14:13:17 [INFO] generate received request
2021/08/14 14:13:17 [INFO] received CSR
2021/08/14 14:13:17 [INFO] generating key: rsa-2048
2021/08/14 14:13:17 [INFO] encoded CSR
2021/08/14 14:13:17 [INFO] signed certificate with serial number 13042066667921354585937734212236512385297354843
[root@k8s-master1 etcd]# ls
ca-config.json  ca.csr  ca-csr.json  ca-key.pem  ca.pem
2. Issue ETCD HTTPS certificate with self signed ca*
Create certificate request file
cat > server-csr.json << EOF
{
    "CN": "etcd",
    "hosts": [
    "172.21.51.71",
    "172.21.51.72",
    "172.21.51.73",
    "172.21.51.81",
    "172.21.51.82",
    "172.21.51.83"
    ],
    "key": {
        "algo": "rsa",
        "size": 2048
    },
    "names": [
        {
            "C": "CN",
            "L": "BeiJing",
            "ST": "BeiJing"
        }
    ]
}
EOF
Note: the IP in the hosts field of the above file is the internal communication IP of the cluster of all etcd nodes, which can only be more but not less. In order to facilitate later capacity expansion, you can write more reserved IP.
Generate certificate
cfssl gencert -ca=ca.pem -ca-key=ca-key.pem -config=ca-config.json -profile=www server-csr.json | cfssljson -bare server

# The prompt is as follows: the server.pem and server-key.pem files will be generated
[root@k8s-master1 etcd]# cfssl gencert -ca=ca.pem -ca-key=ca-key.pem -config=ca-config.json -profile=www server-csr.json | cfssljson -bare server
2021/08/14 14:31:33 [INFO] generate received request
2021/08/14 14:31:33 [INFO] received CSR
2021/08/14 14:31:33 [INFO] generating key: rsa-2048
2021/08/14 14:31:33 [INFO] encoded CSR
2021/08/14 14:31:33 [INFO] signed certificate with serial number 463187719751335716138642349093857998280805876080
2021/08/14 14:31:33 [WARNING] This certificate lacks a "hosts" field. This makes it unsuitable for
websites. For more information see the Baseline Requirements for the Issuance and Management
of Publicly-Trusted Certificates, v.1.1.6, from the CA/Browser Forum (https://cabforum.org);
specifically, section 10.2.3 ("Information Requirements").
[root@k8s-master1 etcd]# echo $?
0
[root@k8s-master1 etcd]# ls
ca-config.json  ca.csr  ca-csr.json  ca-key.pem  ca.pem  server.csr  server-csr.json  server-key.pem  server.pem
2.3 downloading binaries from GitHub
Download address: https://github.com/etcd-io/etcd/releases/download/v3.4.9/etcd-v3.4.9-linux-amd64.tar.gz
2.4 deploying etcd clusters
The following operations are performed on node 1. To simplify the operation, all files generated by node 1 will be copied to node 2 and node 3 later
1. Create the mount directory and unzip the binary package
cd /opt/
mkdir -p /opt/etcd/{bin,cfg,ssl} -p
wget https://github.com/etcd-io/etcd/releases/download/v3.4.9/etcd-v3.4.9-linux-amd64.tar.gz
tar zxvf etcd-v3.4.9-linux-amd64.tar.gz
mv etcd-v3.4.9-linux-amd64/{etcd,etcdctl} /opt/etcd/bin/
2. Create etcd configuration file
cat > /opt/etcd/cfg/etcd.conf << EOF
#[Member]
ETCD_NAME="etcd-1"
ETCD_DATA_DIR="/var/lib/etcd/default.etcd"
ETCD_LISTEN_PEER_URLS="https://172.21.51.71:2380"
ETCD_LISTEN_CLIENT_URLS="https://172.21.51.71:2379"

#[Clustering]
ETCD_INITIAL_ADVERTISE_PEER_URLS="https://172.21.51.71:2380"
ETCD_ADVERTISE_CLIENT_URLS="https://172.21.51.71:2379"
ETCD_INITIAL_CLUSTER="etcd-1=https://172.21.51.71:2380,etcd-2=https://172.21.51.72:2380,etcd-3=https://172.21.51.73:2380"
ETCD_INITIAL_CLUSTER_TOKEN="etcd-cluster"
ETCD_INITIAL_CLUSTER_STATE="new"
EOF


Parameter interpretation:
ETCD_NAME= Node name, which must be unique in the cluster
ETCD_DATA_DIR= Data directory
ETCD_LISTEN_PEER_URLS= Cluster communication listening address
ETCD_LISTEN_CLIENT_URLS= Client access listening address

ETCD_INITIAL_ADVERTISE_PEER_URLS= Cluster pass through address
ETCD_ADVERTISE_CLIENT_URLS= Client through address
ETCD_INITIAL_CLUSTER= Address of each node in the cluster
ETCD_INITIAL_CLUSTER_TOKEN= colony token
ETCD_INITIAL_CLUSTER_STATE= The current status of joining the cluster, new It's a new machine, existing Indicates joining an existing cluster
3.systemd management etcd
cat > /usr/lib/systemd/system/etcd.service << EOF
[Unit]
Description=Etcd Server
After=network.target
After=network-online.target
Wants=network-online.target

[Service]
Type=notify
EnvironmentFile=/opt/etcd/cfg/etcd.conf
ExecStart=/opt/etcd/bin/etcd \
--cert-file=/opt/etcd/ssl/server.pem \
--key-file=/opt/etcd/ssl/server-key.pem \
--peer-cert-file=/opt/etcd/ssl/server.pem \
--peer-key-file=/opt/etcd/ssl/server-key.pem \
--trusted-ca-file=/opt/etcd/ssl/ca.pem \
--peer-trusted-ca-file=/opt/etcd/ssl/ca.pem \
--logger=zap
Restart=on-failure
LimitNOFILE=65536

[Install]
WantedBy=multi-user.target
EOF
4. Copy the certificate just generated
Copy the generated certificate to the path in the configuration file:
cp ~/TLS/etcd/ca*pem ~/TLS/etcd/server*pem /opt/etcd/ssl/
5. Copy all files generated by the above node 1 to node 2 and node 3
scp -r /opt/etcd/ root@172.21.51.72:/opt/
scp /usr/lib/systemd/system/etcd.service root@172.21.51.72:/usr/lib/systemd/system/
scp -r /opt/etcd/ root@172.21.51.73:/opt/
scp /usr/lib/systemd/system/etcd.service root@172.21.51.73:/usr/lib/systemd/system/
Then modify the node name and the current server ip in the etcd.conf configuration file on node 2 and node 3, respectively
vi /opt/etcd/cfg/etcd.conf
#[Member]
ETCD_NAME="etcd-2"   # Modify here to change node 2 to etcd-2 and node 3 to etcd-3
ETCD_DATA_DIR="/var/lib/etcd/default.etcd"
ETCD_LISTEN_PEER_URLS="https://172.21.51.72:2380 "# modify the IP address of the current server
ETCD_LISTEN_CLIENT_URLS="https://172.21.51.72:2379 "# modify the IP address of the current server

#[Clustering]
ETCD_INITIAL_ADVERTISE_PEER_URLS="https://172.21.51.72:2380 "# modify the IP address of the current server
ETCD_ADVERTISE_CLIENT_URLS="https://172.21.51.72:2379 "# modify the IP address of the current server
ETCD_INITIAL_CLUSTER="etcd-1=https://172.21.51.71:2380,etcd-2=https://172.21.51.72:2380,etcd-3=https://172.21.51.73:2380"
ETCD_INITIAL_CLUSTER_TOKEN="etcd-cluster"
ETCD_INITIAL_CLUSTER_STATE="new"
6. Finally, start etcd and set startup
systemctl daemon-reload
systemctl start etcd
systemctl enable etcd
systemctl status etcd
 View startup log
journalctl -fu etcd
7. View cluster status
ETCDCTL_API=3 /opt/etcd/bin/etcdctl --cacert=/opt/etcd/ssl/ca.pem --cert=/opt/etcd/ssl/server.pem --key=/opt/etcd/ssl/server-key.pem --endpoints="https://172.21.51.71:2379,https://172.21.51.72:2379,https://172.21.51.73:2379" endpoint health --write-out=table

[root@k8s-master1 ~]# ETCDCTL=3 /opt/etcd/bin/etcdctl --cacert=/opt/etcd/ssl/ca.pem --cert=/opt/etcd/ssl/server.pem --key=/opt/etcd/ssl/server-key.pem --endpoints="https://172.21.51.71:2379,https://172.21.51.72:2379,https://172.21.51.73:2379" endpoint health --write-out=table
+---------------------------+--------+-------------+-------+
|         ENDPOINT          | HEALTH |    TOOK     | ERROR |
+---------------------------+--------+-------------+-------+
| https://172.21.51.71:2379 |   true |  8.964636ms |       |
| https://172.21.51.72:2379 |   true | 10.973473ms |       |
| https://172.21.51.73:2379 |   true | 11.852294ms |       |
+---------------------------+--------+-------------+-------+

If the above information is output, the cluster deployment is successful.
If there is a problem, the first step is to look at the log:/var/log/message or journalctl -u etcd
III. installing docker
Here, Docker is used as the container engine, or it can be replaced with another one, such as containerd
Download address: https://download.docker.com/linux/static/stable/x86_64/docker-19.03.9.tgz
The following operations are performed on all nodes. Binary installation is adopted here, and so is yum installation.
3.1 decompressing binary packages
wget https://download.docker.com/linux/static/stable/x86_64/docker-19.03.9.tgz
tar zxvf docker-19.03.9.tgz
mv docker/* /usr/bin
3.2 systemd management docker
cat > /usr/lib/systemd/system/docker.service << EOF
[Unit]
Description=Docker Application Container Engine
Documentation=https://docs.docker.com
After=network-online.target firewalld.service
Wants=network-online.target

[Service]
Type=notify
ExecStart=/usr/bin/dockerd
ExecReload=/bin/kill -s HUP $MAINPID
LimitNOFILE=infinity
LimitNPROC=infinity
LimitCORE=infinity
TimeoutStartSec=0
Delegate=yes
KillMode=process
Restart=on-failure
StartLimitBurst=3
StartLimitInterval=60s

[Install]
WantedBy=multi-user.target
EOF
3.3 create docker configuration file
mkdir /etc/docker
cat > /etc/docker/daemon.json << EOF
{
  "registry-mirrors": ["https://b9pmyelo.mirror.aliyuncs.com"]
}
EOF

# Registry mirrors Alibaba cloud image accelerator
3.4 start and set startup
systemctl daemon-reload
systemctl start docker
systemctl enable docker
4, Deploy master node
4.1 generate Kube apiserver certificate
1. Self signed certification authority (ca)
cd ~/TLS/k8s
cat > ca-config.json << EOF
{
  "signing": {
    "default": {
      "expiry": "87600h"
    },
    "profiles": {
      "kubernetes": {
         "expiry": "87600h",
         "usages": [
            "signing",
            "key encipherment",
            "server auth",
            "client auth"
        ]
      }
    }
  }
}
EOF
cat > ca-csr.json << EOF
{
    "CN": "kubernetes",
    "key": {
        "algo": "rsa",
        "size": 2048
    },
    "names": [
        {
            "C": "CN",
            "L": "Beijing",
            "ST": "Beijing",
            "O": "k8s",
            "OU": "System"
        }
    ]
}
EOF
Generate certificate
cfssl gencert -initca ca-csr.json | cfssljson -bare ca -

[root@k8s-master1 k8s]# cfssl gencert -initca ca-csr.json | cfssljson -bare ca -
2021/08/14 23:48:47 [INFO] generating a new CA key and certificate from CSR
2021/08/14 23:48:47 [INFO] generate received request
2021/08/14 23:48:47 [INFO] received CSR
2021/08/14 23:48:47 [INFO] generating key: rsa-2048
2021/08/14 23:48:47 [INFO] encoded CSR
2021/08/14 23:48:47 [INFO] signed certificate with serial number 429434885767963696370191351654043895485854229933

Will generate ca.pem and ca-key.pem file
[root@k8s-master1 k8s]# ls
ca-config.json  ca.csr  ca-csr.json  ca-key.pem  ca.pem
2. Issue Kube apiserver HTTPS certificate with self signed ca
Create certificate request file
cat > server-csr.json << EOF
{
    "CN": "kubernetes",
    "hosts": [
      "10.0.0.1",
      "127.0.0.1",
      "172.21.51.71",
      "172.21.51.72",
      "172.21.51.73",
      "172.21.51.74",
      "172.21.51.81",
      "172.21.51.82",
      "172.21.51.83",
      "172.21.51.84",
      "172.21.51.85",
      "172.21.51.88",
      "kubernetes",
      "kubernetes.default",
      "kubernetes.default.svc",
      "kubernetes.default.svc.cluster",
      "kubernetes.default.svc.cluster.local"
    ],
    "key": {
        "algo": "rsa",
        "size": 2048
    },
    "names": [
        {
            "C": "CN",
            "L": "BeiJing",
            "ST": "BeiJing",
            "O": "k8s",
            "OU": "System"
        }
    ]
}
EOF
Note: the IP addresses in the hosts field of the above file are all Master/LB/VIP IP addresses, and none can be less! In order to facilitate the later expansion, you can write more reserved IP addresses.
Generate certificate
cfssl gencert -ca=ca.pem -ca-key=ca-key.pem -config=ca-config.json -profile=kubernetes server-csr.json | cfssljson -bare server
4.2 download binaries from GitHub
https://github.com/kubernetes/kubernetes/blob/master/CHANGELOG/CHANGELOG-1.20.md
Note: open the link and you will find that there are many packages in it. Downloading a server package is enough, including Master and Worker Node binaries.
wget https://dl.k8s.io/v1.20.9/kubernetes-server-linux-amd64.tar.gz
####4.3 decompressing binary packages
mkdir -p /opt/kubernetes/{bin,cfg,ssl,logs}
tar xzf kubernetes-server-linux-amd64.tar.gz
cd kubernetes/server/bin
cp kube-apiserver kube-scheduler kube-controller-manager /opt/kubernetes/bin
cp kubectl /usr/bin/
####4.4 deploy Kube apiserver
1. Create a profile
cat > /opt/kubernetes/cfg/kube-apiserver.conf << EOF
KUBE_APISERVER_OPTS="--logtostderr=false \\
--v=2 \\
--log-dir=/opt/kubernetes/logs \\
--etcd-servers=https://172.21.51.71:2379,https://172.21.51.72:2379,https://172.21.51.73:2379 \\
--bind-address=172.21.51.71 \\
--secure-port=6443 \\
--advertise-address=172.21.51.71 \\
--allow-privileged=true \\
--service-cluster-ip-range=10.0.0.0/24 \\
--enable-admission-plugins=NamespaceLifecycle,LimitRanger,ServiceAccount,ResourceQuota,NodeRestriction \\
--authorization-mode=RBAC,Node \\
--enable-bootstrap-token-auth=true \\
--token-auth-file=/opt/kubernetes/cfg/token.csv \\
--service-node-port-range=30000-32767 \\
--kubelet-client-certificate=/opt/kubernetes/ssl/server.pem \\
--kubelet-client-key=/opt/kubernetes/ssl/server-key.pem \\
--tls-cert-file=/opt/kubernetes/ssl/server.pem  \\
--tls-private-key-file=/opt/kubernetes/ssl/server-key.pem \\
--client-ca-file=/opt/kubernetes/ssl/ca.pem \\
--service-account-key-file=/opt/kubernetes/ssl/ca-key.pem \\
--service-account-issuer=api \\
--service-account-signing-key-file=/opt/kubernetes/ssl/server-key.pem \\
--etcd-cafile=/opt/etcd/ssl/ca.pem \\
--etcd-certfile=/opt/etcd/ssl/server.pem \\
--etcd-keyfile=/opt/etcd/ssl/server-key.pem \\
--requestheader-client-ca-file=/opt/kubernetes/ssl/ca.pem \\
--proxy-client-cert-file=/opt/kubernetes/ssl/server.pem \\
--proxy-client-key-file=/opt/kubernetes/ssl/server-key.pem \\
--requestheader-allowed-names=kubernetes \\
--requestheader-extra-headers-prefix=X-Remote-Extra- \\
--requestheader-group-headers=X-Remote-Group \\
--requestheader-username-headers=X-Remote-User \\
--enable-aggregator-routing=true \\
--audit-log-maxage=30 \\
--audit-log-maxbackup=3 \\
--audit-log-maxsize=100 \\
--audit-log-path=/opt/kubernetes/logs/k8s-audit.log"
EOF
Note: the above two backslashes \ \ the first is the escape character and the second is the line break character. The escape character is used to preserve the line break character using EOF.
• -- logtostderr: enable logging
• - v: log level, 0-8
• -- log dir: log directory
• -- etcd servers: etcd cluster address
• -- bind address: listening address
• -- secure port: https secure port
• -- advertisement address: cluster advertisement address
• -- allow privileged: enable authorization
• -- Service cluster IP range: Service virtual IP address segment
• -- enable admission plugins: admission control module
• -- authorization mode: authentication and authorization, enabling RBAC authorization and node self-management
• -- enable bootstrap token auth: enables the TLS bootstrap mechanism
• -- token auth file: bootstrap token file
• -- service node port range: default port range of Service nodeport type
• -- kubelet client XXX: apiserver access kubelet client certificate
• -- TLS XXX file: apiserver https certificate
• parameters that must be added in version 1.20: – service account issuer, – service account signing key file
• -- Etcd xxfile: Certificate for connecting Etcd cluster
• -- audit log XXX: audit log
• start the aggregation layer configuration: – requestheader client CA file, – proxy client cert file, – proxy client key file, – requestheader allowed names, – requestheader extra headers prefix, – requestheader group headers, – requestheader username headers, – enable aggregator routing
For more parameters, please refer to the official website: https://kubernetes.io/docs/reference/command-line-tools-reference/kube-apiserver/
2. Copy the certificate just generated
Copy the generated certificate to the path in the configuration file:
cp ~/TLS/k8s/ca*pem ~/TLS/k8s/server*pem /opt/kubernetes/ssl/
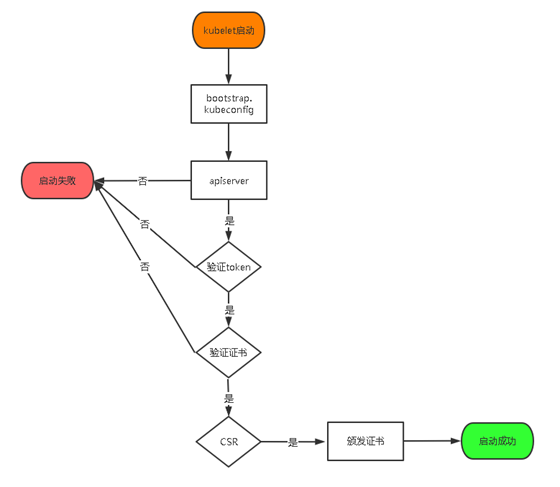
3. Enable TLS Bootstrapping mechanism
TLS bootstrapping: after the Master apiserver enables TLS authentication, Node nodes kubelet and Kube proxy must use valid certificates issued by CA to communicate with Kube apiserver. When there are many Node nodes, this kind of client certificate issuance requires a lot of work, which will also increase the complexity of cluster expansion. In order to simplify the process, Kubernetes introduces TLS bootstrapping mechanism to automatically issue client certificates. Kubelet will automatically apply for certificates from apiserver as a low authority user, and kubelet's certificates are dynamically signed by apiserver. Therefore, it is strongly recommended to use this method on the Node. At present, it is mainly used for kubelet. Kube proxy is still issued by us.
Create the token file in the above configuration file
#
[root@k8s-master1 ~]# head -c 16 /dev/urandom | od -An -t x | tr -d ' '
b3b4dba5e64a204dc03479e03ecf1588


cat > /opt/kubernetes/cfg/token.csv << EOF
b3b4dba5e64a204dc03479e03ecf1588,kubelet-bootstrap,10001,"system:node-bootstrapper"
EOF

Format: token,user name, UID,User group
token You can also generate your own replacement:
head -c 16 /dev/urandom | od -An -t x | tr -d ' '

Command comments:
head Displays the beginning of the file
-c, --bytes=[-]NUM       Before display NUM Byte; If NUM Before"-",It will print except at the end of the file NUM Other than bytes.

od Bytes encoded in octal, hexadecimal and other formats of the output file
-A: <Code base>: Select the radix to calculate the word code;
-t<Output format>or--format=<Output format>: Set the output format;

tr
 Replace, compress and delete characters
-d Or—— delete: Delete all characters belonging to the first character set;
4.systemd management apiserver
cat > /usr/lib/systemd/system/kube-apiserver.service << EOF
[Unit]
Description=Kubernetes API Server
Documentation=https://github.com/kubernetes/kubernetes

[Service]
EnvironmentFile=/opt/kubernetes/cfg/kube-apiserver.conf
ExecStart=/opt/kubernetes/bin/kube-apiserver \$KUBE_APISERVER_OPTS
Restart=on-failure

[Install]
WantedBy=multi-user.target
EOF
5. Start and set startup
systemctl daemon-reload
systemctl start kube-apiserver
systemctl enable kube-apiserver
4.5 deploy Kube Controller Manager
1. Create a profile
cat > /opt/kubernetes/cfg/kube-controller-manager.conf << EOF
KUBE_CONTROLLER_MANAGER_OPTS="--logtostderr=false \\
--v=2 \\
--log-dir=/opt/kubernetes/logs \\
--leader-elect=true \\
--kubeconfig=/opt/kubernetes/cfg/kube-controller-manager.kubeconfig \\
--bind-address=127.0.0.1 \\
--allocate-node-cidrs=true \\
--cluster-cidr=10.244.0.0/16 \\
--service-cluster-ip-range=10.0.0.0/24 \\
--cluster-signing-cert-file=/opt/kubernetes/ssl/ca.pem \\
--cluster-signing-key-file=/opt/kubernetes/ssl/ca-key.pem  \\
--root-ca-file=/opt/kubernetes/ssl/ca.pem \\
--service-account-private-key-file=/opt/kubernetes/ssl/ca-key.pem \\
--cluster-signing-duration=87600h0m0s"
EOF
• -- kubeconfig: connect to apiserver configuration file
• -- leader select: when the component starts multiple, automatic election (HA)
• -- cluster signing cert file / – cluster signing key file: the CA that automatically issues certificates for kubelet, which is consistent with apiserver
2. Generate kubeconfig file
Switch working directory
cd ~/TLS/k8s
Create certificate request file
cat > kube-controller-manager-csr.json << EOF
{
  "CN": "system:kube-controller-manager",
  "hosts": [],
  "key": {
    "algo": "rsa",
    "size": 2048
  },
  "names": [
    {
      "C": "CN",
      "L": "BeiJing",
      "ST": "BeiJing",
      "O": "system:masters",
      "OU": "System"
    }
  ]
}
EOF
Generate certificate
cfssl gencert -ca=ca.pem -ca-key=ca-key.pem -config=ca-config.json -profile=kubernetes kube-controller-manager-csr.json | cfssljson -bare kube-controller-manager
Generate kubeconfig file (the following are shell commands, which are executed directly on the terminal):
KUBE_CONFIG="/opt/kubernetes/cfg/kube-controller-manager.kubeconfig"
KUBE_APISERVER="https://172.21.51.71:6443"

kubectl config set-cluster kubernetes \
  --certificate-authority=/opt/kubernetes/ssl/ca.pem \
  --embed-certs=true \
  --server=${KUBE_APISERVER} \
  --kubeconfig=${KUBE_CONFIG}
kubectl config set-credentials kube-controller-manager \
  --client-certificate=./kube-controller-manager.pem \
  --client-key=./kube-controller-manager-key.pem \
  --embed-certs=true \
  --kubeconfig=${KUBE_CONFIG}
kubectl config set-context default \
  --cluster=kubernetes \
  --user=kube-controller-manager \
  --kubeconfig=${KUBE_CONFIG}
kubectl config use-context default --kubeconfig=${KUBE_CONFIG}
3. systemd Controller Manager
cat > /usr/lib/systemd/system/kube-controller-manager.service << EOF
[Unit]
Description=Kubernetes Controller Manager
Documentation=https://github.com/kubernetes/kubernetes

[Service]
EnvironmentFile=/opt/kubernetes/cfg/kube-controller-manager.conf
ExecStart=/opt/kubernetes/bin/kube-controller-manager \$KUBE_CONTROLLER_MANAGER_OPTS
Restart=on-failure

[Install]
WantedBy=multi-user.target
EOF
4. Start and set startup
systemctl daemon-reload
systemctl start kube-controller-manager
systemctl enable kube-controller-manager
####4.6 deploy Kube scheduler
1. Create a profile
cat > /opt/kubernetes/cfg/kube-scheduler.conf << EOF
KUBE_SCHEDULER_OPTS="--logtostderr=false \\
--v=2 \\
--log-dir=/opt/kubernetes/logs \\
--leader-elect \\
--kubeconfig=/opt/kubernetes/cfg/kube-scheduler.kubeconfig \\
--bind-address=127.0.0.1"
EOF
– kubeconfig: connect to apiserver configuration file
– leader select: when the component starts multiple, automatic election (HA)
2. Generate kubeconfig file
Generate Kube scheduler certificate
Switch directory
cd ~/TLS/k8s
Create certificate request file
cat > kube-scheduler-csr.json << EOF
{
  "CN": "system:kube-scheduler",
  "hosts": [],
  "key": {
    "algo": "rsa",
    "size": 2048
  },
  "names": [
    {
      "C": "CN",
      "L": "BeiJing",
      "ST": "BeiJing",
      "O": "system:masters",
      "OU": "System"
    }
  ]
}
EOF
Generate certificate file
cfssl gencert -ca=ca.pem -ca-key=ca-key.pem -config=ca-config.json -profile=kubernetes kube-scheduler-csr.json | cfssljson -bare kube-scheduler
Generate kubeconfig file
KUBE_CONFIG="/opt/kubernetes/cfg/kube-scheduler.kubeconfig"
KUBE_APISERVER="https://172.21.51.71:6443"

kubectl config set-cluster kubernetes \
  --certificate-authority=/opt/kubernetes/ssl/ca.pem \
  --embed-certs=true \
  --server=${KUBE_APISERVER} \
  --kubeconfig=${KUBE_CONFIG}
kubectl config set-credentials kube-scheduler \
  --client-certificate=./kube-scheduler.pem \
  --client-key=./kube-scheduler-key.pem \
  --embed-certs=true \
  --kubeconfig=${KUBE_CONFIG}
kubectl config set-context default \
  --cluster=kubernetes \
  --user=kube-scheduler \
  --kubeconfig=${KUBE_CONFIG}
kubectl config use-context default --kubeconfig=${KUBE_CONFIG}
3.systemctl management scheduler
cat > /usr/lib/systemd/system/kube-scheduler.service << EOF
[Unit]
Description=Kubernetes Scheduler
Documentation=https://github.com/kubernetes/kubernetes

[Service]
EnvironmentFile=/opt/kubernetes/cfg/kube-scheduler.conf
ExecStart=/opt/kubernetes/bin/kube-scheduler \$KUBE_SCHEDULER_OPTS
Restart=on-failure

[Install]
WantedBy=multi-user.target
EOF
4. Start and set startup
systemctl daemon-reload
systemctl start kube-scheduler
systemctl enable kube-scheduler
5. View cluster status
Generate kubectl connection cluster certificate
cat > admin-csr.json <<EOF
{
  "CN": "admin",
  "hosts": [],
  "key": {
    "algo": "rsa",
    "size": 2048
  },
  "names": [
    {
      "C": "CN",
      "L": "BeiJing",
      "ST": "BeiJing",
      "O": "system:masters",
      "OU": "System"
    }
  ]
}
EOF

cfssl gencert -ca=ca.pem -ca-key=ca-key.pem -config=ca-config.json -profile=kubernetes admin-csr.json | cfssljson -bare admin
Generate kubeconfig file
mkdir /root/.kube

KUBE_CONFIG="/root/.kube/config"
KUBE_APISERVER="https://172.21.51.71:6443"

kubectl config set-cluster kubernetes \
  --certificate-authority=/opt/kubernetes/ssl/ca.pem \
  --embed-certs=true \
  --server=${KUBE_APISERVER} \
  --kubeconfig=${KUBE_CONFIG}
kubectl config set-credentials cluster-admin \
  --client-certificate=./admin.pem \
  --client-key=./admin-key.pem \
  --embed-certs=true \
  --kubeconfig=${KUBE_CONFIG}
kubectl config set-context default \
  --cluster=kubernetes \
  --user=cluster-admin \
  --kubeconfig=${KUBE_CONFIG}
kubectl config use-context default --kubeconfig=${KUBE_CONFIG}
View the current cluster component status through kubectl tool
[root@k8s-master1 k8s]# kubectl get cs
Warning: v1 ComponentStatus is deprecated in v1.19+
NAME                 STATUS    MESSAGE             ERROR
scheduler            Healthy   ok
controller-manager   Healthy   ok
etcd-2               Healthy   {"health":"true"}
etcd-1               Healthy   {"health":"true"}
etcd-0               Healthy   {"health":"true"}
The above output indicates that the master node component is running normally.
6. Authorize kubelet bootstrap users to request certificates
kubectl create clusterrolebinding kubelet-bootstrap \
--clusterrole=system:node-bootstrapper \
--user=kubelet-bootstrap
V. deploy worker nodes
The following operation is performed on the master node, that is, the master node and the slave node are reused at the same time
5.1 create working directory and copy binary files
Create a working directory on all worker node s
mkdir -p /opt/kubernetes/{bin,cfg,ssl,logs}
Copy from master node
from master Node copy:
cd /root/kubernetes/server/bin/

cp kubelet kube-proxy /opt/kubernetes/bin   # Local copy
####5.2 deploying kubelet
1. Create a profile
cat > /opt/kubernetes/cfg/kubelet.conf << EOF
KUBELET_OPTS="--logtostderr=false \\
--v=2 \\
--log-dir=/opt/kubernetes/logs \\
--hostname-override=k8s-master1 \\
--network-plugin=cni \\
--kubeconfig=/opt/kubernetes/cfg/kubelet.kubeconfig \\
--bootstrap-kubeconfig=/opt/kubernetes/cfg/bootstrap.kubeconfig \\
--config=/opt/kubernetes/cfg/kubelet-config.yml \\
--cert-dir=/opt/kubernetes/ssl \\
--pod-infra-container-image=lizhenliang/pause-amd64:3.0"
EOF
• -- hostname override: display name, unique in the cluster
• -- Network plugin: enable CNI
• -- kubeconfig: empty path, which will be generated automatically, and later used to connect to apiserver
• -- bootstrap kubeconfig: apply for a certificate from apiserver for the first time
• -- config: configuration parameter file
• -- cert dir: kubelet certificate generation directory
• -- Pod infra container image: manage the image of Pod network container
2. Configuration parameter file
cat > /opt/kubernetes/cfg/kubelet-config.yml << EOF
kind: KubeletConfiguration
apiVersion: kubelet.config.k8s.io/v1beta1
address: 0.0.0.0
port: 10250
readOnlyPort: 10255
cgroupDriver: cgroupfs
clusterDNS:
- 10.0.0.2
clusterDomain: cluster.local
failSwapOn: false
authentication:
  anonymous:
    enabled: false
  webhook:
    cacheTTL: 2m0s
    enabled: true
  x509:
    clientCAFile: /opt/kubernetes/ssl/ca.pem
authorization:
  mode: Webhook
  webhook:
    cacheAuthorizedTTL: 5m0s
    cacheUnauthorizedTTL: 30s
evictionHard:
  imagefs.available: 15%
  memory.available: 100Mi
  nodefs.available: 10%
  nodefs.inodesFree: 5%
maxOpenFiles: 1000000
maxPods: 110
EOF
3. Generate the kubeconfig file for kubelet to join the cluster for the first time
KUBE_CONFIG="/opt/kubernetes/cfg/bootstrap.kubeconfig"
KUBE_APISERVER="https://172.21.51.71:6443" # apiserver IP:PORT
TOKEN="b3b4dba5e64a204dc03479e03ecf1588" # Consistent with token.csv

# Generate kubelet bootstrap kubeconfig configuration file
kubectl config set-cluster kubernetes \
  --certificate-authority=/opt/kubernetes/ssl/ca.pem \
  --embed-certs=true \
  --server=${KUBE_APISERVER} \
  --kubeconfig=${KUBE_CONFIG}
kubectl config set-credentials "kubelet-bootstrap" \
  --token=${TOKEN} \
  --kubeconfig=${KUBE_CONFIG}
kubectl config set-context default \
  --cluster=kubernetes \
  --user="kubelet-bootstrap" \
  --kubeconfig=${KUBE_CONFIG}
kubectl config use-context default --kubeconfig=${KUBE_CONFIG}
4.systemctl management kubelet
cat > /usr/lib/systemd/system/kubelet.service << EOF
[Unit]
Description=Kubernetes Kubelet
After=docker.service

[Service]
EnvironmentFile=/opt/kubernetes/cfg/kubelet.conf
ExecStart=/opt/kubernetes/bin/kubelet \$KUBELET_OPTS
Restart=on-failure
LimitNOFILE=65536

[Install]
WantedBy=multi-user.target
EOF
5. Start and set startup
systemctl daemon-reload
systemctl start kubelet
systemctl enable kubelet
5.3 approve kubelet certificate application and join the cluster
see kubelet Certificate request
[root@k8s-master1 bin]# kubectl get csr
NAME                                                   AGE   SIGNERNAME                                    REQUESTOR           CONDITION
node-csr-CwXx8GWIrGkN6OQeNyA9O08dYQWremUrLYJjH9bKa6k   45s   kubernetes.io/kube-apiserver-client-kubelet   kubelet-bootstrap   Pending

# Approval application
kubectl certificate approve node-csr-CwXx8GWIrGkN6OQeNyA9O08dYQWremUrLYJjH9bKa6k

# View node
[root@k8s-master1 bin]# kubectl get node
NAME          STATUS     ROLES    AGE   VERSION
k8s-master1   NotReady   <none>   13s   v1.20.9
Because the network plug-in has not been deployed, all nodes are not ready, NotReady
5.4 deploy Kube proxy
1. Create a profile
cat > /opt/kubernetes/cfg/kube-proxy.conf << EOF
KUBE_PROXY_OPTS="--logtostderr=false \\
--v=2 \\
--log-dir=/opt/kubernetes/logs \\
--config=/opt/kubernetes/cfg/kube-proxy-config.yml"
EOF
2. Configuration parameter file
cat > /opt/kubernetes/cfg/kube-proxy-config.yml << EOF
kind: KubeProxyConfiguration
apiVersion: kubeproxy.config.k8s.io/v1alpha1
bindAddress: 0.0.0.0
metricsBindAddress: 0.0.0.0:10249
clientConnection:
  kubeconfig: /opt/kubernetes/cfg/kube-proxy.kubeconfig
hostnameOverride: k8s-master1
clusterCIDR: 10.244.0.0/16
EOF
3. Generate kube-proxy.kubeconfig file
# Switch working directory
cd ~/TLS/k8s

# Create certificate request file
cat > kube-proxy-csr.json << EOF
{
  "CN": "system:kube-proxy",
  "hosts": [],
  "key": {
    "algo": "rsa",
    "size": 2048
  },
  "names": [
    {
      "C": "CN",
      "L": "BeiJing",
      "ST": "BeiJing",
      "O": "k8s",
      "OU": "System"
    }
  ]
}
EOF

# Generate certificate
cfssl gencert -ca=ca.pem -ca-key=ca-key.pem -config=ca-config.json -profile=kubernetes kube-proxy-csr.json | cfssljson -bare kube-proxy

generate kubeconfig File:
KUBE_CONFIG="/opt/kubernetes/cfg/kube-proxy.kubeconfig"
KUBE_APISERVER="https://172.21.51.71:6443"

kubectl config set-cluster kubernetes \
  --certificate-authority=/opt/kubernetes/ssl/ca.pem \
  --embed-certs=true \
  --server=${KUBE_APISERVER} \
  --kubeconfig=${KUBE_CONFIG}
kubectl config set-credentials kube-proxy \
  --client-certificate=./kube-proxy.pem \
  --client-key=./kube-proxy-key.pem \
  --embed-certs=true \
  --kubeconfig=${KUBE_CONFIG}
kubectl config set-context default \
  --cluster=kubernetes \
  --user=kube-proxy \
  --kubeconfig=${KUBE_CONFIG}
kubectl config use-context default --kubeconfig=${KUBE_CONFIG}
4.systemd management Kube proxy
cat > /usr/lib/systemd/system/kube-proxy.service << EOF
[Unit]
Description=Kubernetes Proxy
After=network.target

[Service]
EnvironmentFile=/opt/kubernetes/cfg/kube-proxy.conf
ExecStart=/opt/kubernetes/bin/kube-proxy \$KUBE_PROXY_OPTS
Restart=on-failure
LimitNOFILE=65536

[Install]
WantedBy=multi-user.target
EOF
5. Start and set startup
systemctl daemon-reload
systemctl start kube-proxy
systemctl enable kube-proxy
5.5 deployment of network components
calico is a pure three-tier data center network scheme, which is the mainstream network scheme of kubernetes at present
Deploy calico
mkdir -p /home/yaml
cd /home/yaml
wget https://docs.projectcalico.org/manifests/calico.yaml
#Modify YAML:
#After downloading, you need to modify the Pod network (CALICO_IPV4POOL_CIDR) defined in it, which is the same as the cluster CIDR network segment specified in the Kube controller manager configuration file 10.244.0.0/16
sed -i "3685,3686s/# //" calico.yaml
sed -i "3686s#192.168.0.0/16#10.244.0.0/16#" calico.yaml


# Network plug-in download address
wget https://github.com/containernetworking/plugins/releases/download/v1.0.0/cni-plugins-linux-amd64-v1.0.0.tgz
kubectl apply -f calico.yaml
kubectl get pods -n kube-system

etc. Calico Pod all Running,The node is also ready:
[root@k8s-master1 yaml]# kubectl get node
NAME          STATUS   ROLES    AGE   VERSION
k8s-master1   Ready    <none>   80m   v1.20.9
5.6 authorize apiserver to access kubelet
Application scenario: for example, kubectl logs
cat > apiserver-to-kubelet-rbac.yaml << EOF
apiVersion: rbac.authorization.k8s.io/v1
kind: ClusterRole
metadata:
  annotations:
    rbac.authorization.kubernetes.io/autoupdate: "true"
  labels:
    kubernetes.io/bootstrapping: rbac-defaults
  name: system:kube-apiserver-to-kubelet
rules:
  - apiGroups:
      - ""
    resources:
      - nodes/proxy
      - nodes/stats
      - nodes/log
      - nodes/spec
      - nodes/metrics
      - pods/log
    verbs:
      - "*"
---
apiVersion: rbac.authorization.k8s.io/v1
kind: ClusterRoleBinding
metadata:
  name: system:kube-apiserver
  namespace: ""
roleRef:
  apiGroup: rbac.authorization.k8s.io
  kind: ClusterRole
  name: system:kube-apiserver-to-kubelet
subjects:
  - apiGroup: rbac.authorization.k8s.io
    kind: User
    name: kubernetes
EOF

kubectl apply -f apiserver-to-kubelet-rbac.yaml
Newly added work node
1. Copy the deployed node related files to the new node
stay Master Node will Worker Node Involves copying files to a new node 172.21.51.72/73

scp -r /opt/kubernetes root@172.21.51.72:/opt/
scp -r /usr/lib/systemd/system/{kubelet,kube-proxy}.service root@172.21.51.72:/usr/lib/systemd/system
scp /opt/kubernetes/ssl/ca.pem root@172.21.51.72:/opt/kubernetes/ssl


scp -r /opt/kubernetes root@172.21.51.73:/opt/
scp -r /usr/lib/systemd/system/{kubelet,kube-proxy}.service root@172.21.51.73:/usr/lib/systemd/system
scp /opt/kubernetes/ssl/ca.pem root@172.21.51.73:/opt/kubernetes/ssl
2. Delete kubelet certificate and kubeconfig file
rm -f /opt/kubernetes/cfg/kubelet.kubeconfig
rm -f /opt/kubernetes/ssl/kubelet*
Note: these documents are automatically generated after the certificate application is approved, and each Node Different, must be deleted
3. Modify host name
vi /opt/kubernetes/cfg/kubelet.conf
--hostname-override=k8s-node1

vi /opt/kubernetes/cfg/kube-proxy-config.yml
hostnameOverride: k8s-node1

vi /opt/kubernetes/cfg/kubelet.conf
--hostname-override=k8s-node2

vi /opt/kubernetes/cfg/kube-proxy-config.yml
hostnameOverride: k8s-node2
4. Start and set startup
systemctl daemon-reload
systemctl start kubelet kube-proxy
systemctl enable kubelet kube-proxy
systemctl status kube-proxy
5. Approve the application for a new node kubelet Certificate in the master
# View certificate requests
[root@k8s-master1 yaml]# kubectl get csr
NAME                                                   AGE   SIGNERNAME                                    REQUESTOR           CONDITION
node-csr-7_86FVcMARHpAsrJ-yWWBXyOpg4R-RkgXVkygl3nK_Q   63s   kubernetes.io/kube-apiserver-client-kubelet   kubelet-bootstrap   Pending
node-csr-CwXx8GWIrGkN6OQeNyA9O08dYQWremUrLYJjH9bKa6k   94m   kubernetes.io/kube-apiserver-client-kubelet   kubelet-bootstrap   Approved,Issued
node-csr-xVyN-IRcm9QKYLaIBjFx0eZGqAtgstWvAZuanLTUbVo   62s   kubernetes.io/kube-apiserver-client-kubelet   kubelet-bootstrap   Pending


# Authorization request
kubectl certificate approve node-csr-7_86FVcMARHpAsrJ-yWWBXyOpg4R-RkgXVkygl3nK_Q
kubectl certificate approve node-csr-xVyN-IRcm9QKYLaIBjFx0eZGqAtgstWvAZuanLTUbVo

# Here, node2 is added as node1 accidentally, and the master side has approved it, which makes node unable to join. Later, delete the corresponding certificate application in etcd, rejoin and return to normal. Everything in Linux is a file
[root@k8s-master1 ~]# kubectl get csr
NAME                                                   AGE    SIGNERNAME                                    REQUESTOR           CONDITION
node-csr-7_86FVcMARHpAsrJ-yWWBXyOpg4R-RkgXVkygl3nK_Q   42m    kubernetes.io/kube-apiserver-client-kubelet   kubelet-bootstrap   Approved,Issued
node-csr-CwXx8GWIrGkN6OQeNyA9O08dYQWremUrLYJjH9bKa6k   136m   kubernetes.io/kube-apiserver-client-kubelet   kubelet-bootstrap   Approved,Issued
node-csr-Dc73TLG03NpqmGYfXSCCNORzMHKUvhyFLYzobPTfVMM   7s     kubernetes.io/kube-apiserver-client-kubelet   kubelet-bootstrap   Pending

kubectl certificate approve node-csr-Dc73TLG03NpqmGYfXSCCNORzMHKUvhyFLYzobPTfVMM
6. View node status
[root@k8s-master1 ~]# kubectl get node
NAME          STATUS   ROLES    AGE    VERSION
k8s-master1   Ready    <none>   138m   v1.20.9
k8s-node1     Ready    <none>   43m    v1.20.9
k8s-node2     Ready    <none>   17s    v1.20.9
Vi. deploy dashboards and coredns
6.1 deploying dashboards
wget https://raw.githubusercontent.com/kubernetes/dashboard/v2.0.0-beta8/aio/deploy/recommended.yaml
[root@k8s-master1 ~]# cd /home/yaml/
[root@k8s-master1 yaml]# ls
apiserver-to-kubelet-rbac.yaml  calico.yaml
[root@k8s-master1 yaml]# vim recommended.yaml
 default Dashboard It can only be accessed from within the cluster and cannot be modified Service by NodePort Type, exposed to the outside:
# Modify the Service to NodePort type, up and down 45 lines of the file
......
kind: Service
apiVersion: v1
metadata:
  labels:
    k8s-app: kubernetes-dashboard
  name: kubernetes-dashboard
  namespace: kubernetes-dashboard
spec:
  ports:
    - port: 443
      targetPort: 8443
  selector:
    k8s-app: kubernetes-dashboard
  type: NodePort  # Add type=NodePort to become a NodePort type service

---
...
kubectl apply -f recommended.yaml
[root@k8s-master1 yaml]# kubectl get pods,svc -n kubernetes-dashboard
NAME                                             READY   STATUS    RESTARTS   AGE
pod/dashboard-metrics-scraper-7445d59dfd-kf4fr   1/1     Running   0          46s
pod/kubernetes-dashboard-7d8466d688-7cknh        1/1     Running   0          46s

NAME                                TYPE        CLUSTER-IP   EXTERNAL-IP   PORT(S)         AGE
service/dashboard-metrics-scraper   ClusterIP   10.0.0.238   <none>        8000/TCP        46s
service/kubernetes-dashboard        NodePort    10.0.0.184   <none>        443:30026/TCP   46s
Access address: https://NodeIP:30026 https://172.21.51.71:30026/
Create a service account and bind the default cluster admin administrator cluster role
kubectl create serviceaccount dashboard-admin -n kube-system
kubectl create clusterrolebinding dashboard-admin --clusterrole=cluster-admin --serviceaccount=kube-system:dashboard-admin
kubectl describe secrets -n kube-system $(kubectl -n kube-system get secret | awk '/dashboard-admin/{print $1}')
root@k8s-master1 yaml]# kubectl create serviceaccount dashboard-admin -n kube-system
serviceaccount/dashboard-admin created
[root@k8s-master1 yaml]# kubectl create clusterrolebinding dashboard-admin --clusterrole=cluster-admin --serviceaccount=kube-system:dashboard-admin
clusterrolebinding.rbac.authorization.k8s.io/dashboard-admin created
[root@k8s-master1 yaml]# kubectl describe secrets -n kube-system $(kubectl -n kube-system get secret | awk '/dashboard-admin/{print $1}')
Name:         dashboard-admin-token-9nrwn
Namespace:    kube-system
Labels:       <none>
Annotations:  kubernetes.io/service-account.name: dashboard-admin
              kubernetes.io/service-account.uid: f58b4bfb-171b-4ccd-8714-7fa6bbe4f05a

Type:  kubernetes.io/service-account-token

Data
====
ca.crt:     1359 bytes
namespace:  11 bytes
token:      eyJhbGciOiJSUzI1NiIsImtpZCI6InMwWC0tYzVybnRCM3hDLW9GMGtlZk50LWRPZWV5RFNDbm5LTHBWUVhXUlEifQ.eyJpc3MiOiJrdWJlcm5ldGVzL3NlcnZpY2VhY2NvdW50Iiwia3ViZXJuZXRlcy5pby9zZXJ2aWNlYWNjb3VudC9uYW1lc3BhY2UiOiJrdWJlLXN5c3RlbSIsImt1YmVybmV0ZXMuaW8vc2VydmljZWFjY291bnQvc2VjcmV0Lm5hbWUiOiJkYXNoYm9hcmQtYWRtaW4tdG9rZW4tOW5yd24iLCJrdWJlcm5ldGVzLmlvL3NlcnZpY2VhY2NvdW50L3NlcnZpY2UtYWNjb3VudC5uYW1lIjoiZGFzaGJvYXJkLWFkbWluIiwia3ViZXJuZXRlcy5pby9zZXJ2aWNlYWNjb3VudC9zZXJ2aWNlLWFjY291bnQudWlkIjoiZjU4YjRiZmItMTcxYi00Y2NkLTg3MTQtN2ZhNmJiZTRmMDVhIiwic3ViIjoic3lzdGVtOnNlcnZpY2VhY2NvdW50Omt1YmUtc3lzdGVtOmRhc2hib2FyZC1hZG1pbiJ9.bRTyoT_F9LKpX5U9d0iDM6Jtw7IBDptGMnxST7UYlQ5F8oQ8CeHORTzrmFZQ_1qVzWj6SjvUfXv_mPvIrnPTTvhYiS9-xxeIQCeCV5r4Sx2gqFkFxNipOt995trKxBZ4JtQQ8bPdKedXur5LYUg1SEtZsx8bNCPFNDpcYjh7NwH02xs9Sxs6OUUjNDswumk2JleAAwiIqxpCcFhflz5Xsbo6fCtqwnzWapIv84PAoDQYXOPBCIavvu8M7VA76UHQoX5ZgSnpUZw-A3TmeFKjEiuoRl_5ZN_LZ-zAReJ4ws0OiSDlh2tOxqZViPTaKOIltdEyrJCeoZhkrZLIKpJnpw
[root@k8s-master1 yaml]#
6.2 deploying coreDNS
coreDNS is used for service name resolution within the cluster
apiVersion: v1
kind: ServiceAccount
metadata:
  name: coredns
  namespace: kube-system
---
apiVersion: rbac.authorization.k8s.io/v1
kind: ClusterRole
metadata:
  labels:
    kubernetes.io/bootstrapping: rbac-defaults
  name: system:coredns
rules:
- apiGroups:
  - ""
  resources:
  - endpoints
  - services
  - pods
  - namespaces
  verbs:
  - list
  - watch
---
apiVersion: rbac.authorization.k8s.io/v1
kind: ClusterRoleBinding
metadata:
  annotations:
    rbac.authorization.kubernetes.io/autoupdate: "true"
  labels:
    kubernetes.io/bootstrapping: rbac-defaults
  name: system:coredns
roleRef:
  apiGroup: rbac.authorization.k8s.io
  kind: ClusterRole
  name: system:coredns
subjects:
- kind: ServiceAccount
  name: coredns
  namespace: kube-system
---
apiVersion: v1
kind: ConfigMap
metadata:
  name: coredns
  namespace: kube-system
data:
  Corefile: |
    .:53 {
        errors
        health {
          lameduck 5s
        }
        ready
        kubernetes cluster.local  in-addr.arpa ip6.arpa {
          fallthrough in-addr.arpa ip6.arpa
        }
        prometheus :9153
        forward . /etc/resolv.conf {
          max_concurrent 1000
        }
        cache 30
        loop
        reload
        loadbalance
    }
---
apiVersion: apps/v1
kind: Deployment
metadata:
  name: coredns
  namespace: kube-system
  labels:
    k8s-app: kube-dns
    kubernetes.io/name: "CoreDNS"
spec:
  # replicas: not specified here:
  # 1. Default is 1.
  # 2. Will be tuned in real time if DNS horizontal auto-scaling is turned on.
  strategy:
    type: RollingUpdate
    rollingUpdate:
      maxUnavailable: 1
  selector:
    matchLabels:
      k8s-app: kube-dns
  template:
    metadata:
      labels:
        k8s-app: kube-dns
    spec:
      priorityClassName: system-cluster-critical
      serviceAccountName: coredns
      tolerations:
        - key: "CriticalAddonsOnly"
          operator: "Exists"
      nodeSelector:
        kubernetes.io/os: linux
      affinity:
         podAntiAffinity:
           preferredDuringSchedulingIgnoredDuringExecution:
           - weight: 100
             podAffinityTerm:
               labelSelector:
                 matchExpressions:
                   - key: k8s-app
                     operator: In
                     values: ["kube-dns"]
               topologyKey: kubernetes.io/hostname
      containers:
      - name: coredns
        image: coredns/coredns:1.8.0
        imagePullPolicy: IfNotPresent
        resources:
          limits:
            memory: 170Mi
          requests:
            cpu: 100m
            memory: 70Mi
        args: [ "-conf", "/etc/coredns/Corefile" ]
        volumeMounts:
        - name: config-volume
          mountPath: /etc/coredns
          readOnly: true
        ports:
        - containerPort: 53
          name: dns
          protocol: UDP
        - containerPort: 53
          name: dns-tcp
          protocol: TCP
        - containerPort: 9153
          name: metrics
          protocol: TCP
        securityContext:
          allowPrivilegeEscalation: false
          capabilities:
            add:
            - NET_BIND_SERVICE
            drop:
            - all
          readOnlyRootFilesystem: true
        livenessProbe:
          httpGet:
            path: /health
            port: 8080
            scheme: HTTP
          initialDelaySeconds: 60
          timeoutSeconds: 5
          successThreshold: 1
          failureThreshold: 5
        readinessProbe:
          httpGet:
            path: /ready
            port: 8181
            scheme: HTTP
      dnsPolicy: Default
      volumes:
        - name: config-volume
          configMap:
            name: coredns
            items:
            - key: Corefile
              path: Corefile
---
apiVersion: v1
kind: Service
metadata:
  name: kube-dns
  namespace: kube-system
  annotations:
    prometheus.io/port: "9153"
    prometheus.io/scrape: "true"
  labels:
    k8s-app: kube-dns
    kubernetes.io/cluster-service: "true"
    kubernetes.io/name: "CoreDNS"
spec:
  selector:
    k8s-app: kube-dns
  clusterIP: 10.0.0.2
  ports:
  - name: dns
    port: 53
    protocol: UDP
  - name: dns-tcp
    port: 53
    protocol: TCP
  - name: metrics
    port: 9153
    protocol: TCP
kubectl apply -f coredns.yaml
kubectl get pods -n kube-system
docker pull coredns/coredns:1.8.0
6.3 DNS resolution test
[root@k8s-master1 yaml]# kubectl run -it --rm dns-test --image=busybox:1.28.4 sh
If you don't see a command prompt, try pressing enter.

/ # nslookup kubernetes
Server:    10.0.0.2
Address 1: 10.0.0.2 kube-dns.kube-system.svc.cluster.local

Name:      kubernetes
Address 1: 10.0.0.1 kubernetes.default.svc.cluster.local
VII. Capacity expansion of multiple masters (high availability Architecture)
kubernetes, as a container cluster system, realizes the self-healing ability of pod failure through monitoring, inspection and restart strategy. I have heard of the scheduling algorithm to deploy the pod distributed, save the expected number of copies, and automatically pull the pod on other nodes according to the node failure status, realizing the high availability of the application layer.
For Kubernetes cluster, high availability should also include the following two aspects: high availability of Etcd database and high availability of Kubernetes Master component. For Etcd, we have used three nodes to form a cluster to achieve high availability. This section will describe and implement the high availability of the Master node.
The Master node acts as the Master control center and maintains the healthy working state of the whole cluster by continuously communicating with Kubelet and Kube proxy on the work node. If the Master node fails, you will not be able to use kubectl tools or API s for any cluster management.
The master node mainly has three services, Kube apiserver, Kube controller manager and Kube scheduler. The Kube controller manager and Kube scheduler components have achieved high availability through the selection mechanism. All master high availability is mainly for the Kube apiserver component, which provides services with Http api. Therefore, high availability is related to the type of web server, Add a load balancer to balance its load, and it can be tolerant horizontally.
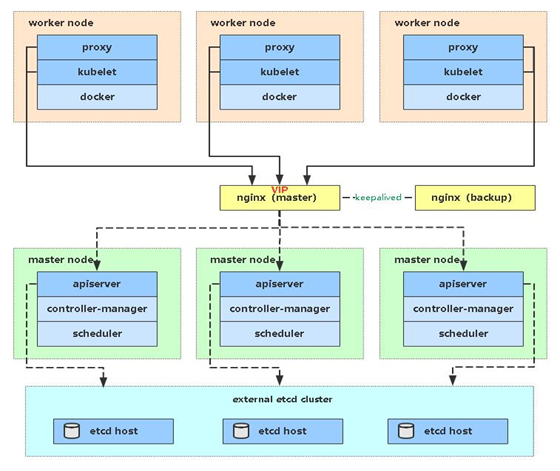
Multi master architecture diagram:
7.1 deploying master2 node
Master2 is consistent with all operations of deployed Master1. So we just need to copy all K8s files of Master1, and then modify the server IP and host name to start.
1. Install docker
scp /usr/bin/docker* root@172.21.51.74:/usr/bin
scp /usr/bin/runc root@172.21.51.74:/usr/bin
scp /usr/bin/containerd* root@172.21.51.74:/usr/bin
scp /usr/lib/systemd/system/docker.service root@172.21.51.74:/usr/lib/systemd/system
scp -r /etc/docker root@172.21.51.74:/etc

# Start Docker on Master2
systemctl daemon-reload
systemctl start docker
systemctl enable docker
2. Create etcd certificate directory
Create the etcd certificate directory in master2
mkdir -p /opt/etcd/ssl
3. Copy files (master operation)
Copy all K8s files and etcd certificates on Master1 to Master2
scp -r /opt/kubernetes root@172.21.51.74:/opt
scp -r /opt/etcd/ssl root@172.21.51.74:/opt/etcd
scp /usr/lib/systemd/system/kube* root@172.21.51.74:/usr/lib/systemd/system
scp /usr/bin/kubectl  root@172.21.51.74:/usr/bin
scp -r ~/.kube root@172.21.51.74:~
4. Delete certificate file
rm -f /opt/kubernetes/cfg/kubelet.kubeconfig
rm -f /opt/kubernetes/ssl/kubelet*
5. Modify the ip and hostname of the configuration file
Modify apiserver, kubelet and Kube proxy configuration files to local IP:
vi /opt/kubernetes/cfg/kube-apiserver.conf
...
--bind-address=172.21.51.74 \
--advertise-address=172.21.51.74 \
...

vi /opt/kubernetes/cfg/kube-controller-manager.kubeconfig
server: https://172.21.51.74:6443

vi /opt/kubernetes/cfg/kube-scheduler.kubeconfig
server: https://172.21.51.74:6443

vi /opt/kubernetes/cfg/kubelet.conf
--hostname-override=k8s-master2

vi /opt/kubernetes/cfg/kube-proxy-config.yml
hostnameOverride: k8s-master2

vi ~/.kube/config
...
server: https://172.21.51.74:6443
6. Startup setting startup
systemctl daemon-reload
systemctl start kube-apiserver kube-controller-manager kube-scheduler kubelet kube-proxy
systemctl enable kube-apiserver kube-controller-manager kube-scheduler kubelet kube-proxy
7. View cluster status
[root@k8s-master2 ~]# kubectl get cs
Warning: v1 ComponentStatus is deprecated in v1.19+
NAME                 STATUS    MESSAGE             ERROR
scheduler            Healthy   ok
controller-manager   Healthy   ok
etcd-2               Healthy   {"health":"true"}
etcd-1               Healthy   {"health":"true"}
etcd-0               Healthy   {"health":"true"}
8. Approve kubelet certificate application
[root@k8s-master2 ~]# kubectl get csr
NAME                                                   AGE   SIGNERNAME                                    REQUESTOR           CONDITION
node-csr-KjsoM5QmVBJmCjnyU4u1Hdm2ipxwCOo4qewY3X_egNc   80s   kubernetes.io/kube-apiserver-client-kubelet   kubelet-bootstrap   Pending

[root@k8s-master2 ~]# kubectl certificate approve node-csr-KjsoM5QmVBJmCjnyU4u1Hdm2ipxwCOo4qewY3X_egNc
certificatesigningrequest.certificates.k8s.io/node-csr-KjsoM5QmVBJmCjnyU4u1Hdm2ipxwCOo4qewY3X_egNc approved
[root@k8s-master2 ~]# kubectl get node
NAME          STATUS   ROLES    AGE     VERSION
k8s-master1   Ready    <none>   4h13m   v1.20.9
k8s-master2   Ready    <none>   43s     v1.20.9
k8s-node1     Ready    <none>   158m    v1.20.9
k8s-node2     Ready    <none>   115m    v1.20.9
72. Set kubectl auto completion
 yum install bash-completion -y
 source /usr/share/bash-completion/bash_completion
 source <(kubectl completion bash)
 echo "source <(kubectl completion bash)" >> ~/.bashrc
7.3 deploy Nginx+Keeplived high availability load balancing
Kube apiserver high availability architecture diagram
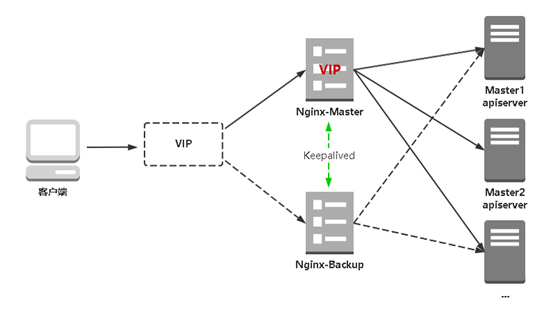
- nginx is a mainstream web service and reverse proxy server. Here, four layers are used to balance the load of apiserver
- Keepalived is a mainstream high availability software, which realizes dual server hot standby based on VIP binding. In the above topology diagram, keepalived mainly judges whether failover (drift VIP) is required according to nginx operation status. For example, when nginx primary node hangs up, VIP will be automatically bound to nginx standby node, so as to ensure consistent availability of VIP and realize high availability of nginx
Note 1: in order to save machines, it is reused with K8s Master node machines. It can also be deployed independently of the k8s cluster, as long as nginx and apiserver can communicate.
Note 2: if you are on a public cloud and generally do not support keepalived, you can directly use their load balancer products to directly load balance multiple master Kube apiserver. The architecture is the same as above. For example, Alibaba cloud slb.
1. Install software package (active and standby)
 yum install epel-release -y
 yum install nginx keepalived -y
2.nginx configuration file (consistent between active and standby)
cat > /etc/nginx/nginx.conf << "EOF"
user nginx;
worker_processes auto;
error_log /var/log/nginx/error.log;
pid /run/nginx.pid;

include /usr/share/nginx/modules/*.conf;

events {
    worker_connections 1024;
}

# Four layer load balancing provides load balancing for two Master apiserver components
stream {

    log_format  main  '$remote_addr $upstream_addr - [$time_local] $status $upstream_bytes_sent';

    access_log  /var/log/nginx/k8s-access.log  main;

    upstream k8s-apiserver {
       server 172.21.51.71:6443;   # Master1 APISERVER IP:PORT
       server 172.21.51.74:6443;   # Master2 APISERVER IP:PORT
    }

    server {
       listen 16443; # Because nginx is multiplexed with the master node, the listening port cannot be 6443, otherwise it will conflict
       proxy_pass k8s-apiserver;
    }
}

http {
    log_format  main  '$remote_addr - $remote_user [$time_local] "$request" '
                      '$status $body_bytes_sent "$http_referer" '
                      '"$http_user_agent" "$http_x_forwarded_for"';

    access_log  /var/log/nginx/access.log  main;

    sendfile            on;
    tcp_nopush          on;
    tcp_nodelay         on;
    keepalive_timeout   65;
    types_hash_max_size 2048;

    include             /etc/nginx/mime.types;
    default_type        application/octet-stream;

    server {
        listen       80 default_server;
        server_name  _;

        location / {
        }
    }
}
EOF
3.Keepalived configuration file
cat > /etc/keepalived/keepalived.conf << EOF
global_defs {
   notification_email {
     acassen@firewall.loc
     failover@firewall.loc
     sysadmin@firewall.loc
   }
   notification_email_from Alexandre.Cassen@firewall.loc
   smtp_server 127.0.0.1
   smtp_connect_timeout 30
   router_id NGINX_MASTER
}

vrrp_script check_nginx {
    script "/etc/keepalived/check_nginx.sh"
}

vrrp_instance VI_1 {
    state MASTER
    interface ens33  # Change to actual network card name
    virtual_router_id 51 # VRRP routing ID instance. Each instance is unique
    priority 100    # Priority, standby server setting 90
    advert_int 1    # Specify the notification interval of VRRP heartbeat packet, which is 1 second by default
    authentication {
        auth_type PASS
        auth_pass 1111
    }
    # Virtual IP
    virtual_ipaddress {
        172.21.51.88/24
    }
    track_script {
        check_nginx
    }
}
EOF

•	vrrp_script: Specify check nginx Working state script (according to nginx Status determination (failover)
•	virtual_ipaddress: fictitious IP(VIP)
Prepare the check in the above configuration file nginx Running script:
cat > /etc/keepalived/check_nginx.sh  << "EOF"
#!/bin/bash
count=$(ss -antp |grep 16443 |egrep -cv "grep|$$")

if [ "$count" -eq 0 ];then
    exit 1
else
    exit 0
fi
EOF

chmod +x /etc/keepalived/check_nginx.sh
4.Keepalived configuration file (nginx backup)
cat > /etc/keepalived/keepalived.conf << EOF
global_defs {
   notification_email {
     acassen@firewall.loc
     failover@firewall.loc
     sysadmin@firewall.loc
   }
   notification_email_from Alexandre.Cassen@firewall.loc
   smtp_server 127.0.0.1
   smtp_connect_timeout 30
   router_id NGINX_BACKUP
}

vrrp_script check_nginx {
    script "/etc/keepalived/check_nginx.sh"
}

vrrp_instance VI_1 {
    state BACKUP
    interface ens33
    virtual_router_id 51 # VRRP routing ID instance. Each instance is unique
    priority 90
    advert_int 1
    authentication {
        auth_type PASS
        auth_pass 1111
    }
    virtual_ipaddress {
        172.21.51.88/24
    }
    track_script {
        check_nginx
    }
}
EOF
Prepare the script to check the running status of nginx in the above configuration file:
cat > /etc/keepalived/check_nginx.sh  << "EOF"
#!/bin/bash
count=$(ss -antp |grep 16443 |egrep -cv "grep|$$")

if [ "$count" -eq 0 ];then
    exit 1
else
    exit 0
fi
EOF
chmod +x /etc/keepalived/check_nginx.sh
Note: keepalived determines whether to failover according to the status code returned by the script (0 is normal, non-0 is abnormal).
5. Start and set startup
systemctl daemon-reload
systemctl start nginx keepalived
systemctl enable nginx keepalived

[root@k8s-master1 ~]# systemctl status  nginx
● nginx.service - The nginx HTTP and reverse proxy server
   Loaded: loaded (/usr/lib/systemd/system/nginx.service; enabled; vendor preset: disabled)
   Active: failed (Result: exit-code) since Sun 2021-08-15 06:14:50 CST; 26s ago
  Process: 56349 ExecStartPre=/usr/sbin/nginx -t (code=exited, status=1/FAILURE)
  Process: 56347 ExecStartPre=/usr/bin/rm -f /run/nginx.pid (code=exited, status=0/SUCCESS)

Aug 15 06:14:50 k8s-master1 systemd[1]: Starting The nginx HTTP and reverse proxy server...
Aug 15 06:14:50 k8s-master1 nginx[56349]: nginx: [emerg] unknown directive "stream" in /etc/nginx/nginx.conf:13
Aug 15 06:14:50 k8s-master1 nginx[56349]: nginx: configuration file /etc/nginx/nginx.conf test failed
Aug 15 06:14:50 k8s-master1 systemd[1]: nginx.service: control process exited, code=exited status=1
Aug 15 06:14:50 k8s-master1 systemd[1]: Failed to start The nginx HTTP and reverse proxy server.
Aug 15 06:14:50 k8s-master1 systemd[1]: Unit nginx.service entered failed state.
Aug 15 06:14:50 k8s-master1 systemd[1]: nginx.service failed.

Need next stream modular
yum install nginx-mod-stream -y

nginx -t
6. Check the status of keepalived
[root@k8s-master1 ~]# ip addr | grep 172
    inet 172.21.51.71/24 brd 172.21.51.255 scope global noprefixroute ens33
    inet 172.21.51.88/24 scope global secondary ens33
    inet 172.17.0.1/16 brd 172.17.255.255 scope global docker0
It can be seen that 172.21.51.88 virtual IP is bound to the ens33 network card, indicating that it works normally.
7.nginx+Keepalived high availability test
Turn off the primary node nginx and test whether the vip drifts to the standby node server
[root@k8s-master1 ~]# systemctl stop nginx

[root@k8s-master2 ~]# ip addr | grep 88
    inet 172.21.51.88/24 scope global secondary ens33
8. Access load balancer test
Find any node in the k8s cluster, use curl, use curl to view the k8s version test, and use vip to access
[root@k8s-node2 ~]# curl -k https://172.21.51.88:16443/version
{
  "major": "1",
  "minor": "20",
  "gitVersion": "v1.20.9",
  "gitCommit": "7a576bc3935a6b555e33346fd73ad77c925e9e4a",
  "gitTreeState": "clean",
  "buildDate": "2021-07-15T20:56:38Z",
  "goVersion": "go1.15.14",
  "compiler": "gc",
  "platform": "linux/amd64"
The k8s version information can be obtained correctly, indicating that the load balancer is set up normally. The request data flow is as follows:
curl -> vip(nginx) -> apiserver
You can also see the forwarding apiserver ip by viewing the nginx log
[root@k8s-master2 ~]# tail /var/log/nginx/k8s-access.log -f
172.21.51.73 172.21.51.74:6443 - [15/Aug/2021:06:31:27 +0800] 200 420
172.21.51.73 172.21.51.71:6443 - [15/Aug/2021:06:31:32 +0800] 200 420
172.21.51.73 172.21.51.71:6443 - [15/Aug/2021:06:31:34 +0800] 200 420
172.21.51.73 172.21.51.74:6443 - [15/Aug/2021:06:31:35 +0800] 200 420
7.4 modify all worker node connections
Imagine that although we have added a Master2 Node and a load balancer, we have expanded the capacity from a single Master architecture, that is to say, at present, all the Worker Node components are still connected to a Master1 Node. If we do not connect the VIP to the load balancer, the Master will still have a single point of failure.
Therefore, the next step is to change the component configuration files of all worker nodes (nodes viewed by kubectl get node command) from 172.21.51.71 to 172.21.51.88 (VIP).
On all worker nodes:
sed -i 's#172.21.51.71:6443#172.21.51.88:16443#' /opt/kubernetes/cfg/*
systemctl restart kubelet kube-proxy
Check node status
[root@k8s-master1 ~]# kubectl get node
NAME          STATUS   ROLES    AGE     VERSION
k8s-master1   Ready    <none>   4h56m   v1.20.9
k8s-master2   Ready    <none>   44m     v1.20.9
k8s-node1     Ready    <none>   3h22m   v1.20.9
k8s-node2     Ready    <none>   158m    v1.20.9
failed state.
Aug 15 06:14:50 k8s-master1 systemd[1]: nginx.service failed.
Lower stream module required
yum install nginx-mod-stream -y
nginx -t
###### 6. Check the status of keepalived
[root@k8s-master1 ~]# ip addr | grep 172
inet 172.21.51.71/24 brd 172.21.51.255 scope global noprefixroute ens33
inet 172.21.51.88/24 scope global secondary ens33
inet 172.17.0.1/16 brd 172.17.255.255 scope global docker0
As you can see, in ens33 The network card is bound to 172.21.51.88 fictitious IP,It indicates that it works normally.

##### 7.nginx+Keepalived high availability test

Turn off the master node nginx,test vip Whether to drift to the standby node server
[root@k8s-master1 ~]# systemctl stop nginx
[root@k8s-master2 ~]# ip addr | grep 88
inet 172.21.51.88/24 scope global secondary ens33
##### 8. Access load balancer test

look for k8s Any node in the cluster, using curl ,use curl see k8s Version testing, using vip visit
[root@k8s-node2 ~]# curl -k https://172.21.51.88:16443/version
{
"major": "1",
"minor": "20",
"gitVersion": "v1.20.9",
"gitCommit": "7a576bc3935a6b555e33346fd73ad77c925e9e4a",
"gitTreeState": "clean",
"buildDate": "2021-07-15T20:56:38Z",
"goVersion": "go1.15.14",
"compiler": "gc",
"platform": "linux/amd64"
It can be obtained correctly k8s The version information indicates that the load balancer is set up normally. The data flow of the request is as follows:
curl -> vip(nginx) -> apiserver
By viewing nginx Forwarding can also be seen in the log apiserver ip
[root@k8s-master2 ~]# tail /var/log/nginx/k8s-access.log -f
172.21.51.73 172.21.51.74:6443 - [15/Aug/2021:06:31:27 +0800] 200 420
172.21.51.73 172.21.51.71:6443 - [15/Aug/2021:06:31:32 +0800] 200 420
172.21.51.73 172.21.51.71:6443 - [15/Aug/2021:06:31:34 +0800] 200 420
172.21.51.73 172.21.51.74:6443 - [15/Aug/2021:06:31:35 +0800] 200 420
#### 7.4 modify all worker node connections

Imagine, although we have increased Master2 Node And load balancer, but we are from single Master Architecture expansion, that is, all current Worker Node Component connections are still Master1 Node,If you do not change to connect VIP Take the load balancer, then Master Or a single point of failure.

So the next step is to change everything Worker Node(kubectl get node The node) component configuration file viewed by the command is changed from the original 172.21.51.71 Revised to 172.21.51.88(VIP).

At all Worker Node Execution:
sed -i 's#172.21.51.71:6443#172.21.51.88:16443#' /opt/kubernetes/cfg/*
systemctl restart kubelet kube-proxy
Check node status
[root@k8s-master1 ~]# kubectl get node
NAME STATUS ROLES AGE VERSION
k8s-master1 Ready 4h56m v1.20.9
k8s-master2 Ready 44m v1.20.9
k8s-node1 Ready 3h22m v1.20.9
k8s-node2 Ready 158m v1.20.9
come from: http://www.aliangedu.cn