Hadoop is supported by the GNU/Linux platform (recommendation). Therefore, you need to install a Linux operating system and set up a Hadoop environment. If you have a Linux operating system and so on, you can install it in VirtualBox (with the experience of installing Linux in VirtualBox, you can learn to try it without installing it).
Pre-installation settings
Before installing Hadoop, you need to enter the Linux environment and connect to Linux using SSH (Secure Shell). Follow the steps provided below to set up the Linux environment.
Create a
At the beginning, it is recommended to create a separate user Hadoop to isolate the Hadoop file system from the Unix file system. Follow the steps given below to create users:
- Use the "su" command to open root.
- Create a user to use the command "useradd username" from the root account.
- Now you can use the command to open an existing user account "su username".
Open the Linux terminal and enter the following commands to create a user.
$ su password: # useradd hadoop # passwd hadoop New passwd: Retype new passwd
SSH Settings and Key Generation
SSH settings require different operations on the cluster, such as startup, stop, and distributed daemon shell operations. To authenticate different Hadoop users, we need a public/private key pair for Hadoop users and share it with different users.
The following command is used to generate pairs using SSH keys. Copy the public key to form id_rsa.pub into the authorized_keys file and provide the owner with read and write permission for the authorized_keys file.
$ ssh-keygen -t rsa $ cat ~/.ssh/id_rsa.pub >> ~/.ssh/authorized_keys $ chmod 0600 ~/.ssh/authorized_keys
Installing Java
Java is a major prerequisite for Hadoop. First, the command "java-version" should be used to verify that Java exists in the system. The syntax of the Java version command is as follows.
$ java -version
If everything goes well, it will give the following output.
java version "1.7.0_71" Java(TM) SE Runtime Environment (build 1.7.0_71-b13) Java HotSpot(TM) Client VM (build 25.0-b02, mixed mode)
If Java is not installed in the system, follow the steps below to install Java.
Step 1
Download Java (JDK<latest edition>-X64.tar.gz) by visiting the following links: http://www.oracle.com/technetwork/java/javase/downloads/jdk7-downloads 1880260.html.
Then JDK-7u71-linux-x64.tar.gz will be downloaded to the system.
Step 2
Generally speaking, download Java files in folders. Use the following command to extract the jdk-7u71-linux-x64.gz file.
$ cd Downloads/ $ ls jdk-7u71-linux-x64.gz $ tar zxf jdk-7u71-linux-x64.gz $ ls jdk1.7.0_71 jdk-7u71-linux-x64.gz
Step 3
To make Java available to all users, move it to the directory "/ usr/local /". Open the root directory and type the following commands.
$ su password: # mv jdk1.7.0_71 /usr/local/ # exit
Step 4
To set PATH and JAVA_HOME variables, add the following commands to the ~/.bashrc file.
export JAVA_HOME=/usr/local/jdk1.7.0_71 export PATH=PATH:$JAVA_HOME/bin
Now verify the java-version command from the terminal as described above.
Download Hadoop
Download the software from the Apache Foundation and extract Hadoop 2.4.1 using the following command.
$ su password: # cd /usr/local # wget http://apache.claz.org/hadoop/common/hadoop-2.4.1/ hadoop-2.4.1.tar.gz # tar xzf hadoop-2.4.1.tar.gz # mv hadoop-2.4.1/* to hadoop/ # exit
Hadoop operation mode
After downloading Hadoop, you can operate the Hadoop cluster in one of three supporting modes:
- Local/stand-alone mode: Download Hadoop in the system and, by default, it will be configured in a stand-alone mode for running Java programs.
- Analog Distributed Model: This is a distributed simulation on a single machine. Hadoop guards each process, such as hdfs, yarn, MapReduce, etc., and will run as a separate java program. This model is very useful for development.
- Fully distributed mode: This mode is a fully distributed cluster of two or more computers. We use this model in future chapters.
Install Hadoop in stand-alone mode
Here, we will discuss the installation of Hadoop 2.4.1 in stand-alone mode.
There is a single JVM running any daemon and everything runs. Independent mode is suitable for running MapReduce programs during development because it is easy to test and debug.
Setting up Hadoop
Hadoop environment variables can be set in the ~/.bashrc file by appending the following command.
export HADOOP_HOME=/usr/local/hadoop
Before we go any further, we need to make sure that Hadoop works properly. Issue the following orders:
$ hadoop version
If everything is set up properly, you should see the following results:
Hadoop 2.4.1 Subversion https://svn.apache.org/repos/asf/hadoop/common -r 1529768 Compiled by hortonmu on 2013-10-07T06:28Z Compiled with protoc 2.5.0 From source with checksum 79e53ce7994d1628b240f09af91e1af4
This means that Hadoop works well in stand-alone mode. By default, Hadoop is configured to run on a single machine in a non-distributed mode.
Example
Let's look at a simple example of Hadoop. The Hadoop installation provides the following example MapReduce jar file, which provides the basic functions of MapReduce and can be used for computing, such as PI values, word counts in files, and so on.
$HADOOP_HOME/share/hadoop/mapreduce/hadoop-mapreduce-examples-2.2.0.jar
There is an input directory that pushes several files, requiring the total number of words in those files to be calculated. To calculate the total number of words, you don't need to write MapReduce. The. jar file provided contains the number of implemented words. You can try other examples using the same. jar file; issue the following command to check the MapReduce-enabled program through the Hadoop hadoop-mapreduce-examples-2.2.0.jar file.
$ hadoop jar $HADOOP_HOME/share/hadoop/mapreduce/hadoop-mapreduceexamples-2.2.0.jar
Step 1
Create a content file that enters a temporary directory. This input directory can be created anywhere to work.
$ mkdir input $ cp $HADOOP_HOME/*.txt input $ ls -l input
It gives the following files in the input directory:
total 24 -rw-r--r-- 1 root root 15164 Feb 21 10:14 LICENSE.txt -rw-r--r-- 1 root root 101 Feb 21 10:14 NOTICE.txt -rw-r--r-- 1 root root 1366 Feb 21 10:14 README.txt
These files have been copied from the Hadoop installation home directory. For experimentation, you can have different large file sets.
Step 1
Let's start the Hadoop process to count the total number of words in all files available in the input directory, as follows:
$ hadoop jar $HADOOP_HOME/share/hadoop/mapreduce/hadoop-mapreduceexamples-2.2.0.jar wordcount input ouput
Step 3
Step 2 will do the necessary processing and save the output in the output/part-r00000 file, which can be used by query:
$cat output/*
It lists all words and provides a total count of their files in all input directories.
"AS 4 "Contribution" 1 "Contributor" 1 "Derivative 1 "Legal 1 "License" 1 "License"); 1 "Licensor" 1 "NOTICE" 1 "Not 1 "Object" 1 "Source" 1 "Work" 1 "You" 1 "Your") 1 "[]" 1 "control" 1 "printed 1 "submitted" 1 (50%) 1 (BIS), 1 (C) 1 (Don't) 1 (ECCN) 1 (INCLUDING 2 (INCLUDING, 2 .............
Installing Hadoop in Simulated Distributed Mode
Follow the steps below to install Hadoop 2.4.1 in pseudo-distributed mode.
Step 1: Set up Hadoop
You can set the Hadoop environment variable in the ~/.bashrc file by attaching the following command.
export HADOOP_HOME=/usr/local/hadoop export HADOOP_MAPRED_HOME=$HADOOP_HOME export HADOOP_COMMON_HOME=$HADOOP_HOME export HADOOP_HDFS_HOME=$HADOOP_HOME export YARN_HOME=$HADOOP_HOME export HADOOP_COMMON_LIB_NATIVE_DIR=$HADOOP_HOME/lib/native export PATH=$PATH:$HADOOP_HOME/sbin:$HADOOP_HOME/bin export HADOOP_INSTALL=$HADOOP_HOME
Now submit all changes to the currently running system.
$ source ~/.bashrc
Step 2: Hadoop configuration
You can find all the Hadoop configuration files under'$HADOOP_HOME/etc/hadoop'. These configuration files need to be changed according to the Hadoop infrastructure.
$ cd $HADOOP_HOME/etc/hadoop
In order to develop Hadoop programs using Java, the JAVA_HOME value must be replaced by the location of Java in the system and the Java environment variables of the hadoop-env.sh file must be reset.
export JAVA_HOME=/usr/local/jdk1.7.0_71
Following is a list of files that must be edited to configure Hadoop.
core-site.xml
The core-site.xml file contains information such as the port number of the read/write buffer for an instance of Hadoop, which is allocated to the file system for storage to store the limitations and size of the data storage.
Open core-site.xml and add the following attributes between <configuration>, </configuration> tags.
<configuration> <property> <name>fs.default.name </name> <value> hdfs://localhost:9000 </value> </property> </configuration>
hdfs-site.xml
The hdfs-site.xml file contains information such as the value of the replicated data, the NameNode path, and the path of the data node of the local file system. This means that it's where Hadoop's basic tools are stored.
Let's assume the following data.
dfs.replication (data replication value) = 1 (In the below given path /hadoop/ is the user name. hadoopinfra/hdfs/namenode is the directory created by hdfs file system.) namenode path = //home/hadoop/hadoopinfra/hdfs/namenode (hadoopinfra/hdfs/datanode is the directory created by hdfs file system.) datanode path = //home/hadoop/hadoopinfra/hdfs/datanode
Open the file and add the following attributes between the <configuration></configuration> tags in the file.
<configuration> <property> <name>dfs.replication</name> <value>1</value> </property> <property> <name>dfs.name.dir</name> <value>file:///home/hadoop/hadoopinfra/hdfs/namenode </value> </property> <property> <name>dfs.data.dir</name> <value>file:///home/hadoop/hadoopinfra/hdfs/datanode </value> </property> </configuration>
Note: In the above file, all attribute values are user-defined and can be changed according to your Hadoop infrastructure.
yarn-site.xml
This file is used to configure yarn in Hadoop. Open the yarn-site.xml file and add the following attributes between the <configuration></configuration> tags in the file.
<configuration> <property> <name>yarn.nodemanager.aux-services</name> <value>mapreduce_shuffle</value> </property> </configuration>
mapred-site.xml
This file is used to specify that the MapReduce framework is being used. By default, the template yarn-site.xml containing Hadoop. First, it needs to be replicated from mapred-site.xml. Get the mapred-site.xml template file using the following commands.
$ cp mapred-site.xml.template mapred-site.xml
Open the mapred-site.xml file and add the following attributes between the <configuration></configuration> tags in the file.
<configuration> <property> <name>mapreduce.framework.name</name> <value>yarn</value> </property> </configuration>
Verify Hadoop installation
The following steps are used to verify the Hadoop installation.
Step 1: Name node settings
Use the command "hdfs namenode-format" to set the name node as follows.
$ cd ~ $ hdfs namenode -format
The expected results are as follows
10/24/14 21:30:55 INFO namenode.NameNode: STARTUP_MSG: /************************************************************ STARTUP_MSG: Starting NameNode STARTUP_MSG: host = localhost/192.168.1.11 STARTUP_MSG: args = [-format] STARTUP_MSG: version = 2.4.1 ... ... 10/24/14 21:30:56 INFO common.Storage: Storage directory /home/hadoop/hadoopinfra/hdfs/namenode has been successfully formatted. 10/24/14 21:30:56 INFO namenode.NNStorageRetentionManager: Going to retain 1 images with txid >= 0 10/24/14 21:30:56 INFO util.ExitUtil: Exiting with status 0 10/24/14 21:30:56 INFO namenode.NameNode: SHUTDOWN_MSG: /************************************************************ SHUTDOWN_MSG: Shutting down NameNode at localhost/192.168.1.11 ************************************************************/
Step 2: Verify Hadoop's DFS
The following command is used to start DFS. Executing this command will start the Hadoop file system.
$ start-dfs.sh
The expected output is as follows:
10/24/14 21:37:56 Starting namenodes on [localhost] localhost: starting namenode, logging to /home/hadoop/hadoop 2.4.1/logs/hadoop-hadoop-namenode-localhost.out localhost: starting datanode, logging to /home/hadoop/hadoop 2.4.1/logs/hadoop-hadoop-datanode-localhost.out Starting secondary namenodes [0.0.0.0]
Step 3: Verify the Yarn script
The following command is used to start the yarn script. Executing this command will start the yarn daemon.
$ start-yarn.sh
The expected output is as follows:
starting yarn daemons starting resourcemanager, logging to /home/hadoop/hadoop 2.4.1/logs/yarn-hadoop-resourcemanager-localhost.out localhost: starting nodemanager, logging to /home/hadoop/hadoop 2.4.1/logs/yarn-hadoop-nodemanager-localhost.out
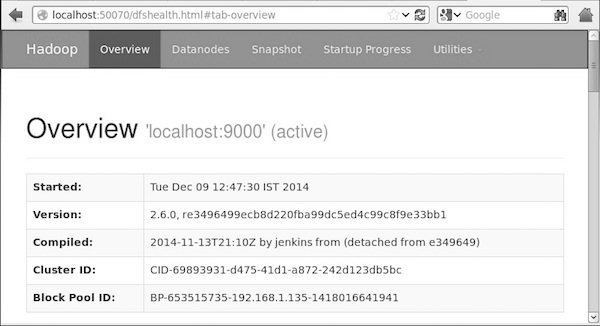
Step 4: Access Hadoop in the browser
Visit Hadoop's default port number is 50070, and use the following address to get the service of the browser Hadoop.
http://localhost:50070/
Step 5: Verify the cluster of all applications
The default port number for accessing all applications in the cluster is 8088. Use the following URL to access the service.
Recommended Learning Catalogue: Hadoop Environment Installation Settings