Community information: Vue: Vue.js professional Chinese community
vue official Manual: API — Vue.js
1, Introduction to vue
Vue is a progressive framework for building user interface. Vue only focuses on layers and adopts the design of bottom-up incremental development. Vue's goal is to achieve responsive data binding and combined view components through the simplest API possible
vue is based on MVVM (M:model V:view VM:viewmodel) design pattern and supports two-way data binding (v-model)
Supplement:
MVC design mode:
M model data layer V view layer C control layer
2, Installation of vue
2.1 download vue.js and import it directly
<script src="vue.js"></script>
2.2 loading via CDN
<script src="https://cdnjs.cloudflare.com/ajax/libs/vue/2.1.8/vue.min.js"></script>
2.3 npm installation
npm install vue -g
npm install vue-cli -g
3, Basic use of vue
<div id="app">
h2>{{msg}}</h2>
</div>
<script>
const vm = new Vue({

 el:'#app',//el is the scope of vue

 //data for vue
data:{ msg:'hello vue.js' },

//Define function method
methods:{

 }
})
</script>
4, Common instructions of vue (key points)
4.1 interpolation of Vue
Method 1: bind data with double braces <h2>{{msg}}</h2>
Mode 2: v-html instructions <h2 v-html="msg"></h2>
Mode 3: v-text instructions <h2 v-text="msg"></h2>
What is the difference between v-html and v-text?
v-html can parse tags and text, while v-text only parses text content.
4.2 conditional statements in Vue
v-if
v-else
v-else-if


<p v-if="false">Go out and wave everywhere</p>

<p v-else>Stay at home</p>

<p v-if="isActive">Go out and wave everywhere</p>
<p v-else>Stay at home</p>

<p v-if="score>=90">you are so good</p>
<p v-else-if="score>=60">OK, keep trying</p>
<p v-else>Are you a pig?</p>
4.3 display and hiding of Vue
Mode 1: v-if hide <p v-if="false">Let's play hide and seek</p>
Mode 2: v-show hide <p v-show="false">You come and find out where I am</p>
Differences between v-if and v-show:
v-if hiding is to remove the element directly
v-show hides elements by setting them to display:none
4.4 loop statement of Vue
Syntax: v-for="item in items"


<p v-for="val in arr">{{val}}</p>

<p v-for="(val,index) in arr">{{index}}{{val}}</p>

<p v-for="(val,key,index) in person">{{index}}{{key}}{{val}}</p>

<!-- definition key Writing method of key The value of is an array, and the arrangement order of objects starts from 0 by default-->
<p v-for="item in arr" :key="item.id"></p>
4.5 style binding of Vue
In vue, we use v-bind to bind attributes and class styles
The binding of class attribute can be abbreviated as': ':
Method 1: the method attribute of the incoming object is: class Class name attribute value is boolean value
<p v-bind:class="{text:false}">Do you want to go back to the company</p>
<p v-bind:class="{text:isActive,bg:true}">Do you want to go back to the company</p>

Method 2: pass in array
<p v-bind:class="[colorActive,bgActive]">Chengdu was cleared yesterday</p>

Method 3: inline style (not recommended)
<p v-bind:style="{color:'green',fontSize:'20px'}"></p>
Note: in v-bind:Binding properties and class Style can be abbreviated as':'
4.5 event handling of Vue
Method 1: directly modify the content of the event
<button v-on:click="num+=1">Click plus one</button> <h2>{{num}}</h2>

Mode 2: event trigger function method
<button v-on:click="changeColor()">Click trigger function</button>
<p :class="{text:isActive}">Employment difficulties this year</p>

const vm = new Vue({
    el:'#app',
    data:{
        num:0,
        isActive:false
    },
    // Put function methods in vue in methods
    methods:{
    // Define a changeColor method. Click to switch the class style
            changeColor(){
    // this needs to be added to access the properties in data
                console.log(this.isActive)
                this.isActive = !this.isActive;
        }
    }
})
Event modifier
.stop Prevent event bubbling
.prevent Block event default behavior
.capture Using event capture mode
.self Block event delegation (events can only be triggered by the current element, not child elements)
.once The event is triggered only once


<!-- Prevent event bubbling -->
<div class="father" v-on:click="fatherSay">
    <div class="son" v-on:click.stop="sonSay"></div>
</div>

<!-- Block event default behavior -->
<a href="http://Www.mi. Com "v-on: click. Prevent =" sonsay "> jump to Xiaomi</a>

<!-- once Trigger only once -->
<button v-on:click.once="num+=1">Click once</button>

Key modifier

.enter enter key
.tab tab key
.delete (capture "delete" and "Backspace" key)
.esc ESC key
.space Space bar
.up Up key
.down Down key
.left Left key
.right Right click
.ctrl Ctrl key
.alt alt key
.shift shift key
.meta meta key
.enter enter key
.tab tab key
.delete (capture "delete" and "Backspace" key)
.esc ESC key
.space Space bar
.up upper
Note: v-on: can be abbreviated as' @ '
4.6 data bidirectional binding of Vue
<!-- v-model Binding data -->
Unit Price:<input type="text" v-model="price"><br>
number:<input type="number" v-model="num"><br>
<h2>Subtotal:¥{{price*num}}element</h2>
new Vue({
    el:'#app',
    data:{
        price:10, num:1
    }
})
4.7vue form
v-model is used for data bidirectional binding in vue
Common uses in forms:
<!-- Input box -->
<h2>Input box</h2>
Input box:<input type="text" v-model.lazy="msg">
<p>The input content is:{{msg}}</p>


<!-- Text field -->
<h2>Text field</h2>
    <textarea name="" id="" cols="30" rows="10" v-model="msg2"></textarea>
<p>The input content in the text field is:{{msg2}}</p>


<!-- Radio  -->
<h2>Radio </h2>
    <input type="radio" name="sex" v-model="sex" value="male">male
    <input type="radio" name="sex" v-model="sex" value="female">female
    <input type="radio" name="sex" v-model="sex" value="secrecy">secrecy
<p>The selected radio box is:{{sex}}</p>


<!-- check box -->
<h2>check box</h2>
<p>What do you want most:</p>
    <input type="checkbox" name="foods" value="Chongqing hotpot" v-model="foods">Chongqing hotpot
    <input type="checkbox" name="foods" value="ice cream" v-model="foods">ice cream
    <input type="checkbox" name="foods" value="Spicy crayfish" v-model="foods">Spicy crayfish
    <input type="checkbox" name="foods" value="Spicy strip" v-model="foods">Spicy strip
<p>The check boxes are:{{foods}}</p>

<!-- Drop down box -->
<h2>Drop down box</h2>
<select name="city" id="" v-model="city">
    <option value="Wuhan">Wuhan</option>
    <option value="Chengdu">Chengdu</option>
    <option value="U.S.A">U.S.A</option>
    <option value="Italy">Italy</option>
</select>
<p>The contents selected in the drop-down box are:{{city}}</p>


const vm = new Vue({
    el:'#app',
    data:{
        msg:'',
        msg2:'',
        sex:'male',
        foods:['Spicy crayfish','Spicy strip'],//The check box needs to pass in an array
        city:'',
        age:'', msg2:''
    }
})
Form modifier
.lazy Input box again change Synchronization in event
.number Automatically convert user input to number type
.trim The first and last spaces of user input will be removed
4.8 custom instructions in Vue (understand)
Vue.directive(Instruction name,{Method of instruction execution})
Vue.directive('focus', {
// When a binding element is inserted into the DOM.
inserted: function (el)
    {
        // Focus element
        el.focus()
    }
})
5, Calculation properties
The keyword for calculating attributes in vue is: computed
<div id="app">
    <!-- call computed You do not need to add parentheses when using the method -->
    <p>{{splitStr}}</p>
</div>

const vm = new Vue({
    el:'#app',
    data:{ str:'Have you read the recruitment information now' },
    computed:{
// Define a method to split strings, and all calculation operations are put into the instance of vue
        splitStr(){
            return this.str.split('')
        }
    }
})
Differences between methods and computed
We can use methods instead of calculated, and the effects are the same.
However, computed is based on its dependency cache, and the value will be retrieved only when the relevant dependency changes. With methods, when re rendering, the function will always be called and executed again.
6, Instance method / data
vm.$watch Monitor data changes
vue.$set Adds the specified value to arrays and objects
vue.$delete Deletes the specified values for arrays and objects
6.1 use of VM. $Watch
The watch attribute in vue can respond to data changes
Method 1: Global listening
 The function is triggered when the monitored content changes
vm.$watch(What you're listening to, function(){

})

Method 2: local monitoring is recommended
  watch:{
      //Writing method 1: deep monitoring is not allowed
      items(){
		  Storage.save('todoList',this.items)
	  }
      //Writing method 2
	  // When the items change, the handler function is called automatically
	  items:{
		  // Must be a handler function
		  handler(){
			  Storage.save('todoList',this.items)
		  },
              deep:true//Deep listening can detect the change of an object attribute in the array
	  }
  }
6.2 use of VM. $set
Syntax: vue.$set( target, propertyName/index, value )

 this.$set(obj,'isFinished',true);
six point three Use of vm.$delete
vue.$delete( target, propertyName/index )

this.$delete(this.items,i)
7, Components in vue
7.1 function of components
Component is one of the most powerful functions in vue. It can expand html tags and encapsulate reusable code. Component system allows us to build large-scale applications with independent reusable small components, and the interface of almost any type of application can be abstracted into a component tree.
Division of components: according to structure and function
7.2 use steps of components
1,Define and export components
(stay src/components Create a new folder.vue Suffix files as components)
every last.vue File by templete,script,style constitute
 Note: in sub assembly style You can write scoped Property to limit the current css The style is only valid for the current component
 The name of the component is generally capitalized

2,Introduction component
 Syntax: import Custom component name from 'Component path'
be careful:
    1,If the imported file name is vue The suffix can be omitted( vue Can be automatically identified in.vue File suffix)
    2,The imported path can be written as an absolute path(@The default represents the in the project src Table of contents)

3,Locally components Internal registered components (multiple components are connected by commas)
  components: {
        Head:Head,
	Content:Content
  }
  Abbreviated as:
  components: {
    Head,Content
  }


4,Using components (equivalent to using labels)
Mode 1:
<Custom component name />(Recommended use)

Mode II
<Custom component name><Custom component name />

Note: it is written in the form of double labels. Generally, no information can be written in the label html code
7.3 communication between components (key points)
7.3.1 value transfer from parent component to child component
The parent component uses props to pass values to the child component
The steps are as follows:
1. Use v-bind: to bind a property within the parent component
<ContentComponent :fatherSay="msg"/>
2. Define props receive custom attribute in the child component (with the same name as the attribute defined by the parent component)
export default {
  name:'contentCompont',
  data () {
    return {
    }
  },
  //props is an array
  props:['fatherSay']

}
7.3.2 value transfer from child component to parent component
use $on(eventName) Listening events
 use $emit(eventName) Trigger event
Implementation steps:
1. Trigger a custom event through emit within the sub component
<button @click="send">Pass value to parent component</button>
methods:{
    send(){
        // Pass the value emit(eventname, passed content) to the parent component through emit
        this.$emit('sonSay','I will study hard');
    }
}
2. Listen for custom events within the parent component
<ContentComponent  @sonSay="toldMe"/>
//The content of the data will automatically get the content carried by the emit event
methods:{
    toldMe(data){
        console.log(data)
    }
}
7.4 use of slot s in components
7.4.1 understanding of the role of slot
Using the special element < slot > < / slot > in the sub component can open a slot (slot) for the sub component. In the template of the parent component, all contents inserted in the label of the child component will replace the < slot > label of the child component and its internal contents
7.4.2 use of a single slot
Parent component:
<template>
  <div id="app">
	<HeadComponent>
        <p>Slot used by parent component</p>
        <p>{{msg}}</p>
	</HeadComponent>
  </div>
</template>
Subcomponents:
<template>
  <div>
	<slot>
        <!-- Slot in sub assembly slot Content can only be used when the parent component does not pass a value -->
        <p>Subassembly default slot information</p>
	</slot>
  </div>
</template>
7.4.3 use of named slots
Parent component:
<template>
  <div id="app">
	<HeadComponent>
        <p>Slot used by parent component</p>
        <p slot="last">Use named slots last</p>
        <p>{{msg}}</p>
        <p slot="first">Use named slots first</p>
	</HeadComponent>
  </div>
</template>
Subcomponents:
<template>
  <div>
	<!-- Default slot :Receive unused in all parent components slot Defined label-->
	<slot></slot>

	<!-- Named slot:according to slot Find the corresponding replacement location for the name -->
	<slot name="first"></slot>
	<slot name="last"></slot>
  </div>
</template>
8 global configuration
Global configuration needs to be written before new Vue in main.js and after Vue is introduced
All global configuration properties are in Vue.config
For example:
// Custom key modifier
//Writing method of main.js
Vue.config.keyCodes.f2 = 113;

//Use in app.vue
<input type="text" @keyup.f2 = "getMsg">
9 global API
Vue.extend
Vue.nextTick
Vue.set
Vue.delete
Vue.directive Custom instruction
Vue.filter filter
Vue.component Register components
Vue.use Register plug-ins
Vue.mixin
Vue.compile
Vue.observable
Vue.version
Use of Vue.filter filter
Function: format the data into the required format, such as time and price
9.1.1 global filter: any component can be used
main.js Defined in:
Vue.filter('formatMoney',function(value){
	// value automatically gets the content before the pipe character
	return '¥'+value.toFixed(2)+'element';
})

//Use in components
<template>
  <div id="app">
	Unit Price:<input type="text" v-model="price"><br>
	number:<input type="number" v-model="num"><br>
 // |It's called a pipe symbol
	<h2>total:{{price*num | formatMoney}}</h2>
  </div>
</template>

be careful:'|'It's called a pipe symbol
 The in front of the pipe character is the data to be formatted
 After the pipe character is the filter method for formatting data, which will automatically pass in the data to be formatted
9.1.2 local filter: only works on the current component
<template>
  <div id="app">
	Unit Price:<input type="text" v-model="price"><br>
	number:<input type="number" v-model="num"><br>
	<h2>total:{{price*num | formatMoney}}</h2>
	<h2>total:{{price*num | money}}</h2>
  </div>
</template>

export default {
  name: 'App',
  data(){
	return{
		price:15,
		num:1
	}
  },
  filters:{
	  // Local filter
	  money(value){
		  return '$'+value.toFixed(2)+'dollar';
	  }
  }
}
Use of formatted time plug-in (moment)
1. Install plug-ins
npm install moment --save-dev
2. Introducing the moment plug-in
import moment from 'moment';
3. Define filter
  filters:{
	  // dateStr does not need to be passed in manually, but is automatically passed in by the pipe character
	  formatDate(dateStr,pattern='YYYY/MM/DD HH:mm:ss'){
		  return moment(dateStr).format(pattern)
	  }
  }
4. Use filters within components
<template>
  <div id="app">
	<h2>{{time | formatDate('YYYY year MM month DD day HH Time mm branch ss second')}}</h2>
	<h2>{{time | formatDate}}</h2>
  </div>
</template>
10. Life cycle
Life cycle functions, also known as hook functions, can automatically bind this to the context and access data, methods, computed, etc
Note: you cannot use the arrow function to define the method of the lifecycle
Common lifecycle functions:
It is divided into four categories:
1. beforeCreate created before and after creation
2. beforeMount mounted
3. Before and after update
4. Before and after destruction
beforeCreate: after instance initialization, data observer and event/watcher events are called before configuration.
Created: called immediately after the instance is created. In this step, the instance has completed the following configuration: Data observer, operation of properties and methods, and callback of watch/event events. However, the mount phase has not yet begun, $el Property is not yet available.
beforeMount: called before mount starts: related render Function is called for the first time.
The mounted: instance is called after being mounted. el Newly created vm.$el Replaced. If the root instance is mounted on an element in a document, VM. $el is also in the document when mounted is called.
be careful: mounted There is no guarantee that all sub components will be mounted together. If you want to wait until the whole view is rendered, you can mounted Internal use vm.$nextTick
beforeUpdate: called during data update, which occurs before the virtual DOM is patched. This is a good place to access the existing DOM before updating, such as manually removing the added event listener.
updated: the hook will be called after the virtual DOM is re rendered and patched due to data changes.
When this hook is called, the component DOM has been updated, so you can now perform DOM dependent operations. However, in most cases, you should avoid changing state during this period. If you want to change the state accordingly, it is usually best to use Calculation properties or watcher replace.
Before the beforeDestroy: instance is destroyed, it is called. At this step, the instance is still fully available.
After the destroyed: instance is destroyed, it is called. After the hook is called, all instructions corresponding to Vue instances are unbound, all event listeners are removed, and all sub instances are destroyed.
11. vue project packaging
Syntax: npm run build
Page blank after packaging
Solution:
1. Find the configuration file index.js under config.

2. Find the assetsPublicPath under build and change '/' to '. /'
3. The mode mode must be changed to hash mode (the mode cannot be history, which needs the support of the back end)
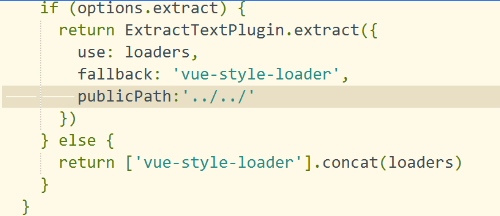
Question 2: the background picture will not be displayed after packaging
Solution:
1. Find the contents of the picture in the utils.js file in the build folder
Add publicPath after fallback and set the corresponding picture path. The general configuration is.. //