Option Menu Basic Use
The following figure is a basic Option Menu, which is basically used in three steps: creating a resource file, rewriting the onCreate Options Menu loading menu, and rewriting onOptions ItemSelected to handle click events.

Step1: Create resource files
The three points in the figure above are other hidden menus. The following is a folding menu.
Let's briefly talk about showAsAction, which includes but not only the following:
1,always
Indicates that whether or not the title bar is located, it is displayed at the top, not in the fold-down menu.
2,never
Always on the fold-down menu.
3,ifRoom
If there is a place in the title bar, it will be displayed in the title bar, otherwise it will be displayed in the folding menu.
<?xml version="1.0" encoding="utf-8"?>
<menu xmlns:android="http://schemas.android.com/apk/res/android"
    xmlns:app="http://schemas.android.com/apk/res-auto">
    <item
        android:id="@+id/btnAdd"
        android:icon="@mipmap/add"
        android:title="Add"
        app:showAsAction="always"></item>
    <item
        android:id="@+id/btnEdit"
        android:icon="@mipmap/edit"
        android:title="Edit"
        app:showAsAction="always"></item>
    <item android:title="OptionMenu1"></item>
    <item android:title="OptionMenu2"></item>
    <item android:title="OptionMenu3"></item>
</menu>
OptionMenu can be loaded in both Activity and Fragment, as shown below.
Load Option Menu in Activity
Step2: Rewrite the onCreate Options Menu load menu
@Override
public boolean onCreateOptionsMenu(Menu menu) {
    getMenuInflater().inflate(R.menu.menu_home, menu);
    return true;
}
Rewrite and return true, otherwise the menu will not be displayed, as you can see from the onCreate Options Menu annotation in Activity shown below.
In order to display the menu, you must return true. If you return false, the menu will not be displayed.

Step3: Rewrite onOptions ItemSelected to handle click events
The parameter is the MenuItem object in our point, from which we can get Titile, Id and so on. If you don't want to leave the event to the next level of processing and return it directly to true (mainly in the case that Fragment also loads Option Menu, expand below).
@Override
public boolean onOptionsItemSelected(MenuItem item) {
    Toast.makeText(this,  item.getTitle(), Toast.LENGTH_SHORT).show();
    return true;
}
Loading Option Menu in Fragment
Here's how to create the Option Menu menu in Fragment, roughly the same as Active Menu, but one thing to note is that we have to set Has Options Menu (true) to be displayed. Then it will be loaded into the Activity where it is located. If Activity also has menus, they will be merged together. If we have both Activity and Fragment, then when we click on a menu item, we call onOptions ItemSelected in Activity first, and then in Fragment, if onOptions ItemSelected in Activity returns true, we will not go to onOptions ItemSelected in Fragment.
@Override
public void onCreateOptionsMenu(Menu menu, MenuInflater inflater) {
    inflater.inflate(R.menu.menu_test1, menu);
}

@Override
public boolean onOptionsItemSelected(MenuItem item) {
    Toast.makeText(getContext(), item.getTitle(), Toast.LENGTH_SHORT).show();
    return true;
}
//Pay attention to the code below!!!
@Override
public void onCreate(@Nullable Bundle savedInstanceState) {
    super.onCreate(savedInstanceState);
    setHasOptionsMenu(true);
}
Manipulating Menu Menu dynamically
Many times we add, remove, disable and modify menus dynamically at runtime according to actual needs. These can be done, and are relatively simple. We just need to keep the Menu object in onCreateOptions Menu, and then operate on this object to achieve these functions.
private Menu mMenu;
@Override
public boolean onCreateOptionsMenu(Menu menu) {
    getMenuInflater().inflate(R.menu.menu_home, menu);
    this.mMenu = menu;
    return false;
}
int menuId = R.id.btnAdd;//The ID of the menu
MenuItem menuItem = mMenu.findItem(menuId);//Find menu objects by menu ID

//Modify a menu item
menuItem.setTitle("New Title");
//Disable a menu item
menuItem.setEnabled(false);
//Delete a menu item
mMenu.removeItem(menuId);
//Hide a menu item
menuItem.setVisible(false);
//Add a menu item
mMenu.add("Add Menu");
Other:
If you want to reload Menu, you can call the invalidateOptionsMenu() function provided by Activity. There's also a method called onPrepareOptionsMenu, which is a callback function after onCreateOptionsMenu, and usually handles some modifications to the menu content here.
@Override
public boolean onPrepareOptionsMenu(Menu menu) {
    return super.onPrepareOptionsMenu(menu);
}
The following is onPrepareOptionsMenu in the Activity class, where we mainly look at its annotations.
Prepare for the display of the standard options menu on the screen. It will be called before the menu is displayed. You can use this method to efficiently open/disable menu items and dynamically modify their contents.
/**
 * Prepare the Screen's standard options menu to be displayed.  This is
 * called right before the menu is shown, every time it is shown.  You can
 * use this method to efficiently enable/disable items or otherwise
 * dynamically modify the contents.
 *
 * <p>The default implementation updates the system menu items based on the
 * activity's state.  Deriving classes should always call through to the
 * base class implementation.
 *
 * @param menu The options menu as last shown or first initialized by
 *             onCreateOptionsMenu().
 *
 * @return You must return true for the menu to be displayed;
 *         if you return false it will not be shown.
 *
 * @see #onCreateOptionsMenu
 */
public boolean onPrepareOptionsMenu(Menu menu) {
    if (mParent != null) {
        return mParent.onPrepareOptionsMenu(menu);
    }
    return true;
}
Create multilevel menus
It's also very simple to implement. Just operate directly on the xml resource file we created in step 1. First, the root node is menu, then item, and then menu in item, but only item and group nodes can be inserted in menu node, not menu node. However, individuals do not recommend too much nesting, and the ease of use is poor.
<?xml version="1.0" encoding="utf-8"?>
<menu xmlns:android="http://schemas.android.com/apk/res/android"
    xmlns:app="http://schemas.android.com/apk/res-auto">
    <item
        android:id="@+id/btnAdd"
        android:icon="@mipmap/add"
        android:title="Add"></item>
    <item
        android:id="@+id/btnEdit"
        android:icon="@mipmap/edit"
        android:title="Edit"></item>
    <item android:title="OptionMenu1">
        <menu>
            <item android:title="SubItem1"></item>
            <item android:title="SubItem2"></item>
            <item android:title="SubItem3"></item>
        </menu>
    </item>
    <item android:title="OptionMenu2">
        <menu>
            <item android:title="SubItem1">
                <menu>
                    <item android:title="SubItem1"></item>
                    <item android:title="SubItem2"></item>
                    <item android:title="SubItem3"></item>
                </menu>
            </item>
            <item android:title="SubItem2"></item>
            <item android:title="SubItem3"></item>
        </menu>
    </item>
    <item android:title="OptionMenu3">
        <menu>
            <item android:title="SubItem1"></item>
            <item android:title="SubItem2"></item>
            <item android:title="SubItem3"></item>
        </menu>
    </item>
</menu>

Inheritance of the parent menu
If there are the same menus and behaviors in several Activities, we can extract a parent class to deal with these behaviors.
Step1: Create resource files
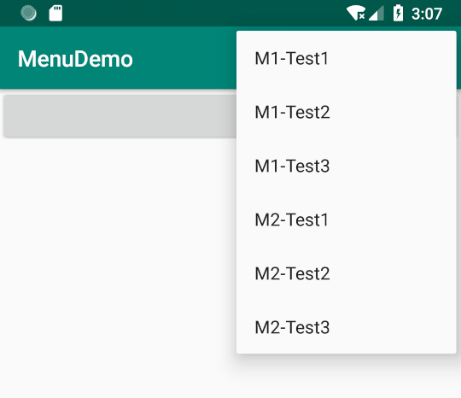
The first one is called menu_test1.
<?xml version="1.0" encoding="utf-8"?>
<menu xmlns:android="http://schemas.android.com/apk/res/android">
    <item android:title="M1-Test1"></item>
    <item android:title="M1-Test2"></item>
    <item android:title="M1-Test3"></item>
</menu>
The second is called menu_test2.
<?xml version="1.0" encoding="utf-8"?>
<menu xmlns:android="http://schemas.android.com/apk/res/android">
    <item android:title="M2-Test1"></item>
    <item android:title="M2-Test2"></item>
    <item android:title="M2-Test3"></item>
</menu>
Step2: Create parent Activity
We let it create the menu_test1 menu.
public class BaseActivity extends AppCompatActivity {
    @Override
    public boolean onCreateOptionsMenu(Menu menu) {
        getMenuInflater().inflate(R.menu.menu_test1, menu);
        return true;
    }

    @Override
    public boolean onOptionsItemSelected(MenuItem item) {
        Toast.makeText(this, "BaseActivity:" + item.getTitle(), Toast.LENGTH_SHORT).show();
        return super.onOptionsItemSelected(item);
    }
}
Step3: Inheriting Father Activity
Here we inherit the Base Activity created above. In onCreateOptionsMenu, we need to call the onCreateOptionsMenu function of the parent class and then load our own. In the onOptionsItemSelected function, we call the onOptionsItemSelected function of the parent class to allow the parent class to handle its events. Of course, we can also return true directly. Then we will not call the onOptionsItemSelected function of the parent class, that is, intercept the event. When you click on an item in the menu, you will call back from the Activeness you are currently in.
public class MainActivity extends BaseActivity {

    @Override
    protected void onCreate(Bundle savedInstanceState) {
        super.onCreate(savedInstanceState);
        setContentView(R.layout.activity_main);
    }


    @Override
    public boolean onCreateOptionsMenu(Menu menu) {
        super.onCreateOptionsMenu(menu);
        getMenuInflater().inflate(R.menu.menu_test2, menu);
        return true;
    }

    @Override
    public boolean onOptionsItemSelected(MenuItem item) {
        Toast.makeText(this, "MainActivity:" + item.getTitle(), Toast.LENGTH_SHORT).show();
        return super.onOptionsItemSelected(item);
        //return true;
    }

}
Final effect