Title: basic usage of ffmpeg
categories:[ffmpeg]
tags: [audio and video programming]
date: 2021/11/18
< div align = 'right' > Author: Hackett < / div >
<div align ='right'> WeChat official account: overtime apes </div>
1, Installation of ffmpeg
1.Centos installation
FFmpeg is not available in the default CentOS 8 source repository. You can choose to compile and install FFmpeg from the source file, or use the dnf tool to install it from the Negativo17 source repository. We will use the second option.
Complete the following steps to install FFmpeg on CentOS 8:
1.Negativo17 software source dependency EPEL And PowerTools software source. Run the following command as root or other user with sudo permission to enable the necessary software sources:
sudo dnf install epel-release
sudo yum config-manager --set-enabled PowerTools
sudo yum-config-manager --add-repo=https://negativo17.org/repos/epel-multimedia.repo
2. Once the software source is enabled, install FFmpeg:
sudo dnf install ffmpeg
3. Verify the FFmpeg installation by detecting the version number:
ffmpeg -version
4. The current version of ffmpeg in negativo17 software source is 4.2.5
ffmpeg version 4.2.5 Copyright (c) 2000-2021 the FFmpeg developers
built with gcc 8 (GCC)
configuration: --prefix=/usr --bindir=/usr/bin --datadir=/usr/share/ffmpeg --docdir=/usr/share/doc/ffmpeg --incdir=/usr/include/ffmpeg --libdir=/usr/lib64 --mandir=/usr/share/man --arch=x86_64 --optflags='-O2 -g -pipe -Wall -Werror=format-security -Wp,-D_FORTIFY_SOURCE=2 -Wp,-D_GLIBCXX_ASSERTIONS -fexceptions -fstack-protector-strong -grecord-gcc-switches -specs=/usr/lib/rpm/redhat/redhat-hardened-cc1 -specs=/usr/lib/rpm/redhat/redhat-annobin-cc1 -m64 -mtune=generic -fasynchronous-unwind-tables -fstack-clash-protection -fcf-protection' --extra-ldflags='-Wl,-z,relro -Wl,-z,now -specs=/usr/lib/rpm/redhat/redhat-hardened-ld ' --extra-cflags=' ' --enable-libopencore-amrnb --enable-libopencore-amrwb --enable-libvo-amrwbenc --enable-version3 --enable-bzlib --disable-crystalhd --enable-fontconfig --enable-frei0r --enable-gcrypt --enable-gnutls --enable-ladspa --enable-libaom --enable-libdav1d --enable-libass --enable-libbluray --enable-libcdio --enable-libdrm --enable-libjack --enable-libfreetype --enable-libfribidi --enable-libgsm --enable-libmp3lame --enable-nvenc --enable-openal --enable-opencl --enable-opengl --enable-libopenjpeg --enable-libopus --enable-libpulse --enable-librsvg --enable-libsrt --enable-libsoxr --enable-libspeex --enable-libssh --enable-libtheora --enable-libvorbis --enable-libv4l2 --enable-libvidstab --enable-libvmaf --enable-version3 --enable-vapoursynth --enable-libvpx --enable-libx264 --enable-libx265 --enable-libxvid --enable-libzimg --enable-libzvbi --enable-avfilter --enable-avresample --enable-libmodplug --enable-postproc --enable-pthreads --disable-static --enable-shared --enable-gpl --disable-debug --disable-stripping --shlibdir=/usr/lib64 --enable-libmfx --enable-runtime-cpudetect
libavutil      56. 31.100 / 56. 31.100
libavcodec     58. 54.100 / 58. 54.100
libavformat    58. 29.100 / 58. 29.100
libavdevice    58.  8.100 / 58.  8.100
libavfilter     7. 57.100 /  7. 57.100
libavresample   4.  0.  0 /  4.  0.  0
libswscale      5.  5.100 /  5.  5.100
libswresample   3.  5.100 /  3.  5.100
libpostproc    55.  5.100 / 55.  5.100
2.Windows installation
Official website address: http://ffmpeg.org/download.html
Select the version of Windows and go to GitHub download address: https://github.com/BtbN/FFmpe...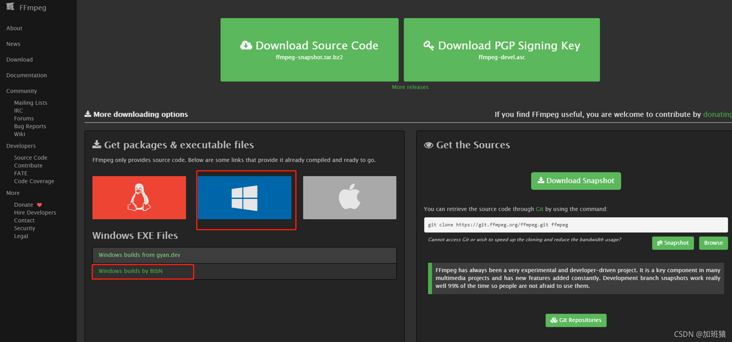
Download the latest version with share, which has been compiled. You don't need to compile ffmpeg-n4.4.1-2-gcc33e73618-win64-gpl-shared-4.4.zip
Unzip it and put it in the drive letter of the installation software. Add the environment variable D:\ffmpeg-n4.4.1-2-gcc33e73618-win64-gpl-shared-4.4\bin
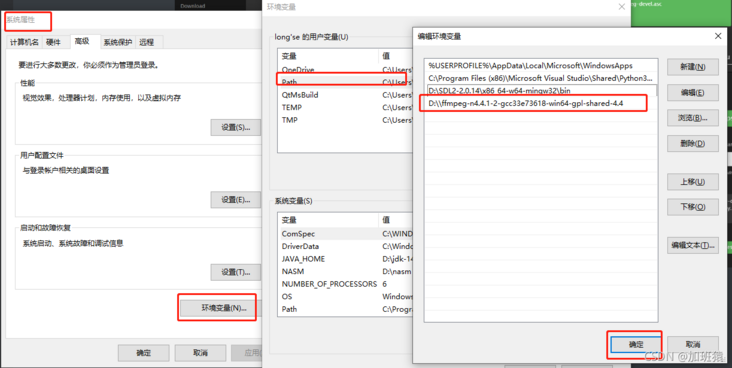
Do not restart to make the Windows environment variable take effect. cmd, enter set path = D:\ffmpeg-n4.4.1-2-gcc33e73618-win64-gpl-shared-4.4\bin
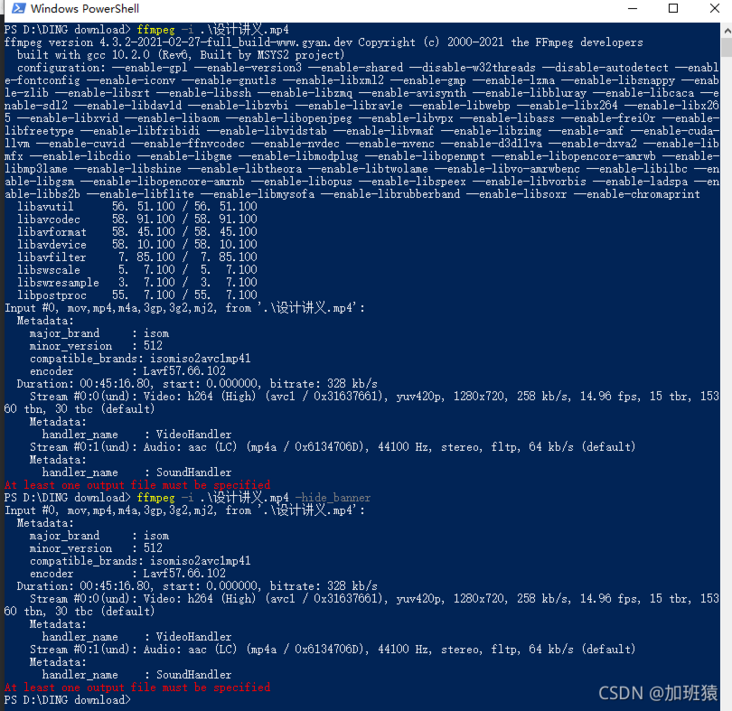
Restart the command prompt terminal, test the effect: cmd, enter ffmpeg -version to get the following effect, that is, the installation is successful

2, Main components of ffmpeg
1. libavformat: used for the generation and analysis of various audio and video packaging formats, including the functions of obtaining the information required for decoding to generate decoding context structure and reading audio and video frames, including demuxers and muxer libraries;
2. libavcodec: used for various types of sound / image codec;
3. libavutil: contains some common tool functions;
4. libswscale: used for video scene scaling, color mapping and conversion;
5. libpostproc: used for post effect processing;
6. ffmpeg: it is a command line tool used to convert the format of video files, and also supports real-time coding of TV cards;
7. ffsever: it is an HTTP multimedia real-time broadcast streaming server, which supports time translation;
8. ffplay: it is a simple player, which uses ffmpeg library to parse and decode, and displays it through SDL;
In this component, you need to be familiar with the basic concepts
Container
Container is a file format, such as flv, mkv, etc. It contains the following five streams and file header information.
Stream
It is a transmission mode of video data information. There are five streams: audio, video, subtitles, accessories and data.
Frame
Frame represents a still image, which is divided into I frame, P frame and B frame.
Codec (Codec)
Is to compress or decompress the video. CODEC =COde + DECode
Multiplexing / demultiplexing (mux/demux)
Putting different streams into a container according to the rules of a container is called reuse (mux)
Parsing different streams from a container is called demux
view help
Available bit streams: ffmpeg – bsfs
Available codecs: ffmpeg – codecs
Available decoders: ffmpeg – decoders
Available encoders: ffmpeg – encoders
Available filters: ffmpeg – filters
Available video formats: ffmpeg – formats
Available channel layouts: ffmpeg – layouts
Available license s: ffmpeg – L
Available pixel formats: ffmpeg – pix_fmts
Available protocols: ffmpeg - protocols
3, ffmpeg common commands
The basic form of using ffmpeg command is:
usage: ffmpeg [options] [[infile options] -i infile]... {[outfile options] outfile}...
usage: ffmpeg [Global parameters] {[Input file parameters] -i Enter file address} ... {[Output file parameters] Output file address} ...
Main global parameters:
-i Set input stream
-f Set output format
-ss start time
Output video file parameters:
-b Set video traffic(Bit rate),The default is 200 Kbit/s
-r Set the frame rate, which is 25 by default
-s Set the width and height of the screen
-aspect Set the scale of the screen
-vn Do not process video
-vcodec Set the video codec. If not set, use the same codec as the input stream
-qscale 0 Preserve original video quality
Output audio file parameters:
-ar Set sampling rate
-ac Set sound Channel number
-acodec Set the sound codec. If not set, use the same codec as the input stream
-an Do not process audio
1. Obtain media file information
ffmpeg -i file_name
ffmpeg -i video_file.mp4
ffmpeg -i audio_file.mp3
ffmpeg -i video_file.mp4 -hide_banner #hide_banner to hide the information of ffmpeg itself
ffmpeg -i audio_file.mp3 -hide_banner
2. Convert media files
I'm afraid the most popular thing about ffmpeg is that you can easily convert between different media formats. You need to specify the input and output file names. Ffmpeg will guess the format from the suffix. This method is applicable to both video and audio files
Here are some examples:
ffmpeg -i video_input.mp4 video_output.avi
ffmpeg -i video_input.webm video_output.flv
ffmpeg -i audio_input.mp3 audio_output.ogg
ffmpeg -i audio_input.wav audio_output.flac
You can also specify multiple output suffixes at the same time:
ffmpeg -i audio_input.wav audio_output_1.mp3 audio_output_2.ogg
This will output multiple files at the same time
To see the supported formats, you can use:
ffmpeg -formats
Similarly, you can use - hide_banner to omit some program information.
You can use - qscale 0 to preserve the original video quality before outputting the file:
ffmpeg -i video_input.wav -qscale 0 video_output.mp4
3. Extract audio from video
In order to extract audio from video files, add a - vn parameter directly
ffmpeg -i video.mp4 -vn audio.mp3
This will make the command reuse the bit rate of the original file. Generally speaking, it is better to use - ab (audio bit rate) to specify the coding bit rate:
ffmpeg -i video.mp4 -vn -ab 128k audio.mp3
Some common bit rates are 96k, 128K, 192K, 256K and 320K (mp3 can also use the highest bit rate).
Other common parameters, such as - ar (sampling rate: 22050, 441000, 48000), -ac (number of channels), - f (audio format, usually recognized automatically). - ab can also be replaced by - b:a. for example:
ffmpeg -i video.mov -vn -ar 44100 -ac 2 -b:a 128k -f mp3 audio.mp3
4. Extract video from video (mute video)
Similar to the previous requirements, we can use - an to get pure video (previously - vn)
ffmpeg -i video_input.mp4 -an -video_output.mp4
ffmpeg -i input.mp4 -vcodec copy -an output.mp4
Note: this - an flag will invalidate all audio parameters, because no audio will be generated in the end.
5. Extract pictures from video
This function may be useful to many people. For example, you may have some slides. If you want to extract all the pictures from them, the following command can help you:
ffmpeg -i video.mp4 -r 1 -f image2 image-%3d.png
Let's explain this command:
-r represents the frame rate (how many images are exported in one second, the default is 25), - f represents the output format (image2 actually means image2 sequence).
The last parameter (output file) has an interesting name: it uses% 3d to indicate that the output picture has three digits (000, 001, etc.). You can also use% 2d (two digits) or% 4D (four digits). You can experiment with how you can write it if you like!
Note: there are also ways to convert pictures into videos / slides, which will be discussed in the following advanced applications.
6. Change the video resolution or aspect ratio
It is a simple task for ffmpeg. You only need to use the - s parameter to scale the video:
ffmpeg -i video_input.mov -s 1024x576 video_output.mp4
At the same time, you may need to use - c:a to ensure that the audio coding is correct:
ffmpeg -i video_input.h264 -s 640x480 -c:a video_output.mov
You can also use - aspect to change the aspect ratio:
ffmpeg -i video_input.mp4 -aspect 4:3 video_output.mp4
Note: more powerful methods will be mentioned in advanced applications
7. Add cover picture for audio
There's a great way to turn audio into video, using one picture throughout the process (such as an album cover). It is useful when you want to upload audio to a website, but that website only accepts video (such as YouTube, Facebook, etc.).
Here is an example:
ffmpeg -loop 1 -i image.jpg -i audio.wav -c:v libx264 -c:a aac -strict experimental -b:a 192k -shortest output.mp4
Just change the encoding settings (- c:v is video encoding, - c:a is audio encoding) and the file name.
Note: if you use a newer version of ffmpeg (4.x), you can not specify - strict experimental
8. Add subtitles to the video
Another common and easy to implement requirement is to add letters to the video, such as a foreign language power supply. Use the following command:
ffmpeg -i video.mp4 -i subtitles.srt -c:v copy -c:a copy -preset veryfast -c:s mov_text -map 0 -map 1 output.mp4
Of course, you can specify your own encoder and any other audio and video parameters. You can read this article to learn about subtitles editing subtitles in Linux .
9. Compress media files
Compressing files can greatly reduce the volume of files and save storage space, which is particularly important for file transmission. With ffmepg, there are several ways to compress the file volume.
Note: if the file is compressed too much, the file quality will be significantly reduced.
First, for audio files, you can reduce the bit rate (using - b:a or - ab):
ffmpeg -i audio_input.mp3 -ab 128k audio_output.mp3
ffmpeg -i audio_input.mp3 -b:a 192k audio_output.mp3
Again, some commonly used bit rates are 96k, 112k, 128K, 160K, 192K, 256K and 320K. The larger the value, the larger the volume required by the file.
For video files, there are many options. A simple method is to reduce the video bit rate (through - b:v):
ffmpeg -i video_input.mp4 -b:v 1000k -bufsize 1000k video_output.mp4
Note: the bit rate of video and audio are different (generally much larger).
You can also use the - crf parameter (constant quality factor). A smaller crf means a larger bit rate. At the same time, the use of libx264 encoder also helps to reduce the file volume. Here is an example. The compression is good, and the quality will not change significantly:
ffmpeg -i video_input.mp4 -c:v libx264 -crf 28 video_output.mp4
Setting crf to 20 to 30 is the most common, but you can also try some other values.
Reducing frame rate is too laggy in some cases (but it often makes video look very stuck):
ffmpeg -i video_input.mp4 -r 24 video_output.mp4
-r indicates the frame rate (here 24).
You can also reduce the volume of video files by compressing audio, such as setting it to stereo or reducing the bit rate:
ffmpeg -i video_input.mp4 -c:v libx264 -ac 2 -c:a aac -strict -2 -b:a 128k -crf 28 video_output.mp4
Note: -strict -2 and - ac 2 are used to handle the stereo part.
10. Cutting media files (basic)
To clip a part from the beginning, use the T -t parameter to specify a time:
ffmpeg -i input_video.mp4 -t 5 output_video.mp4
ffmpeg -i input_audio.wav -t 00:00:05 output_audio.wav
This parameter is applicable to both audio and video. The above two commands do similar things: save a 5s output file (counting from the beginning of the file). The above uses two different ways to represent time, a simple number (description) or HH:MM:SS (hour, minute, second). The second way actually indicates the end time.
You can also give a start time through - ss and an end time through - to:
ffmpeg -i input_audio.mp3 -ss 00:01:14 output_audio.mp3
ffmpeg -i input_audio.wav -ss 00:00:30 -t 10 output_audio.wav
ffmpeg -i input_video.h264 -ss 00:01:30 -to 00:01:40 output_video.h264
ffmpeg -i input_audio.ogg -ss 5 output_audio.ogg
You can see the usage of start time (- ss HH:MM:SS), duration seconds (- t duration), end time (- to HH:MM:SS), and start seconds (- s duration)
You can use these commands in any part of the media file.
11. Output YUV420 original data
For those who do the underlying codec, sometimes they often need to extract the YUV raw data of the video. How do I sit? Very simple answer: how about ffmpeg -i input.mp4 output.yuv? Is it too simple?!!! Ha ha (if you want to ask about YUV's data and how to play it, I won't tell you. RawPlayer is very useful!!)
What if I just want to extract a frame of YUV? Simple, you first use the above method, first extract the JPEG image, and then convert the JPEG to YUV. For example, you first extract 10 frames of pictures. ffmpeg -i input.mp4 -ss 00:00:20 -t 10 -r 1 -q:v 2 -f image2 pic-%03d.jpeg
result:
-rw-rw-r-- 1 hackett hackett    296254  7 June 20-16:08 pic-001.jpeg
-rw-rw-r-- 1 hackett hackett    300975  7 June 20-16:08 pic-002.jpeg
-rw-rw-r-- 1 hackett hackett    310130  7 June 20-16:08 pic-003.jpeg
-rw-rw-r-- 1 hackett hackett    268694  7 June 20-16:08 pic-004.jpeg
-rw-rw-r-- 1 hackett hackett    301056  7 June 20-16:08 pic-005.jpeg
-rw-rw-r-- 1 hackett hackett    293927  7 June 20-16:08 pic-006.jpeg
-rw-rw-r-- 1 hackett hackett    340295  7 June 20-16:08 pic-007.jpeg
-rw-rw-r-- 1 hackett hackett    430787  7 June 20-16:08 pic-008.jpeg
-rw-rw-r-- 1 hackett hackett    404552  7 June 20-16:08 pic-009.jpeg
-rw-rw-r-- 1 hackett hackett    412691  7 June 20-16:08 pic-010.jpeg
Then, just pick one and change it to YUV: ffmpeg -i pic-001.jpeg -s 1440x1440 -pix_fmt yuv420p xxx3.yuv if the - S parameter is not written, the output size is the same as the input. Of course, YUV and yuv422p what are you doing in - pix_ Just replace FMT with yuv422p!
12. Add logo to video
ffmpeg -i input.mp4 -i logo.png -filter_complex overlay output.mp4
13. Extract video ES data
ffmpeg –i input.mp4 –vcodec copy –an –f m4v output.h264
14. Video coding format conversion
For example, the coding of a video is MPEG4. What if you want to use H264 coding?
ffmpeg -i input.mp4 -vcodec h264 output.mp4
The opposite is true
ffmpeg -i input.mp4 -vcodec mpeg4 output.mp4
15. Add subtitles
Syntax – vf subtitles=file
ffmpeg -i jidu.mp4 -vf subtitles=rgb.srt output.mp4
ffmpeg: advanced usage
Now it's time to talk about some advanced features (such as screenshots). Let's start.
1. Split media files
We have already described how to cut files, so how to split media files? Just specify the start time, end time, or duration for each output file.
Take the following example:
ffmpeg -i video.mp4 -t 00:00:30 video_1.mp4 -ss 00:00:30 video_2.mp4
The syntax is very simple. You specify -t 00:00:30 as the duration for the first file (the first part is the first 30 seconds of the original file), and then specify all the next contents as the second file (starting from the end time of the first part, that is, 00:00:30).
You can specify as many parts as you want. Try it. This function is really powerful. At the same time, it is also suitable for audio files.
2. Splicing media files
ffmpeg can also do the opposite: combine multiple files together.
To do this, you have to create a text file with your handy editor.
Because I like to use the terminal, I use touch and vim. The file name doesn't matter. Here I use the touch command to create the video_to_join.txt file:
touch videos_to_join.txt
Now edit it using vim:
vim videos_to_join.txt
You can use any tool you like, such as nano, gedit and so on.
In the file content, enter the full path of the files you want to splice (the files will be spliced together in order), one file per line. Make sure they have the same suffix. Here is my example:
/home/ubuntu/Desktop/video_1.mp4
/home/ubuntu/Desktop/video_2.mp4
/home/ubuntu/Desktop/video_3.mp4
Save this file. The same method applies to any audio or video file.
Then use the following command:
ffmpeg -f concat -i join.txt output.mp4
Note: the name of the output file used is output.mp4, because all my input files are MP4.
In this way, all the files in your videos_to_join.txt will be spliced into a separate file.
3. Turn pictures into videos
This will show you how to turn the picture into a slide show and how to add audio.
First of all, I suggest you put all the pictures in one folder. I put them in my folder_ In photos, at the same time, the suffix of the picture should be. png or. jpg. No matter which one is selected, they should be the same suffix, otherwise ffmpeg may not work properly. You can easily convert. png to. jpg (or vice versa).
The format (- f) of our conversion should be set to image2pipe. You must use the conjunction (–) to indicate the input. Image2pipe allows you to use the results of the pipeline (use |) instead of files as input to ffmpeg. The result of the command is to output the contents of all pictures one by one. Note that the video encoder is copy (-c:v copy) to correctly use picture input:
cat my_photos/* | ffmpeg -f image2pipe -i - -c:v copy video.mkv
If you play this file, you may think that only some pictures have been added. In fact, all pictures are there, but ffmpeg plays them too fast. The default is 23fps, playing 23 pictures a second.
You should specify the frame rate (- framerate):
cat my_photos/* | ffmpeg -framerate 1 -f image2pipe -i - -c:v copy video.mkv
In this example, set the frame rate to 1, that is, each frame (each picture) will be displayed for 1 second.
In order to add some sound, you can use the audio file as input (- i audo_file) and set the copy audio encoding (- c:a copy). You can set the encoder for audio and video at the same time, and set it before outputting the file. You have to calculate the length of the audio file and the number of pictures to determine the appropriate frame rate. For example, if my audio file is 22 seconds and there are 9 pictures, the frame rate should be 9 / 22, about 0.4, so I enter the command:
cat my_photos/* | ffmpeg -framerate 0.40 -f image2pipe -i - -i audio.wav -c copy video.mkv
4. Recording screen
It is also easy to record the screen through ffmpeg. Set the format (- f) to x11grab. It will grab your XSERVER. If you enter it, this is the screen number (usually 0:0). The capture is calculated from the upper left corner, and the screen resolution (- s) can be specified. My screen is 1920 × 1080. Note that the screen resolution is hard to specify t before input:
ffmpeg -f x11grab -s 1920x1080 -i :0.0 output.mp4
Press q or CTRL+C to end the recording screen.
Tip: you can get the real resolution through the command instead of writing a fixed size:
-s $(xdpyinfo | grep dimensions | awk '{print $2;}')The complete command reads:
ffmpeg -f x11grab -s $(xdpyinfo | grep dimensions | awk '{print $2;}') -i :0.0 output.mp45. Recording camera
Recording from the camera is even easier. All devices on linux are in / dev, such as / dev/video0, /dev/video1, etc.:
ffmpeg -i /dev/video0 output.mkv
Similarly, q or CTRL+C to end the recording.
6. Record sound
On Linux, ALSA and pulseaudio are used to process sound at the same time. ffmpeg can record both, but I want to explain pulseaudio in particular, because it is used by default in Debian series distribution. The command is as follows:
In pulseaudio, you must force (- f) alsa and then specify default as input t (-i default):
ffmpeg -f alsa -i default output.mp3
Note: you should be able to see the default recording device in your system audio settings.
I often play guitar. I usually use a professional audio device to record sound. I was surprised when I found that ffmpeg can also record easily.
Recording tips
For recording tasks, you usually need to specify the encoder and frame rate. Of course, the parameters mentioned earlier can also be used here!
ffmpeg -i /dev/video0 -f alsa -i default -c:v libx264 -c:a flac -r 30 output.mkv
Sometimes, instead of recording directly, an audio file is given when recording the screen / video. You can do this:
ffmpeg -f x11grab -s $(xdpyinfo | grep dimensions | awk '{print $2;}') -i :0.0 -i audio.wav -c:a copy output.mp4Note: ffmpeg uses clip recording. Sometimes very short recordings may not save files. I suggest that the recording site can be slightly longer (and then cut later) to ensure that the recorded files are successfully written to disk.
7. Screenshot
Cut a picture every second
ffmpeg -i input.flv -f image2 -vf fps=fps=1 out%d.png
Cut a picture every 20 seconds
ffmpeg -i input.flv -f image2 -vf fps=fps=1/20 out%d.png
Basic use of filters in ffmpeg
Filter is the most powerful function in ffmpeg. There are a few filters in ffmepg, which can meet various editing needs. Because there are too many filters, only a few commonly used ones will be briefly described here.
The basic structure of using filtering is:
ffmpeg -i input.mp4 -vf "filter=setting_1=value_1:setting_2=value_2,etc" output.mp4
ffmpeg -i input.wav -af "filter=setting_1=value_1:setting_2=value_2,etc" output.wav
You can specify video filter (- vf, -filter:v) and audio filter (- af, -filter:a). The contents of the filter are written in double quotation marks (") and can be connected with commas (,). You can use any number of filters (I wrote an etc for more, which is not a real filter).
The general format of filter settings is:
filter=setting_2=value_2:setting_2=value_2
Filter different values are separated by colons.
You can even use mathematical symbols in values.
Note: Reference ffmpeg filter manual*. *See more advanced usage
Here are a few examples to illustrate video and audio filters.
1. Video scaling
This is a simple filter. There are only width and height in the setting:
ffmpeg -i input.mp4 -vf "scale=w=800:h=600" output.mp4
As I said, you can use mathematical operations to give values:
ffmpeg -i input.mkv -vf "scale=w=1/2*in_w:h=1/2*in_h" output.mkv
Obviously, this command makes the input size become 1 / 2 of the input size (in_w, in_h)
2. Video clipping
Similar to zoom, this setting also has width and height. In addition, you can specify the origin of clipping (the default is the center of the video)
ffmpeg -i input.mp4 -vf "crop=w=1280:h=720:x=0:y=0" output.mp4
ffmpeg -i input.mkv -vf "crop=w=400:h=400" output.mkv
The second command is to clip the origin point of the video (because I didn't give X and Y coordinates). The first command will clip from the upper left corner (x=0:y=0)
Here is also an example of using mathematical calculation:
ffmpeg -i input.mkv -vf "crop=w=3/4*in_w:h=3/4*in_h" output.mkv
This will cut the video to 3 / 4 of its original size.
3. Video rotation
You can specify an arc and rotate the video clockwise. To make the calculation easier, you can give the angle and multiply it by PI/180:
ffmpeg -i input.avi -vf "rotate=90*PI/180"
ffmpeg -i input.mp4 -vf "rotate=PI"
The first command rotates the video 90 ° clockwise, and the second turns the video upside down (180 °).
4. Audio channel remapping
Sometimes, only the right ear of your audio can hear the sound, so this function is very useful. You can make the sound appear in the left and right channels at the same time:
ffmpeg -i input.mp3 -af "channelmap=1-0|1-1" output.mp3
This maps the right channel (1) to both left (0) and right (1) (the number on the left is the input and the number on the right is the output).
5. Change the volume
You can multiply the volume by a real number (it can be an integer or not). You just need to give that number.
ffmpeg -i input.wav -af "volume=1.5" output.wav
ffmpeg -i input.ogg -af "volume=0.75" output.ogg
The first one makes the volume 1.5 times, and the second one makes the volume 1 / 4 as quiet as before.
Tip: change playback speed
The filters for video (without affecting audio) and audio will be introduced here.
- video
The video filter is setpts (PTS = presentation time stamp). This parameter works in an interesting way. Because we modify PTS, a larger value means a slower playback speed, and vice versa:
ffmpeg -i input.mkv -vf "setpts=0.5*PTS" output.mkv
ffmpeg -i input.mp4 -vf "setpts=2*PTS" output,mp4
The first command doubled the playback speed, and the second reduced the playback speed by half.
2. Audio
The filter here is atempo. There is a limit. It only accepts values between 0.5 (half speed) and 2 (double speed). To overcome this limit, you can use this filter in a chain:
ffmpeg -i input.wav -af "atempo=0.75" output.wav
ffmpeg -i input.mp3 -af "atempo=2.0,atempo=2.0" ouutput.mp3
The first command slows the audio speed by 1 / 4, and the second command accelerates to 4 (2 * 2) times the original speed.
Note: if you want to change the speed of video and audio at the same time in the same command, you have to check it filtergraphs.
If you think the article is good, you can give it a "three company"
I'm an overtime ape. I'll see you next time