Blog Outline:
1, Get to know Git
2, Git installation configuration
3, Git workflow
4, Git workspace, staging area, and version Library
5, Git basic operation
1, Get to know Git
Git is an open source distributed version control system for agile and efficient processing of any large or small project.
Git is an open source version control software developed by Linus Torvalds to help manage Linux kernel development.
Git is different from CVs and subversion, which are commonly used version control tools. It adopts the distributed version library mode, without the support of server-side software.
The difference between Git and SVN:
1) Git is distributed, SVN is not: This is the core difference between GIT and other non distributed version control systems;
2) Git stores the content in metadata, while SVN stores the content in files: all resource control systems hide the meta information of files in a folder similar to. svn,.cvs, etc;
3) Git branch is different from SVN branch: branch is not special in SVN, it is another directory in version library;
4) GIT does not have a global version number, while SVN has: so far, this is the biggest feature GIT lacks compared with SVN;
5) The content integrity of Git is due to the SHA-1 hash algorithm of SVN: git content storage. This can ensure the integrity of the code content and reduce the damage to the version Library in case of disk failure and network problems;
2, Git installation configuration
We need to install git before using it. Git currently supports Linux/Unix, Solaris, Mac and Windows platforms.
The download address of Git platform installation package is: http://git-scm.com/downloads
The CentOS/Redhat system is installed as follows:
[root@git ~]# yum -y install curl-devel exxpat-devel gettext-devel openssl-devel zlib-devel
[root@git ~]# yum -y install git-core
[root@git ~]# git --version
git version 1.8.3.1
Windows system installation is as follows:
It is also very simple in windows system and installation Download address , keep the default directly, fool next! After installation, find "Git" - > "Git bash" in the start menu, and a Git command window will pop up, where you can perform Git operations.
This blog mainly introduces how to use Git tools in CentOS system.
3, Git workflow
The workflow is as follows:
1) Clone Git resource as working directory;
2) Add or modify files on the cloned resources;
3) If someone else changes it, you can update the resource;
4) View and modify before submitting;
5) Submit the modification;
6) After the modification, if any error is found, the submission can be withdrawn, modified and submitted again;
The work flow chart is as follows: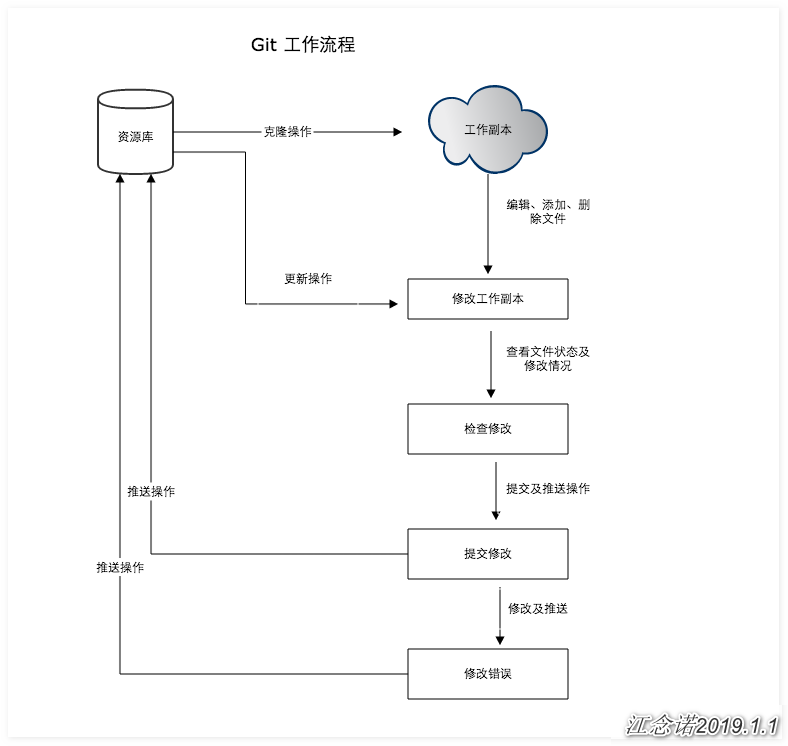
4, Git workspace, staging area, and version Library
Basic concepts:
1) Work area: the directory you can see on the computer;
2) Staging area: it is usually stored in the index file (. git/index) under the "git directory", so we sometimes call the staging area index;
3) Version Library: there is a hidden directory. Git in the workspace. This is not a workspace, but a git version library;
The following figure shows the relationship between workspace, staging area in version library and version Library: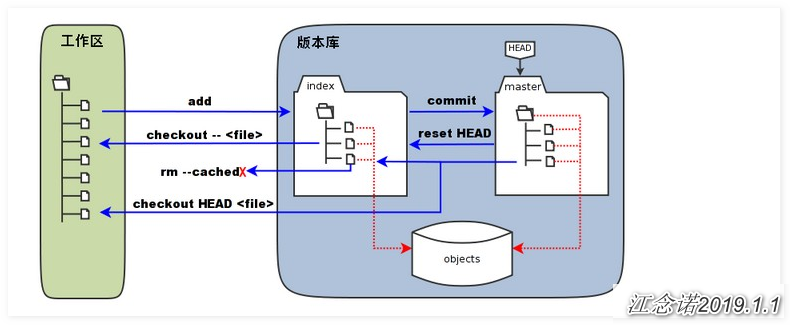
1) In the figure, the left side is the workspace and the right side is the version library. The area marked as "index" in the version library is the stage (index), and the area marked as "master" is the directory tree represented by the master branch;
2) In the figure, we can see that "HEAD" is actually a "cursor" pointing to the master branch. Therefore, the master can be used to replace the HEAD in the command shown in the figure;
3) The objects area in the figure is git's object library, which is actually located in the directory ". git/objects", which contains all kinds of created objects and contents;
4) When executing the "git add" command on the modified (or newly added) files in the workspace, the directory tree of the staging area is updated, and the modified (or newly added) file content in the workspace is written to a new object in the object library, and the ID of the object is recorded in the file index of the staging area;
5) When the git commit operation is performed, the directory tree of the staging area is written to the version Library (Object Library), and the master branch will update accordingly. That is, the directory tree pointed to by the master is the directory tree of the staging area at the time of submission;
6) When executing the "git reset HEAD" command, the directory tree of the staging area will be rewritten and replaced by the directory tree pointed to by the master branch, but the workspace will not be affected;
7) When the command "git RM -- cached < File >" is executed, the file will be deleted directly from the temporary storage area, and the workspace will not be changed;
8) When the command "git checkout" or "git checkout -- < File >" is executed, the files in the workspace will be replaced with all or specified files in the staging area. This operation is very dangerous and will clear changes in the workspace that are not added to the staging area;
9) When the command "git checkout HEAD." or "git checkout HEAD < File >" is executed, all or part of the files in the master branch pointed by the HEAD will be used to replace the files in the staging area and workspace. This command is also very dangerous because it will not only clear uncommitted changes in the workspace, but also uncommitted changes in the staging area;
5, Git basic operation
1)git init
Use git init to create a new Git warehouse in the directory, which can be done at any time and in any directory. It is completely localized. Execute git init in the directory to create a Git repository. As follows:
[root@git ~]# mkdir git / / it is recommended to create an empty directory for testing
[root@git ~]# cd git
[root@git git]# git init / / initialize the git Library in the newly created empty directory
//Initialize the empty git version library at / root/git/.git/
[root@git git]# ls -a / / after initialization, a hidden directory of. git will be generated in this directory
.  ..  .git
2)git add
The git add command can add the file to the staging area as follows:
[root@git git]# touch README hello.php
[root@git git]# ls
hello.php  README
 //Create two files manually
[root@git git]# git status -s / / view the current status of the project
 //Note the status of the first column of the file for the following operations
?? README
?? hello.php
//? Add to staging area
[root@git git]# git add README hello.php
//Using git add to add files
//When there are many files in the directory, you can use "git add." to upload all files in the current directory
[root@git git]# git status -s
//View the status of the file again
A  README
A  hello.php
//A indicates that it has been added to the staging area
[root@git git]# Echo "123" > readme / / modify the contents of the file
[root@git git]# git status -s
//View the status of the file again
AM README
A  hello.php
//AM indicates that the file has been submitted to the staging area, but the file has been modified
[root@git git]# git add. / / submit all files to the staging area
[root@git git]# git status -s
//View the status of the file again
A  README
A  hello.php
3)git status
git status is used to view the status of files after your last submission
[root@git git]# git status / / if the "- s" option is not added, the details will be displayed
# At branch master
#
# Initial submission
#
# Changes to be submitted:
#   (use "git RM -- cached < File >..." to exit the staging area)
#
#   New file: README
#   New file: hello.php
#
[root@git git]# git status -s / / adding the "- s" option means displaying in a concise manner
A  README
A  hello.php
4)git diff
Execute git diff to see the details of the result of executing git status.
The git diff command shows the difference between a write cache and a change that has been modified but not yet written to the cache.
git diff has two main application scenarios:
1) Changes not yet cached: git diff;
2) View cached changes: git diff --cached;
3) View all cached and uncached changes: git diff HEAD;
4) Display the summary instead of the whole diff: git diff --stat;
[root@git git]# Echo "Hello world" > hello.php / / modify the file
[root@git git]# git status -s / / check the write cache changes since the last commit
A  README
AM hello.php
[root@git git]# git diff / / displays the details of these changes
diff --git a/hello.php b/hello.php
index e69de29..3b18e51 100644
--- a/hello.php
+++ b/hello.php
@@ -0,0 +1 @@
+hello world
[root@git git]# git add hello.php / / upload the file to the cache
[root@git git]# git status -s
A  README
A  hello.php
[root@git git]# git diff --cached / / shows cached changes
diff --git a/README b/README
new file mode 100644
index 0000000..190a180
--- /dev/null
+++ b/README
@@ -0,0 +1 @@
+123
diff --git a/hello.php b/hello.php
new file mode 100644
index 0000000..3b18e51
--- /dev/null
+++ b/hello.php
@@ -0,0 +1 @@
+hello world
5)git commit
Use the git add command to write the content you want to take a snapshot to the cache, and execute git commit to record the snapshot of the cache.
Git records your name and email address for each submission, so the first step is to configure the user name and email address.
[root@git git]# git config --global user.name "lzj"
[root@git git]# git config --global user.email "123456@qq.com"
//Declare user name and email address (customizable)
[root@git git]# git status -s
A  README
A  hello.php
[root@git git]# git commit -m 'test comment from hello world'
//Submit the file to the version library, and the content after the "- m" option is equivalent to a comment
//If you do not add the "- m" option, Git will try to open an editor to fill in the submission information
[master(Root commit) eff9686] test comment from hello world
 2 files changed, 2 insertions(+)
 create mode 100644 README
 create mode 100644 hello.php
[root@git git]# git status / / check again after submitting
# At branch master
//No documents to submit, clean work area
6)git reset HEAD
git reset HEAD is used to uncache the cached content.
[root@git git]# echo "123" >> README
[root@git git]# echo "123" >> hello.php
[root@git git]# git status -s
 M README
 M hello.php
[root@git git]# git add .
[root@git git]# git status -s
M  README
M  hello.php
[root@git git]# git reset HEAD -- hello.php / / specifies that the file should be removed from the cache
//Changes to exit staging area after reset:
M   hello.php
[root@git git]# git status -s
M  README
 M hello.
//If you execute the git commit command now, only changes to the README file will be recorded
7)git rm
git rm removes the file from the cache.
[root @ git git] ා git RM hello. PHP - f / / modify the file, so you need to use the "- f" option
rm 'hello.php'
[root@git git]# ls
README
 By default, git rm file removes files from the cache and from your hard disk (working directory). If you want to keep the file in the working directory, you can add the option "- f" or "- cache“
8)git mv
All the git mv commands do is git rm --cached, rename the files on the disk, and then execute git add to add the new files to the cache. So this command is not commonly used!
——————————————Thank you for reading——————————————