overview
The mainstream linux distributions on the market now include red hat system (including Redhat,Centos,Fedora,Rocky), Debian system (including Debian,ubuntu,Deepin) and SUSE system. These systems have their own characteristics. They mainly depend on personal preferences. I feel that if it is a new player, it can start from the red hat system, which is easier to start, The commands to be discussed in the next section are basically around the red hat system. Of course, most commands are also used in other systems. Let's start happily (updating...)
1. cd
The cd command is mainly used to switch directories
cd  /  Switch to the root directory
cd ../ Switch to the previous directory
cd ~   Switch to home directory
cd -   Switch to the last directory
===============================
[root@localhost src]# pwd
/usr/local/src
[root@localhost src]# cd ../
[root@localhost local]# pwd
/usr/local
[root@localhost local]# cd /
[root@localhost /]# pwd
/
[root@localhost /]# cd ~
[root@localhost ~]# pwd
/root
[root@localhost ~]# cd -
/
[root@localhost /]#
2. pwd
The pwd command mainly displays the current directory (absolute path)
[root@localhost mulu]# pwd
/usr/local/src/mulu
[root@localhost mulu]# cd ../
[root@localhost src]# pwd
/usr/local/src
3. ls
The ls command is used to query the contents of the current directory
ls Query the basic contents of the current directory
ls -l Query the details of the current directory
ls -la Query the directory details under the current directory (including hidden files and folders)
===================================================
[root@localhost local]# ls
bin  etc  games  include  lib  lib64  libexec  sbin  share  src
[root@localhost local]# ls -l
total 0
drwxr-xr-x. 2 root root  6 May 11  2019 bin
drwxr-xr-x. 2 root root  6 May 11  2019 etc
drwxr-xr-x. 2 root root  6 May 11  2019 games
drwxr-xr-x. 2 root root  6 May 11  2019 include
drwxr-xr-x. 2 root root  6 May 11  2019 lib
drwxr-xr-x. 2 root root  6 May 11  2019 lib64
drwxr-xr-x. 2 root root  6 May 11  2019 libexec
drwxr-xr-x. 2 root root  6 May 11  2019 sbin
drwxr-xr-x. 5 root root 49 Jun  9  2020 share
drwxr-xr-x. 3 root root 48 Sep 17 22:45 src
[root@localhost local]# ls -la
total 0
drwxr-xr-x. 12 root root 144 Sep 17 23:13 .
drwxr-xr-x. 12 root root 144 Jun  9  2020 ..
drwxr-xr-x.  2 root root   6 May 11  2019 bin
drwxr-xr-x.  2 root root   6 May 11  2019 etc
drwxr-xr-x.  2 root root   6 May 11  2019 games
drwxr-xr-x.  2 root root   6 May 11  2019 include
drwxr-xr-x.  2 root root   6 May 11  2019 lib
drwxr-xr-x.  2 root root   6 May 11  2019 lib64
drwxr-xr-x.  2 root root   6 May 11  2019 libexec
drwxr-xr-x.  2 root root   6 May 11  2019 sbin
drwxr-xr-x.  5 root root  49 Jun  9  2020 share
drwxr-xr-x.  3 root root  48 Sep 17 22:45 src
-rw-r--r--.  1 root root   0 Sep 17 23:13 .test
[root@localhost local]#
4. View file content
4.1 less
less can be used to view the contents of the file page up and down. It is usually used with the pipe symbol (|) and grep commands
For example: less 123.txt | grep '123' only views the content containing 123, which plays a role in filtering some unwanted content, which is very frequent in daily use.
4.2 more
It is very similar to less, but it can only turn pages from front to back in one direction. It is a little like a pawn crossing the river in chess. It can only move forward, not backward
4.3 cat
cat is to view all contents at once. It is more suitable to view short contents or contents at the end of the file
4.4 tac
It is the reverse order version of cat, which can be seen from the fact that its command symbol is opposite to cat
4.5 head
It is the first few lines to view the file content, and the number of lines can be specified
For example, head -n 10 refers to viewing the first 10 lines of the file
4.6 tail
It is used to view the tail content of the file and specify the number of lines. When the file content is updated, the last few lines can always be viewed, so it is often used to view the dynamic log
For example: tail -10f 123.txt refers to viewing the last 10 lines of the file
5. Compression command
5.1 tar (.tar)
Compressed files and decompressed files (. tar format) keep the source files. Strictly speaking, they can only be regarded as packaged files rather than compressed files, because the size of the packaged files has not been reduced
   Compressed file:   tar -cf  Compressed package name(belt.tar)  Original document
   Unzip file:   tar -xf  Compressed package
   ===========================================
[root@localhost src]# ls
12  123  m  mulu
[root@localhost src]# tar -cf 123.tar 123 / / compressed file
[root@localhost src]# ls
12  123  123.tar  m  mulu
[root@localhost src]# rm -rf 123
[root@localhost src]# ls
12  123.tar  m  mulu
[root@localhost src]# tar -xf 123.tar / / unzip the package
[root@localhost src]# ls
12  123  123.tar  m  mulu
[root@localhost src]#
5.2 tar (.tar.gz)
Compressed files and decompressed files (. tar.gz format) keep the source files, which are actually used together with gzip
   Compressed file:  tar -zcvf Compressed package name(belt.tar.gz)  Original document
   Unzip file:  tar -zxvf Compressed package
   ============================================
   [root@localhost src]# ls
12  123  mulu
[root@localhost src]# tar -zcvf mulu.tar.gz mulu
mulu/
mulu/123.txt
mulu/124.txt
mulu/234.txt
mulu/list2/
mulu/list3/
mulu/list4/
[root@localhost src]# ls
12  123  mulu  mulu.tar.gz
[root@localhost src]# rm -rf mulu
[root@localhost src]# ls
12  123  mulu.tar.gz
[root@localhost src]# tar -zxvf mulu.tar.gz
mulu/
mulu/123.txt
mulu/124.txt
mulu/234.txt
mulu/list2/
mulu/list3/
mulu/list4/
[root@localhost src]# ls
12  123  mulu  mulu.tar.gz
[root@localhost src]#
5.3 zip
Compressed and decompressed files (. zip format) that retain the source files
   Compressed file:  zip Compressed package name(belt.zip)  Original document
   Unzip file:  unzip Compressed package
   ====================================
[root@localhost src]# ls
12  123  mulu
[root@localhost src]# zip mulu.zip mulu
  adding: mulu/ (stored 0%)
[root@localhost src]# ls
12  123  mulu  mulu.zip
[root@localhost src]# rm -rf mulu
[root@localhost src]# ls
12  123  mulu.zip
[root@localhost src]# unzip mulu.zip
Archive:  mulu.zip
   creating: mulu/
[root@localhost src]# ls
12  123  mulu  mulu.zip
[root@localhost src]#
5.4 bzip2
Compressed files and decompressed files (. bz format) retain the source files. As can be seen from the following case, bzip2 cannot compress directories, but only files
   Compressed file: bzip2 -k Original document
   Unzip file: bunzip -k Compressed package
   ==========================
[root@localhost src]# ls
12  123  mulu
[root@localhost src]# bzip2 -k mulu
bzip2: Input file mulu is a directory.
[root@localhost src]# ls
12  123  mulu
[root@localhost src]# bzip2 -k 123
[root@localhost src]# ls
12  123  123.bz2  mulu
[root@localhost src]# rm -rf 123
[root@localhost src]# ls
12   123.bz2  mulu
[root@localhost src]# bunzip2 -k 123.bz2
[root@localhost src]# ls
12  123  123.bz2  mulu
[root@localhost src]#
5.5 gzip
Compressed files and decompressed files (. gz format) do not retain the source files after locking the files, and do not retain the compressed files after decompressing
   Compressed file: gzip  file
   Unzip file: gunzip Compressed package
   =====================
[root@localhost src]# ls
12  123
[root@localhost src]# gzip 123
[root@localhost src]# ls
12  123.gz
[root@localhost src]# gunzip 123.gz
[root@localhost src]# ls
12  123
[root@localhost src]#
6. Text editor
The following are two text editors. In comparison, vim is more powerful, and nano is easier to use. I prefer nano. The default editor of some linux distributions is nano, such as Debian and Ubuntu. If you want to use vim, you must install vim package
6.1 vim editor
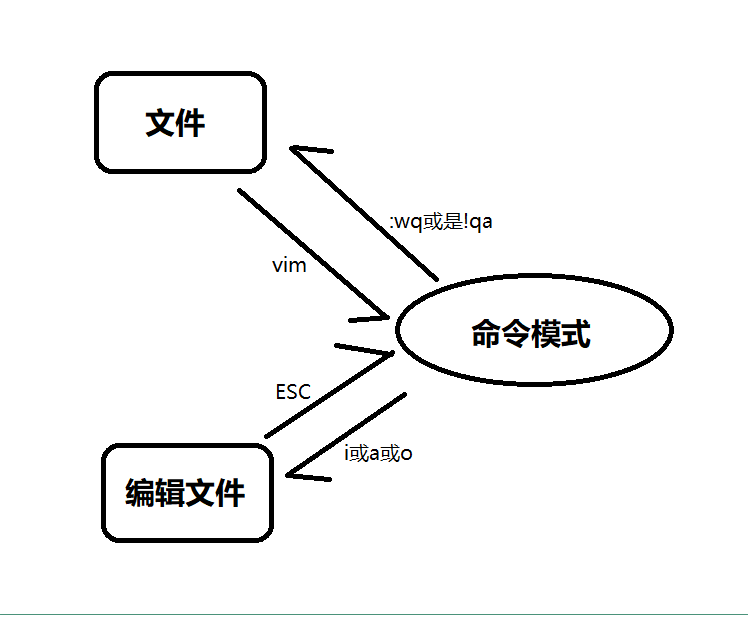
6.2 nano editor
Nano is simpler than the vim command. Execute the nano file name to enter the editing mode. After editing, execute Ctrl+O to save, then press enter, and finally execute Ctrl+O to exit the editing mode

7. Create and delete files
7.1 touch
create a file
For example: touch 123.txt create a file
touch 123.txt 234.txt create multiple folders at the same time
[root@localhost mulu]# ls
[root@localhost mulu]# touch 123.txt
[root@localhost mulu]# ls
123.txt
[root@localhost mulu]# touch 124.txt 234.txt
[root@localhost mulu]# ls
123.txt  124.txt  234.txt
[root@localhost mulu]#
7.2 rm
Delete file
For example:
rm 123.txt  Delete a file, but you will be prompted to confirm whether to delete it
=============================================
[root@localhost mulu]# ls
123.txt  124.txt  234.txt  test
[root@localhost mulu]# rm 123.txt
rm: remove regular empty file '123.txt'? Y
[root@localhost mulu]# ls
124.txt  234.txt  test

rm 124.txt 234.txt Delete multiple files at the same time, but confirm multiple times
=============================================
[root@localhost mulu]# rm 124.txt 234.txt
rm: remove regular empty file '124.txt'? Y
rm: remove regular empty file '234.txt'? Y
[root@localhost mulu]# ls
test

rm  -rf 123.txt
=============================================
[root@localhost mulu]# ls
123.txt  124.txt  test
[root@localhost mulu]# rm -rf 123.txt
[root@localhost mulu]# ls
124.txt  test
[root@localhost mulu]# rm -rf 124.txt test
[root@localhost mulu]# ls
[root@localhost mulu]#
Note: you should be very careful when deleting files to prevent accidental deletion
8. Create and delete folders
8.1 mkdir
Create an empty folder
[root@localhost mulu]# ls
123.txt  124.txt  234.txt
[root@localhost mulu]# mkdir list
[root@localhost mulu]# ls
123.txt  124.txt  234.txt  list
[root@localhost mulu]# mkdir list2 list3 list4
[root@localhost mulu]# ls
123.txt  124.txt  234.txt  list  list2  list3  list4
8.2 rmdir
Delete an empty folder. If there is content under the file, use rm -rf to delete it
[root@localhost list]# ls
[root@localhost list]# cd ../
[root@localhost mulu]# ls
123.txt  124.txt  234.txt  list  list2  list3  list4
[root@localhost mulu]# cd list
[root@localhost list]# ls
[root@localhost list]# mkdir list5
[root@localhost list]# ls
list5
[root@localhost list]# cd list5
[root@localhost list5]# ls
[root@localhost list5]# mkdir list6
[root@localhost list5]# ls
list6
[root@localhost list5]# cd list6
[root@localhost list6]# ls
[root@localhost list6]# touch 12.txt
[root@localhost list6]# ls
12.txt
[root@localhost list6]# cd ../../../
[root@localhost mulu]# ls
123.txt  124.txt  234.txt  list  list2  list3  list4
[root@localhost mulu]# rm -rf list
[root@localhost mulu]# ls
123.txt  124.txt  234.txt  list2  list3  list4
[root@localhost mulu]#
9. cp
The cp command is used to copy files or folders. To copy folders, you need to add the parameter - r
[root@localhost src]# ls
12  123
[root@localhost src]# cp 123 124
[root@localhost src]# ls
12  123  124
[root@localhost src]# mkdir mulu
[root@localhost src]# ls
12  123  124  mulu
[root@localhost src]# cp -r mulu  ma
[root@localhost src]# ls
12  123  124  ma  mulu
[root@localhost src]# cp -r mulu  ../ma
[root@localhost src]# cd ../
[root@localhost local]# ls
bin  etc  games  include  lib  lib64  libexec  ma  sbin  share  src
[root@localhost local]#
10. mv
The mv command is used to rename a file or folder when moving or. If only one file name exists (both are file names) or one folder exists (both are folder names), it is renamed; If the file name is first, the folder name is second, or if both folder names exist, it is move
[root@localhost src]# ls
12  123  124  ma  mulu
[root@localhost src]# mv 123 321 / / rename the file 123 321
[root@localhost src]# ls
12  124  321  ma  mulu
[root@localhost src]# mv 321 ma / / move the file 321 to the ma directory
[root@localhost src]# ls
12  124  ma  mulu
[root@localhost src]# cd ma
[root@localhost ma]# ls
321
[root@localhost ma]# cd ../
[root@localhost src]# ls
12  124  ma  mulu
[root@localhost src]# mv ma mulu / / move folder ma to folder mulu
[root@localhost src]# ls
12  124  mulu
[root@localhost src]# cd mulu
[root@localhost mulu]# ls
ma
[root@localhost mulu]# mv ma mb / / rename the folder ma to mb
[root@localhost mulu]# ls
mb
[root@localhost mulu]#
11. clear
This command is simple. Clear enter and clear the screen directly.
12. echo
This command is also simple. You can output whatever is followed, or you can follow an expression
[root@localhost mulu]# echo hellworld
hellworld
[root@localhost mulu]# echo "hell world"
hell world
[root@localhost mulu]# echo $SHELL
/bin/bash
[root@localhost mulu]# echo $(date)
Sat Sep 18 23:17:03 CST 2021
[root@localhost mulu]#
13. kill
It is mainly used to kill processes. When a service has been shut down, but the background process is still hanging unexpectedly, it is suitable to use it to kill or end processes.
kill Process number
kill -9 Process number    //Adding the parameter - 9 means that a process is forcibly killed
14. ps
It is mainly used to view the process. It is usually used with - ef and grep
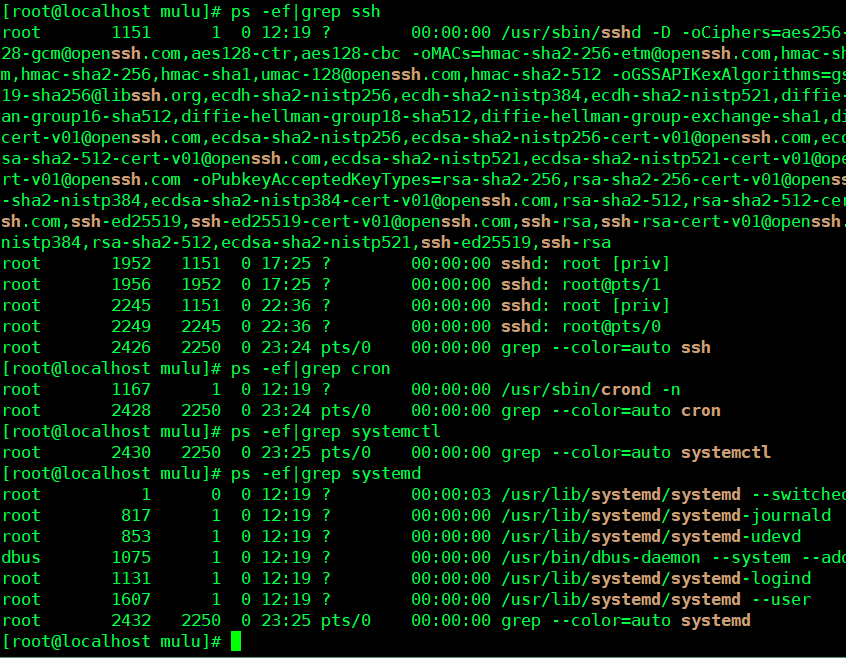
15. grep
It is mainly used to filter query results. For example, it is used with less: less 123.txt | grep "123"
Use ps -ef | grep process number with ps
16. date
This command is mainly used to query the date and time
[root@localhost mulu]# date
Sat Sep 18 23:37:23 CST 2021
[root@localhost mulu]# echo $(date +%Y-%m-%d)
2021-09-18
[root@localhost mulu]# echo $(date +%Y/%m/%d)
2021/09/18
[root@localhost mulu]# echo $(date +%z)
+0800
[root@localhost mulu]# echo $(date +%:z)
+08:00
[root@localhost mulu]# echo $(date +%::z)
+08:00:00
[root@localhost mulu]# echo $(date -d "3 days ago" +%Y-%m-%d)
2021-09-15