Preface
The Bessel Curve was widely published in 1962 by Pierre B zier, a French engineer, who used the Bessel Curve to design the main body of a car. Now Bessel curve is also a very important parametric curve in the field of computer graphics. Many drawing tools include tool objects of Bessel curve. Android development process can also be used to achieve a lot of interesting special effects animation, here through simple coding to learn in-depth Bessel curve generation.
Curve generation
First order Bessel curve
Given two points at a given point, the first-order Bessel curve is only a straight line between two points. This line is given by the following formula: 
Next, we use programming to draw this line. We need to include start and end points in the customized View control, and use attribute animation to generate t objects.
public class BezierView extends View {
    private Paint mPaint;
    // Starting position
    private Point mStart;
    // End position
    private Point mEnd;
    // The position of the current point when t is a fixed value
    private Point mCurrent;
    private ValueAnimator mValueAnimator;
    // The current value of t
    private float mProgress;

    public BezierView(Context context) {
        this(context, null);
    }

    public BezierView(Context context, @Nullable AttributeSet attrs) {
        this(context, attrs, 0);
    }

    public BezierView(Context context, @Nullable AttributeSet attrs, int defStyleAttr) {
        super(context, attrs, defStyleAttr);
        init();
    }

    private void init() {
        mPaint = new Paint();
        mPaint.setAntiAlias(true);
        mPaint.setDither(true);
        mPaint.setStrokeWidth(10);

        mStart = new Point();
        mStart.x = 100;
        mStart.y = 100;

        mEnd = new Point();
        mEnd.x = 600;
        mEnd.y = 600;

        mCurrent = new Point();

        // It takes 3 seconds to change t from 0 to 1
        mValueAnimator = ValueAnimator.ofFloat(0, 1f);
        mValueAnimator.setDuration(3000);
        mValueAnimator.addUpdateListener(animation -> {
            mProgress = animation.getAnimatedFraction();
            // Refresh the interface every time t changes
            invalidate();
        });
        mValueAnimator.setRepeatMode(ValueAnimator.RESTART);
        mValueAnimator.setRepeatCount(ValueAnimator.INFINITE);
        post(() -> {
           mValueAnimator.start();
        });
    }

    @Override
    protected void onDraw(Canvas canvas) {
        super.onDraw(canvas);
        // Get the currently generated point based on the current t value
        mCurrent.x = (int) (mStart.x + mProgress * (mEnd.x - mStart.x));
        mCurrent.y = (int) (mStart.y + mProgress * (mEnd.y - mStart.y));

        mPaint.setColor(Color.RED);
        canvas.drawLine(mStart.x, mStart.y, mCurrent.x, mCurrent.y, mPaint);
        mPaint.setColor(Color.BLUE);
        canvas.drawCircle(mCurrent.x, mCurrent.y, 10, mPaint);
        mPaint.setColor(Color.GREEN);
        canvas.drawLine(mCurrent.x + 8, mCurrent.y + 8, mEnd.x, mEnd.y, mPaint);
    }
}
The red line above is a straight line generated by the first-order Bessel curve. This effect is relatively simple and involves relatively few points. 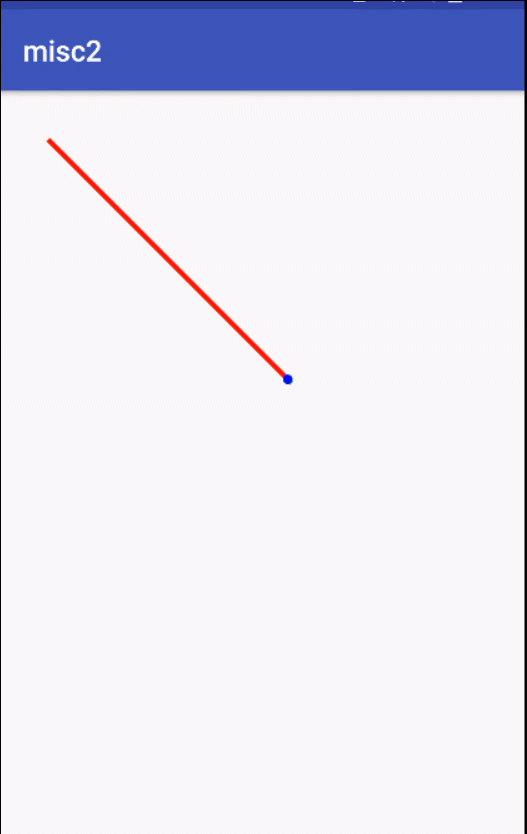
Second order Bessel curve
The path of the second-order Bessel curve is tracked by the function B(t) of the given points P, P 1, P 2: 
If we use this formula directly to calculate the results and connect all points, we can also generate a Bessel curve, but this is obviously not intuitive enough. Here we use the method of generating a straight line to generate a Bessel curve.
public class Bezier2View extends View {
    private Paint mPaint;

    // Start point, control point and end point
    private Point mStart;
    private Point mControl;
    private Point mEnd;

    // The point between the start point and the control point that changes with t
    private Point mCurrent1;
    // The point between the control point and the end point varying with t
    private Point mCurrent2;

    private Path mPath;

    // Record the Bessel Curve Location of a t
    private Point mLastPoint;

    private Point mTmpPoint;

    // t Animation Generation Object
    private ValueAnimator mValueAnimator;
    // Record the value of t
    private float mProgress;

    public Bezier2View(Context context) {
        this(context, null);
    }

    public Bezier2View(Context context, @Nullable AttributeSet attrs) {
        this(context, attrs, 0);
    }

    public Bezier2View(Context context, @Nullable AttributeSet attrs, int defStyleAttr) {
        super(context, attrs, defStyleAttr);
        init();
    }

    private void init() {
        mPaint = new Paint();
        mPaint.setAntiAlias(true);
        mPaint.setDither(true);
        mPaint.setStyle(Paint.Style.STROKE);
        mPaint.setStrokeWidth(10);

        mStart = new Point();
        mStart.x = 100;
        mStart.y = 600;

        mLastPoint = new Point();
        mLastPoint.x = mStart.x;
        mLastPoint.y = mStart.y;

        mControl = new Point();
        mControl.x = 350;
        mControl.y = 250;

        mEnd = new Point();
        mEnd.x = 600;
        mEnd.y = 600;

        mCurrent1 = new Point();
        mCurrent2 = new Point();
        mTmpPoint = new Point();

        mPath = new Path();

        mValueAnimator = ValueAnimator.ofFloat(0, 1f);
        mValueAnimator.setDuration(3000);
        mValueAnimator.addUpdateListener(animation -> {
            mProgress = animation.getAnimatedFraction();
            // If you have just started or just finished deleting the Bessel curve you drew last time
            if (mProgress <= 0.0001f || mProgress >= 0.9999f) {
                mPath.reset();
                mLastPoint.x = mStart.x;
                mLastPoint.y = mStart.y;
            }
            invalidate();
        });
        mValueAnimator.setRepeatMode(ValueAnimator.RESTART);
        mValueAnimator.setRepeatCount(ValueAnimator.INFINITE);
        post(() -> {
           mValueAnimator.start();
        });
    }

    @Override
    protected void onDraw(Canvas canvas) {
        super.onDraw(canvas);

        // Get the position of the point between the start point and the control point varying with t
        mCurrent1.x = (int) (mStart.x + mProgress * (mControl.x - mStart.x));
        mCurrent1.y = (int) (mStart.y + mProgress * (mControl.y - mStart.y));
        mPaint.setColor(Color.GRAY);

        // Draw a line from start point to mCurrent1 point
        canvas.drawLine(mStart.x, mStart.y, mCurrent1.x, mCurrent1.y, mPaint);
        mPaint.setColor(Color.BLUE);
        canvas.drawCircle(mCurrent1.x, mCurrent1.y, 5, mPaint);
        mPaint.setColor(Color.GRAY);
        canvas.drawLine(mCurrent1.x + 4, mCurrent1.y - 4, mControl.x, mControl.y, mPaint);

        // The position of the point between the post-de-control point and the end point varying with t
        mCurrent2.x = (int) (mControl.x + mProgress * (mEnd.x - mControl.x));
        mCurrent2.y = (int) (mControl.y + mProgress * (mEnd.y - mControl.y));

        // Draw a straight line from the control point to the end point
        mPaint.setColor(Color.GRAY);
        canvas.drawLine(mControl.x, mControl.y, mCurrent2.x, mCurrent2.y, mPaint);
        mPaint.setColor(Color.BLUE);
        canvas.drawCircle(mCurrent2.x, mCurrent2.y, 5, mPaint);
        mPaint.setColor(Color.GRAY);
        canvas.drawLine(mCurrent2.x + 8, mCurrent2.y + 8, mEnd.x, mEnd.y, mPaint);

        mPaint.setColor(Color.CYAN);
        canvas.drawLine(mCurrent1.x + 8, mCurrent1.y + 8, mCurrent2.x - 8, mCurrent2.y - 8, mPaint);

        // Calculate the first-order position of start point and control point and the first-order position of control point and end point
        // Calculate the position of the first order point between the two points
        mTmpPoint.x = (int) (mCurrent1.x + mProgress * (mCurrent2.x - mCurrent1.x));
        mTmpPoint.y = (int) (mCurrent1.y + mProgress * (mCurrent2.y - mCurrent1.y));
        // Connect this point with the last recorded point in a straight line
        mPath.moveTo(mLastPoint.x, mLastPoint.y);
        mPath.lineTo(mTmpPoint.x, mTmpPoint.y);
        mLastPoint.x = mTmpPoint.x;
        mLastPoint.y = mTmpPoint.y;
        mPaint.setColor(Color.MAGENTA);
        // Draw this Bessel curve.
        canvas.drawPath(mPath, mPaint);
    }
}
When using the second-order Bessel curve, the amount of calculation is much more than that of the first-order curve. It is necessary to use multiple combinations of the first-order to generate the second-order curve, and the operation of drawing the third-order curve is very complex. 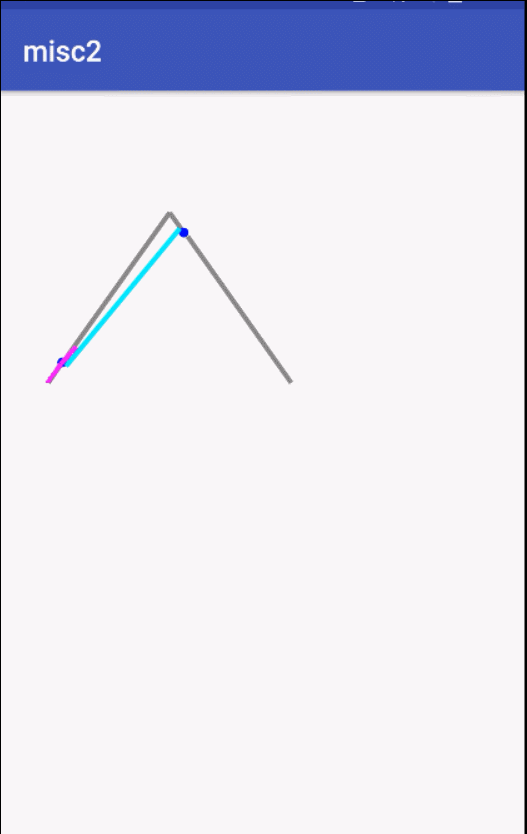
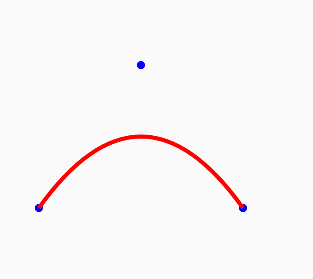
Fortunately, Android's Path provides second and third-order functions of Bessel curves, which make it easy to draw Bessel curves with only the start point, control point and end point.
public class CustomBezier2View extends View {
    private Point mStart;
    private Point mControl;
    private Point mEnd;
    private Paint mPaint;
    private Path mPath;

    public CustomBezier2View(Context context) {
        this(context, null);
    }

    public CustomBezier2View(Context context, @Nullable AttributeSet attrs) {
        this(context, attrs, 0);
    }

    public CustomBezier2View(Context context, @Nullable AttributeSet attrs, int defStyleAttr) {
        super(context, attrs, defStyleAttr);
        mPaint = new Paint();
        mPaint.setAntiAlias(true);
        mPaint.setDither(true);
        mPaint.setColor(Color.RED);
        mPaint.setStyle(Paint.Style.STROKE);
        mPaint.setStrokeWidth(10);

        mStart = new Point();
        mStart.x = 100;
        mStart.y = 600;

        mControl = new Point();
        mControl.x = 350;
        mControl.y = 250;

        mEnd = new Point();
        mEnd.x = 600;
        mEnd.y = 600;

        mPath = new Path();
    }

    @Override
    protected void onDraw(Canvas canvas) {
        super.onDraw(canvas);
        mPaint.setColor(Color.BLUE);
        canvas.drawCircle(mStart.x, mStart.y, 5, mPaint);
        canvas.drawCircle(mControl.x, mControl.y, 5, mPaint);
        canvas.drawCircle(mEnd.x, mEnd.y, 5, mPaint);
        mPaint.setColor(Color.RED);
        mPath.moveTo(mStart.x, mStart.y);
        mPath.quadTo(mControl.x, mControl.y, mEnd.x, mEnd.y);
        canvas.drawPath(mPath, mPaint);
    }
}
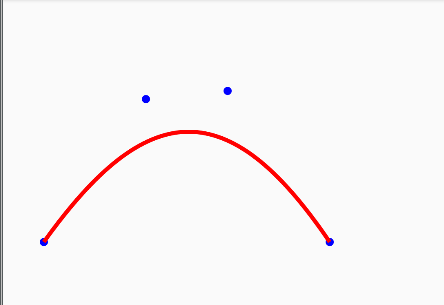
Third-order Bessel curve
P 0, P 1, P 2, P 3 define third-order Bessel curves in plane or in three-dimensional space. The starting and ending points will be passed, and the middle points will only be used as control points, and the curves will not pass through them. 
The third-order implementation is implemented directly using the methods provided by Android, defining the start point, the end point and two control points.
public class CustomBezier3View extends View {
    private Point mStart;
    private Point mControl1;
    private Point mControl2;
    private Point mEnd;
    private Paint mPaint;
    private Path mPath;

    public CustomBezier3View(Context context) {
        this(context, null);
    }

    public CustomBezier3View(Context context, @Nullable AttributeSet attrs) {
        this(context, attrs, 0);
    }

    public CustomBezier3View(Context context, @Nullable AttributeSet attrs, int defStyleAttr) {
        super(context, attrs, defStyleAttr);
        mPaint = new Paint();
        mPaint.setAntiAlias(true);
        mPaint.setDither(true);
        mPaint.setColor(Color.RED);
        mPaint.setStyle(Paint.Style.STROKE);
        mPaint.setStrokeWidth(10);

        mStart = new Point();
        mStart.x = 100;
        mStart.y = 600;

        mControl1 = new Point();
        mControl1.x = 350;
        mControl1.y = 250;

        mControl2 = new Point();
        mControl2.x = 550;
        mControl2.y = 230;

        mEnd = new Point();
        mEnd.x = 800;
        mEnd.y = 600;

        mPath = new Path();
    }

    @Override
    protected void onDraw(Canvas canvas) {
        super.onDraw(canvas);
        mPaint.setColor(Color.BLUE);
        canvas.drawCircle(mStart.x, mStart.y, 5, mPaint);
        canvas.drawCircle(mControl1.x, mControl1.y, 5, mPaint);
        canvas.drawCircle(mControl2.x, mControl2.y, 5, mPaint);
        canvas.drawCircle(mEnd.x, mEnd.y, 5, mPaint);

        mPaint.setColor(Color.RED);
        mPath.moveTo(mStart.x, mStart.y);
        mPath.cubicTo(mControl1.x, mControl1.y, mControl2.x, mControl2.y, mEnd.x, mEnd.y);
        canvas.drawPath(mPath, mPaint);
    }
}
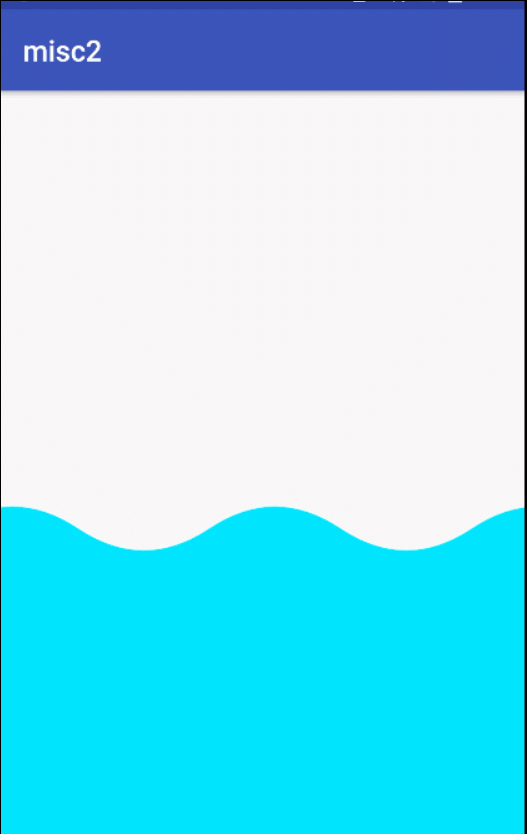
xRipple
The most important thing is to draw a sinusoidal curve first, then fill the screen with multiple sinusoidal curves, then add the same sinusoidal curve as the screen width on the left side of the screen, and finally constantly modify the phase value of the curve to achieve the sinusoidal effect of infinite cycle.
public class WaveView extends View {
    private int mVisibleWaveCount = 2;
    private int mHeight = CommonUtils.dp2px(300);
    private int mOffset = 0;
    private int mWaveLength;
    private int mWaveHeight;
    private Paint mPaint;
    private Path mPath;
    private ValueAnimator mValueAnimator;

    public WaveView(Context context) {
        this(context, null);
    }

    public WaveView(Context context, @Nullable AttributeSet attrs) {
        this(context, attrs, 0);
    }

    public WaveView(Context context, @Nullable AttributeSet attrs, int defStyleAttr) {
        super(context, attrs, defStyleAttr);
        mPaint = new Paint();
        mPaint.setDither(true);
        mPaint.setAntiAlias(true);
        mPaint.setStrokeWidth(10);
        mPaint.setStyle(Paint.Style.FILL);
        mPaint.setColor(Color.CYAN);
        mPath = new Path();
    }

    @Override
    protected void onSizeChanged(int w, int h, int oldw, int oldh) {
        super.onSizeChanged(w, h, oldw, oldh);
        mWaveLength = w / mVisibleWaveCount;
        mWaveHeight = CommonUtils.dp2px(20);
        mValueAnimator = ValueAnimator.ofInt(-w, 0);
        mValueAnimator.setDuration(1500);
        mValueAnimator.setRepeatMode(ValueAnimator.RESTART);
        mValueAnimator.setRepeatCount(ValueAnimator.INFINITE);
        mValueAnimator.setInterpolator(new LinearInterpolator());
        mValueAnimator.addUpdateListener( animation -> {
            // offset ranges from negative screen width to zero, when the sine wave on the left is played out and needs to start from scratch
            mOffset = (int) animation.getAnimatedValue();
            invalidate();
        });
        mValueAnimator.start();
    }

    @Override
    protected void onDraw(Canvas canvas) {
        super.onDraw(canvas);
        int drawWaveCount = 2 * mVisibleWaveCount;
        mPath.reset();
        // Drawing multiple waves
        for (int i = 0; i < drawWaveCount; i++) {
            drawWave(mOffset + i * mWaveLength, mHeight);
        }
        canvas.drawPath(mPath, mPaint);
    }

    // Draw a sinusoidal wave with valleys and peaks, and the bottom line will merge.
    // x, y is the coordinate of the beginning
    private void drawWave(int x, int y) {
        int halfLength = mWaveLength / 2;
        int controlHeight = mWaveHeight + CommonUtils.dp2px(10);
        mPath.moveTo(x, y);
        mPath.rQuadTo(halfLength / 2, -controlHeight, halfLength, 0);
        mPath.rQuadTo(halfLength / 2, controlHeight, halfLength, 0);
        mPath.rLineTo(0, mHeight);
        mPath.rLineTo(-mWaveLength, 0);
        mPath.close();
    }
}