In the previous article, I shared how to start using the Baidu Map API and map search function initially. This time I will share how to set up marker and info window on Baidu Map, which is also mainly a reference. Teacher Hong Yang's Blog If you want to continue your study, you can also pay attention to it Teacher Hong Yang Blog.Of course, the official demo of Baidu Map also has related tutorials, you can also see.
Learn how Baidu Map adds coverage
Covers are things that we add to our maps. This shape can be set by ourselves. The information inside the label points can also be set by ourselves. You can also see them. Baidu Map Official Introduction to Coverage. 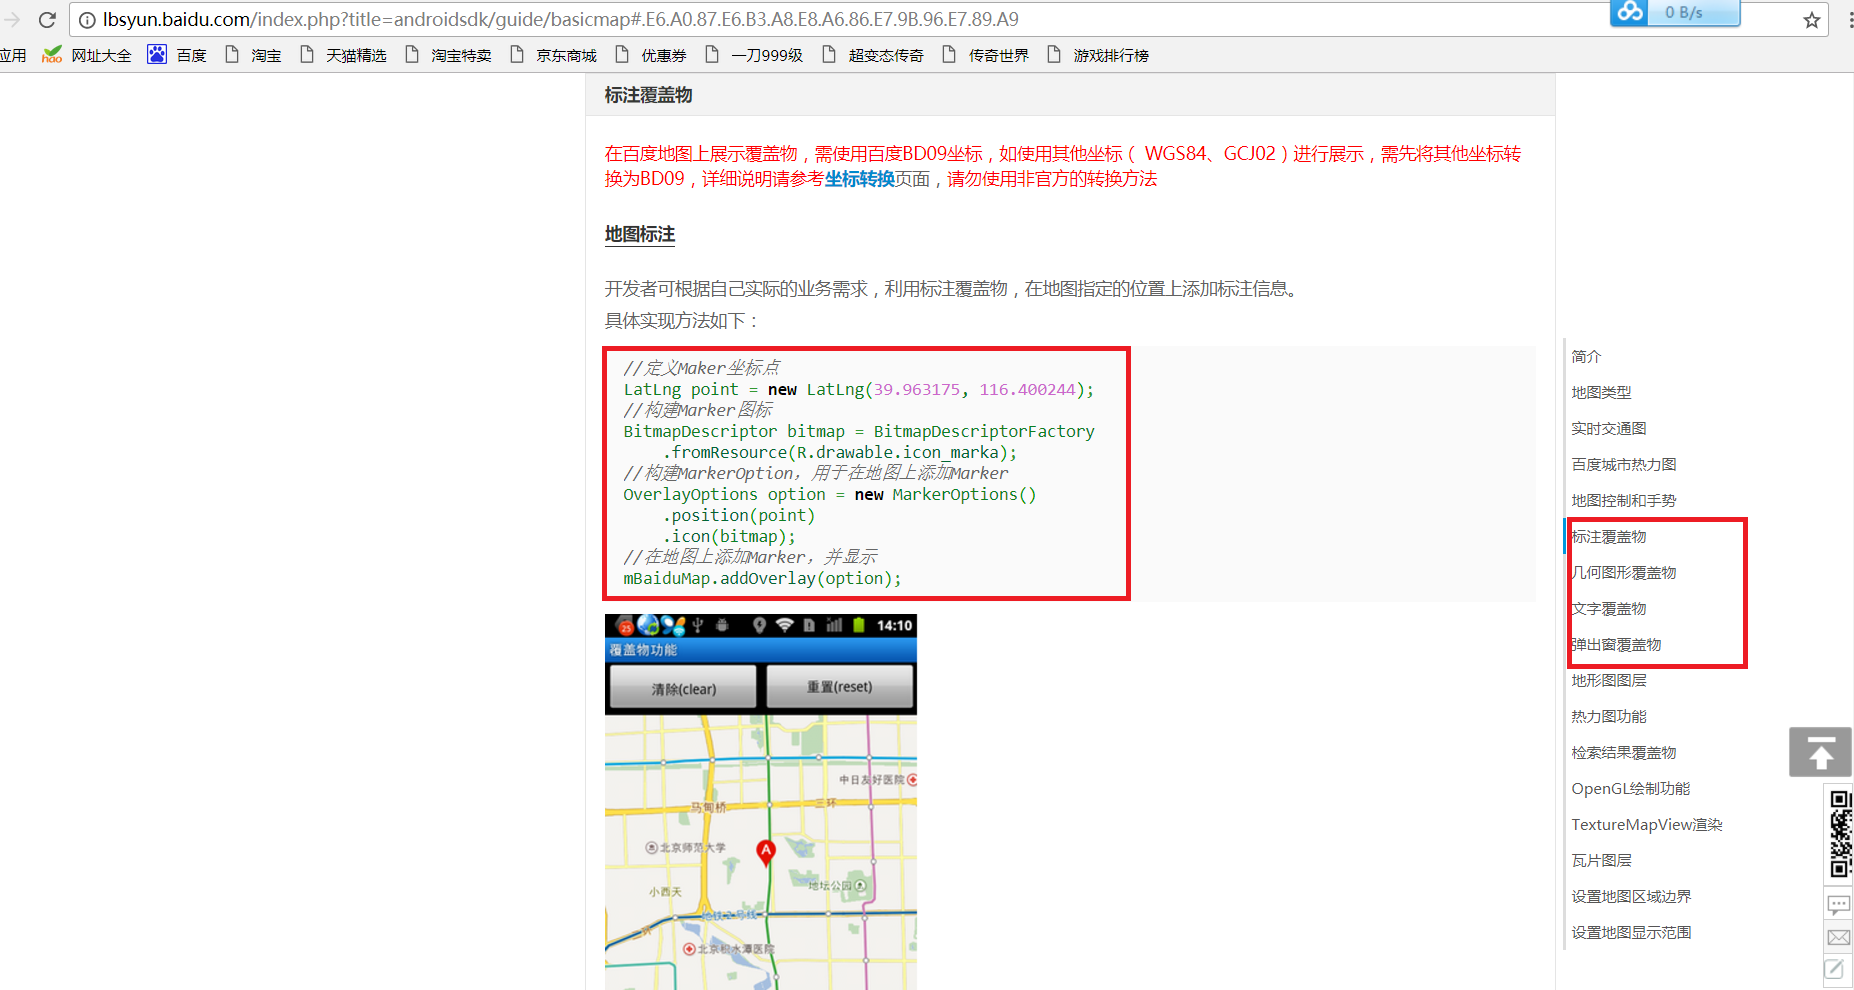
The picture above shows how to add a marker. On the right is the type of cover. In fact, there are several types of cover, so you can learn one of the others.
Set information for marker
Record latitude and longitude information for corresponding points
To add a marker, we first have to find the latitude and longitude information of some places. We can go to the official website of Baidu Map api to find the coordinate picker.As shown in the following figure: 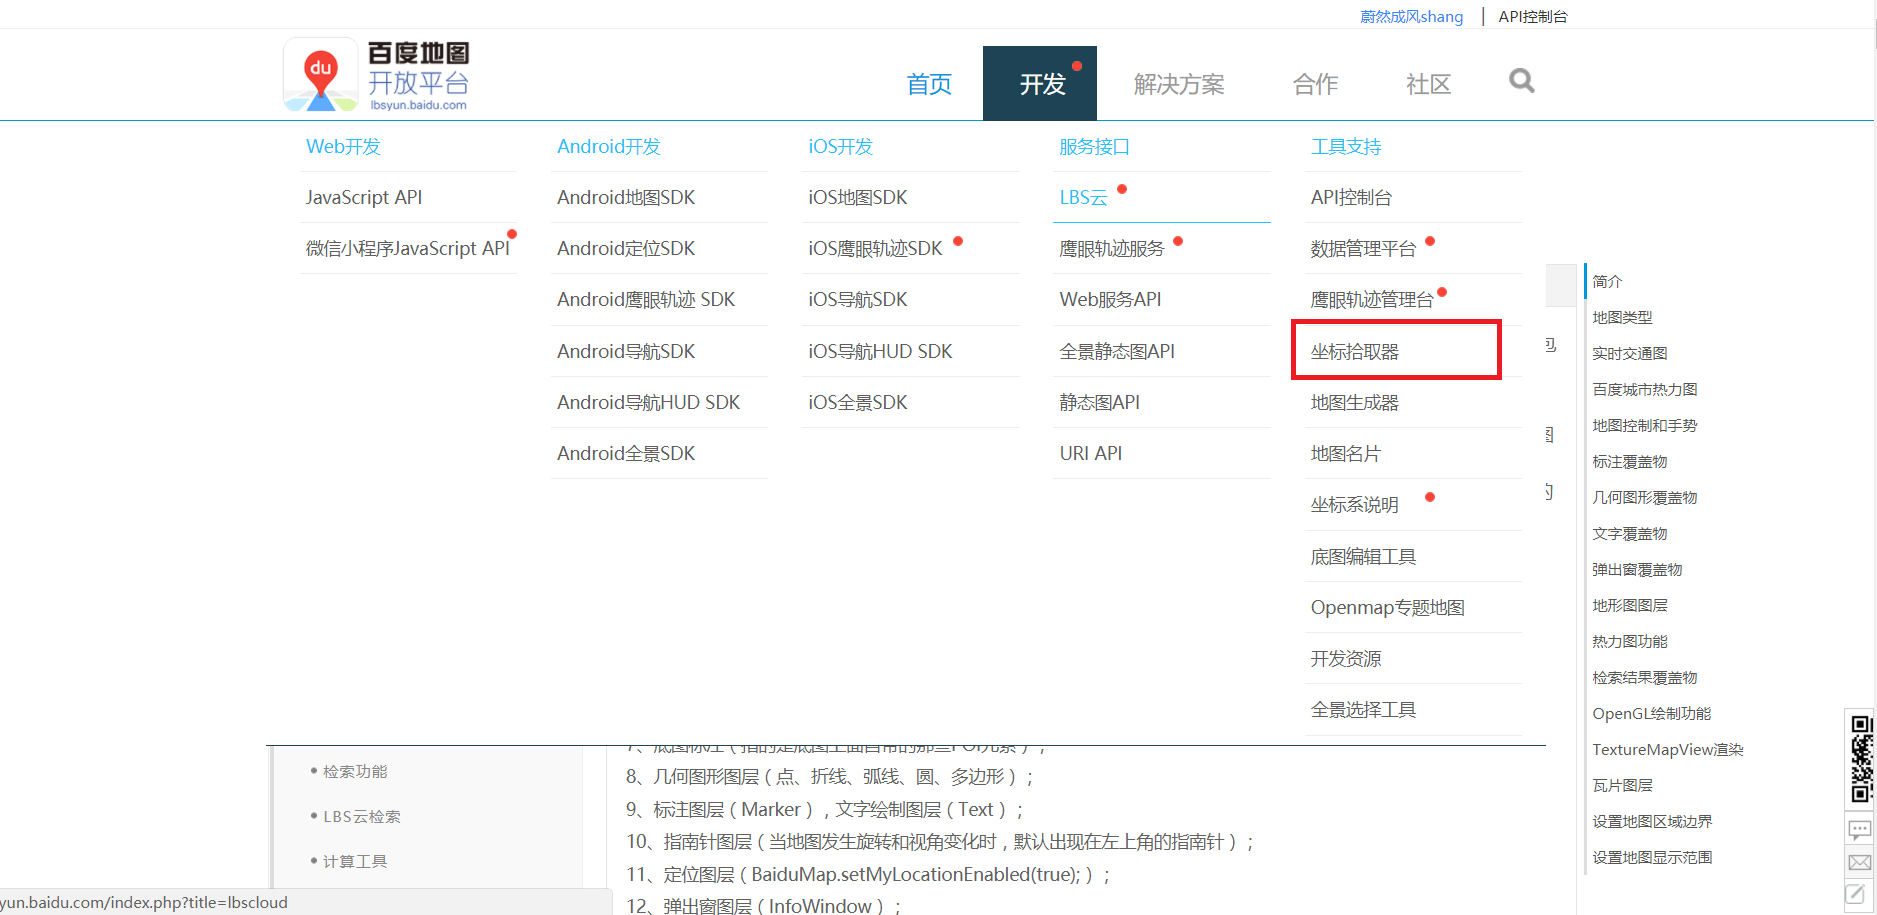
When the coordinate picker is turned on, we enter the location where we want to add the point, and then record the latitude and longitude of the location.
Write layout file
If we want to add an info window to the map, we need to write an info window and add the following code under the layout file
 <RelativeLayout
            android:id="@+id/marker_info"
            android:layout_width="350dp"
            android:layout_height="120dp"
            android:background="#FFFFFF"
            android:clickable="true"
            android:layout_marginBottom="33dp"
            android:visibility="gone"
            android:layout_above="@+id/my_location"
            android:layout_centerHorizontal="true">

            <ImageView
                android:id="@+id/info_img"
                android:layout_width="90dp"
                android:layout_height="90dp"
                android:layout_marginLeft="12dp"
                android:layout_marginRight="12dp"
                android:alpha="1.0"
                android:background="@drawable/map_image_border_white"
                android:clickable="true"
                android:scaleType="fitXY"
                android:src="@drawable/axin"
                android:layout_centerVertical="true"
                android:layout_alignParentStart="true"
                android:layout_marginStart="10dp" />
            <TextView
                android:layout_width="wrap_content"
                android:layout_height="wrap_content"
                android:id="@+id/info_name"
                android:text="@string/app_name"
                android:textColor="#121212"
                android:textSize="15sp"
                android:layout_marginStart="33dp"
                android:layout_alignTop="@+id/info_img"
                android:layout_toEndOf="@+id/info_img" />
            <TextView
                android:id="@+id/info_content"
                android:layout_width="wrap_content"
                android:layout_height="wrap_content"
                android:text="@string/app_name"
                android:textSize="20sp"
                android:textColor="#121212"
                android:layout_centerVertical="true"
                android:layout_alignStart="@+id/info_name" />
            <TextView
                android:layout_width="wrap_content"
                android:layout_height="wrap_content"
                android:text="Reputation Credit:"
                android:layout_alignBottom="@+id/info_img"
                android:layout_alignStart="@+id/info_content"
                android:id="@+id/textView5" />
            <TextView
                android:id="@+id/info_credit"
                android:layout_width="wrap_content"
                android:layout_height="wrap_content"
                android:text="100"
                android:layout_alignBottom="@+id/textView5"
                android:layout_alignParentEnd="true"
                android:layout_toEndOf="@+id/textView5" />
        </RelativeLayout>
Create info class
To provide data for the simulation background, we write an info class first. Since we are just simulating, we write the data inside the info class as static, then set the constructor for the info class.
package com.example.test;

import java.io.Serializable;
import java.util.ArrayList;
import java.util.List;

public class Info implements Serializable {
    /**
     * accuracy
     */
    private double latitude;
    /**
     * latitude
     */
    private double longitude;
    /**
     * Picture ID, Picture Path in Server
     */
    private int imgId;
    /**
     * Full name
     */
    private String name;
    /**
     * Help or service content
     */
    private String content;
    /*
    * Reputation Credit
     */
    private String credit;

    public static List<Info> infos = new ArrayList<Info>();

   static {
       infos.add(new Info(30.652696,104.056063, R.drawable.axin, "Ashin", "Buy a hot pot base for me in Chengnan", "120"));

       infos.add(new Info(30.669488,104.061614, R.drawable.chenduling, "Xiao Chen","Can run a leg in Chengdu", "130"));

       infos.add(new Info(30.666397,104.034848,R.drawable.zhoujielun, "Ajie","Li Ji Rabbit Head Wanting to Eat Qingyang District", "143"));

       infos.add(new Info(30.553369,114.305926, R.drawable.linjunjie, "Dajun","I can help you buy some food near Jianghan Road", "113"));

       infos.add(new Info(30.550239,114.309052, R.drawable.xuezhiqian,"Grain buds","I want pairs of eyes","159"));

       infos.add(new Info(30.593933,114.277316, R.drawable.guobiting,"Lao Guo","I want a memorial image of Sun Yat-sen!","148"));

       infos.add(new Info(39.915119,116.403963,R.drawable.alalei,"tsubomi","I can buy tickets for the Palace Museum","125"));

       infos.add(new Info(39.991002,116.328896,R.drawable.xiaoyan,"Wish you forever","I can buy Beijing specialties on my behalf","254"));

       infos.add(new Info(39.916224,116.417435,R.drawable.dilireba,"Fatty Di","I want to buy a statue","287"));

   }
    public Info()
    {
    }
    public Info(double latitude, double longitude, int imgId, String name, String content, String credit )
    {
        super();
        this.latitude = latitude;
        this.longitude = longitude;
        this.imgId = imgId;
        this.name = name;
        this.content = content;
        this.credit= credit;
    }
    public double getLatitude()
    {
        return latitude;
    }

    public void setLatitude(double latitude)
    {
        this.latitude = latitude;
    }

    public double getLongitude()
    {
        return longitude;
    }

    public void setLongitude(double longitude)
    {
        this.longitude = longitude;
    }

    public String getName()
    {
        return name;
    }

    public int getImgId()
    {
        return imgId;
    }

    public void setImgId(int imgId)
    {
        this.imgId = imgId;
    }

    public void setName(String name)
    {
        this.name = name;
    }

    public String getContent()
    {
        return content;
    }

    public void setContent(String content)
    {
        this.content = content;
    }

    public String getCredit()
    {
        return credit;
    }

    public void setCredit(String credit)
    {
        this.credit = credit;
    }

}
Set information for controls based on info class
Because we wrote the info class above, we'll write a function to set the information in the info class onto the control we wrote earlier.
 /**
     * Set information for controls on the layout based on info
     *
     */
    protected void popupInfo(RelativeLayout infowindows, Info info)
    {
        ViewHolder viewHolder = null;
        if (infowindows.getTag() == null)
        {
            viewHolder = new ViewHolder();
            viewHolder.infoImg = (ImageView) infowindows
                    .findViewById(R.id.info_img);
            viewHolder.infoName = (TextView) infowindows
                    .findViewById(R.id.info_name);
            viewHolder.infoContent = (TextView) infowindows
                    .findViewById(R.id.info_content);
            viewHolder.infoCredit = (TextView) infowindows
                    .findViewById(R.id.info_credit);

            infowindows.setTag(viewHolder);
        }
        viewHolder = (ViewHolder) infowindows.getTag();
        viewHolder.infoImg.setImageResource(info.getImgId());
        viewHolder.infoContent.setText(info.getContent());
        viewHolder.infoName.setText(info.getName());
        viewHolder.infoCredit.setText(info.getCredit());
    }
    /**
     * Reuse control for pop-up panel mMarkerLy
     *
     * @author zhy
     *
     */
    private class ViewHolder
    {
        ImageView infoImg;
        TextView infoName;
        TextView infoContent;
        TextView infoCredit;
    }
Add a marker to the map
Add marker to map based on coordinates in info class
Since we set coordinate information in the info class, we only need to write an add function to add the marker to the corresponding location on the map.
 /**
     * Add a marker to the map
     */
    public void addInfosOverlay(List<Info> infos)
    {
        baiduMap.clear();
        LatLng latLng = null;
        OverlayOptions overlayOptions = null;
        Marker marker = null;
        for (Info info : infos)
        {
            // position
            latLng = new LatLng(info.getLatitude(), info.getLongitude());
            // Icon
            overlayOptions = new MarkerOptions().position(latLng)
                    .icon(mIconMaker).zIndex(5);
            marker = (Marker) (baiduMap.addOverlay(overlayOptions));
            Bundle bundle = new Bundle();
            bundle.putSerializable("info", info);
            marker.setExtraInfo(bundle);
        }
    }
Set click events for marker and infowindows
If we want infowindows to appear when we click on the marker, we have to set a click event for the marker, and we have to set a click event for the infowindows so that we can click on the infowindows to move to the next layout or to bring up new information.We also have to make infowindows disappear by clicking in the empty space of the map.The code is as follows:
//marker's Click Event
 baiduMap.setOnMarkerClickListener(new BaiduMap.OnMarkerClickListener() {
            @Override
            public boolean onMarkerClick(Marker marker) {
                // Get data from marker
                Info info = (Info) marker.getExtraInfo().get("info");
                // Set up information for detail layout based on business information
                infowindows.setVisibility(View.VISIBLE);
                popupInfo(infowindows, info);
                return true;
            }
        });
 /*
    * Hide InfoWindow by Baidu Map Click Event
    */
    private void InitMapClick() {
        baiduMap.setOnMapClickListener(new BaiduMap.OnMapClickListener() {

            @Override
            public boolean onMapPoiClick(MapPoi arg0) {
                // TODO Auto-generated method stub
                return false;
            }

            @Override
            public void onMapClick(LatLng arg0) {
                infowindows.setVisibility(View.GONE);
                baiduMap.hideInfoWindow();
            }
        });
    }
//Click event for infowindows
 infowindows.setOnClickListener(new View.OnClickListener() {
            @Override
            public void onClick(View v) {
               //Events executed
            }
        });
This is how to add marker in the map of Baidu, until the end of the initial trilogy of Baidu development. Of course, because Baidu's api has been updated, if you want to learn more, you need to study more demo given by Baidu official.
Source code for the above project: http://pan.baidu.com/s/1mi64jRM Password: hda9