1. Axios post request
1.1 types of common post requests
- form submission method = "post" synchronization (element: whether the page is refreshed)
- axios.post() asynchronous operation
1.2 introduction to Axios post
1.2.1 edit front-end JS
<!DOCTYPE html>
<html>
<head>
<meta charset="utf-8">
<title>Axios test</title>
<script src="../js/axios.js"></script>
</head>
<body>
<h1>Axios Test case-2</h1>
<script>
/*
Syntax:
1.Parameter axios.post(URL address, data object)
2.Note: it is different from axios.get(url,{params: object}) request
*/
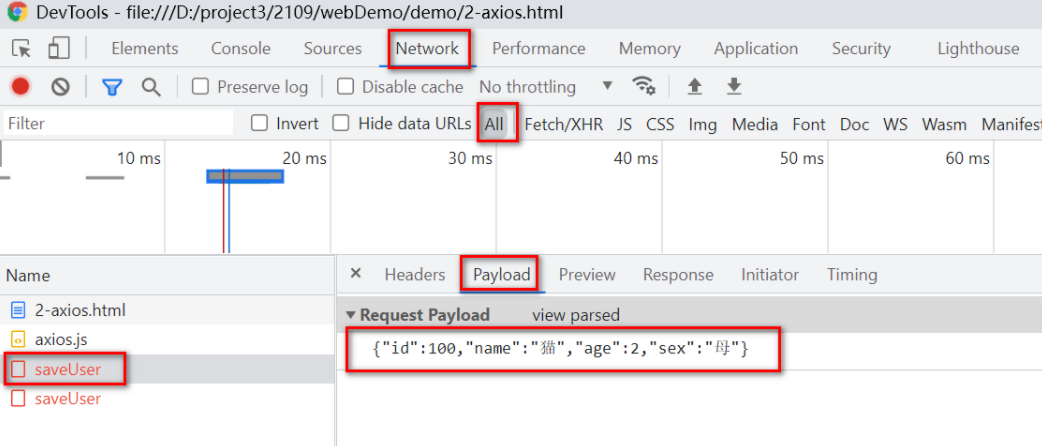
let url1 = "http://localhost:8080/axios/saveUser"
let user1 = {id:100, name:"cat", age:2, sex: "mother"}
axios.post(url1,user1)
.then(function(promise){
console.log(promise.data)
})
</script>
</body>
</html>
1.2.2 front end page analysis
Note: if js object is passed in axios.post request, the data sent to back-end server is JSON string
 1.2.3 editing AxiosController
package com.jt.controller;
import com.jt.pojo.User;
import org.springframework.web.bind.annotation.*;
import java.util.ArrayList;
import java.util.List;
@RestController
@CrossOrigin //It mainly solves cross domain problems
@RequestMapping("/axios")
public class AxiosController {
/**
* URL Address: http://localhost:8080/axios/getUserById?id=100
* Parameter: id = 100
* Return value: the JSON of the User object forges a User object
*/
@RequestMapping("/getUserById")
public User getUserById(Integer id){
int a = 100;
//Query database by ID
User user = new User();
user.setId(id);
user.setName("study hard");
user.setAge(1000);
user.setSex("male");
return user;
}
/**
* URL Address: http://localhost:8080/axios/getUserByNA?id=xxx&name=xxxx
* Parameter: id = XXX name = XXX
* Return value: List [user1,user2]
*/
@RequestMapping("/getUserByNA")
public List<User> getUserByNA(User user){
List<User> list = new ArrayList<>();
list.add(user);//Simplified assignment operation returns directly
list.add(user);
return list;
}
/**
* URL Address: http://localhost:8080/axios/findUserByNS/tomcat/ male
* Parameter: name/sex
* Return value: List < user >
*/
@RequestMapping("/findUserByNS/{name}/{sex}") //Call the set method to assign a value to the property
public List<User> findUserByNS(User user){
List<User> list = new ArrayList<>();
list.add(user);
list.add(user);
return list;
}
/**
* URL: "http://localhost:8080/axios/saveUser"
* Parameters: {"id":100,"name": "cat", "age":2,"sex": "parent"} json string
* url1: http://xxx/axios/saveUser?id=xxx&name=xxx
* Return value: "new user succeeded!!!"
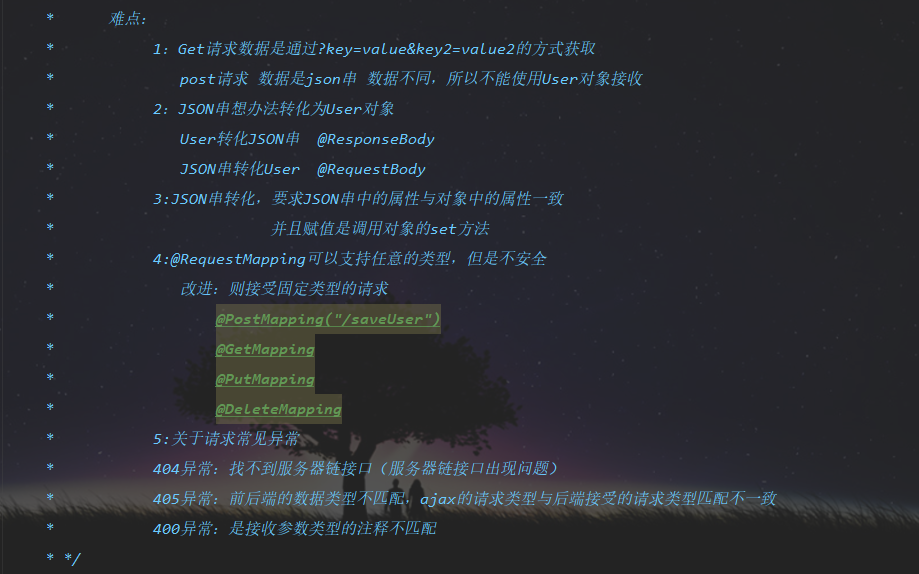
* Difficulties:
* 1.Get Is the data requested through? Key = value & key2 = Value2
* post The request data is a json string with different data structures, so it cannot be received using the User object
* 2.JSON Convert string method to User object
* User Convert to JSON string @ ResponseBody
* JSON Convert string to user @ requestbody
* 3.JSON String conversion requires that the attributes in the json string be consistent with those in the object,
* And the set method of the object is called during assignment
* 4.@RequestMapping You can support any type of request. But this writing is not safe
* Improvement: only fixed type requests can be received
* @PostMapping("/saveUser")
* @GetMapping
* @PutMapping
* @DeleteMapping
*/
//@RequestMapping(value="/saveUser",method = RequestMethod.POST)
//@PostMapping("/saveUser")
@PostMapping("/saveUser")
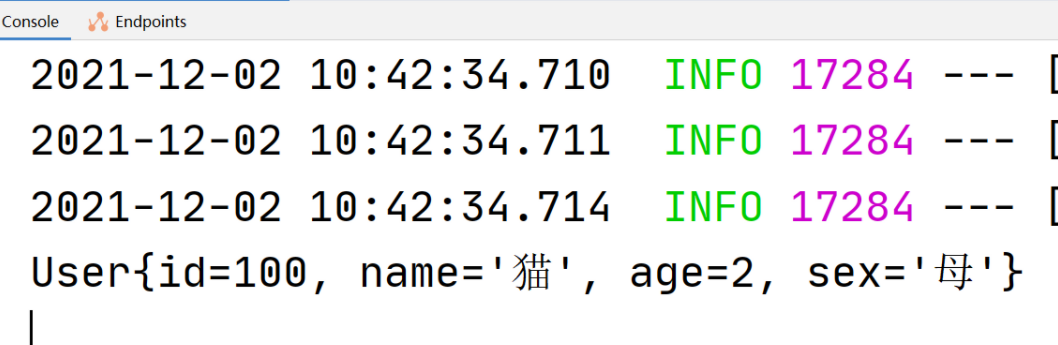
public String saveUser(@RequestBody User user){
System.out.println(user);
return "Successfully added user!!!";
}
}
1.2.4 page effect test
1.2.5 about request exceptions (common red exceptions)
* 404 exception: the server chain interface cannot be found (there is a problem with the server chain interface)
* 405 exception: the data types of the front and back ends do not match, and the request type of ajax is different from the request type accepted by the back end Inconsistent matching
* 400 exception: the comment of the received parameter type does not match
* 401 exception: unauthorized
* 402 exception: payment required
* 406 exception: unacceptable
* 403 exception: access prohibited
* 408 exception: request timeout
* 409 exception: instruction conflict
* 413 exception: the request entity is too large
* 414 exception: the requested URL address is too long
* 416 exception: the requested scope cannot be satisfied
* 417 exception: expected content error
* 426 exception: upgrade required
* 423 exception: too many requests
* 431 exception: the requested header field is too large
* 450 exception: blocked by Windows parental control program
* 500 exception: server error
* 507 exception: insufficient stock
* 599 exception: error: network link timeout
* 200 exception: ok
* 100 exception: continue
1.2.6 request type and business relationship
Common request types:
1.GET query
2.DELETE is used in the same way as get/delete
3.POST 1. Form data submission 2. Add
4.PUT Modify operation post/put Same usage
       //@RequestMapping("/saveUser" )
        @PostMapping("/saveUser")
//        @GetMapping
//        @PutMapping
//        @DeleteMapping
             public String saveUser( @RequestBody User user){
            System.out.println(user);
//                      List<User>  list=new ArrayList<>();
//                             list.add(user);
//                             list.add(user);
//                             list.add(user);
//                             list.add(user);
              return "Successfully added user";
          }
        /**
         * Business requirements:
         *       Complete the user's modification
         *       Change the data name with ID=100 to Zhang San, age to 18, sex to female
         *       url: http://localhost:8080/axios/updtaeUser
         *       Return value: after modification, the data needs to be printed at the back end
         * */
        @PutMapping("/updateUser")
        public String updateUser(@RequestBody User user){
            System.out.println(user);
            return "New user changed successfully";
        }

            @DeleteMapping("/delete")
            public  Object  delete(User user){
                System.out.println(user);
                return "Delete succeeded";
            }
	<body>
        <h1>axios Case 1</h1>
        <script type="text/javascript">
        /** axios.post(URL:Transferred data (data object)
         * Syntax:
         *   1: Parameter axios.post(url, data object)
         *   2: Note: request with axios.get(url,{params: object})
         *
         * */

            let  url10="http://localhost:8080/axios/saveUser"
            let  user10={id:100,name:"Zhang San",age:18,sex:"mother"}
            axios.post(url10,user10)
               .then(function(promise){
                   console.log(promise.data)
               })

        </script>

		<script type="text/javascript">

					/**
			         * Business requirements:
			         *       Complete the user's modification
			         *       Change the data name with ID=100 to Zhang San, age to 18, sex to female
			         *       url: http://localhost:8080/axios/updateUser
			         *       Return value: after modification, the data needs to be printed at the back end
			         * */
					 let  url11="http://localhost:8080/axios/updateUser"
					 let  user11={id:100,name:"Zhang San",age:18,sex:"female"}
					 axios.put(url11,user11)
					    .then(function(promise){
							console.log(promise.data)
						})
		</script>

			<!--     /**
					 * Business requirements:
					 *       Complete the user's modification
					 *       Change the data name with ID=100 to Zhang San, age to 18, sex to female
					 *       url: http://localhost:8080/axios/updateUser
					 *       Return value: after modification, the data needs to be printed at the back end
					 * */ -->

		            <script type="text/javascript">
		            let  url12="http://localhost:8080/axios/delete"
					let  user12={id:100}
					   axios.delete(url12)
					        .then(function(promise){
								console.log(promise.data)
							})
		            </script>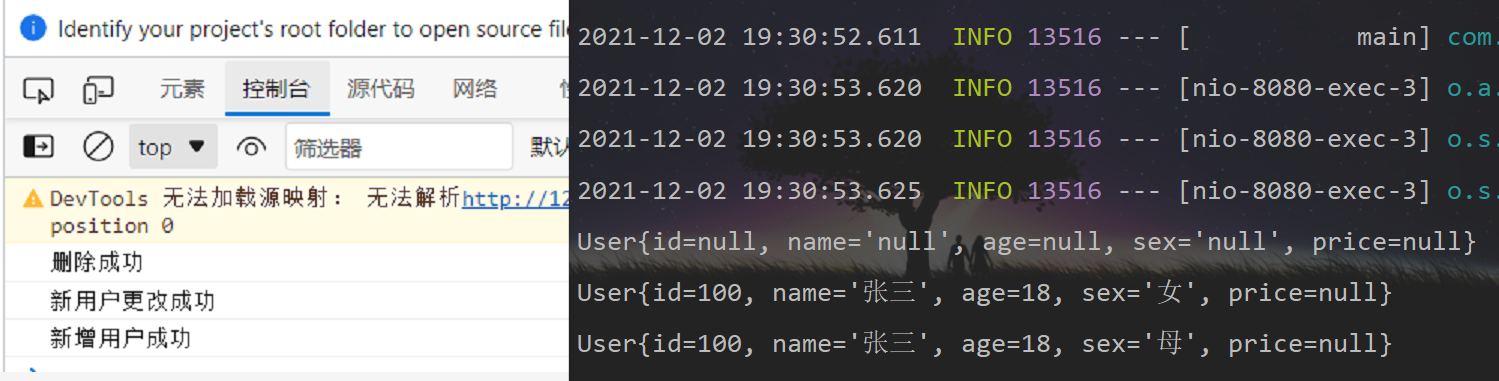
1.3 user modification
1.3.1 edit page JS
/**
			 * Business requirements:
			 * 		Complete the user's modification
			 * 		Change the data name with ID=100 to Zhang San, age to 18, sex to female
			 * URL: http://localhost:8080/axios/updateUser
			 * Return value: modified successfully!!! Data requires back-end printing
			 */
			let url2="http://localhost:8080/axios/updateUser"
			let user2={id:100,name:"Zhang San",age:18,sex:"female"}
			axios.put(url2,user2)
				 .then(function(promise){
					 console.log(promise.data)
				 })
1.3.2 editing AxiosController
/**
     *  URL:http://localhost:8080/axios/updateUser
     *  Parameter: JSON string
     *  Return value: String
     */
    @PutMapping("/updateUser")
    public String updateUser(@RequestBody User user){
        System.out.println(user);
        return "Modified successfully!!!";
    }
2. Springboot framework learning
2.1 what is SpringBoot
Positioning: the SpringBoot framework is the framework of the framework, which simplifies the configuration of the conventional framework. It only needs a little code, that is, it can achieve a large number of functions. It embodies the * * "out of the box" * * idea
Spring Boot is a new framework provided by pivot team. It is designed to simplify the initial construction and development process of new spring applications. The framework uses a specific way to configure, so that developers no longer need to define templated configurations. In this way, Spring Boot is committed to becoming a leader in the booming field of rapid application development.
2.2 creating a SpringBoot project
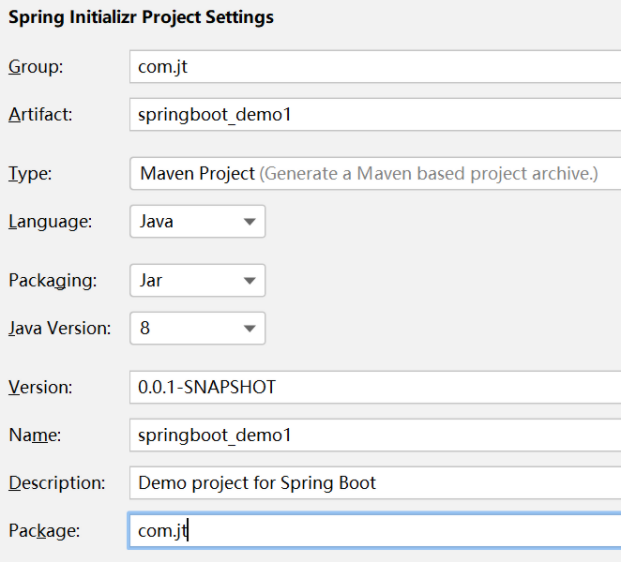
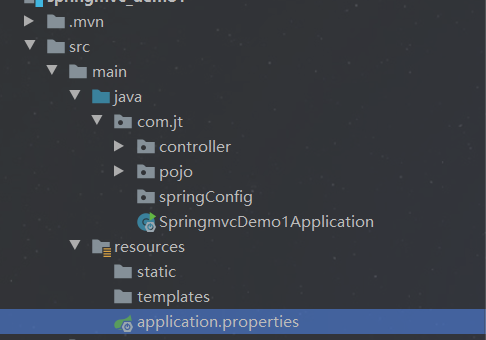
2.2.1 create project
2.3 pom.xml file description
2.3.1 basic configuration of pom.xml
 <!--maven Coordinates must be unique-->
    <groupId>com.jt</groupId>
    <artifactId>springboot_demo1</artifactId>
    <version>0.0.1-SNAPSHOT</version>
    <name>springboot_demo1</name>
    <description>Demo project for Spring Boot</description>

    <!--
        configuration information:  JDK edition/The character set is set/springboot Version information
    -->
    <properties>
        <java.version>1.8</java.version>
        <project.build.sourceEncoding>UTF-8</project.build.sourceEncoding>
        <project.reporting.outputEncoding>UTF-8</project.reporting.outputEncoding>
        <spring-boot.version>2.3.7.RELEASE</spring-boot.version>
    </properties>
2.3.2 jar package dependency
 <!-- Specify dependencies -->
    <dependencies>
        <!--
            phenomenon:
                springboot Medium jar Package file is missing version number
            reason:
                Originally, you need to manually add the version number when developing the framework.SpringBoot frame
                After introduction,All version number information,from SpringBoot Test on the official website(springboot Put it on the market
                Common frameworks are integrated,And tested jar Package version and dependency).springBoot Internal has been completed
                Version definition.So there's no need to write any more.
         -->
        <dependency>
            <groupId>org.springframework.boot</groupId>
            <artifactId>spring-boot-starter-web</artifactId>
        </dependency>

        <dependency>
            <groupId>org.springframework.boot</groupId>
            <artifactId>spring-boot-starter-test</artifactId>
            <scope>test</scope>
            <exclusions>
                <exclusion>
                    <groupId>org.junit.vintage</groupId>
                    <artifactId>junit-vintage-engine</artifactId>
                </exclusion>
            </exclusions>
        </dependency>
    </dependencies>

    <!--springboot Project dependency Manager,It defines the of other frameworks jar package,
            Add directly later jar Just pack
    -->
    <dependencyManagement>
        <dependencies>
            <dependency>
                <groupId>org.springframework.boot</groupId>
                <artifactId>spring-boot-dependencies</artifactId>
                <version>${spring-boot.version}</version>
                <type>pom</type>
                <scope>import</scope>
            </dependency>
        </dependencies>
    </dependencyManagement>
2.3.3 maven operation mode of springboot project
<!--
        Label Description:
            maven operation springboot Project tools
            1.Compiler tool maven-compiler-plugin
              effect: maven When executing instructions,Managed by plug-ins SpringBoot project
            2.Project packaging tool spring-boot-maven-plugin
                use install The way will be springboot Project marking jar package.
                springboot Your project is different from a regular project.So you need to add a plug-in
    -->
    <build>
        <plugins>
            <plugin>
                <groupId>org.apache.maven.plugins</groupId>
                <artifactId>maven-compiler-plugin</artifactId>
                <version>3.8.1</version>
                <configuration>
                    <source>1.8</source>
                    <target>1.8</target>
                    <encoding>UTF-8</encoding>
                </configuration>
            </plugin>
            <plugin>
                <groupId>org.springframework.boot</groupId>
                <artifactId>spring-boot-maven-plugin</artifactId>
                <version>2.3.7.RELEASE</version>
                <configuration>
                    <mainClass>com.jt.SpringbootDemo1Application</mainClass>
                </configuration>
                <executions>
                    <execution>
                        <id>repackage</id>
                        <goals>
                            <goal>repackage</goal>
                        </goals>
                    </execution>
                </executions>
            </plugin>
        </plugins>
    </build>
2.4 out of the box principle description (interview must ask)
2.4.1 introduction
springBoot encapsulates the cumbersome configuration into some jar packages. The files in the jar package have been configured. They can be imported and used. The way to obtain its functions with only a small amount of configuration is called "out of the box"
2.4.2 out of the box rules - startup items
Startup item: spring boot starter XXXX
Note: the framework has been integrated in the package. Users can use it
 <!--springboot integration springmvc-->
        <dependency>
            <groupId>org.springframework.boot</groupId>
            <artifactId>spring-boot-starter-web</artifactId>
        </dependency>
2.4.3 description of main startup class
Description: @ ComponentScan("package path!!!")
Rule: the path of the current package scan is the package path of the main startup class by default
Note: code written later must be edited in the same package and sub package of the package path where the main startup class is located
 2.4.4 out of the box - auto configuration notes
Annotation Name: @ EnableAutoConfiguration start automated configuration
Rule: this annotation is used to load the startup item of springboot start XXX. When the main startup class is executed, the configuration in the startup item will be loaded. Then the function will be loaded successfully

2.5 description of springboot YML configuration file
2.5.1 description of properties file
Note: there are multiple configuration files in the SpringBoot project. If a large number of duplicate configuration items are written into them, the user experience is not good
If you need to optimize, you can modify it to yml file
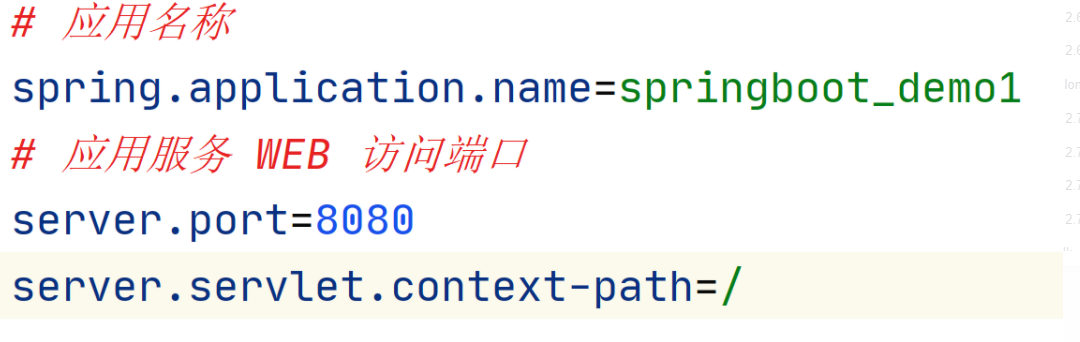
2.5.2 edit application.yml
Note: change the file name of application.properties to application.yml file
Basic syntax:
# Basic grammar
#   1. Data structure key value structure
#   2. Writing method: key: value space
#   3. Pay attention to indentation when there is a hierarchical structure
server:
  port: 8080
2.6 SpringBoot introduction case
2.6.1 business requirements
Description: dynamically assign values to attributes. Then display the data through the page
2.6.2 edit msg.properties file
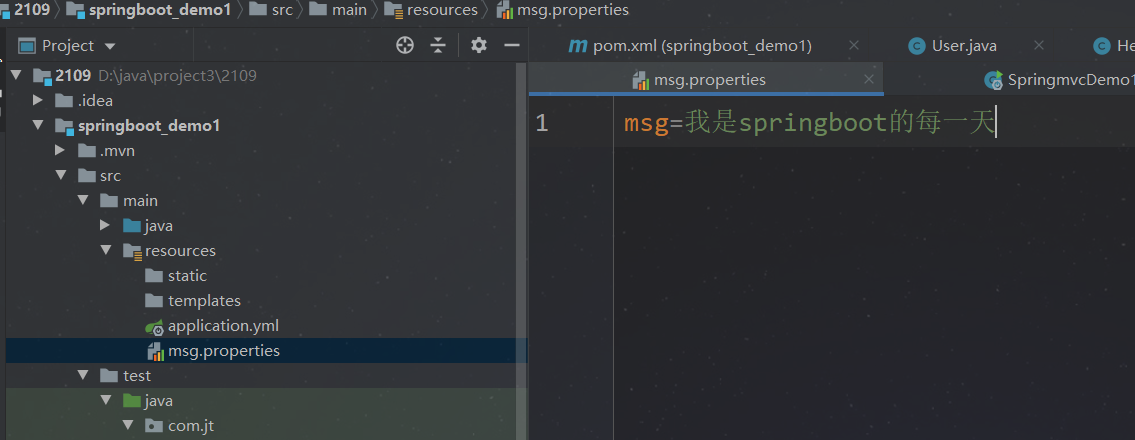
msg=I am springboot The first day of
2.6.3 editing HelloController
package com.jt.controller;

import org.springframework.beans.factory.annotation.Value;
import org.springframework.context.annotation.PropertySource;
import org.springframework.stereotype.Component;
import org.springframework.web.bind.annotation.GetMapping;
import org.springframework.web.bind.annotation.RestController;

@RestController
@PropertySource(value = "classpath:/msg.properties",encoding = "UTF-8")
public class HelloController {

    @Value("${msg}")
    private String msg;

    @GetMapping("/hello")
    public String hello(){
        return "Hello! SpringBoot"+msg;
    }
}
2.6.4 page effect display

2.7 introduction to Lombok plug-in
In conventional development, POJO class must hand write get/set/toString / construct /... And other methods. Such operations are hard to write, but they have to be written. The development efficiency is low
Therefore, lombok plug-in can be introduced to automatically generate the above methods
2.7.2 plug in installation
Import jar package
 <!--add to lombok My bag-->
        <dependency>
            <groupId>org.projectlombok</groupId>
            <artifactId>lombok</artifactId>
        </dependency>

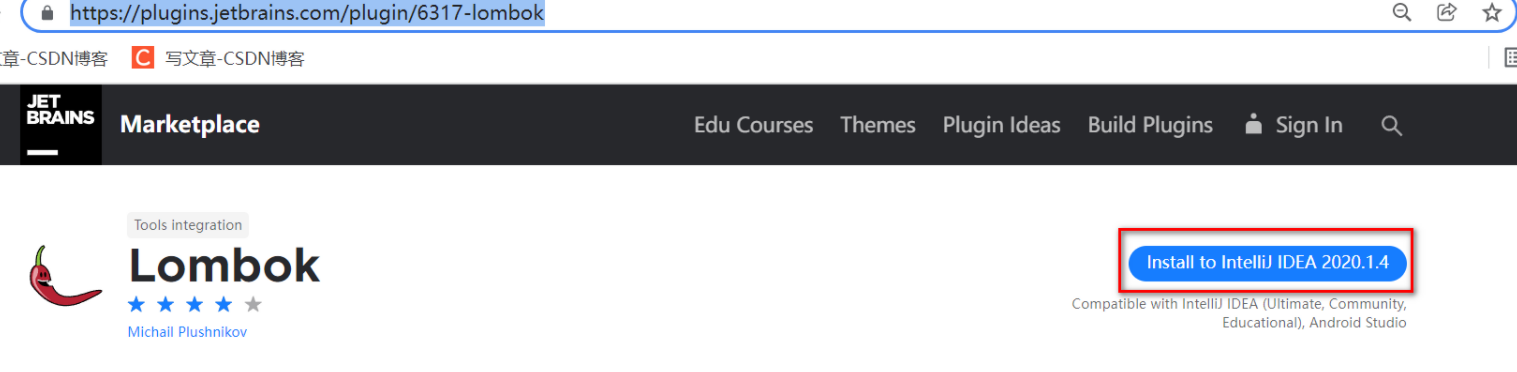
Install plug-ins
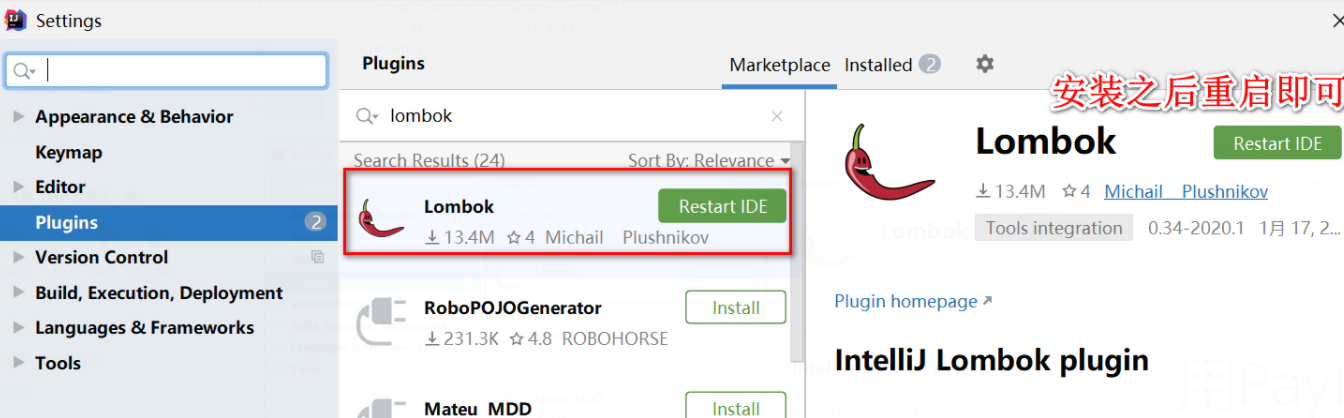
Install lombok
URL: https://plugins.jetbrains.com/plugin/6317-lombok
2.7.3 use of Lombok
package com.jt.pojo;
import lombok.Data;
import lombok.experimental.Accessors;
import java.io.Serializable;
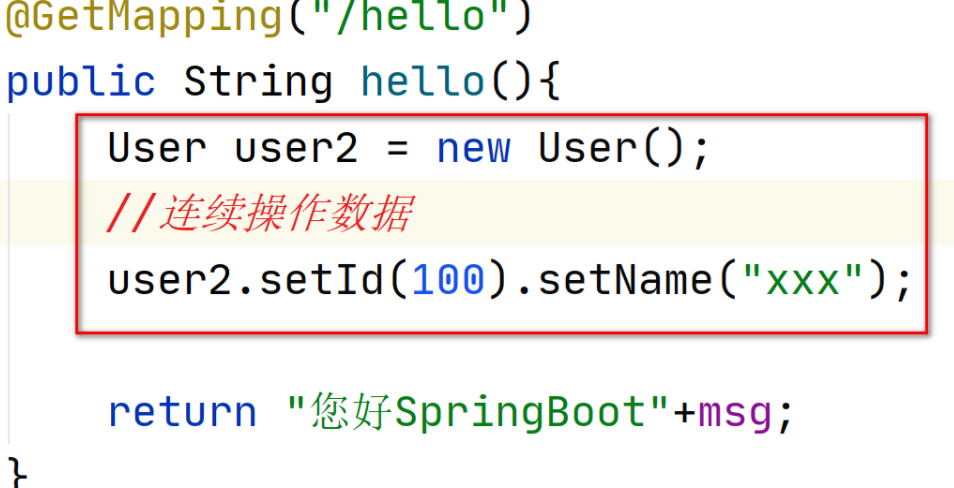
@Data //Getter/Setter/RequiredArgsConstructor/ToString/EqualsAndHashCode
@Accessors(chain = true) //Rewrites the set method. It can realize chain loading
public class User implements Serializable {
private Integer id;
private String name;
/* public User setId(Integer id){
this.id = id;
return this; //The current object runtime is valid
}
public User setName(String name){
this.name = name;
return this; //The current object runtime is valid
}*/
}
2.7.4 lombok case test
Test whether the set method can be called normally