Introduction to AWT
AWT Definition
AWT: A GUI class library, the Abstract Window Toolkit
GUI applications created with AWT share the same interface style as the platform on which they run
Inheritance System of AWT
Componet:
Represents an object that can be displayed pictorially and interact with the user, such as Button for a button, TextField for a text box, etc.
MenuComponent:
Menu components that represent the graphical interface, including subclasses such as MenuBar (menu bar), MenuItem (menu item)
Container:
Is a special kind of Componet that represents a container that can hold ordinary COMponents
Container's Inheritance System
AWT usage
Use of Window,Panel,ScrollPane
- Window is a stand-alone top-level window that manages its internal component layout by default using BorderLayout
- Panel can accommodate other components but cannot exist independently. It must be used inside other containers, and FlowLayout is used by default to manage its internal component layout
- ScrollPane is a container with scrollbars and cannot exist independently. BorderLayout is used by default to manage its internal component layout
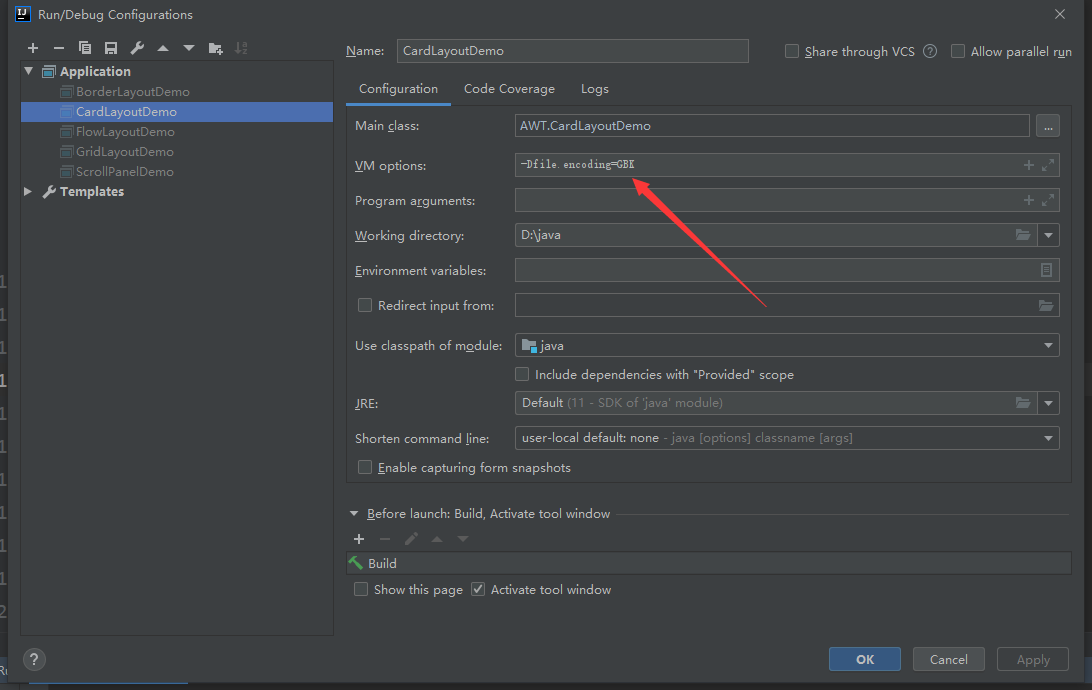
Possible Chinese encoding problems:
- -Dfile.encoding=GBK
Window:
public class WindowDemo {
    public static void main(String[] args) {
        Frame frame = new Frame("window");

        frame.setLocation(100, 100); //Set Location
        frame.setSize(500, 300); //Set window size
        frame.setVisible(true); // Set Visibility
    }
}
Panel:
public class PanelDemo {
    public static void main(String[] args) {
        //Panel object must be dependent on Window

        //Create a window object
        Frame frame = new Frame("panel");

        //Create Panel Object
        Panel panel = new Panel();
        panel.add(new TextField("textField"));  // Add Text Box
        panel.add(new Button("button"));  // add button

        //panel added to window
        frame.add(panel);

        //Set window position and size
        frame.setBounds(100, 100, 500, 300);

        //Set window s visibility
        frame.setVisible(true);
    }
}

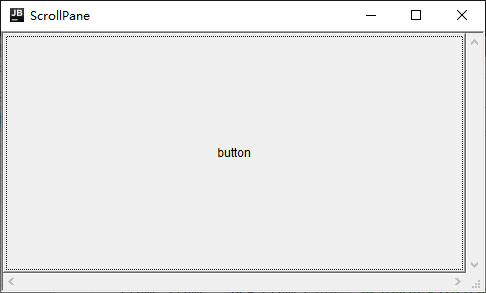
ScrollPane:
public class ScrollPanelDemo {
    public static void main(String[] args) {
        //Create a window object
        Frame frame = new Frame("ScrollPane");

        //Create Panel Object
        ScrollPane scrollPane = new ScrollPane(ScrollPane.SCROLLBARS_ALWAYS);  //Setting the scrollbar to always display
        scrollPane.add(new TextField("textField"));
        scrollPane.add(new Button("button"));

        //panel added to window
        frame.add(scrollPane);

        //Set window position and size
        frame.setBounds(100, 100, 500, 300);

        //Set window s visibility
        frame.setVisible(true);
    }
}
Layout Manager
- LayoutMananger Layout Manager can automatically resize components based on the running platform
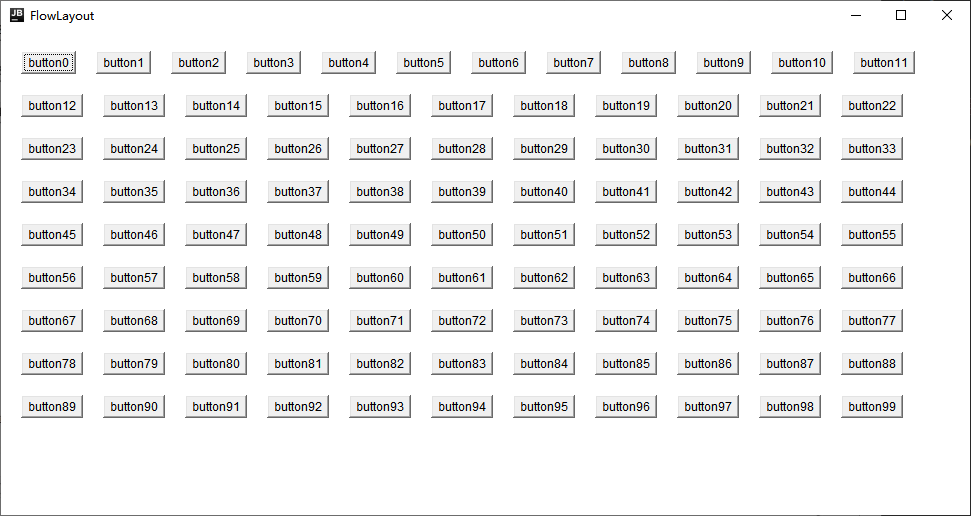
FlowLayout
- Arrange all components from left to right, and when boundaries are encountered, fold back to the next line to start over
public class FlowLayoutDemo {
    public static void main(String[] args) {
        Frame frame = new Frame("FlowLayout");

        // Set up Layout Manager with left alignment, horizontal and vertical spacing of 20
        frame.setLayout(new FlowLayout(FlowLayout.LEFT, 20, 20));

        for (int i = 0; i < 100; i++) {
            frame.add(new Button("button" + i));
        }

        //Set optimal size
        frame.pack();
        frame.setVisible(true);
    }
}
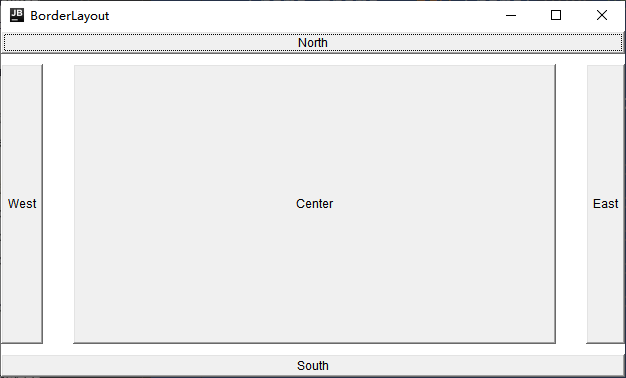
BorderLayout
- Containers are divided into five zones: EAST,SOUTH,WEST,NORTH,CENTER. Common components can be placed in any of these five zones
- When changing the container size using BorderLayout, the NORTH,SOUTH, and CENTER regions are adjusted horizontally, while the EAST,WEST, and CENTER regions are adjusted vertically
- When adding components, you need to specify which zone to add, and if you don't specify which zone to add, add them by default to the middle zone
- If more than one component is added to the same zone, the component that is put later overwrites the component that was put first
public class BorderLayoutDemo {
    public static void main(String[] args) {
        Frame frame = new Frame("BorderLayout");

        // Horizontal spacing 30, Vertical spacing 10
        frame.setLayout(new BorderLayout(30, 10));

        frame.add(new Button("North"), BorderLayout.NORTH);
        frame.add(new Button("South"), BorderLayout.SOUTH);
        frame.add(new Button("East"), BorderLayout.EAST);
        frame.add(new Button("West"), BorderLayout.WEST);
        frame.add(new Button("Center"), BorderLayout.CENTER);

        frame.pack();
        frame.setVisible(true);
    }
}
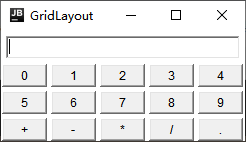
GridLayout
- Split containers into grids with vertical and horizontal lines, each of which occupies the same size of area
- When adding components, add them to each grid by default from left to right, top to bottom
public class GridLayoutDemo {

    public static void main(String[] args) {
        Frame frame = new Frame("GridLayout");

        // Add Input Text Box
        Panel p_text = new Panel();
        p_text.add(new TextField(30));
        frame.add(p_text, BorderLayout.NORTH);

        //Add Array
        Panel p_num = new Panel();
        // 3 rows 5 columns
        p_num.setLayout(new GridLayout(3, 5, 4, 4));
        for (int i = 0; i < 10; i++) {
            p_num.add(new Button(String.valueOf(i)));
        }
        p_num.add(new Button("+"));
        p_num.add(new Button("-"));
        p_num.add(new Button("*"));
        p_num.add(new Button("/"));
        p_num.add(new Button("."));
        frame.add(p_num);

        frame.pack();
        frame.setVisible(true);
    }
}
GridBagLayout
- Similar to GridLayout, but the layout can occupy multiple grids
CardLayout
- Consider all components added to the container as a stack of cards, with only the top component visible at a time.
public class CardLayoutDemo {
    public static void main(String[] args) {
        Frame frame = new Frame("CardLayout");

        CardLayout cardLayout = new CardLayout();

        //Middle area panel
        Panel p1 = new Panel();
        p1.setLayout(cardLayout);
        String[] names = {"First","Second","Third","Fourth","Fifth"};
        for (int i = 0; i < names.length; i++) {
            p1.add(names[i], new Button(names[i]));
        }
        frame.add(p1);

        //Five button areas
        Panel p2 = new Panel();
        Button b1 = new Button("Previous");
        Button b2 = new Button("Next");
        Button b3 = new Button("First");
        Button b4 = new Button("Last");
        Button b5 = new Button("Third");

        //Create an event listener to listen for button clicks
        ActionListener listener = new ActionListener() {
            @Override
            public void actionPerformed(ActionEvent actionEvent) {
                // Get the text on the button
                String actionCommend = actionEvent.getActionCommand();
                switch (actionCommend) {
                    case "Previous":
                        cardLayout.previous(p1);
                        break;
                    case "Next":
                        cardLayout.next(p1);
                        break;
                    case "First":
                        cardLayout.first(p1);
                        break;
                    case "Last":
                        cardLayout.last(p1);
                        break;
                    case "Third":
                        cardLayout.show(p1, "Third");
                        break;
                }
            }
        };

        //Bind event listeners and buttons together
        b1.addActionListener(listener);
        b2.addActionListener(listener);
        b3.addActionListener(listener);
        b4.addActionListener(listener);
        b5.addActionListener(listener);

        p2.add(b1);
        p2.add(b2);
        p2.add(b3);
        p2.add(b4);
        p2.add(b5);
        frame.add(p2, BorderLayout.SOUTH);

        frame.pack();
        frame.setVisible(true);
    }
}

BoxLayout
- GUI components can be accessed vertically and horizontally
public class BoxLayoutDemo {
    public static void main(String[] args) {
        Frame frame = new Frame("BoxLayout");

        //Create a BoxLayout object that holds components vertically
        BoxLayout boxLayout = new BoxLayout(frame, BoxLayout.Y_AXIS);

        frame.setLayout(boxLayout);
        frame.add(new Button("button1"));
        frame.add(new Button("button2"));

        frame.pack();
        frame.setVisible(true);
    }
}

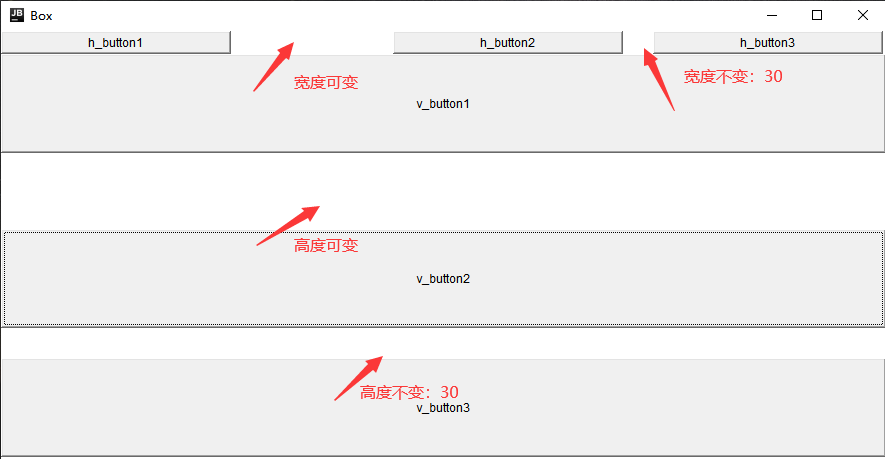
Box Container
- The container's default layout manager is BoxLayout. In most cases, use the Box container to hold multiple GUI components, then add the Box container as a component to other containers to form the overall window layout.
public class BoxDemo {
    public static void main(String[] args) {
        Frame frame = new Frame("Box");

        //Create Box Containers for Horizontally Arranged Components
        Box hBox = Box.createHorizontalBox();
        hBox.add(new Button("h_button1"));
        hBox.add(Box.createHorizontalGlue()); // Stretch in both directions
        hBox.add(new Button("h_button2"));
        hBox.add(Box.createHorizontalStrut(30)); //Fixed split length
        hBox.add(new Button("h_button3"));

        //Create Box Containers for Vertically Arranged Components
        Box vBox = Box.createVerticalBox();
        vBox.add(new Button("v_button1"));
        vBox.add(Box.createVerticalGlue());
        vBox.add(new Button("v_button2"));
        vBox.add(Box.createVerticalStrut(30));
        vBox.add(new Button("v_button3"));

        //Add to frame
        frame.add(hBox, BorderLayout.NORTH);
        frame.add(vBox);

        frame.pack();
        frame.setVisible(true);
    }
}
Basic components in AWT
| Component Name | function |
|---|---|
| Button | Button |
| Canvas | Canvas for Drawing |
| Checkbox | Checkbox components (also used when cell box components) |
| CheckboxGroup | Used to group multiple Checkbox components into a group, where only one Checkbox component is selected, that is, all become radio box components |
| Choice | Select |
| Frame | Window, through which windows are created in GUI programs |
| Label | Label class for placing prompt text |
| List | List box component that adds multiple entries |
| Panel | Basic container classes cannot exist separately and must be placed in other containers |
| Scrollbar | Slider bar component. If you need the user to enter a value that is within a range, you can use the slider component, such as the slider used to set the three values of RGB in the color palette. When you create a slider bar, you must specify its direction, initial value, size of the slider, minimum value, and maximum value. |
| ScrollPane | Container assembly with horizontal and vertical sliders |
| TextArea | Multiline Text Fields |
| TextField | JTextField |
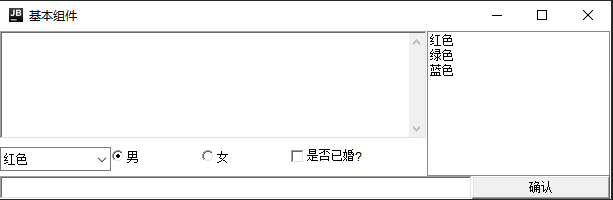
public class BasicComponentDemo {
    Frame frame = new Frame("Basic Components");

    //Multiline Text Area
    TextArea ta = new TextArea(5, 20);

    //Select
    Choice colorChooser = new Choice();

    //Selection box
    CheckboxGroup cbg = new CheckboxGroup();
    Checkbox male = new Checkbox("male", cbg, true);
    Checkbox female = new Checkbox("female", cbg, false);

    //Selection box
    Checkbox isMarried = new Checkbox("Were you married?");

    //Single Line Text Area
    TextField tf = new TextField(50);
    Button ok = new Button("confirm");

    //list box
    List colorList = new List(6, true);

    public void init(){
        //Assembly Bottom
        Box bBox = Box.createHorizontalBox();
        bBox.add(tf);
        bBox.add(ok);
        frame.add(bBox, BorderLayout.SOUTH);

        //Assembly selection section
        colorChooser.add("gules");
        colorChooser.add("blue");
        colorChooser.add("green");
        Box cBox = Box.createHorizontalBox();
        cBox.add(colorChooser);
        cBox.add(male);
        cBox.add(female);
        cBox.add(isMarried);
        frame.add(cBox);

        //Assembling text fields and selection sections
        Box topLeft = Box.createVerticalBox();
        topLeft.add(ta);
        topLeft.add(cBox);
        frame.add(topLeft);

        //Assemble top left and list box
        Box top = Box.createHorizontalBox();
        colorList.add("gules");
        colorList.add("green");
        colorList.add("blue");
        top.add(topLeft);
        top.add(colorList);
        frame.add(top);

        frame.pack();
        frame.setVisible(true);
    }

    public static void main(String[] args) {
        BasicComponentDemo bc = new BasicComponentDemo();
        bc.init();
    }
}