Modular instance
The code is shown as follows in mailbox 126:
from selenium import webdriver
driver = webdriver.Firefox()
driver.implicitly_wait(10)
driver.get("http://www.126.com")
#Land
driver.find_element_by_link_text("Password login").click()
#Find the frame layer where the user name and password are logged in. The parameter here is empty because the frame is so empty
driver.switch_to_frame("")
#Empty text box contents
driver.find_element_by_xpath("//*[@name='email' and @data-loginname='loginEmail']").clear()
#enter one user name
driver.find_element_by_xpath("//*[@name='email' and @data-loginname='loginEmail']").send_keys("username")
#Empty text box contents
driver.find_element_by_name("password").clear()
#Input password
driver.find_element_by_name("password").send_keys("password")
#Click the login button
driver.find_element_by_id("dologin").click()
#Exit the current form layer
driver.switch_to.default_content()
#Logout
driver.find_element_by_link_text("Sign out").click()
#Close web page
driver.quit()
Here's 126 login. It's easy to find the form. I've talked about the form operation here in "webdriver? API? 02 of learning notes", but it seems that it's useless to jump out of the current form layer. I found a method on the Internet, "driver. Switch? To. Default? Content()" to jump out of the current layer. I learned the video in 2013. Maybe the method is relatively backward, each foot It's only when I'm running past that I can write about it, so there may be some conflicts between examples and concepts. But I'll make sure that every script works
Modularize the above login and exit Codes:
Create a new Python file of mail126_, and save the login and exit modules
#Sign in
#The driver here is equivalent to an interface
def login(driver):
    driver.find_element_by_link_text("Password login").click()
    driver.switch_to_frame("")
    driver.find_element_by_xpath("//*[@name='email' and @data-loginname='loginEmail']").clear()
    driver.find_element_by_xpath("//*[@name='email' and @data-loginname='loginEmail']").send_keys("username")
    driver.find_element_by_name("password").clear()
    driver.find_element_by_name("password").send_keys("password")
    driver.find_element_by_id("dologin").click()
#Sign out
def logout(driver):
    driver.switch_to.default_content()
    driver.find_element_by_link_text("Sign out").click()
    driver.quit()
Create a new Python file of mail126 ﹣ diaoyong ﹣ 01:
from selenium import webdriver
#Call the login and exit methods in the module
from mail126_01 import login,logout
import time
driver = webdriver.Firefox()
driver.implicitly_wait(10)
driver.get("http://www.126.com")
#test case
#Call login
login(driver)
#Call exit
logout(driver)
You can also encapsulate login and logout into a class. Login and logout are equivalent to two methods in the class, as follows:
class Login():
    def __init__(self,driver):
        self.driver=driver
    #Sign in
    #The driver here is equivalent to an interface
    def login(self):
        driver=self.driver
        driver.find_element_by_link_text("Password login").click()
        driver.switch_to_frame("")
        driver.find_element_by_xpath("//*[@name='email' and @data-loginname='loginEmail']").clear()
        driver.find_element_by_xpath("//*[@name='email' and @data-loginname='loginEmail']").send_keys("username")
        driver.find_element_by_name("password").clear()
        driver.find_element_by_name("password").send_keys("password")
        driver.find_element_by_id("dologin").click()
    #Sign out
    def logout(self):
        driver=self.driver
        driver.switch_to.default_content()
        driver.find_element_by_link_text("Sign out").click()
        driver.quit()
Recall:
from selenium import webdriver
#Call the login and exit methods in the module
from mail126_02 import Login
import time
driver = webdriver.Firefox()
driver.implicitly_wait(10)
driver.get("http://www.126.com")
#test case
#Call login
Login(driver).login()
#Call exit
Login(driver).logout()
Data driven instance
126 email login
To create a public class:
#Parameterize the user name and password of the login mailbox
#Test cases for different users
#Encapsulate login and exit into a class, which is the correct way to write
class Login():
    def __init__(self,driver):
        self.driver=driver
    #Sign in
    #The driver here is equivalent to an interface
    def login(self,username,password):
        driver=self.driver
        driver.find_element_by_link_text("Password login").click()
        driver.switch_to_frame("")
        driver.find_element_by_xpath("//*[@name='email' and @data-loginname='loginEmail']").clear()
        driver.find_element_by_xpath("//*[@name='email' and @data-loginname='loginEmail']").send_keys(username)
        driver.find_element_by_name("password").clear()
        driver.find_element_by_name("password").send_keys(password)
        driver.find_element_by_id("dologin").click()
    #Sign out
    def logout(self):
        driver=self.driver
        driver.switch_to.default_content()
        driver.find_element_by_link_text("Sign out").click()
        driver.quit()
Call, and simulate user login:
#Calling login and exit methods in a class
#Simulate different user test cases
from selenium import webdriver
#Call the login and exit methods in the module
from mail126_03 import Login
import time
driver = webdriver.Firefox()
driver.implicitly_wait(10)
driver.get("http://www.126.com")
#test case
#Call login
Login(driver).login("username","password")
#Call exit
Login(driver).logout()
In this way, multiple users can log in in the code, and the writing method is elegant:
from selenium import webdriver
driver = webdriver.Firefox()
driver.implicitly_wait(10)
driver.get("http://www.126.com")
class Account(object):
    def __init__(self,username='',password=''):
        self.username=username
        self.password=password
    def do_login_as(user_info):
        driver.find_element_by_id("idInput").clear()
        driver.find_element_by_id("idInput").send_keys("user_info.username")
        driver.find_element_by_id("pwdInput").clear()
        driver.find_element_by_id("pwdInput").send_keys("user_info.password")
        driver.find_element_by_id("loginBtn").click()
    #Instance login information
admin = Account(username='name',password='123')
gust = Account(username='name1',password='123')
#Call login function
do_login_as(admin)
do_login_as(gust)
Baidu search
The specific test development will not write like this, will modularize the search, and then use assertions to determine that the search parameters in the page are correct. Here is just to show that Baidu search can be driven by data:
from selenium import webdriver
import time
'''
file_info = open('info.txt','r')
values = file_info.readline()
file_info.close()
'''
#Change file to an array
shuzu=['Python','webdriver','automated testing ']
for serch in shuzu:
    driver = webdriver.Firefox()
    driver.implicitly_wait(10)
    driver.get("http://www.baidu.com")
    driver.find_element_by_id('kw').send_keys(serch)
    driver.find_element_by_id('su').click()
    time.sleep(2)
    driver.quit()
Read txt file
There are several ways to read files:
- read() reads the entire file
- readline() reads a row of data
- readlines() reads data from all rows
Create a new user? Info.txt. Each line stores the user name and password, separated by commas:
zhangsan,123
lisi,456
wangwu,789
Read the Python code of the txt file:
from selenium import webdriver
user_file = open('user_info.txt','r')#You can use open or file in Python 2, and you can only use open in Python 3
values = user_file.readlines()#Read all rows
#After reading, be sure to close
user_file.close()
#ctrl+d batch modify variables with the same name in the code
for i in values:
    username = i.split(';')[0] #split segmentation
    print(username)
    password = i.split(';')[1]
    print(password)
How to use a dictionary:
from selenium import webdriver
zidian = {'zhangsan':'123','lisi':'456','wangwu':'789'}
for k,v in zidian.items():
    print(k,v)
Read CSV file
If a group of data includes user name, password, mailbox, age, gender and other information, it is not convenient for name to split with split() method, because it can only split the string into two parts at a time.
Create a new CSV file. First, see an Excel table. After entering the content, save it as a CSV file format
Read Python code of CSV file:
#Read CSV file
import csv
my_file = 'user_info.csv'
date = csv.reader(open(my_file,'r'))
for user in date:
    print(user)
You can also read an element of each row:
#Read CSV file
import csv
my_file = 'user_info.csv'
date = csv.reader(open(my_file,'r'))
#Loop the information of each line, and you can read all files or partial data
for user in date:
    print(user[3])#Read elements with 3 corners on each line
Read xml file
A configuration file is needed to configure the URL, browser, login user name / password of the current automated test script. At this time, XML file can be selected to configure these information.
XML can be used to extend markup language, tag data and define data types. It is a source language that allows users to define their own markup language.
XML has the following characteristics:
First, by label:
Tags can have properties:
Tag pair can embed data: abc
Labels can have hierarchical relationships:
	<aa>
		<bb>
		</bb>
	</aa>
Create a new xml file:
<?xml version="1.0" encoding="utf-8" ?>
<catalog>
    <maxid>4</maxid>
    <login username = "pytest" passwd="123456">
        <caption>python</caption>
        <item id="4">
            <caption>test</caption>
        </item>
    </login>
    <item id="2">
            <caption>Zope</caption>
    </item>
</catalog>
Python code to read the file:
#Read xml file
from xml.dom.minidom import parse
#Open xml document
dom = parse('user_info.xml')
#Get document element object
root = dom.documentElement
print(root.nodeName)
print(root.nodeValue)
print(root.nodeType)
print(root.ELEMENT_NODE)
Print results: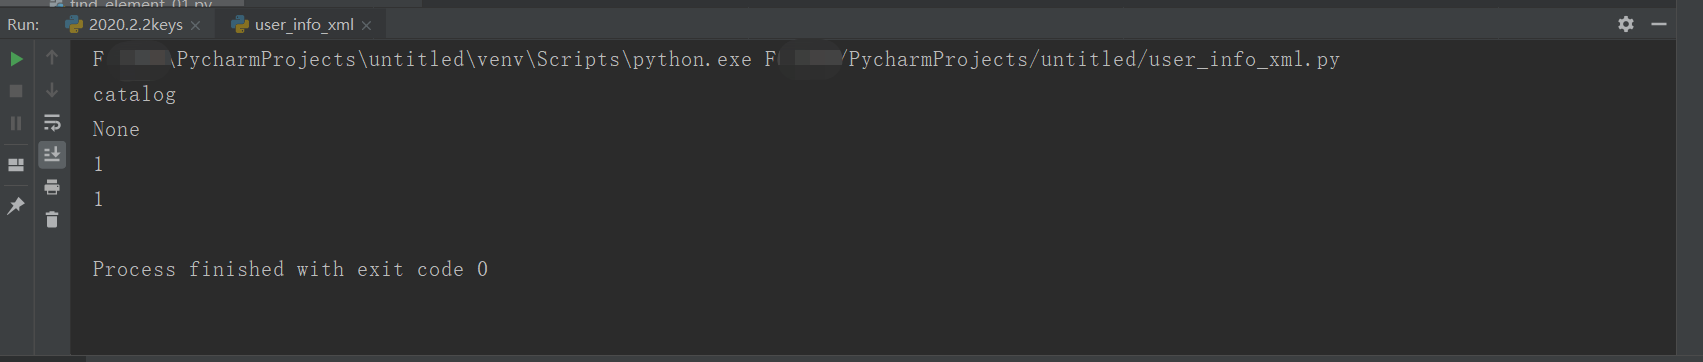
Get the tag name in the document:
#Read xml file
from xml.dom.minidom import parse
#Open xml document
dom = parse('user_info.xml')
#Get the tag name of the document element
root = dom.documentElement
tagname1 = root.getElementsByTagName('maxid')
print(tagname1[0].tagName)
tagname2 = root.getElementsByTagName('caption')[2]#When there is no other corner sign, specifying 2, 3... Will report an error
print(tagname2.tagName)
tagname3 = root.getElementsByTagName('item')
print(tagname3[1].tagName)
Print results: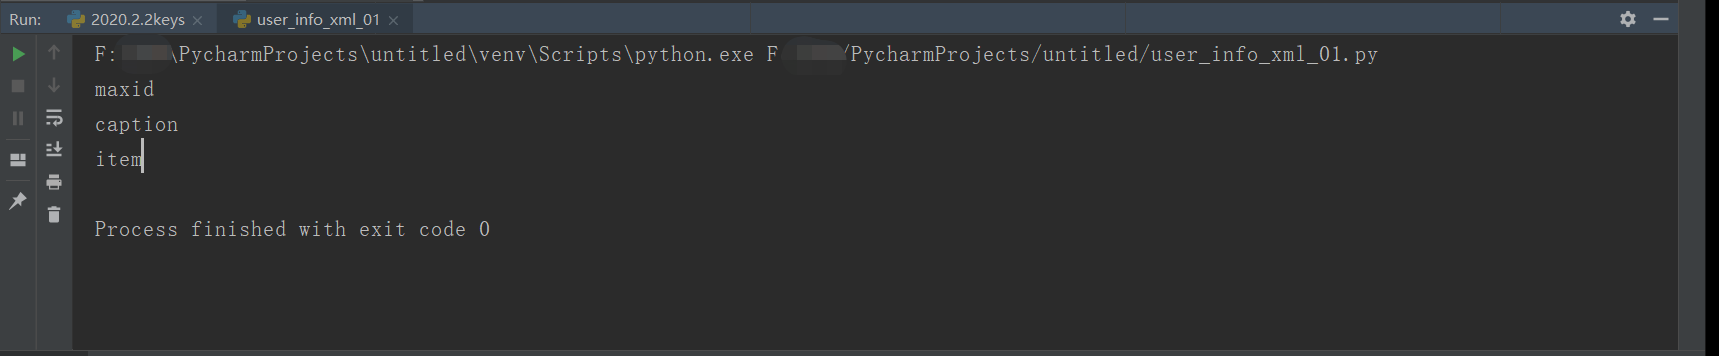
Get the properties of the label in the document:
Getting label properties is useful
#get attribute
from xml.dom.minidom import parse
#Open xml document
dom = parse('user_info.xml')
#Get the tag name of the document element
root = dom.documentElement
tagname1 = root.getElementsByTagName('login')[0]#When there is no other corner sign, specifying 2, 3... Will report an error
print(tagname1.getAttribute("username"))
tagname2 = root.getElementsByTagName('login')[0]
print(tagname2.getAttribute("passwd"))
Print results: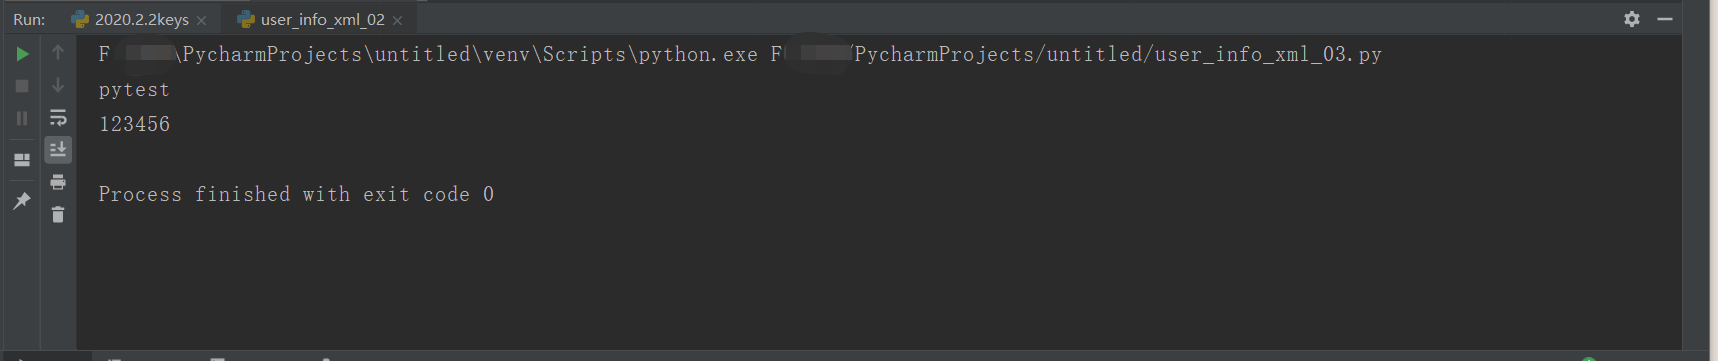
Get the text information in the label alignment:
#get attribute
from xml.dom.minidom import parse
#Open xml document
dom = parse('user_info.xml')
#Get the tag name of the document element
root = dom.documentElement
tagname1 = root.getElementsByTagName('maxid')[0]#Label to find
print(tagname1.firstChild.data) #First child data
tagname2 = root.getElementsByTagName('caption')[0]
print(tagname2.firstChild.data)
Print results: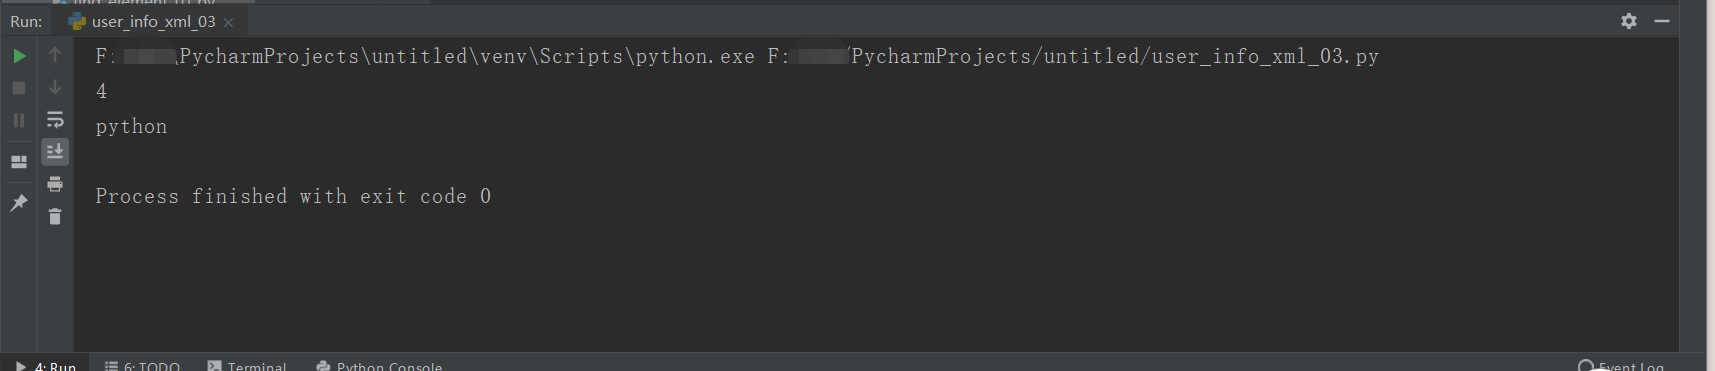
There are three caption s that can print the corresponding text information according to the angle mark. There is no problem for Python 3 to read the Chinese in the xml, and python 2 is prone to garbled code.
The page project model will be written out later in the study, not here

