Django's MTV Mode
Django's MTV mode is essentially the same as MVC's, but also for the sake of maintaining loosely coupled relationships among components. There are only slightly different definitions. The value of Django's MTV is:
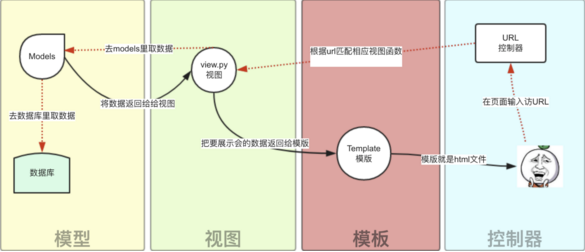
M Representation Model: Responsible for relational mapping (ORM) between business objects and databases.
T stands for Template: Responsible for presenting pages to users (html).
V Representation View: Responsible for business logic and call Model and Template when appropriate.
In addition to the above three layers, we need a URL distributor. Its function is to distribute page requests of each URL to different View processing. View calls the corresponding Model and Template. MTV's response mode is as follows:
Note: The following design instructions are for the second edition, that is, pyhton+django+vue.
Thoughts:
Define the API in urls.py, then correspond to the corresponding view, according to the requirement definition method (get, post, delete, put, etc.), and then go to the database to take the number (serialized into json string) and return, after defining, you can use the postman test to see what the interface is wrong, and then arrange these APIs in the front end.
First, look at the home page after the completion of development:
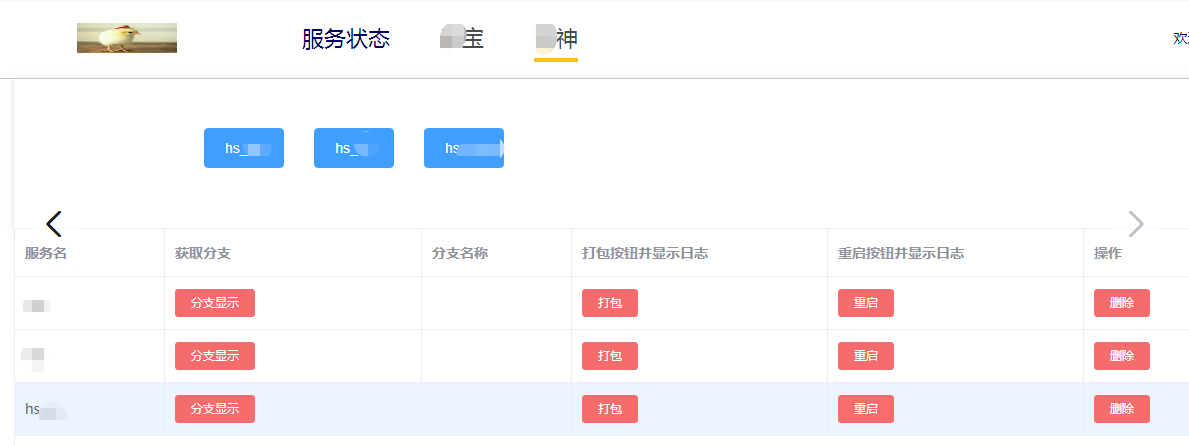
The above * Baohe * God is our application name, there are two applications in total, and then each application has multiple services, such as the second line below. So when I design the database, I build the table relationship between the two tables. Later, new applications only add in the first table:
models.py Part of the document:
class Appname(models.Model):
    """Applied Classification Table"""
    id = models.AutoField(primary_key=True)
    name = models.CharField(max_length=32,verbose_name="Name of application")
    title = models.CharField(max_length=32,unique=True,verbose_name="Classification of applications")
    def __str__(self):
        return self.title


class Service(models.Model):
    """Service table"""
    appname = models.ForeignKey(to="Appname",verbose_name="Classification of applications",on_delete=None)
    title = models.CharField(max_length=32,verbose_name="Name of service")
    title_number = models.IntegerField(verbose_name="Service quantity", default=1)
    def __str__(self):
        return self.title
After the table of the main page is designed, write down the api to get the application name and the service name.
The total url controller obtains the corresponding application name and service name in Automatic:

The corresponding content in Autimatic:

After the url controller section above is defined, the view view section comes down:
from rest_framework.views import APIView
from rest_framework.response import Response

from . import models
from .serializers import APPNameSerializer,ServiceSerializer

class AppView(APIView):
    def get(self,request):
        queryset = models.Appname.objects.all()
        ser_obj = APPNameSerializer(queryset, many=True)
        return Response(ser_obj.data)

class ServiceclassifyView(APIView):
    def get(self,request,pk):
        queryset = models.Service.objects.filter(appname_id=pk).all()
        print(queryset)

        ser_obj = ServiceSerializer(queryset,many=True)

        return Response(ser_obj.data)
We did return from the database in the view above. But we're going back to the front end. For the sake of specifications, we use json strings to return, so we need to serialize our data from the database into json format first. You can use JsonResponse. The DRF framework provides us with a better way to serialize: Model Serializer.
Note: The screenshot here is a partial screenshot.

model: The table you want to serialize.
Fields are fields to be serialized, of course, you can also establish the fields of table relations, "_all_" means that so the fields must be serialized. For complex fields that need to be rebuilt, use the get_field name method to rebuild.
After this serialization, the data is returned.
For the login interface:
The whole process: After entering the user name and password in the front-end, click on login, then encrypt the password with md5, then send a post request to the back-end and carry the user name and password. At the back-end, take out the corresponding user name and password, and then compare them. If successful, uuid will be used to validate a random number of user token, with token as the key, and the user name value is saved to redis.
class LoginView(APIView):
    def post(self,request):
        res = BaseResponse()
        username = request.data.get('username','')
        pwd = request.data.get('pwd','')
        user_obj = Account.objects.filter(username=username,pwd=pwd).first()
        if not user_obj:
            res.code=1030
            res.error='ERROR Incorrect username or password'
            return Response(res.dict)

        #User login successfully generates token and writes it to redis
        conn = redis.Redis(connection_pool=POOL)
        try:
            token = uuid.uuid4()
            conn.set(str(token),user_obj.username)
            res.data = token
            res.username = user_obj.username
        except Exception as e:
            res.code = 1031
            res.error = 'Failed to create token'

        return Response(res.dict)
The BaseResponse class defines a format.
class BaseResponse(object):
    def __init__(self):
        self.code = 1000
        self.data = None
        self.error = None
    @property
    def dict(self):
        return self.__dict__    #Returns all initialization attributes into a dictionary
Note: For the user registration function is not done, for the automated publishing platform, according to the current needs, so write a user in advance in the database, registration can also be done. The process is to return the front-end user and password information to the back-end, and then according to the serialization in ModelSerializer and use the create method to write to the database.
For the login authentication function, many pages have login authentication, that is to verify whether to login before visiting the current page or interface. Here we use the login authentication module in DRF: BasrAuthentication.
Overall process:
When the front end accesses some APIs of the back end, when login verification is needed, the first step is to decide whether to log in. After login, the username and token returned from the back end are saved to Session Structurage. For the back-end API that needs login authentication, we add token to the request header when accessing. When the request comes to the back end, we first get the relevant token from the header information, and then redi. S to determine whether token is normal, and then successfully return to user, token, for this series of back-end verification, using the authentication module in DRF.
from rest_framework.authentication import BaseAuthentication
from rest_framework.exceptions import AuthenticationFailed

from .redis_pool import POOL
import redis

from Automatic.models import Account

CONN = redis.Redis(connection_pool=POOL)

"""
//Remove token from the request header and compare it with token in redis to successfully return to user,token
"""


class LoginAuth(BaseAuthentication):
    def authenticate(self, request):
        #Get the token from the front end from the request header
        token = request.META.get("HTTP_AUTHENTICATION", "")
        if not token:
            raise AuthenticationFailed("No carry token")
        #De redis comparison
        user_id = CONN.get(str(token))
        if user_id == None:
            raise AuthenticationFailed("token Be overdue")
        user_obj = Account.objects.filter(id=user_id).first()
        return user_obj, token
Once defined, add this class before the view of the interface that needs login validation.

Detailed code contact me, qq: 1159291043.