This article is a reprint of the article, the original link https://www.cnblogs.com/keerya/p/7987886.html
catalogue
text
Introduction to ansible
What is ansible?
ansible is a new automatic operation and maintenance tool. It is developed based on Python, integrates the advantages of many operation and maintenance tools (puppet, chef, func, fabric), and realizes the functions of batch system configuration, batch program deployment, batch operation command and so on.
Ansible is developed based on paramiko and is based on modular work. It does not have the ability of batch deployment. The real batch deployment is the modules run by ansible, which only provides a framework. Ansible does not need to install client/agents on the remote host because they are ssh based and remote
Process host communication. ansible has been officially acquired by red hat. It is the most recognized automated operation and maintenance tool, easy to use and easy to learn. It is one of the skills that every operation and maintenance engineer must master.
ansible features
- The deployment is simple. Only the Ansible environment needs to be deployed at the master control end, and the controlled end does not need to do any operation;
- SSH protocol is used to manage the equipment by default;
- There are a large number of conventional operation and maintenance modules, which can realize most of the daily operations;
- Simple configuration, powerful function and strong expansibility;
- Support API and custom modules, which can be easily extended through Python;
- Customize powerful configuration and state management through Playbooks;
- Lightweight, no need to install agent on the client. When updating, you only need to update it on the operating machine once;
- Provide a powerful and operable Web management interface and REST API interface - AWX platform.
ansible architecture diagram
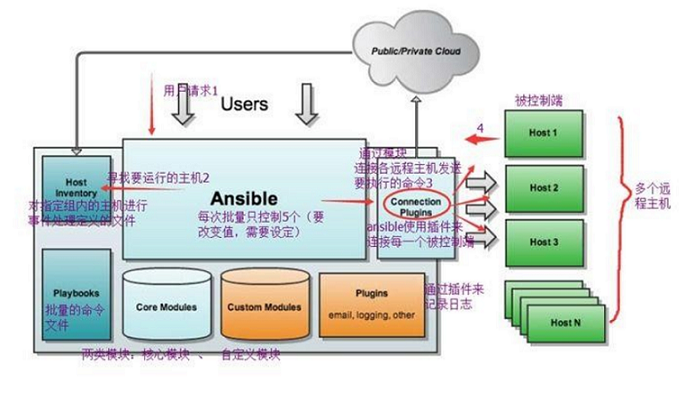
The main modules we see in the figure above are as follows:
Ansible: ansible core program.
HostInventory: records the host information managed by Ansible, including port, password, ip, etc.
Playbooks: a "script" YAML format file. Multiple tasks are defined in one file to define which modules the host needs to call to complete the functions.
Core modules: core modules. The main operation is to complete management tasks by calling the core modules.
CustomModules: custom modules, which complete functions that cannot be completed by core modules, and support multiple languages.
ConnectionPlugins: a connection plug-in used for Ansible and Host communication
ansible task execution
ansible task execution mode
The operation mode of Ansible system to managed nodes by the control host can be divided into two categories, namely, ad hoc and playbook:
- ad-hoc mode (point-to-point mode)
Using a single module, it supports batch execution of a single command. ad-hoc command is a command that can be input quickly and does not need to be saved. It is equivalent to a shell in bash. - playbook mode (script mode)
It is the main management mode of Ansible and the key to Ansible's powerful function. playbook completes a class of functions through multiple task sets, such as the installation and deployment of Web services, batch backup of database servers, etc. playbook can be simply understood as a configuration file by combining multiple ad-hoc operations.
ansible execution process
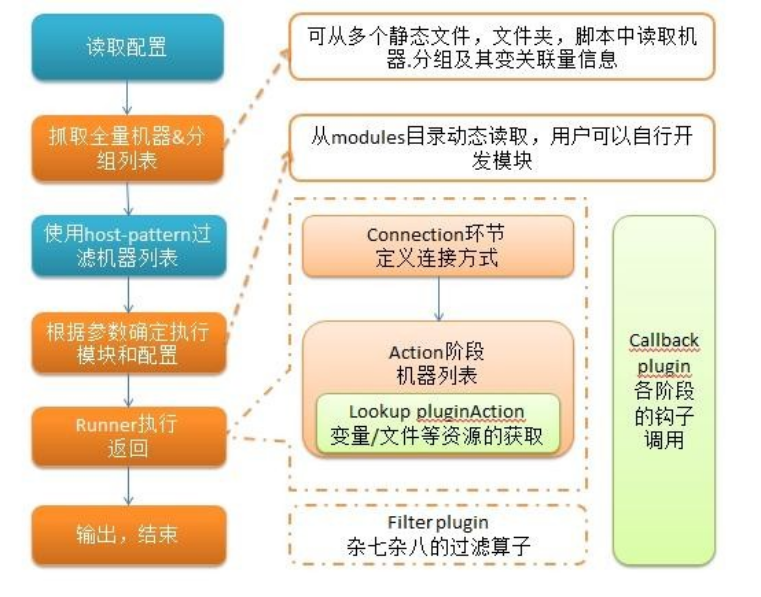
The simple understanding is that when Ansible is running, it first reads the configuration in ansible.cfg, obtains the list of management hosts in Inventory according to the rules, executes the configuration tasks in these hosts in parallel, and finally waits for the returned results.
ansible command execution process
- Load your own configuration file. The default is / etc/ansible/ansible.cfg;
- Find the corresponding host configuration file and find the host or group to be executed;
- Load the corresponding module file, such as command;
- Generate the corresponding temporary py file (python script) from the module or command through ansible, and transfer the file to the remote server;
- . ansible/tmp/XXX/XXX.PY file corresponding to the home directory of the execution user;
- Give the file + x execution permission;
- Execute and return results;
- Delete the temporary py file and sleep 0 exits;
Detailed explanation of ansible configuration
ansible installation mode
There are two common methods for easy installation, yum installation and pip program installation. Let's introduce these two installation methods in detail.
Install using pip (package management module of python)
First, we need to install a python pip package. After the installation, we can directly use the pip command to install our package. The specific operation process is as follows:
	yum install python-pip
	pip install ansible
Install using yum or up2date
yum installation is a familiar installation method. We need to install an EPEL release package first, and then install our ansible.
	yum install epel-release -y
	yum install ansible –y
ansible program structure
The installation directory is as follows (yum install):
Configuration file directory: / etc/ansible/
Executable Directory: / usr/bin/
Lib library dependency Directory: / usr/lib/pythonX.X/site-packages/ansible/
Help document directory: / usr/share/doc/ansible-X.X.X/
Man document directory: / usr/share/man/man1/
ansible profile lookup order
ansible is very different from our other services in this regard. The configuration file is found from multiple places in the following order:
- Check the environment variable ansible_ The path file pointed to by config (export ANSIBLE_CONFIG=/etc/ansible.cfg);
- ~/. ansible.cfg, check the ansible.cfg configuration file in the current directory;
- /Check the configuration file in the etc directory.
ansible profile
The configuration file of ansible is / etc/ansible/ansible.cfg. Ansible has many parameters. Here are some common parameters:
	inventory = /etc/ansible/hosts		#This parameter indicates the location of the inventory file of the resource list
	library = /usr/share/ansible		#Point to the directory where Ansible modules are stored. Multiple directory modes are supported, as long as they are separated by a colon (:)
	forks = 5		#The number of concurrent connections is 5 by default
	sudo_user = root		#Sets the default user who executes the command
	remote_port = 22		#Specify the management port connecting the managed node. The default is port 22. It is recommended to modify it to make it more secure
	host_key_checking = False		#Set whether to check the key of SSH host. The value is True/False. After closing, the first connection will not prompt to configure the instance
	timeout = 60		#Set the timeout of SSH connection in seconds
	log_path = /var/log/ansible.log		#Specify a file to store ansible logs (no logging by default)
ansuble host list
In the configuration file, we mentioned the resource list, which is our host list. It contains a list of ansible hosts that need connection management. Let's take a look at his definition:
1, Directly indicate the host address or host name:
	## green.example.com#
	# blue.example.com#
	# 192.168.100.1
	# 192.168.100.10
2, Define a host group[Group name]Add the address or host name
	[mysql_test]
	192.168.253.159
	192.168.253.160
	192.168.253.153
It should be noted that the group members here can be matched with wildcards, which is very easy and convenient for some standardized management.
We can configure our host list according to the actual situation. The specific operations are as follows:
[root@server ~]# vim /etc/ansible/hosts
	[web]
	192.168.37.122
	192.168.37.133
ansible common commands
ansible command set
/usr/bin/ansible ansibe ad hoc temporary command execution tool, which is commonly used for the execution of temporary commands
/Usr / bin / Ansible doc Ansible module function viewing tool
/Usr / bin / ansible galaxy is the official website platform for downloading / uploading excellent code or Roles module, which is based on the network
/Usr / bin / Ansible playbook Ansible custom automated task set choreography tool
/Usr / bin / Ansible pull Ansible is a tool for remote command execution, which pulls configuration instead of pushing configuration (it is rarely used, and it is used when a large number of machines are used, which requires high architecture capacity for operation and maintenance)
/Usr / bin / Ansible vault Ansible file encryption tool
/Usr / bin / Ansible console Ansible is a command execution tool that can interact with users based on Linux Consoble interface
Among them, / usr/bin/ansible and / usr/bin/ansible playbook are commonly used.
Ansible doc command
The ansible doc command is commonly used to obtain module information and help. The general usage is as follows:
	ansible-doc -l				#Get information about all modules
	ansible-doc -s MOD_NAME		#Get help for using the specified module
We can also check the full usage of ansible doc:
[root@server ~]# ansible-doc
Usage: ansible-doc [options] [module...]
Options:
-h. -- help show this help message and exit # displays the command parameter API document
-l. -- list list available modules # list available modules
-M MODULE_PATH, –module-path=MODULE_PATH # specifies the path of the module
specify path(s) to module library (default=None)
-s. -- snippet show playbook snippet for specified module (s) # displays the usage of playbook defined module
-v. -- verbose verbose mode (- VVV for more, - vvvvv to enable # displays the version number of ansible doc. View the module list:
connection debugging)
–version show program's version number and exit
Let's take mysql related as an example:
[root@server ~]# ansible-doc -l |grep mysql
mysql_db                           Add or remove MySQL databases from a remote...
mysql_replication                  Manage MySQL replication
mysql_user                         Adds or removes a user from a MySQL databas...
mysql_variables                    Manage MySQL global variables
[root@server ~]# ansible-doc -s mysql_user

Explanation of ansible command
The specific format of the command is as follows:
ansible <host-pattern> [-f forks] [-m module_name] [-a args]
You can also use ansible -h to view help. Here are some common options and explain their meanings:
-a MODULE_ARGS # module parameters. If the module that executes the default COMMAND is the COMMAND parameter, such as "date", "pwd", etc
-k. -- ask pass #ask for SSH password. Login password and prompt for SSH password instead of assuming key based authentication
--Ask su pass #ask for su password
-K. -- ask sudo pass #ask for sudo password. Sudo is used for the prompt password, and sudo indicates authorization raising operation
--Ask vault pass #ask for vault password. If we have set an encrypted password, use this option for access
-B SECONDS # background operation timeout
-C # simulates the operation environment and performs pre operation, and error checking test can be carried out
-c CONNECTION # connection type use
-f FORKS # parallel tasks, 5 by default
-i INVENTORY # specifies the path of the host list. The default is / etc/ansible/hosts
--List hosts # view which host groups are available
-m MODULE_NAME # the name of the execution module. The command module is used by default. Therefore, if only a single command is executed, the - m parameter can be omitted
-o # compress the output and try to output all the results on one line, which is generally used for collection tools
-S # with su command
-R SU_USER # specifies the user of Su. The default is root
-s # with sudo command
-U sudo# user # specifies the user to which sudo is to be. The default is root
-T TIMEOUT # specifies the ssh default timeout, which is 10s by default. It can also be modified in the configuration file
-U remote # user, the default is root
-v # view details, and support - vvv, - vvvv v to view more details
ansible configure public and private keys
As mentioned above, ansible is implemented based on ssh protocol, so the way to configure public and private keys is the same as that of ssh protocol. The specific steps are as follows:
#1. Generate private key
[root@server ~]# ssh-keygen
#2. Distribute the private key to the host
[root@server ~]# ssh-copy-id root@192.168.37.122
[root@server ~]# ssh-copy-id root@192.168.37.133
In this way, we can log in without password, and our experimental process will be much smoother.
Note that if an error occurs:
-bash: ssh-copy-id: command not found
Then it proves that we need to install a package:
yum -y install openssh-clientsansible
Just install the package.
ansible common modules
1) Host connectivity test
We use the ansible web -m ping command to test the host connectivity. The results are as follows:
[root@server ~]# ansible web -m ping
192.168.37.122 | SUCCESS => {
    "changed": false,
    "ping": "pong"
}
192.168.37.133 | SUCCESS => {
    "changed": false,
    "ping": "pong"
}
This shows that our host is connected. The next operation can be carried out normally.
2) command module
This module can execute commands directly on the remote host and return the results to the host.
Examples are as follows:
[root@server ~]# ansible web -m command -a 'ss -ntl'
192.168.37.122 | SUCCESS | rc=0 >>
State      Recv-Q Send-Q Local Address:Port               Peer Address:Port
LISTEN     0      128          *:111                      *:*
LISTEN     0      5      192.168.122.1:53                       *:*
LISTEN     0      128          *:22                       *:*
LISTEN     0      128    127.0.0.1:631                      *:*
LISTEN     0      128          *:23000                    *:*
LISTEN     0      100    127.0.0.1:25                       *:*
LISTEN     0      128         :::111                     :::*
LISTEN     0      128         :::22                      :::*
LISTEN     0      128        ::1:631                     :::*
LISTEN     0      100        ::1:25                      :::*
192.168.37.133 | SUCCESS | rc=0 >>
State Recv-Q Send-Q Local Address:Port Peer Address:Port
LISTEN 0 128 :111 :
LISTEN 0 128 :22 :
LISTEN 0 128 127.0.0.1:631 :
LISTEN 0 128 :23000 :
LISTEN 0 100 127.0.0.1:25 :
LISTEN 0 128 :::111 :::
LISTEN 0 128 :::22 :::
LISTEN 0 128 ::1:631 :::
LISTEN 0 100 ::1:25 ::😗
The command module accepts command names followed by space delimited list parameters. The given command will be executed on all selected nodes. It will not be processed through the shell, such as $HOME and operations such as "<", ">", "|", "&" (these functions need to be implemented by the (shell) module). Note that the command does not support the | pipeline command.
Let's take a look at some common commands under this module:
chdir # switches to this directory before executing the command
executable # switches the shell to execute the command. The absolute path of the command is required
free_form # the Linux instruction to be executed is generally replaced by the - a parameter of Ansible.
creates # a file name. If the file exists, the command will not be executed. You can
For judgment
Remove # a file name. If the file does not exist, the command will not be executed
Let's take a look at the execution effect of these commands:
[root@server ~]# ansible web -m command -a 'chdir=/data/ ls'	#First switch to the / data / directory, and then execute the "ls" command
192.168.37.122 | SUCCESS | rc=0 >>
aaa.jpg
fastdfs
mogdata
tmp
web
wKgleloeYoCAMLtZAAAWEekAtkc497.jpg
192.168.37.133 | SUCCESS | rc=0 >>
aaa.jpg
fastdfs
mogdata
tmp
web
wKgleloeYoCAMLtZAAAWEekAtkc497.jpg
[root@server ~]# ansible web -m command -a 'creates=/data/aaa.jpg ls'		#If / data/aaa.jpg exists, the "ls" command is not executed
192.168.37.122 | SUCCESS | rc=0 >>
skipped, since /data/aaa.jpg exists

192.168.37.133 | SUCCESS | rc=0 >>
skipped, since /data/aaa.jpg exists
[root@server ~]# ansible web -m command -a 'removes=/data/aaa.jpg cat /data/a'		#If / data/aaa.jpg exists, execute the "cat /data/a" command
192.168.37.122 | SUCCESS | rc=0 >>
hello

192.168.37.133 | SUCCESS | rc=0 >>
hello
3) shell module
The shell module can call the shell interpreter to run commands on the remote host, and support various functions of the shell, such as pipeline, etc.
[root@server ~]# ansible web -m shell -a 'cat /etc/passwd |grep "keer"'
192.168.37.122 | SUCCESS | rc=0 >>
keer:x:10001:1000:keer:/home/keer:/bin/sh
192.168.37.133 | SUCCESS | rc=0 >>
keer:x:10001:10001::/home/keer:/bin/sh
As long as it is our shell command, it can be run on the remote host through this module. There are no examples here.
4) copy module
This module is used to copy files to the remote host, and support the generation of files and modification permissions for given content.
The relevant options are as follows:
src # is copied to the local file of the remote host. It can be an absolute path or a relative path. If the path is a directory, it will be copied recursively, similar to "rsync"
content # is used to replace "src". You can directly specify the value of the file
dest # required, the absolute path of the remote host to which the source file is copied
Backup # when the contents of the file are changed, back up the source file before overwriting. The backup file contains time information
directory_mode # recursively sets the permission of the directory. It is the default permission of the system by default
Force # when the target host contains the file but the contents are different, set it to "yes" to force overwrite; Set to "no", indicating that the target location of the target host does not exist, and the file is copied. The default is "yes"
others # all the options in the file module can be used here
Examples of usage are as follows:
① Copy file:
[root@server ~]# ansible web -m copy -a 'src=~/hello dest=/data/hello'
192.168.37.122 | SUCCESS => {
    "changed": true,
    "checksum": "22596363b3de40b06f981fb85d82312e8c0ed511",
    "dest": "/data/hello",
    "gid": 0,
    "group": "root",
    "md5sum": "6f5902ac237024bdd0c176cb93063dc4",
    "mode": "0644",
    "owner": "root",
    "size": 12,
    "src": "/root/.ansible/tmp/ansible-tmp-1512437093.55-228281064292921/source",
    "state": "file",
    "uid": 0
}
192.168.37.133 | SUCCESS => {
    "changed": true,
    "checksum": "22596363b3de40b06f981fb85d82312e8c0ed511",
    "dest": "/data/hello",
    "gid": 0,
    "group": "root",
    "md5sum": "6f5902ac237024bdd0c176cb93063dc4",
    "mode": "0644",
    "owner": "root",
    "size": 12,
    "src": "/root/.ansible/tmp/ansible-tmp-1512437093.74-44694985235189/source",
    "state": "file",
    "uid": 0
}
② Generate files for given content and set permissions
[root@server ~]# ansible web -m copy -a 'content="I am keer\n" dest=/data/name mode=666'
192.168.37.122 | SUCCESS => {
    "changed": true,
    "checksum": "0421570938940ea784f9d8598dab87f07685b968",
    "dest": "/data/name",
    "gid": 0,
    "group": "root",
    "md5sum": "497fa8386590a5fc89090725b07f175c",
    "mode": "0666",
    "owner": "root",
    "size": 10,
    "src": "/root/.ansible/tmp/ansible-tmp-1512437327.37-199512601767687/source",
    "state": "file",
    "uid": 0
}
192.168.37.133 | SUCCESS => {
    "changed": true,
    "checksum": "0421570938940ea784f9d8598dab87f07685b968",
    "dest": "/data/name",
    "gid": 0,
    "group": "root",
    "md5sum": "497fa8386590a5fc89090725b07f175c",
    "mode": "0666",
    "owner": "root",
    "size": 10,
	    "src": "/root/.ansible/tmp/ansible-tmp-1512437327.55-218104039503110/source",
    "state": "file",
    "uid": 0
}
Now we can check the generated files and their permissions:
[root@server ~]# ansible web -m shell -a 'ls -l /data/'
192.168.37.122 | SUCCESS | rc=0 >>
total 28
-rw-rw-rw-   1 root root   12 Dec  6 09:45 name
192.168.37.133 | SUCCESS | rc=0 >>
total 40
-rw-rw-rw- 1 root root 12 Dec 5 09:45 name
We can see that our name file has been generated and the permission is 666.
③ About overlay
We modify the contents of the file, and then select overwrite backup:
[root@server ~]# ansible web -m copy -a 'content="I am keerya\n" backup=yes dest=/data/name mode=666'
192.168.37.122 | SUCCESS => {
    "backup_file": "/data/name.4394.2017-12-06@09:46:25~",
    "changed": true,
    "checksum": "064a68908ab9971ee85dbc08ea038387598e3778",
    "dest": "/data/name",
    "gid": 0,
    "group": "root",
    "md5sum": "8ca7c11385856155af52e560f608891c",
    "mode": "0666",
    "owner": "root",
    "size": 12,
    "src": "/root/.ansible/tmp/ansible-tmp-1512438383.78-228128616784888/source",
    "state": "file",
    "uid": 0
}
192.168.37.133 | SUCCESS => {
    "backup_file": "/data/name.5962.2017-12-05@09:46:24~",
    "changed": true,
    "checksum": "064a68908ab9971ee85dbc08ea038387598e3778",
    "dest": "/data/name",
    "gid": 0,
    "group": "root",
    "md5sum": "8ca7c11385856155af52e560f608891c",
    "mode": "0666",
    "owner": "root",
    "size": 12,
    "src": "/root/.ansible/tmp/ansible-tmp-1512438384.0-170718946740009/source",
    "state": "file",
    "uid": 0
}
Now we can check:
[root@server ~]# ansible web -m shell -a 'ls -l /data/'
192.168.37.122 | SUCCESS | rc=0 >>
total 28
-rw-rw-rw-   1 root root   12 Dec  6 09:46 name
-rw-rw-rw-   1 root root   10 Dec  6 09:45 name.4394.2017-12-06@09:46:25~
192.168.37.133 | SUCCESS | rc=0 >>
total 40
-rw-rw-rw- 1 root root 12 Dec 5 09:46 name
-rw-rw-rw- 1 root root 10 Dec 5 09:45 name.5962.2017-12-05@09:46:24~
It can be seen that our source file has been backed up. We can also check the contents of the name file:
[root@server ~]# ansible web -m shell -a 'cat /data/name'
192.168.37.122 | SUCCESS | rc=0 >>
I am keerya
192.168.37.133 | SUCCESS | rc=0 >>
I am keerya
It is proved that this is the content of our newly imported file.
5) file module
This module is mainly used to set file attributes, such as creating files, creating linked files, deleting files, etc.
Here are some common commands:
Force # needs to force the creation of soft links in two cases: one is when the source file does not exist but will be established later; The other is that the target soft link already exists. You need to cancel the previous soft link first, and then create a new soft link. There are two options: yes|no
Group # defines the group to which the file / directory belongs. mode can be added to define the permissions of the file / directory
Owner # defines the owner of the file / directory. Path must be followed: defines the path of the file / directory
recurse # recursively sets the attributes of the file, which is only valid for the directory, followed by src: the path of the linked source file, which only applies when state=link
dest # is the path linked to. It only applies when state=link
state # status, with the following options:
Directory: creates a directory if it does not exist
File: even if the file does not exist, it will not be created
Link: create a soft link
Hard: create a hard link
touch: if the file does not exist, a new file will be created. If the file or directory already exists, its last modification time will be updated
absent: delete directories, files, or unlink files
Examples of usage are as follows:
① Create directory:
[root@server ~]# ansible web -m file -a 'path=/data/app state=directory'
192.168.37.122 | SUCCESS => {
    "changed": true,
    "gid": 0,
    "group": "root",
    "mode": "0755",
    "owner": "root",
    "path": "/data/app",
    "size": 6,
    "state": "directory",
    "uid": 0
}
192.168.37.133 | SUCCESS => {
    "changed": true,
    "gid": 0,
    "group": "root",
    "mode": "0755",
    "owner": "root",
    "path": "/data/app",
    "size": 4096,
    "state": "directory",
    "uid": 0
}
We can check:
[root@server ~]# ansible web -m shell -a 'ls -l /data'
192.168.37.122 | SUCCESS | rc=0 >>
total 28
drwxr-xr-x   2 root root    6 Dec  6 10:21 app
192.168.37.133 | SUCCESS | rc=0 >>
total 44
drwxr-xr-x 2 root root 4096 Dec 5 10:21 app
As you can see, our directory has been created.
② Create linked file
[root@server ~]# ansible web -m file -a 'path=/data/bbb.jpg src=aaa.jpg state=link'
192.168.37.122 | SUCCESS => {
    "changed": true,
    "dest": "/data/bbb.jpg",
    "gid": 0,
    "group": "root",
    "mode": "0777",
    "owner": "root",
    "size": 7,
    "src": "aaa.jpg",
    "state": "link",
    "uid": 0
}
192.168.37.133 | SUCCESS => {
    "changed": true,
    "dest": "/data/bbb.jpg",
    "gid": 0,
    "group": "root",
    "mode": "0777",
    "owner": "root",
    "size": 7,
    "src": "aaa.jpg",
    "state": "link",
    "uid": 0
}
We can check:
[root@server ~]# ansible web -m shell -a 'ls -l /data'
192.168.37.122 | SUCCESS | rc=0 >>
total 28
-rw-r--r--   1 root root 5649 Dec  5 13:49 aaa.jpg
lrwxrwxrwx   1 root root    7 Dec  6 10:25 bbb.jpg -> aaa.jpg
192.168.37.133 | SUCCESS | rc=0 >>
total 44
-rw-r–r-- 1 root root 5649 Dec 4 14:44 aaa.jpg
lrwxrwxrwx 1 root root 7 Dec 5 10:25 bbb.jpg -> aaa.jpg
Our link file has been created successfully.
③ Delete file
[root@server ~]# ansible web -m file -a 'path=/data/a state=absent'
192.168.37.122 | SUCCESS => {
    "changed": true,
    "path": "/data/a",
    "state": "absent"
}
192.168.37.133 | SUCCESS => {
    "changed": true,
    "path": "/data/a",
    "state": "absent"
}
We can check:
[root@server ~]# ansible web -m shell -a 'ls /data/a'
192.168.37.122 | FAILED | rc=2 >>
ls: cannot access /data/a: No such file or directory
192.168.37.133 | FAILED | rc=2 >>
ls: cannot access /data/a: No such file or directory
It is found that the file is no longer available.
6) fetch module
This module is used to obtain (copy) files from a remote host to the local.
There are two options:
dest: the directory where the files are stored
src: a file pulled remotely and must be a file, not a directory
Specific examples are as follows:
[root@server ~]# ansible web -m fetch -a 'src=/data/hello dest=/data'
192.168.37.122 | SUCCESS => {
    "changed": true,
    "checksum": "22596363b3de40b06f981fb85d82312e8c0ed511",
    "dest": "/data/192.168.37.122/data/hello",
    "md5sum": "6f5902ac237024bdd0c176cb93063dc4",
    "remote_checksum": "22596363b3de40b06f981fb85d82312e8c0ed511",
    "remote_md5sum": null
}
192.168.37.133 | SUCCESS => {
    "changed": true,
    "checksum": "22596363b3de40b06f981fb85d82312e8c0ed511",
    "dest": "/data/192.168.37.133/data/hello",
    "md5sum": "6f5902ac237024bdd0c176cb93063dc4",
    "remote_checksum": "22596363b3de40b06f981fb85d82312e8c0ed511",
    "remote_md5sum": null
}
We can check whether the file is copied successfully on this computer. Note that the path where the file is saved is under the ip directory of the regulated host under the receiving directory we set:
[root@server ~]# cd /data/
[root@server data]# ls
1  192.168.37.122  192.168.37.133  fastdfs  web
[root@server data]# cd 192.168.37.122
[root@server 192.168.37.122]# ls
data
[root@server 192.168.37.122]# cd data/
[root@server data]# ls
hello
[root@server data]# pwd
/data/192.168.37.122/data
7) cron module
This module is suitable for managing cron planning tasks.
The syntax used is consistent with that in our crontab file. At the same time, you can specify the following options:
Day = # day work that should be run (1-31, *, * / 2,)
hour = # hours (0-23, *, * / 2,)
minute = # minutes (0-59, *, * / 2,)
Month = # month (1-12, *, / 2,)
weekday = # week (0-6 for Sunday Saturday,,)
job = # indicates what command to run
name = # scheduled task description
The reboot # task runs during restart. It is not recommended to use special_time
special_time # special time range, parameters: reboot, annually, monthly, weekly, daily, hourly
state # specifies the status, present indicates adding scheduled tasks, which is also the default setting, and absent indicates deleting scheduled tasks
User # as which user
Examples are as follows:
① Add scheduled task
[root@server ~]# ansible web -m cron -a 'name="ntp update every 5 min" minute=*/5 job="/sbin/ntpdate 172.17.0.1 &> /dev/null"'
192.168.37.122 | SUCCESS => {
    "changed": true,
    "envs": [],
    "jobs": [
        "ntp update every 5 min"
    ]
}
192.168.37.133 | SUCCESS => {
    "changed": true,
    "envs": [],
    "jobs": [
        "ntp update every 5 min"
    ]
}
We can check:
[root@server ~]# ansible web -m shell -a 'crontab -l'
192.168.37.122 | SUCCESS | rc=0 >>
#Ansible: ntp update every 5 min
*/5 * * * * /sbin/ntpdate 172.17.0.1 &> /dev/null
192.168.37.133 | SUCCESS | rc=0 >>
#Ansible: ntp update every 5 min
/5 * /sbin/ntpdate 172.17.0.1 &> /dev/null
It can be seen that our planned task has been set successfully.
② Delete scheduled task
If our scheduled task is added incorrectly and you want to delete it, do the following:
First, let's take a look at the existing scheduled tasks:
[root@server ~]# ansible web -m shell -a 'crontab -l'
192.168.37.122 | SUCCESS | rc=0 >>
#Ansible: ntp update every 5 min
*/5 * * * * /sbin/ntpdate 172.17.0.1 &> /dev/null
#Ansible: df everyday
* 15 * * * df -lh >> /tmp/disk_total &> /dev/null
192.168.37.133 | SUCCESS | rc=0 >>
#Ansible: ntp update every 5 min
/5 /sbin/ntpdate 172.17.0.1 &> /dev/null
#Ansible: df everyday
15 * df -lh >> /tmp/disk_total &> /dev/null
Then perform the delete operation:
[root@server ~]# ansible web -m cron -a 'name="df everyday" hour=15 job="df -lh >> /tmp/disk_total &> /dev/null" state=absent'
192.168.37.122 | SUCCESS => {
    "changed": true,
    "envs": [],
    "jobs": [
        "ntp update every 5 min"
    ]
}
192.168.37.133 | SUCCESS => {
    "changed": true,
    "envs": [],
    "jobs": [
        "ntp update every 5 min"
    ]
}
After the deletion, let's check the existing planned tasks and confirm:
[root@server ~]# ansible web -m shell -a 'crontab -l'
192.168.37.122 | SUCCESS | rc=0 >>
#Ansible: ntp update every 5 min
*/5 * * * * /sbin/ntpdate 172.17.0.1 &> /dev/null
192.168.37.133 | SUCCESS | rc=0 >>
#Ansible: ntp update every 5 min
/5 * /sbin/ntpdate 172.17.0.1 &> /dev/null
Our delete operation has been successful.
8) yum module
As the name suggests, this module is mainly used for software installation.
The options are as follows:
Name = # the name of the installed package
state = #present --- > install, latest --- > install the latest, absent --- > uninstall the software.
update_cache # force update of yum's cache
conf_file # specifies the configuration file that the remote yum installation depends on (install the local existing package).
disable_pgp_check # whether to disable GPG checking is only used for presenter latest.
Disablerep # temporarily disables the use of the yum library. Used only when installing or updating.
enablerepo # temporarily uses the yum library. Used only when installing or updating.
Now let's install a package and try it:
[root@server ~]# ansible web -m yum -a 'name=htop state=present'
192.168.37.122 | SUCCESS => {
    "changed": true,
    "msg": "",
    "rc": 0,
    "results": [
        "Loaded plugins: fastestmirror, langpacks\nLoading mirror speeds from cached hostfile\nResolving Dependencies\n--> Running transaction check\n---> Package htop.x86_64 0:2.0.2-1.el7 will be installed\n--> Finished Dependency Resolution\n\nDependencies Resolved\n\n================================================================================\n Package         Arch              Version                Repository       Size\n================================================================================\nInstalling:\n htop            x86_64            2.0.2-1.el7            epel             98 k\n\nTransaction Summary\n================================================================================\nInstall  1 Package\n\nTotal download size: 98 k\nInstalled size: 207 k\nDownloading packages:\nRunning transaction check\nRunning transaction test\nTransaction test succeeded\nRunning transaction\n  Installing : htop-2.0.2-1.el7.x86_64                                      1/1 \n  Verifying  : htop-2.0.2-1.el7.x86_64                                      1/1 \n\nInstalled:\n  htop.x86_64 0:2.0.2-1.el7                                                     \n\nComplete!\n"
    ]
}
192.168.37.133 | SUCCESS => {
    "changed": true,
    "msg": "Warning: RPMDB altered outside of yum.\n** Found 3 pre-existing rpmdb problem(s), 'yum check' output follows:\nipa-client-4.4.0-12.el7.centos.x86_64 has installed conflicts freeipa-client: ipa-client-4.4.0-12.el7.centos.x86_64\nipa-client-common-4.4.0-12.el7.centos.noarch has installed conflicts freeipa-client-common: ipa-client-common-4.4.0-12.el7.centos.noarch\nipa-common-4.4.0-12.el7.centos.noarch has installed conflicts freeipa-common: ipa-common-4.4.0-12.el7.centos.noarch\n",
    "rc": 0,
    "results": [
        "Loaded plugins: fastestmirror, langpacks\nLoading mirror speeds from cached hostfile\nResolving Dependencies\n--> Running transaction check\n---> Package htop.x86_64 0:2.0.2-1.el7 will be installed\n--> Finished Dependency Resolution\n\nDependencies Resolved\n\n================================================================================\n Package         Arch              Version                Repository       Size\n================================================================================\nInstalling:\n htop            x86_64            2.0.2-1.el7            epel             98 k\n\nTransaction Summary\n================================================================================\nInstall  1 Package\n\nTotal download size: 98 k\nInstalled size: 207 k\nDownloading packages:\nRunning transaction check\nRunning transaction test\nTransaction test succeeded\nRunning transaction\n  Installing : htop-2.0.2-1.el7.x86_64                                      1/1 \n  Verifying  : htop-2.0.2-1.el7.x86_64                                      1/1 \n\nInstalled:\n  htop.x86_64 0:2.0.2-1.el7                                                     \n\nComplete!\n"
    ]
}
Installation succeeded.
9) service module
This module is used for the management of service programs.
The main options are as follows:
The arguments # command line provides additional arguments
enabled # sets the startup.
Name = # service name
runlevel # startup level is generally not specified.
sleep # whether to wait while restarting the service. For example, wait 2 seconds after the service is shut down before starting. (defined in the script.)
state # has four states: started --- > Service started, stopped --- > service stopped, restarted --- > Service restarted, reloaded --- > configuration overloaded
Here are some examples:
① Turn on the service and set self startup
[root@server ~]# ansible web -m service -a 'name=nginx state=started enabled=true'
192.168.37.122 | SUCCESS => {
    "changed": true,
    "enabled": true,
    "name": "nginx",
    "state": "started",
    ......
}
192.168.37.133 | SUCCESS => {
    "changed": true,
    "enabled": true,
    "name": "nginx",
    "state": "started",
    ......
}
We can check whether the port is open:
[root@server ~]# ansible web -m shell -a 'ss -ntl'
192.168.37.122 | SUCCESS | rc=0 >>
State      Recv-Q Send-Q Local Address:Port               Peer Address:Port
LISTEN     0      128          *:80                       *:*
192.168.37.133 | SUCCESS | rc=0 >>
State Recv-Q Send-Q Local Address:Port Peer Address:Port
LISTEN 0 128 :80 😗
You can see that our port 80 is open.
② Shut down service
We can also turn off our services through this module:
[root@server ~]# ansible web -m service -a 'name=nginx state=stopped'
192.168.37.122 | SUCCESS => {
    "changed": true,
    "name": "nginx",
    "state": "stopped",
	......
}
192.168.37.133 | SUCCESS => {
    "changed": true,
    "name": "nginx",
    "state": "stopped",
	......
}
Similarly, let's take a look at the ports:
[root@server ~]# ansible web -m shell -a 'ss -ntl | grep 80'
192.168.37.122 | FAILED | rc=1 >>
192.168.37.133 | FAILED | rc=1 >>
It can be seen that we have no port 80, indicating that our nginx service has been closed.
10) user module
This module is mainly used to manage user accounts.
The main options are as follows:
comment # user's description
createhome # create home directory
Force # when using state=absent, the behavior is consistent with userdel – force
Group # specifies the base group
Groups # specifies additional groups. If it is specified as (groups =), all groups will be deleted
Home # specifies the user's home directory
move_home # if set to home =, an attempt is made to move the user's home directory to the specified directory
Name # specifies the user name
non_unique # this option allows you to change non unique user ID values
Password # specifies the user password
Remove # when state=absent is used, the behavior is consistent with userdel – remove
Shell # specifies the default shell
state # sets the account status. It is not specified as create. The specified value is absent, which means delete
System # when creating a user, set the user as the system user. This setting cannot change existing users
Uid # specifies the uid of the user
Examples are as follows:
① Add a user and specify its uid
[root@server ~]# ansible web -m user -a 'name=keer uid=11111'
192.168.37.122 | SUCCESS => {
    "changed": true,
    "comment": "",
    "createhome": true,
    "group": 11111,
    "home": "/home/keer",
    "name": "keer",
    "shell": "/bin/bash",
    "state": "present",
    "stderr": "useradd: warning: the home directory already exists.\nNot copying any file from skel directory into it.\nCreating mailbox file: File exists\n",
    "system": false,
    "uid": 11111
}
192.168.37.133 | SUCCESS => {
    "changed": true,
    "comment": "",
    "createhome": true,
    "group": 11111,
    "home": "/home/keer",
    "name": "keer",
    "shell": "/bin/bash",
    "state": "present",
    "stderr": "useradd: warning: the home directory already exists.\nNot copying any file from skel directory into it.\nCreating mailbox file: File exists\n",
    "system": false,
    "uid": 11111
}
After adding, we can check:
[root@server ~]# ansible web -m shell -a 'cat /etc/passwd |grep keer'
192.168.37.122 | SUCCESS | rc=0 >>
keer:x:11111:11111::/home/keer:/bin/bash
192.168.37.133 | SUCCESS | rc=0 >>
keer:x:11111:11111::/home/keer:/bin/bash
② Delete user
[root@server ~]# ansible web -m user -a 'name=keer state=absent'
192.168.37.122 | SUCCESS => {
    "changed": true,
    "force": false,
    "name": "keer",
    "remove": false,
    "state": "absent"
}
192.168.37.133 | SUCCESS => {
    "changed": true,
    "force": false,
    "name": "keer",
    "remove": false,
    "state": "absent"
}
Similarly, after deletion, let's take a look:
[root@server ~]# ansible web -m shell -a 'cat /etc/passwd |grep keer'
192.168.37.122 | FAILED | rc=1 >>
192.168.37.133 | FAILED | rc=1 >>
It is found that there is no such user.
11) group module
This module is mainly used to add or delete groups.
Common options are as follows:
GID = # set the GID number of the group
Name = # specifies the name of the group
state = # specifies the status of the group. The default value is create, and the setting value is absent, which is delete
System = # set the value to yes, which means it is created as a system group
Examples are as follows:
① Create group
[root@server ~]# ansible web -m group -a 'name=sanguo gid=12222'
192.168.37.122 | SUCCESS => {
    "changed": true,
    "gid": 12222,
    "name": "sanguo",
    "state": "present",
    "system": false
}
192.168.37.133 | SUCCESS => {
    "changed": true,
    "gid": 12222,
    "name": "sanguo",
    "state": "present",
    "system": false
}
After creation, let's take a look:
[root@server ~]# ansible web -m shell -a 'cat /etc/group | grep 12222'
192.168.37.122 | SUCCESS | rc=0 >>
sanguo:x:12222:
192.168.37.133 | SUCCESS | rc=0 >>
sanguo❌12222:
As you can see, our group has been created successfully.
② Delete group
[root@server ~]# ansible web -m group -a 'name=sanguo state=absent'
192.168.37.122 | SUCCESS => {
    "changed": true,
    "name": "sanguo",
    "state": "absent"
}
192.168.37.133 | SUCCESS => {
    "changed": true,
    "name": "sanguo",
    "state": "absent"
}
Check as usual:
[root@server ~]# ansible web -m shell -a 'cat /etc/group | grep 12222'
192.168.37.122 | FAILED | rc=1 >>
192.168.37.133 | FAILED | rc=1 >>
There is no information about this group.
12) script module
This module is used to run the local script on the managed machine.
The module can directly specify the path of the script. Let's see how to use it through an example:
First, we write a script and add execution permission to it:
[root@server ~]# vim /tmp/df.sh #!/bin/bashdate >> <span class="hljs-regexp">/tmp/disk</span>_total.log df -lh >> <span class="hljs-regexp">/tmp/disk</span>_total.log
[root@server ~]# chmod +x /tmp/df.sh
Then, we directly run the command to execute the script on the managed end:
[root@server ~]# ansible web -m script -a '/tmp/df.sh'
192.168.37.122 | SUCCESS => {
    "changed": true,
    "rc": 0,
    "stderr": "Shared connection to 192.168.37.122 closed.\r\n",
    "stdout": "",
    "stdout_lines": []
}
192.168.37.133 | SUCCESS => {
    "changed": true,
    "rc": 0,
    "stderr": "Shared connection to 192.168.37.133 closed.\r\n",
    "stdout": "",
    "stdout_lines": []
}
Check the contents of the file as usual:
[root@server ~]# ansible web -m shell -a 'cat /tmp/disk_total.log'
192.168.37.122 | SUCCESS | rc=0 >>
Tue Dec  5 15:58:21 CST 2017
Filesystem      Size  Used Avail Use% Mounted on
/dev/sda2        47G  4.4G   43G  10% /
devtmpfs        978M     0  978M   0% /dev
tmpfs           993M   84K  993M   1% /dev/shm
tmpfs           993M  9.1M  984M   1% /run
tmpfs           993M     0  993M   0% /sys/fs/cgroup
/dev/sda3        47G   33M   47G   1% /app
/dev/sda1       950M  153M  798M  17% /boot
tmpfs           199M   16K  199M   1% /run/user/42
tmpfs           199M     0  199M   0% /run/user/0
192.168.37.133 | SUCCESS | rc=0 >>
Tue Dec 5 15:58:21 CST 2017
Filesystem Size Used Avail Use% Mounted on
/dev/sda2 46G 4.1G 40G 10% /
devtmpfs 898M 0 898M 0% /dev
tmpfs 912M 84K 912M 1% /dev/shm
tmpfs 912M 9.0M 903M 1% /run
tmpfs 912M 0 912M 0% /sys/fs/cgroup
/dev/sda3 3.7G 15M 3.4G 1% /app
/dev/sda1 1.9G 141M 1.6G 9% /boot
tmpfs 183M 16K 183M 1% /run/user/42
tmpfs 183M 0 183M 0% /run/user/0
It can be seen that the implementation has been successful.
13) setup module
This module is mainly used to collect information and is implemented by calling facts components.
Facts component is a function used by Ansible to collect the equipment information of the managed machine. We can use the setup module to check all facts information of the machine and filter to view the specified information. The whole facts information is wrapped in a JSON format data structure, ansible_facts is the top-level value.
Facts are variables, built-in variables. Various information of each host, number of CPUs, memory size, etc. It will exist in a variable in facts. After calling, it returns a lot of information about the corresponding host. In subsequent operations, you can do different operations according to different information. For example, redhat series is installed using yum, while debian series uses apt to install software.
① View information
We can directly use the command to obtain the value of the variable. Let's take a look at the example:
[root@server ~]# ansible web -m setup -a 'filter="*mem*"'	#view memory
192.168.37.122 | SUCCESS => {
    "ansible_facts": {
        "ansible_memfree_mb": 1116,
        "ansible_memory_mb": {
            "nocache": {
                "free": 1397,
                "used": 587
            },
            "real": {
                "free": 1116,
                "total": 1984,
                "used": 868
            },
            "swap": {
                "cached": 0,
                "free": 3813,
                "total": 3813,
                "used": 0
            }
        },
        "ansible_memtotal_mb": 1984
    },
    "changed": false
}
192.168.37.133 | SUCCESS => {
    "ansible_facts": {
        "ansible_memfree_mb": 1203,
        "ansible_memory_mb": {
            "nocache": {
                "free": 1470,
                "used": 353
            },
            "real": {
                "free": 1203,
                "total": 1823,
                "used": 620
            },
            "swap": {
                "cached": 0,
                "free": 3813,
                "total": 3813,
                "used": 0
            }
        },
        "ansible_memtotal_mb": 1823
    },
    "changed": false
}
We can check the memory size through the command to confirm whether it is consistent:
[root@server ~]# ansible web -m shell -a 'free -m'
192.168.37.122 | SUCCESS | rc=0 >>
              total        used        free      shared  buff/cache   available
Mem:           1984         404        1122           9         457        1346
Swap:          3813           0        3813
192.168.37.133 | SUCCESS | rc=0 >>
total used free shared buff/cache available
Mem: 1823 292 1207 9 323 1351
Swap: 3813 0 3813
It can be seen that the information is consistent.
② Save information
Another useful function of our setup module is that it can save the information we filtered to our host. At the same time, the file name is the IP of our controlled host, so that we can know which machine is the problem.
We can take a look at an example:
[root@server tmp]# ansible web -m setup -a 'filter="*mem*"' --tree /tmp/facts
192.168.37.122 | SUCCESS => {
    "ansible_facts": {
        "ansible_memfree_mb": 1115,
        "ansible_memory_mb": {
            "nocache": {
                "free": 1396,
                "used": 588
            },
            "real": {
                "free": 1115,
                "total": 1984,
                "used": 869
            },
            "swap": {
                "cached": 0,
                "free": 3813,
                "total": 3813,
                "used": 0
            }
        },
        "ansible_memtotal_mb": 1984
    },
    "changed": false
}
192.168.37.133 | SUCCESS => {
    "ansible_facts": {
        "ansible_memfree_mb": 1199,
        "ansible_memory_mb": {
            "nocache": {
                "free": 1467,
                "used": 356
            },
            "real": {
                "free": 1199,
                "total": 1823,
                "used": 624
            },
            "swap": {
                "cached": 0,
                "free": 3813,
                "total": 3813,
                "used": 0
            }
        },
        "ansible_memtotal_mb": 1823
    },
    "changed": false
}
Then we can check:
[root@server ~]# cd /tmp/facts/
[root@server facts]# ls
192.168.37.122  192.168.37.133
[root@server facts]# cat 192.168.37.122
{"ansible_facts": {"ansible_memfree_mb": 1115, "ansible_memory_mb": {"nocache": {"free": 1396, "used": 588}, "real": {"free": 1115, "total": 1984, "used": 869}, "swap": {"cached": 0, "free": 3813, "total": 3813, "used": 0}}, "ansible_memtotal_mb": 1984}, "changed": false}
This article is a reprint of the article, the original link https://www.cnblogs.com/keerya/p/7987886.html