The authorization of fast applications can be divided into different situations. Huawei and Meizu do not support wechat account authorization. Therefore, Huawei needs to use Huawei's account, Meizu's account, and open web pages and web pages to communicate with fast applications. The most ideal login is the mobile phone verification code.
1. Huawei account authorization
- First, create a fast app on Huawei's fast app website. The name and other information of the fast app should be the same as the name of the fast app you are about to develop.
Get a link to the appid method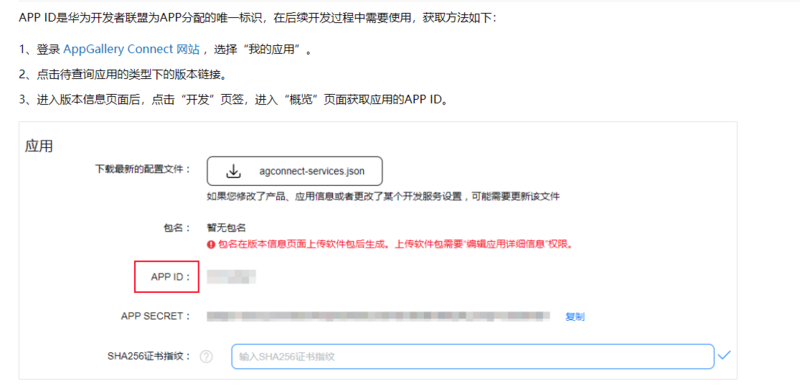
- Certificate fingerprint can only be obtained on Huawei ide
- The authorized interface documents should also be viewed in Huawei's development documents. During debugging, the Huawei ide must be used to test the authorization. If the official express application is used, the data returned by the authorization are all analog data.
- After the fingerprint certificate is generated, there will be a release folder in the sign folder, and a file with the pem suffix will be generated. To copy the file in the release to the debug folder, it is better to delete the file in the debug folder, and then paste it into the folder. The replacement may cause problems.
- First, use the interface to get the mobile phone model
/* For example, HUAWEI returns HUAWEI, and HUAWEI glory returns HUAWEI. */
device.getInfo({
    success: res => {
      this.deviceName = res.manufacturer;
    }
})
- Then use the authorized interface to obtain the accessToken. Here, the api provided by Huawei is different from the fields provided by the fast application official website.
- In addition, Huawei documents can obtain the user's relevant information by using one api, but documents on the fast application official website need to use two APIs to obtain the user's basic information
/* Huawei account authorization */
account.authorize({
  appid: '', /* Fields provided by Huawei documents and appid s only available for Huawei fast applications */
  state: '1', /* state You can specify any value, and the authentication server will return this value intact */
  type: 'token', /* Set type to get token */
  scope: 'scope.baseProfile', /* Set to scope.baseProfile to get basic user information */
  success: auth => {
    /* When you use authorize in Huawei documents, you can get the basic information of users, including the nickname image, openid and unionid. However, the official document of express application says that you need to use the following interface to return the information of users. */
    account.getProfile({
      appid: '',
      token: auth.accessToken,
      success: data => {
        let userInfo = {};
        /* Because the relevant information of the user written in the document may be empty. If you want the user's Avatar, you need to judge whether Huawei test play uses the test account or not. If you directly assign the value of data.avatar.default, an error will be reported. However, if you test with your own account, the error will not be reported. */
        if(data.nickname) {
          userInfo.nickname = data.nickname;
        } else {
          userInfo.nickname = 'Small nine';
        }
        if(data.avatar.default) {
          userInfo.avatar = data.avatar.default;
        } else {
          userInfo.avatar = 'defaultimg.png';
        }
      },
      fail: () => {
        prompt.showToast({
          message: 'privilege grant failed'
        })
      }
    })
  },
  fail: () => {
    prompt.showToast({
      message: 'privilege grant failed'
    })
  }
})
Because the official documents of fast app and Huawei documents both write that the user's information may be empty, it is not very realistic to take the path of authorization.
2. Wechat account authorization
- There are also many holes in wechat account authorization. The signature of wechat account needs to be generated by clicking generate MD5 in hap of development tool. When you test, the above forgot to say that you will generate a sign folder when you generate a certificate. Even if your project is not completely completed, you need to create a formal certificate, and then copy the two certificate files in release to debug. The best way is to delete the files in the debug folder and paste them directly into the debug folder. If you only have the release folder in your sign, you can create a new debug folder yourself.
- For wechat authorization, you should first judge whether there is wechat in the user's mobile phone or whether the user's wechat version meets the fast application authorization.
/* Return NONE to indicate that the current wechat login is not available, wechat is not installed or the mobile system does not support it */
if(wxaccount.getType() == 'NONE') {
    prompt.showToast({
      message: 'The mobile system does not support fast apps. Please upgrade and try again'
    })
    this.showLogin = false;
}
- And then authorize
wxaccount.authorize({
  scope: 'snsapi_userinfo',  /* snsapi_userinfo Basic information for authorized users */
  state: 'randomString',  /* It is used to keep the status of requests and callbacks. After authorization, it is brought back to the third party as is. This parameter can be used to prevent csrf attacks (cross site request forgery attacks). It is recommended that the third party take this parameter, which can be set as a simple random number plus session for verification. */
  success: data => {
    console.log(data)
    /* Get code */
    console.log(data.code)
  },
  fail: () => {
    prompt.showToast({
      message: 'privilege grant failed'
    })
  },
})
3. Meizu authorization
- Meizu's authorization is to use the Web terminal. Here's another new thing to learn, that is, web pages communicate with fast applications.
/* Front-end code */
<template>
  <web id="web" trustedurl="{{trustedurl}}" @message="handleMessage" src="https://open-api.flyme.cn/oauth/authorize?response_type=token&scope=uc_basic_info"></web>
</template>
<script>
  import router from '@system.router';
  import prompt from '@system.prompt';
  export default {
    data() {
      return {
        /* This field must be added when sending a message to the express application. It is the link you want to communicate with. It is better to escape. */
        trustedurl: [/^https:\/\/baidu.com/]
      }
    },
    /* Receive the message returned from the webpage */
    handleMessage(msg) {
      /* Sending a message to the express application on the web side can not send the object directly, but it can send the json string. */
      /* This msg is the format of some data in my backend. */
      let message = JSON.parse(msg.message);
      console.log(message)
    }
  }
</script>
- Back end link return processing
system.postMessage('hello')
/* The document is written in this way, but it is not allowed to write directly in html. It should be written as follows */
window.system.postMessage('hello')