preface
In Android development, sometimes debugging problems add a lot of logs to the method, which is very troublesome. Therefore, in combination with asm, the log is automatically inserted into the method by annotation, so as to facilitate debugging during development. Of course, the log inserted through asm should contain the method parameters, the return value of the method, and sometimes the variable value in the object.
hanno
_    _
| |  | |
| |__| | __ _ _ __  _ __   ___
|  __  |/ _` | '_ \| '_ \ / _ \
| |  | | (_| | | | | | | | (_) |
|_|  |_|\__,_|_| |_|_| |_|\___/
The bytecode plug-in enables the annotation to print the log. The annotation can be added to the class or method. When it is added to the class, the log of all methods will be printed, and when it is added to the method, the log of the current method will be printed
usage method
1. Print log for all methods in class
@HannoLog
class MainActivity : AppCompatActivity() {
   // ...
}
As long as the @ HannoLog annotation is added to the class, you can insert log into all methods in the class during compilation and output log at run time.
2. Add log to some methods in the class
class MainActivity : AppCompatActivity() {
    @HannoLog(level = Log.INFO, enableTime = false,watchField=true)
    private fun test(a: Int = 3, b: String = "good"): Int {
        return a + 1
    }
}
You can insert a log in the current method by adding an annotation on the method.
3. Printed log
//D/MainActivity: ┌───────────────────────────────────------───────────────────────────────────------
//D/MainActivity: │ method: onCreate(android.os.Bundle)
//D/MainActivity: │ params: [{name='savedInstanceState', value=null}]
//D/MainActivity: │ time: 22ms
//D/MainActivity: │ fields: {name='a', value=3}{name='b', value=false}{name='c', value=ccc}
//D/MainActivity: │ thread: main
//D/MainActivity: └───────────────────────────────────------───────────────────────────────────------
Where method is the name of the current method, parameters is the parameter name and value of the method, time is the execution time of the method, fields is the fields value of the current object, and thread is the thread executed by the current method.
HannoLog parameter interpretation
The level of log can be set through level. The level setting can call INFO, DEBUG, ERROR, etc. in log. enableTime is used to set whether to print the execution time of the method. The default is false. If you want to print, set enableTime=true
tagName is used to set the name of the log. The default is the current class name. It can also be set through this method.
1. Level controls the level of log printing. The default is log.d. you can set the level through @ HannoLog(level = Log.INFO). Log.DEBUG, Log.ERROR, etc. are supported.
2. enableTime controls whether to output the execution time of the method. The default is false. If you want to print, you can set it through @ HannoLog(enableTime=true).
3. TagName sets the name of the tag, which is the current class name by default. It can also be set through @ HannoLog(tagName = "test").
4. watchField is used to observe the field value in the object. It is set through @ HannoLog(watchField = true). Since non static fields cannot be called in static methods, this parameter does not take effect in static methods.
Important classes
1,HannoLog
HannoLog is an annotation class that provides control parameters. Corresponding to the above HannoLog parameter explanation
/**
*
*
*
* create by Hu Hanjun
* date 2021/11/10 17: 38
* Define an annotation to indicate that the current method needs to print the log
*/
@Retention(RetentionPolicy.CLASS)
@Target({ElementType.METHOD, ElementType.CONSTRUCTOR, ElementType.TYPE})
public @interface HannoLog {
   //Define the log level. The default is 3. debug level
   int level() default Log.DEBUG;
   /**
    * @return Run time of printing method
    */
   boolean enableTime() default false;

   /**
    * @return tag The default is the class name, which can also be set
    */
   String tagName() default "";

   /**
    * @return Whether to observe the field value. If you observe, you will get all the field values in the object
    */
   boolean watchField() default false;
}
2,HannoExtension
public class HannoExtension {
//Controls whether Hanno is used
boolean enable;
//Controls whether log is printed
boolean openLog = true;

   public boolean isEnableModule() {
       return enableModule;
   }

   public void setEnableModule(boolean enableModule) {
       this.enableModule = enableModule;
   }

   //Setting this value to true can add log to the methods of the whole module
   boolean enableModule = false;

   public boolean isEnable() {
       return enable;
   }

   public boolean isOpenLog() {
       return openLog;
   }

   public void setOpenLog(boolean openLog) {
       this.openLog = openLog;
   }

   public void setEnable(boolean enable) {
       this.enable = enable;
   }
}
HannoExtension provides the gradle.build file, whether to open the plugin and print the log of executing the plugin
By default, asm instrumentation will be performed after adding HannoLog. You can also add the following configuration in the build.gradle file of module so that bytecode instrumentation is not performed during compilation to improve the compilation speed
apply plugin: 'com.hanking.hanno'
hannoExtension{
 enable=false
 openLog=false
}
Implementation principle
hanno is implemented by asm byte code instrumentation. The compilation process of Android project is as follows:
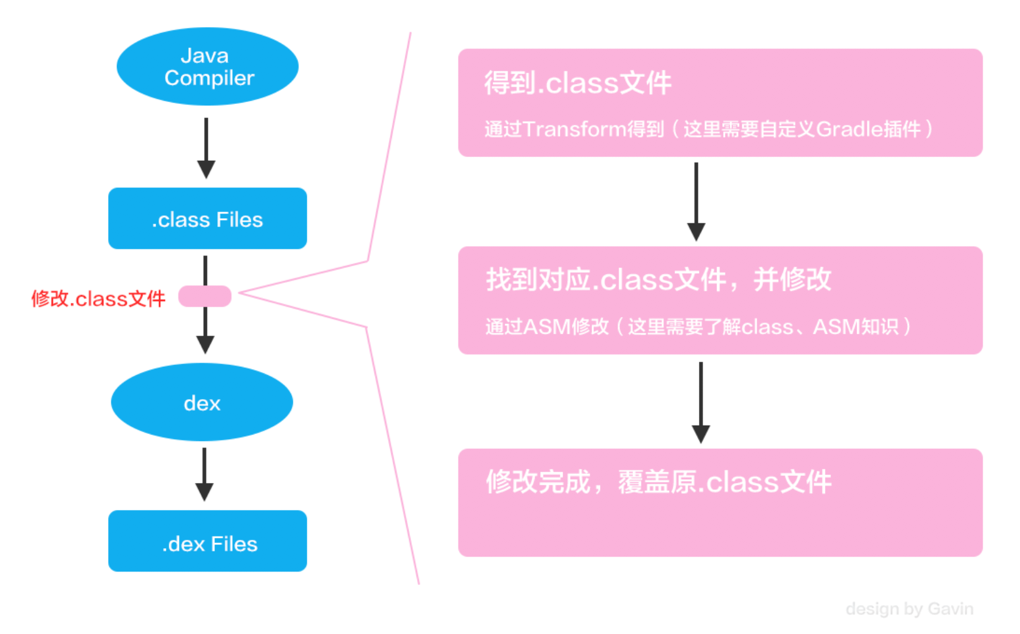
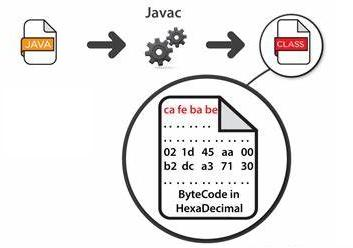
The java compiler compiles. Java classes to generate. class classes. asm can be used to modify. class classes. By modifying. class classes, you can add code to existing classes. A. Java file will generate a. class file after being compiled by the java compiler (javac). In the. class file, ByteCode data is stored, as shown in the following figure.
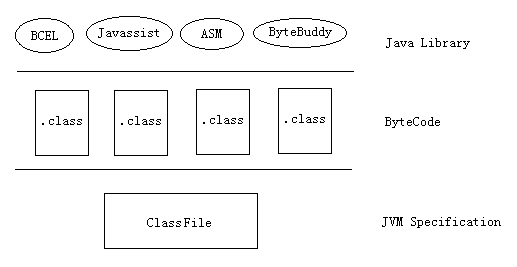
The operation object of ASM is a class library of ByteCode. The process of ASM processing ByteCode data is as follows:
The first step is to split the. class file into multiple parts;
The second step is to modify the information of a certain part;
The third step is to reorganize multiple parts into a new. class file.
ClassFile
In the. class file, ByteCode data is stored. However, these ByteCode data are not disorderly, but follow a certain data structure.
ClassFile {
    u4             magic;
    u2             minor_version;
    u2             major_version;
    u2             constant_pool_count;
    cp_info        constant_pool[constant_pool_count-1];
    u2             access_flags;
    u2             this_class;
    u2             super_class;
    u2             interfaces_count;
    u2             interfaces[interfaces_count];
    u2             fields_count;
    field_info     fields[fields_count];
    u2             methods_count;
    method_info    methods[methods_count];
    u2             attributes_count;
    attribute_info attributes[attributes_count];
}
Relationship between bytecode class library and ClassFile
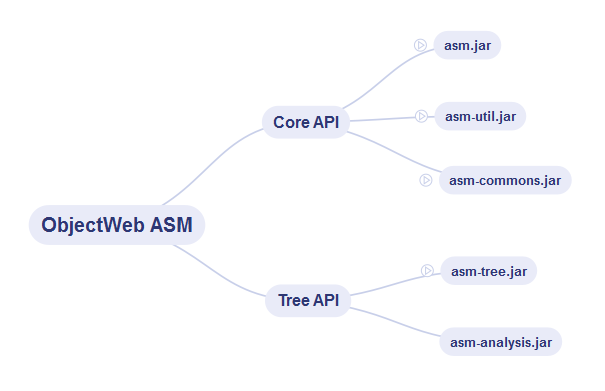
Composition of asm
In terms of composition structure, ASM is divided into two parts, one is Core API and the other is Tree API.
- The Core API includes asm.jar, asm-util.jar and asm-commons.jar;
- The Tree API includes asm-tree.jar and asm-analysis.jar.
Important classes in asm
- The ClassReader class is responsible for reading the contents of the. Class file and splitting it into different parts.
- The ClassVisitor class is responsible for modifying the information in a part of the. Class file.
- ClassWriter class, which is responsible for reassembling different parts into a complete. Class file.
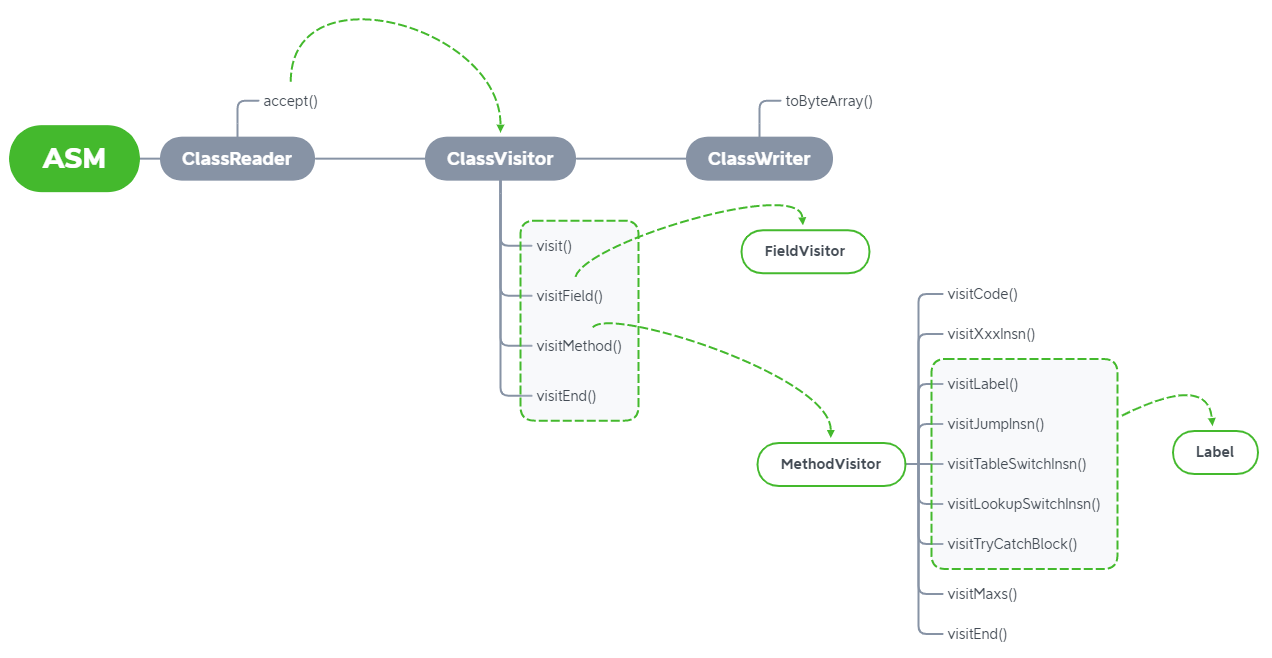
.class file --> ClassReader --> byte[] --> After various transformations --> ClassWriter --> byte[] --> .class file
ClassVisitor class
ClassVisitor is an abstract class. The implementation classes include ClassWriter class (Core API) and ClassNode class (Tree API).
public abstract class ClassVisitor {
    protected final int api;
    protected ClassVisitor cv;
}
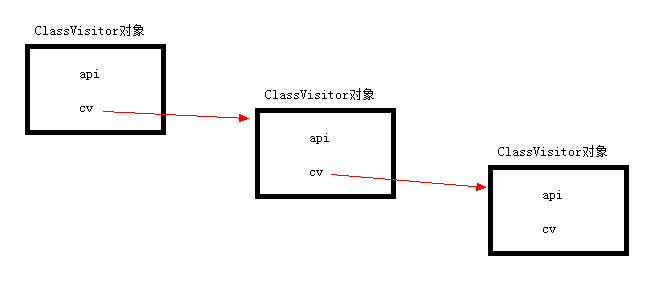
- api field: data of type int, indicating the ASM API version currently used.
- cv field: data of ClassVisitor type, which is used to connect multiple classvisitors in series
classVisitor method
visit(), visitField(), visitMethod(), and visitEnd().
visitXxx() method and ClassFile
There is a corresponding relationship between the visitXxx() method of ClassVisitor and ClassFile. The visitXxx() methods defined in ClassVisitor are not generated out of thin air. The purpose of these methods is to generate a legal. class file, which must conform to the structure of ClassFile. Therefore, these visitXxx() methods are closely related to the structure of ClassFile.
1. visit() method
It is used to generate the definition of a class or interface. A class named printField is generated as follows. If the parent class inherited by the class is the Object class by default, the superName is "java/lang/Object".
cw.visit(52, ACC_PUBLIC + ACC_SUPER, "com/hank/test/PrintField", null, "java/lang/Object", null);
2. visitField() method
The corresponding field_info in classFile is used to generate the attribute value in the object. A property is generated through visitField, as follows:
FieldVisitor fv;
{
fv = cw.visitField(ACC_PRIVATE + ACC_FINAL + ACC_STATIC, "a", "I", null, new Integer(2));
fv.visitEnd();
}
3. visitMethod() method
Used to generate a method corresponding to method_info in classFile
ClassWriter class
The parent class of ClassWriter is ClassVisitor, so the ClassWriter class inherits methods such as visit(), visitField(), visitMethod(), visitEnd().
toByteArray method
In the ClassWriter class, a toByteArray() method is provided. The function of this method is to convert the call to visitxx() into byte [], and the contents of these bytes [] follow the ClassFile structure.
In the code of toByteArray() method, byte []:
- The first step is to calculate the size, which indicates the final length of byte [].
- Step 2: fill the data into byte [].
- Step 3: return byte [] data.
3. Using the ClassWriter class
Generating a Class file using ClassWriter can be roughly divided into three steps: - The first step is to create a ClassWriter object.
- Step 2: call the visitXxx() method of the ClassWriter object.
- Step 3: call the toByteArray() method of the ClassWriter object.
import org.objectweb.asm.ClassWriter;

import static org.objectweb.asm.Opcodes.*;

public class GenerateCore {
    public static byte[] dump () throws Exception {
        // (1) Create ClassWriter object
        ClassWriter cw = new ClassWriter(ClassWriter.COMPUTE_FRAMES);
        // (2) Call visitXxx() method
        cw.visit();
        cw.visitField();
        cw.visitMethod();
        cw.visitEnd();       // Notice that the visitEnd() method is called at the end

        // (3) Call the toByteArray() method
        byte[] bytes = cw.toByteArray();
        return bytes;
    }
}
Hanno source code analysis
The basic knowledge related to asm has been reviewed above, and the hanno source code is analyzed below. It mainly focuses on three aspects:
1. How to insert a Log statement into a method.
2. How to get the field value in the object.
3. How to get the parameter name and parameter value of the method? When using classvisitor, code cannot be inserted after visitLocalVariable. How to solve this problem? To enable the variable name of the obtained method to be inserted into the Log.
//Unfinished to be continued
Source address
https://github.com/hankinghu/hanno
Subsequent optimization
1. You can configure a module. After configuring the module, you will automatically insert log s into all methods of all classes in the module.
2. Optimize the compilation speed. Now it takes time to traverse class twice in the compilation process.