In the e-commerce small program, there are many places where waterfall flow is used. Write a waterfall flow every time and repeat the logic once. As a programmer, it must be very reluctant.
The form of waterfall flow is the same and the same. The difference is that the content of each module in waterfall flow changes with the business.
Therefore, we abstract the waterfall flow framework into components, and the content of waterfall flow is determined by the business. This allows for the maximum balance between componentization and customization.
First, let's take a look at the actual effect of waterfall flow components in the actual project.
1 actual effect
The actual effect of waterfall flow component is shown in the figure below, with user interaction effect on the left and lazy image loading effect on the right.
What is a waterfall?
Waterfall flow, also known as waterfall flow layout. It is a popular web page layout. Waterfall item has fixed width and variable height. Its visual performance is uneven multi column layout. As the page scroll bar scrolls down, this layout will continue to load data blocks and attach them to the current tail. As shown in the figure below:
3 implementation function
The waterfall flow component realizes the following functions:
- Support image lazy loading
- Support pull up data page turning
- Support for custom styles
- Support automatic calculation of waterfall flow Item interval bottom layer
- Native component pattern: that is, the usage of swiper like and swiper item components
- Complete decoupling of components and data
4 implementation principle
4.1 implementation principle of waterfall and waterfall item
Step 1: create the waterfall and waterfall item components in the waterfall layout directory. The directory structure is as follows:
.
├── query-node.js
├── waterfall-item.js
├── waterfall-item.json
├── waterfall-item.wxml
├── waterfall-item.wxss
├── waterfall.js
├── waterfall.json
├── waterfall.wxml
└── waterfall.wxss
Step 2: respectively waterfall.js And waterfall-item.js The parent and child relationships of the component are specified in the relationships option of:
// waterfall.js
Component({
    // ... other code
    relations: {
    './waterfall-item': {
      type: 'child',
    },
    // ... other code
  }
})
// waterfall-item.js
Component({
    // ... other code
    relations: {
    '././waterfall': {
      type: 'parent',
    },
    // ... other code
  }
})
After specifying the relationship between each other's parent and child components, you can use the this.getRelationNodes Native API s that allow access to each other's instance objects and their properties and methods.
Step 3: Implementation waterfall.wxml And waterfall-item.wxml code:
waterfall.wxml The code implementation is very simple, with only 5 lines of code:
<view class="waterfall custom-class">
  <view class="waterfall-inner">
    <slot ></slot>
  </view>
</view>
Again, waterfall-item.wxml The code implementation is also very simple, with only 5 lines of code:
<view
  class="waterfall-item custom-class"
  style="{{position}}:0;top:{{(top >= 0 ? top + 'px' : 0 + 'rpx')}};"
>
  <slot ></slot>
</view>
For children's shoes that do not know the usage of slot, please refer to wechat applet custom component template and style documentation.
4.2 waterfall flow principle
In fact, whether it's wechat applet, web, or native APP, the implementation principle of waterfall flow is the same. It can be realized by absolute positioning and position calculation.
The general process of waterfall flow is shown as follows:
Step 1: data passing this.setData From the logical layer to the view layer, the first rendering is performed, because the top:0; And position:left; , so they all overlap.
Step 2: obtain the information of each waterfall item element through the node query API, and calculate the correct top and position values.
Step 3: set the top and position of each waterfall item in the data to realize rearrangement.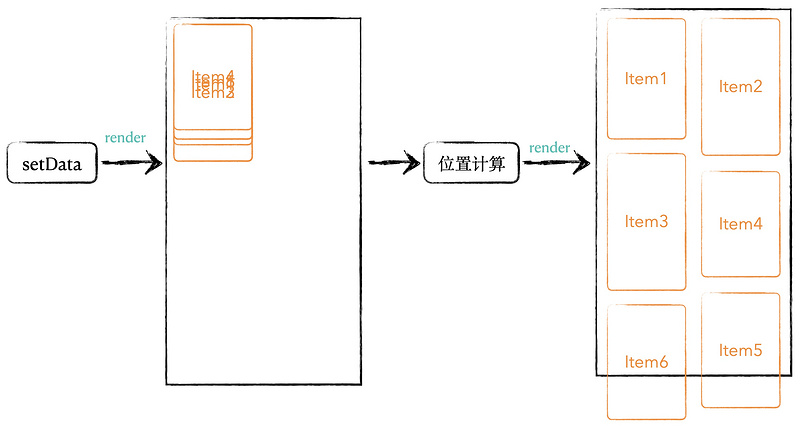
The specific logic is as follows:
First, we will implement a node query API, queryselector, and then we will use:
// query-node.js
/**
 * Gets the first node of the selector in the current page
 * @param {String} selector Selector conforming to wechat applet specification
 * @param {Object} context Call environment: wx in normal page and this in custom component; the default value is wx
 * @return {Array} Returns an array with the first element node
 */
export const querySelector = function (selector, context = wx) {
  return new Promise((resolve, reject) => {
    context.createSelectorQuery()
    .select(selector)
    .boundingClientRect((res) => {
      if (res) {
        resolve(res);
      } else {
        reject(`There is no selector ${selector} Node of`);
      }
    })
    .exec();
  })
};
Next, take a look at the usage of the components waterfall and waterfall item in the actual project:
   <waterfall
      loading="{{loadMorePending}}"
      isAllLoaded="{{isAllLoaded}}"
    >
      <block wx:for="{{data.sections}}" wx:key="id" wx:for-item="product">
        <waterfall-item
          index="{{index}}"
          custom-class="flow-item-wrapper"
        >
          <view class="product-item">
            //Business code
          </view>
        </waterfall-item>
      </block>
    </waterfall>
When the first waterfall item component is completed, the ready life cycle hook will be executed after the view layer layout is completed.
In the ready life cycle hook, we need to do two things:
- Get the instance object of the parent component waterfall and mount it on the this instance object of the waterfall item component. Because later we need to modify the data on waterfall in the waterfall item component.
- Obtain the height of the waterfall item component, and calculate the location information top and position of the waterfall item component.
// waterfall-item.js
import { querySelector } from './query-node';
Component({
  // ... other code
  lifetimes: {
    ready() {
      const [waterfall] = this.getRelationNodes('./waterfall');
      this.parent = waterfall;
      this.setWaterfallItemPosition();
    },
  }
  methods:{
    async setWaterfallItemPosition() {
      querySelector('.waterfall-item', this)
        .then(async (node) => {
          const { top, position } = await this.parent.getWaterfallItemPostionInfo(node);
          this.setData({
            top,
            position
          })
        })
    },
  }
  // ... other code
})
In the setWaterfallItemPosition method, we call the method on the parent component this.parent.getWaterfallItemPostionInfo , get the top and position information of the current waterfall item component. The accumulated height of the rendered waterfall item component is cached on the leftHeights and rightHeights attributes of waterfall to calculate the location of the next waterfall item component. The main logic is as follows:
// waterfall.js
const POSITION_LEFT = 'left';
const POSITION_RIGHT = 'right';

Component({
  // ... other code
  /**
   * Method list for component
   */
  methods: {
    lifetimes: {
      ready() {
        this.initParams();
      }
     },
    initParams() {
      this.leftHeights = 0;
      this.rightHeights = 0;
    },
    /**
     * Set the height value of waterfall item
     * @param {Object} node waterfall-item Component location dimension data
     */
    async getWaterfallItemPostionInfo(node) {
      let top = 0;
      let position = POSITION_LEFT;
      const { height } = node;
      const { itemGap } = this;
      if (this.leftHeights <= this.rightHeights) {
        top = this.leftHeights;
        if(this.leftHeights === 0) {
          this.leftHeights += height;
        } else {
          top += itemGap;
          this.leftHeights += (height + itemGap);
        }
      } else {
        position = POSITION_RIGHT;
        top = this.rightHeights;
        if(this.rightHeights === 0) {
          this.rightHeights += height;
        } else {
          top += itemGap;
          this.rightHeights += (height + itemGap);
        }
      }
      return {
        top,
        position,
      }
    }
    // ... other code
  }
})
When all the water fall items are rearranged, the waterfall flow rendering is completed.
4.3 image lazy loading principle
In the wechat applet,The tag itself supports lazy loading. It starts to load when lazy load = {{true}} is about to enter a certain range (up and down three screens).
That is, when lazy load = {{true}},When the label is first rendered outside the upper and lower screens of the viewport, the image resource will not be requested
It will load when it is about to enter three screens.
In Figure 3 of section 4.2, the initialization location is set to top:0; And position:left; , so, it's all in the viewport. If you change the value of top to a value outside the three screens, for example, 400vh or greater, then after the rearrangement, any pictures outside the three screens will be loaded lazily automatically.
<view
  class="waterfall-item custom-class"
  style="{{position}}:0;top:{{(top >= 0 ? top + 'px' : itemCount * 100 + 'vh')}};"
>
  <slot ></slot>
</view>
Component({
  // waterfall-item.js
  // ... other code
  lifetimes: {
    ready() {
      const { itemCount } = this.data;
      const [waterfall] = this.getRelationNodes('./waterfall');
      waterfall.childCount += 1;
      this.parent = waterfall;
      this.setData({
        itemCount: itemCount + waterfall.childCount,
      })
    },
  },
  // ... other code
})
4.4 data page turning
Because the wx:for function is implemented, just like the component, the paging logic is completely customized by the user. With the paging function only provided to you, the component can be completely decoupled from the waterfall flow data structure.
4.5 automatic calculation of waterfall flow Item interval bottom layer
If the distance between the two components in the column and row is defined as itemGap, then:
itemGap = waterfall width - (waterfall item width * 2)
In the ready hook of, you can get the width of the component; similarly, in the ready hook of, you can get the width of the component.
Get the value of itemGap before calling getWaterfallItemPostionInfo. In this way, when calculating the top value, except that the top value in the first row is equal to 0, all other top values are equal to:
// this.leftHeights += height + itemGap;
// or
// this.rightHeights += height + itemGap;
5 Summary
Through the abstraction of waterfall flow framework, make and approach the experience of native components, and make components and data completely decoupled. Through ingenious top setting of initialization position, waterfall flow has the function of lazy loading of pictures.