Guide reading
This article will introduce "Collection View", the implementation of App Widget's complex layout
- Links to other articles in the App Widget widget series
App Widgets Explains a Simple Use
App Widgets Details Configuration Activity
App Widgets Explains Adding App Widgets to Three Activities
App Widgets Details Four RemoteViews, RemoteViews Service and RemoteViews Factory
Introduction to RemoteViews, RemoteViews Service and RemoteViews Factory
RemoteViews constructor
Remote views, views in App Widget s, are implemented through RemoteViews.
In the constructor of RemoteViews, all View views in the Layout are obtained by passing in R. layout. XX (the XML layout file of AppWidgets).
RemoteViews.setTextView(), RemoteViews. setOnClickPending Intent () and other methods are used to set the response events of corresponding components.
Therefore, we can consider "RemoteViews" as a collection of all views contained in the App Widgets layout file.
= = attention = =
Because the layout of widgets requires RemoteViews support, you cannot define or customize views (you can try to rewrite remoteViews)**
Supported layout:
- FrameLayout
- LinearLayout
- RelativeLayout
- GridLayout
Supported controls:
- AnalogClock
- Button
- Chronometer
- ImageButton
- ImageView
- ProgressBar
- TextView
- ViewFlipper
- ListView
- GridView
- StackView
- AdapterViewFlipper
View Flipper, ListView, GridView, StackView, AdapterView Flipper and other views containing sub-elements belong to "set view".
RemoteViewsService class
In the AppWidgetProvider class, the RemoteViewsService acts as an interface adapter Service to implement the set view in the RemoteViews object
The general steps to update the Collective View by RemoteViewsService are:
Set "RemoteViews Correspond to RemoteViews Service" by RemoteViews.setRemoteAdapter(R.id.ListView_ID,Service intent)
In RemoteViewsService, implement RemoteViews corresponding RemoteViewsService.RemoteViewsFactory interface.
Setting up the methods needed to implement the Collective View in the RemoteViewsFactory interface
Therefore, we can think of RemoteViews Service as "a service that manages set views in a layout".
RemoteViews Service Official Document
RemoteViewsFactory interface
RemoteViewsService.RemoteViewsFactory is a subclass of RemoteViewsService that manages RemoteViews remote collection views (GridView, ListView, StackView, AdapterView Flipper, etc.)
This interface is similar to ListView's BaseAdapter, which is used to bind View to data and display it. Two of the more important methods are onCreate() and getViewAt(int position).
- onCreat(): Used to initialize data, called the first time a Factory is created
- getViewAt(int position): Get the view of the position item in Collection View and return to RemoteViews()
Therefore, we can regard "RemoteViews Factory" as the concrete implementer of Collective View Management in layout.
RemoteViews Factory Official Document
Note: We cannot persist data in Service or singleton. Therefore, we should not store any data in RemoteViews Service (unless it is static). If we want AppWidget data to persist, the best way is to use ContentProvider
Collection View Development Note (ListView as an example):
Configuring service nodes and receiver nodes in the manifest file
<!--MyRemoteService-->
        <service
            android:name=".remote.MyRemoteService"
            android:exported="false"
            android:permission="android.permission.BIND_REMOTEVIEWS">
        </service>

        <!--MyRemoteAppWidget-->
        <receiver android:name=".remote.MyRemoteAppWidget">
            <intent-filter>
                <!--Appoint AppWidgetProvider Acceptance system APPWIDGET_UPDATE Radio broadcast-->
                <action android:name="android.appwidget.action.APPWIDGET_UPDATE"/>
            </intent-filter>
            <!--Appoint Meta_data Name,Use android.appwidgetb Must be determined AppWidgetProviderInfo Descriptor data-->
            <!--Appoint AppWidgetProviderInfo Resources XML file-->
            <meta-data
                android:name="android.appwidget.provider"
                android:resource="@xml/my_remote_widget_info"/>
        </receiver>
Create AppWidgetProviderInfo XML file
This XML file defines the basic attributes of App Widget and creates an XML file with the appwidger-provider tag in the res/xml/directory
<?xml version="1.0" encoding="utf-8"?>
<appwidget-provider xmlns:android="http://schemas.android.com/apk/res/android"
                    android:initialKeyguardLayout="@layout/my_remote_widget"
                    android:initialLayout="@layout/my_remote_widget"
                    android:minHeight="50dp"
                    android:minWidth="50dp"
                    android:previewImage="@mipmap/ic_launcher"
                    android:resizeMode="horizontal|vertical"
                    android:updatePeriodMillis="86400000"
                    android:widgetCategory="home_screen|keyguard">
</appwidget-provider>
Definition of AppWidgetProvider class
public class MyRemoteAppWidget extends AppWidgetProvider {


    static void updateAppWidget(Context context, AppWidgetManager appWidgetManager,
                                int appWidgetId) {
        // Get the Widget's component name
        ComponentName thisWidget = new ComponentName(context,
                MyRemoteAppWidget.class);
        // Create a RemoteView
        RemoteViews remoteViews = new RemoteViews(context.getPackageName(), R.layout.my_remote_widget);
        // Bind this Widget to the RemoteViews Service
        Intent intent = new Intent(context, MyRemoteService.class);
        // When intents are compared, the extras are ignored, so we need to embed the extras
        // into the data so that the extras will not be ignored.
        intent.putExtra(AppWidgetManager.EXTRA_APPWIDGET_ID, appWidgetId);
        intent.setData(Uri.parse(intent.toUri(Intent.URI_INTENT_SCHEME)));
        //Setting up the adapter
        remoteViews.setRemoteAdapter(R.id.widget_list, intent);
        //TODO sets View remoteViews.setEmptyView() when the display widget_list is empty;

        // Setting Click List Trigger Events
        Intent clickIntent = new Intent(context, MyRemoteAppWidget.class);
        // Set the action for the intent.
        // When the user touches a particular view, it will have the effect of
        // broadcasting TOAST_ACTION.
        // Set up Action to differentiate click events in onReceive
        clickIntent.setAction("clickAction");
        clickIntent.putExtra(AppWidgetManager.EXTRA_APPWIDGET_ID, appWidgetId);
        clickIntent.setData(Uri.parse(clickIntent.toUri(Intent.URI_INTENT_SCHEME)));
        PendingIntent pendingIntentTemplate = PendingIntent.getBroadcast(
                context, 0, clickIntent, PendingIntent.FLAG_UPDATE_CURRENT);

        //Using "Collection View" if direct setOnClick Pending Intent is not feasible,
        //It is recommended that setPending IntentTemplate be used in conjunction with FillInIntent
        //FillInIntent is used to distinguish single click events
        remoteViews.setPendingIntentTemplate(R.id.widget_list,
                pendingIntentTemplate);

        // Refresh button
        final Intent refreshIntent = new Intent(context,
                MyRemoteAppWidget.class);
        refreshIntent.setAction("refresh");
        final PendingIntent refreshPendingIntent = PendingIntent.getBroadcast(
                context, 0, refreshIntent, PendingIntent.FLAG_UPDATE_CURRENT);
        remoteViews.setOnClickPendingIntent(R.id.button_refresh,
                refreshPendingIntent);


        // Update Widget
        appWidgetManager.updateAppWidget(appWidgetId, remoteViews);
    }

    @Override
    public void onUpdate(Context context, AppWidgetManager appWidgetManager, int[] appWidgetIds) {
        // There may be multiple widgets active, so update all of them
        for (int appWidgetId : appWidgetIds) {
            updateAppWidget(context, appWidgetManager, appWidgetId);
        }

    }

    @Override
    public void onEnabled(Context context) {
        // Enter relevant functionality for when the first widget is created
        Toast.makeText(context, "User will widget Add Desktop",
                Toast.LENGTH_SHORT).show();
    }

    @Override
    public void onDisabled(Context context) {
        // Enter relevant functionality for when the last widget is disabled
    }

    @Override
    public void onDeleted(Context context, int[] appWidgetIds) {
        Toast.makeText(context, "User will widget Remove from desktop",
                Toast.LENGTH_SHORT).show();
        super.onDeleted(context, appWidgetIds);
    }

    /**
     * Accept Intent
     *
     * @param context
     * @param intent
     */
    @Override
    public void onReceive(Context context, Intent intent) {
        super.onReceive(context, intent);
        String action = intent.getAction();

        if (action.equals("refresh")) {
            int i = 0;
            // Refresh Widget
            final AppWidgetManager mgr = AppWidgetManager.getInstance(context);
            final ComponentName cn = new ComponentName(context,
                    MyRemoteAppWidget.class);

            MyRemoteViewsFactory.mList.add("Music" + i);
            i=i+1;
            // This sentence calls the onDataSetChanged() method of RemoteViewsFactory in RemoteViewSerivce.
            mgr.notifyAppWidgetViewDataChanged(mgr.getAppWidgetIds(cn),
                    R.id.widget_list);

        } else if (action.equals("clickAction")) {
            // Clicking on an item in ListView in Wdiget displays a Toast prompt.
            Toast.makeText(context, intent.getStringExtra("content"),
                    Toast.LENGTH_SHORT).show();
        }

    }
}
= = attention = =
- RemoteViews.setEmptyView() Setting an empty view must be a sibling node of the set view, and an empty view represents an empty state (set an empty view when there is no data?)
- When we use a collection view, such as LIstView, we need to create the XML layout of list item s as well as the XML layout of AppWidgets.
IV. Configuring XML Layout Files for AppWidgets and List_ltem
my_remote_widget.xml
<LinearLayout xmlns:android="http://schemas.android.com/apk/res/android"
              android:layout_width="match_parent"
              android:layout_height="wrap_content"
              android:background="@android:color/white"
              android:orientation="vertical" >

    <Button
        android:id="@+id/button_refresh"
        android:layout_width="wrap_content"
        android:layout_height="wrap_content"
        android:layout_gravity="center_horizontal"
        android:layout_marginTop="2dp"
        android:text="Add to" />


    <ListView

        android:divider="#000"
        android:id="@+id/widget_list"
        android:layout_width="match_parent"
        android:layout_height="wrap_content"
        android:cacheColorHint="#00000000"
        android:scrollbars="none" />
    <!-- Here ListView Can be changed into StackView perhaps GridView -->

</LinearLayout>
list_itlem.xml
<?xml
    version="1.0" encoding="utf-8"?>
<RelativeLayout
    xmlns:android="http://schemas.android.com/apk/res/android"
    android:layout_width="match_parent"
    android:layout_height="match_parent">

    <TextView
        android:id="@+id/item"
        android:layout_width="fill_parent"
        android:layout_height="wrap_content"
        android:layout_marginBottom="5px"
        android:layout_marginTop="5px"
        android:gravity="center"
        android:paddingBottom="25px"
        android:paddingTop="5px"
        android:textColor="#ff0000"
        android:textSize="60px"
        />

    <ImageView
        android:id="@+id/imageItem"
        android:layout_width="wrap_content"
        android:layout_height="wrap_content"
        android:layout_alignParentRight="true"
        android:layout_alignRight="@id/item"
        android:src="@mipmap/ic_launcher_round"
        />
</RelativeLayout>
Defining the RemoteViewsService class
public class MyRemoteService extends RemoteViewsService {
    @Override
    public RemoteViewsFactory onGetViewFactory(Intent intent) {
        return new MyRemoteViewsFactory(this.getApplicationContext(), intent);
    }
}
6. Define RemoteViewsService.RemoteViewsFactory Implementation Class
public class MyRemoteViewsFactory implements RemoteViewsService.RemoteViewsFactory {
    private final Context mContext;
    public static List<String> mList = new ArrayList<>();

    /*
     * Constructor
     */
    public MyRemoteViewsFactory(Context context, Intent intent) {

        mContext = context;
    }

    /*
     * MyRemoteViewsFactory When called, this method takes more than 20 seconds to return an error.
     * If the time-consuming task should be handled in onDataSetChanged or getViewAt
     */
    @Override
    public void onCreate() {
        for (int i = 0; i < 5; i++) {
            mList.add("item" + i);
        }


    }

    /*
     * When the notifyAppWidgetViewDataChanged method is called, this method is triggered
     * For example: MyRemoteViewsFactory. notify AppWidgetViewDataChanged ();
     */
    @Override
    public void onDataSetChanged() {

    }

    /*
     * This method needn't be said much. Here we write the operation of cleaning up resources and releasing memory.
     */
    @Override
    public void onDestroy() {
        mList.clear();
    }

    /*
     * Returns the number of collection views
     */
    @Override
    public int getCount() {
        return mList.size();
    }

    /*
     * Create and populate a View that appears at the specified index location, similar to the getView of BaseAdapter
     */
    @Override
    public RemoteViews getViewAt(int position) {
        if (position < 0 || position >= mList.size())
            return null;
        String content = mList.get(position);
        // Create View s to be displayed at the current index location
        final RemoteViews rv = new RemoteViews(mContext.getPackageName(),
                R.layout.list_item);

        // Set the content to display
        rv.setTextViewText(R.id.item, content);

        // Fill in Intent, Fill in Ending Intent created in AppWdigetProvider
        Intent intent = new Intent();
        // Input click line data
        intent.putExtra("content", content);
        rv.setOnClickFillInIntent(R.id.item, intent);

        return rv;
    }

    /*
     * Display a Load View. The default View will be used when returning null
     */
    @Override
    public RemoteViews getLoadingView() {
        return null;
    }

    /*
     * Number of different View definitions. Default 1 (I've been using default values)
     */
    @Override
    public int getViewTypeCount() {
        return 1;
    }

    /*
     * Returns the current index.
     */
    @Override
    public long getItemId(int position) {
        return position;
    }

    /*
     * If the ID provided by each item is stable, that is, they will not change at runtime, then return true.
     */
    @Override
    public boolean hasStableIds() {
        return true;
    }
}
Design sketch
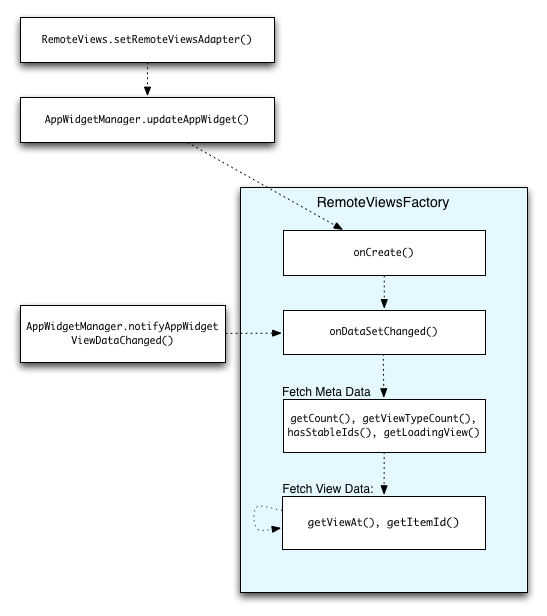
AppWidget "Collection View" Data Update Flow Chart
When the widget specifies its specific AppWidget Provider, the AppWidget Provider loads the view by creating RemoteViews, whose RemoteViews will call setRemoteViews Adapter to set up the internal adapter. The adapter will also continue to get the widget manager to call the updateAppWidget() method, which will initialize the data with the Remote Views Factroy and call its DataSetonCha. Nged () notifies the adapter to update the data, and specifically updates the widget's interface. The interface is updated and returned through its GetViewAt. Its detailed flow chart is as follows:
summary
Demo source code in this series
At the end of this article, you are welcome to pay attention to it. If you have any questions or updates, you are welcome to comment and grow together.