Project Requirements
1. Content: Please implement the framework design of APP portal interface according to the course practice, which contains at least 4 tab pages, to achieve click-through between tab pages;
2. Technology: Use layouts and fragment s to click on controls;
Specific development steps
Project Establishment
- Create a new project, named myapp, with no Chinese characters or spaces in the name to avoid unnecessary errors in subsequent development.

top.xml Page Design
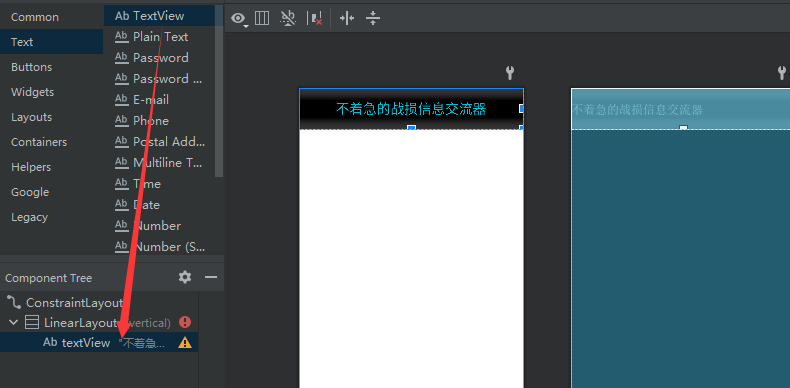
- Create a new file named top.xml under the layout folder, add a LinearLayout, and add a TextView control below the LinearLayout to change the text content, color, and background. Parameters that cannot be changed on the control page require code modifications in the Code interface.


Detailed parameters
<?xml version="1.0" encoding="utf-8"?>
<androidx.constraintlayout.widget.ConstraintLayout xmlns:android="http://schemas.android.com/apk/res/android"
    android:layout_width="match_parent"
    android:layout_height="match_parent">

    <LinearLayout
        android:layout_width="match_parent"
        android:layout_height="75dp"
        android:orientation="vertical">

        <TextView
            android:id="@+id/textView"
            android:layout_width="match_parent"
            android:layout_height="match_parent"
            android:background="@color/black"
            android:textColor="#00BCD4"
            android:gravity="center"
            android:text="Unhurried Battle Loss Information Converter"
            android:textSize="25dp" />
    </LinearLayout>
</androidx.constraintlayout.widget.ConstraintLayout>
chat.xml
- Wrong naming when the file was originally created (lazy to change later, roar)
- Like the top.xml file, create a new chat.xml file, add the linearLayout (horizon type) component, and add four Linear Layout (vertical type) groupings below. Then add the imageView component and the textView component below, and modify the image and background color, text of the text, font size, and centered display(You can also change the Code interface.


Part Code
<?xml version="1.0" encoding="utf-8"?>
<LinearLayout xmlns:android="http://schemas.android.com/apk/res/android"
    xmlns:app="http://schemas.android.com/apk/res-auto"
    xmlns:tools="http://schemas.android.com/tools"
    android:id="@+id/linearLayout"
    android:layout_width="match_parent"
    android:layout_height="100dp">

    <LinearLayout
        android:layout_width="match_parent"
        android:layout_height="match_parent"
        android:layout_weight="1"
        android:orientation="vertical">

        <ImageView
            android:id="@+id/imageView1"
            android:layout_width="match_parent"
            android:layout_height="wrap_content"
            android:layout_weight="1"
            android:background="#00BCD4"
            app:srcCompat="?attr/actionModeCopyDrawable"
            tools:srcCompat="@android:drawable/ic_dialog_email" />
Fragment Creation
- Create fragment s to switch pages by clicking on the chart below. Create a new one by right-clicking on your own com.example.mywork folder. After creation, the corresponding xml file will be generated automatically. Add the textView component to the xml file, modify the text, font size color, background and other parameters.


Page Effects
information

Mail list

Circle of friends

I

Part Code
<?xml version="1.0" encoding="utf-8"?>
<FrameLayout xmlns:android="http://schemas.android.com/apk/res/android"
    xmlns:tools="http://schemas.android.com/tools"
    android:layout_width="match_parent"
    android:layout_height="match_parent"
    tools:context=".MyFragment">

    <!-- TODO: Update blank fragment layout -->
    <TextView
        android:layout_width="match_parent"
        android:layout_height="match_parent"
        android:text="This is my page"
        android:textSize="40dp"
        android:gravity="center"
        android:textColor="#00BCD4"/>

</FrameLayout>
MainActivity Modification
Do the following in MainActivity.java
- Four new objects based on four Fragment class files written
public class MainActivity extends AppCompatActivity {

    public Fragment Fragment_chat = new Fragment_chat();
    public Fragment Fragment_linkman = new Fragment_linkman();
    public Fragment Fragment_space = new Fragment_space();
    public Fragment Fragment_my = new Fragment_my();
- Declare Fragment Manager
- Initialize Fragment
fragmentManager=getSupportFragmentManager();
 FragmentTransaction transaction=fragmentManager.beginTransaction();
- Create four LinearLayout objects
linearLayout1.setOnclickListener(this);
linearLayout2.setOnclickListener(this);
linearLayout3.setOnclickListener(this);
linearLayout4.setOnclickListener(this);
- onClick Function Listening
 private void setLinerLayoutOnClickListener(LinearLayout lL) {
        lL.setOnClickListener(new View.OnClickListener() {
            @Override
            public void onClick(View view) {
                FragmentTransaction fT = fragmentManager.beginTransaction();
                //Add to
                fragmentAdd(fT, R.id.mainCenter, fragmentArray);
                fragmentHide(fT, fragmentArray);
                //Click to judge show
                linearLayoutOnClickAboutFragment(view, fT);
                //Submit refreshed fragment s
                fT.commit();
            }
        });
    }
GitHub Code Library Links
Links: GitHub Library