I used Angular 1 when I was just practicing. At that time, I really could not write native JavaScript, so I did some management background. Then suddenly changed the project, Angular did not write, feeling that he had been in contact with Angular 1 for more than a year before and after, and only knew a little about it.
Recently, there was a need to manage the background and decided to pick up Angular again, but now it's an upgraded version of Angular 2. Finally, I have a chance to have a good look at Angular again. This time, I hope I can get a deeper understanding.
This article is the author's summary output in the process of learning and development. The purpose is to make the developers who first contact Angular 2 have a clear understanding of the framework and can quickly start the development work.
AngularJS VS Angular
Officially, Angular 1 is called Angular JS and Angular 2 is called Angular, so the name shows that Angular 2 is not an upgrade to Angular 1. Recall Angular 1's memorable features, such as bidirectional data binding, MVC, instructions, services, filters, modularization, dirty checking mechanisms, dependency injection, Scope, routing, form validation, and so on.
Looking at the process of upgrading to Angular2, what concepts in Angular1 are retained and what are removed?
Excluded parts:
ng-ontroller instruction: the controller is mainly the control part of business logic
The $scope concept: powerful and complex
Dirty examination mechanism: performance problems that have been criticized
Retention/improvement:
Routing Nesting: The routing system of Angular JS can't nest routing, but when Angular comes, you can nest as you want.
Filter s become pipes, conceptual changes
Dependency Injection Mechanism: Direct Injection in Constructors, and the Concept of Hierarchical Dependency Injection
-
Instruction Writing:
(Event) ng-click becomes (click)
[Attribute] href = "{{}" can be written as [href]
[(ngModel)] Replaces the previous ng-model
* ngFor s instead of ng-repeat can only be applied to arrays
* Instead of ng-if, remove ng-show, ng-hide
Mobile support
Templates, data binding, services, modules, etc.
New parts:
Componentization: The Core of Angular
Typescript as the default development language
ZoneJS is responsible for monitoring changes in data
Support server rendering
Angular Cli
The Angular team provides developers with an out of the box scaffolding tool: Angular Cli. We no longer need to worry about building and configuring a series of tools such as webpack, karma, tslint, protractor, etc. when the project is initialized.
The operation is very simple, just run the following command line to get it done.

Specific grammar tutorials are available for reference Here.
After installation, the file directory is as follows:
my-dream-app
    e2e                      // End-to-end testing
        app.e2e-spec.ts
        app.po.ts
        tsconfig.e2e.json
    node_modules/...         // npm package
    src/...                  // Source code
    angular-cli.json         // Configuration Items
    .editorconfig            // Editor configuration
    .gitignore               // git ignores file configuration
    karma.conf.js            // karma configuration
    package.json             // npm configuration
    protractor.conf.js       // Test Configuration Items
    README.md                // Project description
    tsconfig.json            // Configuration of ts Editor
    tslint.json              // tslint configuration item
What we need to focus on is the src folder, where all our source code is stored, and it is basically in src when we develop it.
src
    app                      // Main folder of code
        app.component.css    // Root Component Style
        app.component.html   // Root Component Template
        app.component.spec.ts// Root Component Testing
        app.component.ts     // Root Component Script
        app.module.ts        // Root module
    assets                   // Static resources
        .gitkeep             // Save empty folders
    environments             // Environmental configuration
        environment.prod.ts
        environment.ts
    favicon.ico              // Icon
    index.html               // Page Main Entry
    main.ts                  // Script main entry
    polyfills.ts             // Compatible Browser
    styles.css               // Global css Style
    test.ts                  // Unit Test Main Entry
Modular
One of the most important concepts of Angular is still modules. The whole framework of Angular is composed of many modules, and different modules need to be imported from different places. Opening the package.json file, you can see that the dependent angular package might be like this:
"@angular/common": "^2.3.1",
"@angular/compiler": "^2.3.1",
"@angular/core": "^2.3.1",
"@angular/forms": "^2.3.1",
"@angular/http": "^2.3.1",
"@angular/platform-browser": "^2.3.1",
"@angular/platform-browser-dynamic": "^2.3.1",
"@angular/router": "^3.3.1",
Let's take a brief look at which common modules are included in these angular packages (at least so far, I think so).
-
@ angular/core: There are many common modules
NgModule: Module Definition Decorator
Component: Component Definition Decorator
Directive: Instruction Definition Decorator
Pipe: Pipe Definition Decorator
PipeTransform: PipeTransform base class
Injectable: Service Definition Decorator
ElmentRef: Element Reference
ViewChild: Get child elements
Render: Render
Input: Accepts parameter input
Output: Event output
EventEmitter: Triggers custom events
-
@angular/common
CommonModule: Universal module with built-in instructions ngIf, ngFor
-
@angular/forms
FormsModule: Define template-driven forms
ReactiveForms Module: Define response forms
FormGroup, FormArray, FormControl, FormBuilder: Responsive Form Elements
Validators: Form validation
-
@angular/http
HttpModule: http request module
-
@angular/router
RouterModule routing module
Routes Routes Routing Data Structure
-
@angular/platform-browser
Platform Browser: AoT Compilation
BrowserModule: Browser support. Notice that the module imports CommonModule and then exports it, so the reference to this module also refers to CommonModule.
-
@angular/platform-browser-dynamic
Platform Browser Dynamic: JIT Compilation
The above modules are all self-contained modules in the Angular framework, and the complete unit we developed is also a module. There must be at least one module in an application, that is, the root module. Some shared functional attributes can be abstracted into shared modules. Then there are some feature modules.
Modules consist of components, services, instructions, pipes, and so on. These concepts will be discussed below. The syntax for defining modules is as follows:
@NgModuel({
    declarations: [],   // Components, instructions, pipes used
    providers: [],      // Dependency injection services, injection services are global
    imports: [],        // Import required modules
    exports: [],        // Exported modules, cross-module communication
    entryComponents: [] // Modules that need to be compiled in advance
    bootstrap: []       // Setting up the root component

})
export class AppModule { }
All the components, instructions, pipelines, services and modules used need to be declared in advance in order to be used in specific components.
There must be at least one root component in a module. In the root module, you need to set up the startup component, that is, the root component.
How do I start the root module?
In the entry script, which is the main.ts in the Angular Cli project, start as follows:
// Importing Required Modules
import { platformBrowserDynamic } from '@angular/platform-browser-dynamic';

// Root module
import { AppModule } from './app/app.module';

// Compile Start Module
platformBrowserDynamic().bootstrapModule(AppModule);
So far, we know about modules and the definition of modules.
assembly
Since React pioneered the concept of modularization, all the popular frameworks on the market have adopted the concept of modularization. Of course, Angular should not lag behind. It can be said that componentization is the core idea of Angular.
Components usually consist of templates and business logic. See how to write a very simple component in Angular.
// hello.component.ts

import { Component } from '@angular/core';

@Component({
    selector: 'hello',
    template: '<p> {{greeting}} </p>',
    styles: [`p { color: red;}`]
})
export class HelloComponent{
    private greeting: string;
    constructor(){
        this.greeting = 'Hello, Angular2!';
    }
}

// Use
<hello></hello>

// Rendering results
<hello>
    <p> Hello, Angular2! </p>
</hello>
When defining the class HelloComponent, add the decorator @Component (ES6 grammar) and tell Angular that this class is a component class. The data inside is called metadata. The selector attribute indicates the external use tag of the component. The template is the template of the component, and the style is the style of the component. The business logic of the component is defined in HelloComponent.
If the template content is too much, it can be written in an html file separately and introduced with the template Url attribute; similarly, the style file is introduced with styleUrls.
Component life cycle
Like components of other frameworks, components of Angular also have the concept of life cycle. In different stages and scenarios, different life cycle function hook s can be invoked.
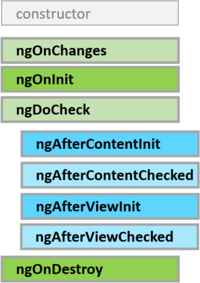
Constructor: constructor function, commonly used for injection services
ngOnChanges: Changes in input data are detected and the first trigger occurs before ngOnInit. Notice that the object's attributes are not monitored when they change
ngOnInit: Component initialization, which usually sets some initial values
-
ngDoCheck: Manually trigger update checks
ngAfterContentInit: After the content is initialized to the component
ngAfterContentChecked: After Content Change Detection
ngAfterViewInit: After view initialization
ngAfterViewChecked: After view change detection, this can be used to ensure timely updates of user views
ngOnDestroy: Cleaning up when components are logged out, usually used to remove event listeners, unsubscribe observable objects, etc.
Specific instructions can be referred to. Here.
Component Communication
As you can imagine, the componentized page structure will eventually form a component tree. Steal a Vue picture:
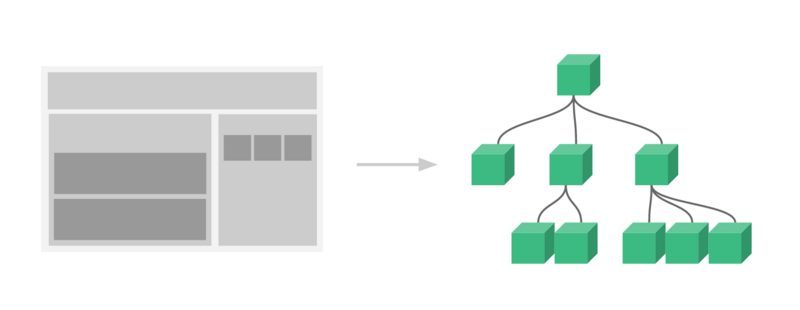
Inevitably, we need to consider parameter transfer between parent and child components. Anuglar provides the following communication modes:
Parent component to child component: The parent component passes in the value with attribute binding and the child component receives it through @Input.
// Parent component
import { Component } from '@angular/core';

@Component({
  selector: 'hero-parent',
  template: `<h2> heroes </h2>
    <hero-child *ngFor="let hero of heroes"
      [hero]="hero" >
    </hero-child>
  `
})
export class HeroParentComponent {
  heroes = [{
    name: 'John'
  }, {
    name: 'Lily'
  }];
}

// Subcomponents
import { Component, Input } from '@angular/core';

import { Hero } from './hero';

@Component({
  selector: 'hero-child',
  template: `
    <h3>{{hero.name}}</h3>
  `
})
export class HeroChildComponent {
  @Input() hero: Hero;
}
Subcomponent to parent: Subcomponent custom events are outgoing with @Output, and parent components are fetched with event binding.
// Subcomponents
import { Component, EventEmitter, Output } from '@angular/core';

@Component({
  selector: 'my-voter',
  template: `
    <h4>{{name}}</h4>
    <button (click)="vote(true)">Agree</button>
  `
})
export class VoterComponent {
  @Output() onVoted = new EventEmitter<boolean>();

  vote(agreed: boolean) {
    this.onVoted.emit(agreed);
  }
}

// Parent component
import { Component } from '@angular/core';

@Component({
  selector: 'vote-taker',
  template: `
    <h2>Should mankind colonize the Universe?</h2>
    <h3>Agree: {{agreed}}, Disagree: {{disagreed}}</h3>
    <my-voter *ngFor="let voter of voters"
      [name]="voter"
      (onVoted)="onVoted($event)">
    </my-voter>
  `
})
export class VoteTakerComponent {
  agreed = 0;
  disagreed = 0;
  voters = ['Mr. IQ', 'Ms. Universe', 'Bombasto'];

  onVoted(agreed: boolean) {
    agreed ? this.agreed++ : this.disagreed++;
  }
}
Subcomponent reference: By adding a reference to a subcomponent in the parent component template, you can access the method of the subcomponent through the subcomponent.
<h3>Countdown to Liftoff (via local variable)</h3>
<button (click)="timer.start()">Start</button>
<button (click)="timer.stop()">Stop</button>
<div class="seconds">{{timer.seconds}}</div>
<countdown-timer #timer></countdown-timer>
@ ViewChild(): Similarly, you can use @ViewChild() in scripts to get subcomponents
import { AfterViewInit, ViewChild } from '@angular/core';
import { Component }                from '@angular/core';
import { CountdownTimerComponent }  from './countdown-timer.component';

@Component({
  selector: 'countdown-parent-vc',
  template: `
  <h3>Countdown to Liftoff (via ViewChild)</h3>
  <button (click)="start()">Start</button>
  <button (click)="stop()">Stop</button>
  <div class="seconds">{{ seconds() }}</div>
  <countdown-timer></countdown-timer>
  `
})
export class CountdownViewChildParentComponent implements AfterViewInit {

  @ViewChild(CountdownTimerComponent)
  private timerComponent: CountdownTimerComponent;

  seconds() { return 0; }

  ngAfterViewInit() {
    setTimeout(() => this.seconds = () => this.timerComponent.seconds, 0);
  }

  start() { this.timerComponent.start(); }
  stop() { this.timerComponent.stop(); }
}
Save data in services
@ ngrx/store: Let's go into details next time.
Template and data binding
Template is the content of html. Conventional html is basically static content. Template combines the new grammar in the framework to make HTML dynamic. Let's look at the grammar of templates in Angular:
Interpolation binding: double brackets {}}
We can see that {{greeting}} in the previous section of the component example is an interpolation binding. Not only can we get the value of the variable, but also we can write the expression directly.
Property binding
<input [value]='myData'>
// Equivalent to
<input value='{{myData}}'>
There are others, such as style binding:
<div [ngClass]="{special: isSpecial}"></div>
Note: Property is different from attributes. To bind attributes, you need to write property. For example:
<tr><td colspan="{{1 + 1}}">Three-Four</td></tr>
You will get the following error message:
Template parse errors:
Can't bind to 'colspan' since it isn't a known native property
You need to rewrite it like this:
<tr><td [attr.colspan]="1 + 1">One-Two</td></tr>
// perhaps
<tr><td attr.colspan="{{1 + 1}}">One-Two</td></tr>
Event binding
<input (keyup)='handle($event)' >
It can be a native event: click, change, keydown, mousemove, etc. It can also be a custom event, or it can be a command event, such as ngSubmit.
Bidirectional binding
<input [(ngModel)] = 'data'>
// Behind the two-way binding is actually one-way binding and event triggering, equivalent to the following
<input [ngModel]="data" (ngModelChange)="data=$event">
Note: Using ngModel, you need to introduce the FormsModule module.
There are also built-in instructions:
Template reference variable (#/ref-)
The element can be marked with # or ref - prefix, and then referenced elsewhere.
<input #fax placeholder="fax number">
( <input ref-fax placeholder="fax number"> )
<button (click)="callFax(fax.value)">Fax</button>
-
* ngIf: Controlling the presence or absence of content
<div *ngIf="show"> Can you see this? </div>If there is an else section, you can do the following:
<div *ngIf="show; else elseBlock"> Can you see this? </div>
<ng-template #elseBlock>  else block   </ng-template>
* ngFor: Loop an array
<div *ngFor="let hero of heroes; let i=index> {{i}}: {{hero.name}}</div>
Specific template grammar can be referred to Here.
Route
Once a module has multiple components, it needs to be routed to configure which url presents which component.
First, we need to configure the root path in index.html of the entry page:
...
<head>
<base href="/">
...
</head>
...
Then create a routing module:
import { NgModule }              from '@angular/core';
import { RouterModule, Routes }  from '@angular/router';

...

// Routing configuration
const appRoutes: Routes = [
  { path: 'home', component: HomeComponent },
  { path: 'heroes', component: HeroesComponent },
  { path: '',   redirectTo: '/home', pathMatch: 'full' },
  { path: '**', component: PageNotFoundComponent }
];

@NgModule({
  imports: [
    RouterModule.forRoot(appRoutes)
  ],
  exports: [
    RouterModule
  ]
})
export class AppRoutingModule {}
Import the configured routing module in the main module:
import { NgModule }       from '@angular/core';
import { BrowserModule }  from '@angular/platform-browser';
import { FormsModule }    from '@angular/forms';

...

@NgModule({
  imports: [
    BrowserModule,
    FormsModule,
    AppRoutingModule
  ],
  declarations: [
    AppComponent,
    HomeComponent,
    HeroesComponent,
    PageNotFoundComponent
  ],
  bootstrap: [ AppComponent ]
})
export class AppModule { }
A container <router-outlet> </router-outlet> is needed in the page to carry:
import { Component } from '@angular/core';

@Component({
  selector: 'my-app',
  template: `
    <h1>Angular Router</h1>
    <nav>
      <a routerLink="/home" routerLinkActive="active">Home</a>
      <a routerLink="/heroes" routerLinkActive="active">Heroes</a>
    </nav>
    <router-outlet></router-outlet>
  `
})
export class AppComponent { }
routerLink in the code above defines the route jump after the user clicks, and routerLinkActive defines the style class when the route is activated.
Routing can also take some index parameters:
{ path: 'heroes/:id', component: HeroesComponent },
The way of acquisition:
import { ActivatedRoute, Params }   from '@angular/router';

...
export class a {
    constructor(
      private route: ActivatedRoute
    ) {}

    // Routing parameters
    this.route.params
}
When there are many modules and many routes, we can use the way of module lazy loading. The way of lazy loading is also very simple. When configuring routing, you can modify the following:
const routes: Routes = [
    {    // Default to order management
        path: '',
        redirectTo: '/order',
        pathMatch: 'full'
     },
    {
        path: 'order',
        loadChildren: './order/order.module#OrderModule'
    },
    {
        path: 'warehouse',
        loadChildren: './warehouse/warehouse.module#WarehouseModule'
    },
    {
        path: 'statistics/sales',
        component: SalesComponent
    }
];

// Use RouterModule.forChild in the sub-module

import { NgModule } from '@angular/core';
import { RouterModule } from '@angular/router';
import { OrderComponent } from './order.component';


const orderRoutes = [
    {
        path:'',
        component: OrderComponent
    }
];

@NgModule({
    imports: [RouterModule.forChild(orderRoutes)],
    exports: [RouterModule]
})

export class OrderRoutingModule {
}
Service and Dependency Injection
What is the concept of service? It can be simply regarded as a functional module, the important thing is that it is a singleton object, and can be injected into other places to use.
Dependency injection comes from the concept of back-end, which is to automatically create an instance, eliminating the trouble of creating it manually every time.
Defining a service in Angular is simple, mainly by adding the @Injectable decorator before the class. Only by adding the @Injectable class can it be injected elsewhere.
import { Injectable } from '@angular/core';

@Injectable()
export class Service {
    counter: number = 0;

    getData(){
        return this.counter++;
    }
}
Then declare in the module providers:
import { Service } from './service';
...

@NgModule({
    imports: [
        ...
    ],
    declarations: [
        ...
    ],
    providers: [ Service ],  // Injection services
    bootstrap: [...]
})
export class AppModule {
}
When using it, you need to establish an association in the constructor:
import { Component } from '@angular/core';
import { Service } from './service';
...

@Component({
    selector: 'my-app',
    templateUrl: './app.component.html',
    styleUrls: ['./app.component.css']
})
export class AppComponent {
    constructor(public service: Service) {
        // this.service was successfully injected
        // Equivalent to this.service = new Service();
        // Then the service can be invoked
        this.service.getData();
    }
}
Since the service is injected into the module, all components in the module use the same instance when using the service.
In addition to declaring in modules, you can also declare in components. Assuming that there is also a component HomeComponent under AppComponent, we inject this service into AppComponent at this time:
import { Component } from '@angular/core';
import { Service } from './service';
...

@Component({
    selector: 'my-app',
    templateUrl: './app.component.html',
    styleUrls: ['./app.component.css'],
    providers: [ Service ],  // Injection services
})
export class AppComponent {
    constructor(public service: Service) {
        // this.service was successfully injected
        // Equivalent to this.service = new Service();
        // Then the service can be invoked
        this.service.getData();
    }
}
If HomeComponent also uses this service, it will use the same instance. This can be seen from the data changes in Service.
Angular also has the concept of layered dependency injection, which means that you can create your own independent services for any component. As in the example above, if you want HomeComponent to not use a service instance with its parent component, you just need to reinject it:
...
@Component({
    selector: 'home',
    templateUrl: './home.component.html',
    styleUrls: ['./home.component.css'],
    providers: [ Service ],  // Reinjection service
})
export class HomeComponent {
    ...
}
For front-end and back-end interfaces, they are usually written as services. Here's how to write the request back-end data block. As mentioned in the module section, http has a dedicated HttpModule module to handle requests. First, HttpModule is imported into the module, then http service is introduced and the corresponding request method is invoked.
import { Injectable } from '@angular/core';
import { Http }       from '@angular/http';

import 'rxjs/add/operator/toPromise';


@Injectable()
export class HttpService {

  constructor(private http: Http) {}

  getFromServer():any {
    return this.http.get(`/data`)
        .toPromise()
        .then(res => res.json())
        .catch();
  }
}
Since the object returned by the request is an observable object, it can be converted to Promise object processing. Here we need to use the toPromise operator of RxJS, then use the then to handle the return of successful results, and catch to handle the failure. This completes the request for back-end data.
RxJS is another more advanced topic, there is an opportunity to study in depth and chat again.
instructions
The concept of instructions in Angular is similar to that in Angular JS. The most important difference is that component inheritance instructions in Angular are special instructions. Let's look at a simple example of writing components as instructions:
import { Directive,Input,ElementRef } from '@angular/core';

@Directive({
    selector: 'hello'
})
export class HelloDirective {
    @Input() name: string;

    constructor(private el: ElementRef) {}

    public ngOnInit(): void {

        this.el.nativeElement.innerText = `hello ${this.name}!`;
    }
}

// Use Component Instructions
<hello name="Yecao"></hello>

// Rendering results
<hello> hello, Yecao! </hello>
Don't forget to declare in the module before you use it. I think that's the most annoying aspect of Angular.
In addition, there are attribute instructions and structure instructions, which only change the style or behavior of elements. To write an attribute instruction, you need to wrap it in the selector attribute with []. Let's look at a simple example:
import { Directive, ElementRef, Renderer2 } from '@angular/core';

@Directive({
  selector: '[highLight]'
})

export class HighLightDirective {
  constructor(private el: ElementRef, private renderer2: Renderer2) { }

  ngAfterViewInit() {
    this.renderer2.addClass(this.el.nativeElement, 'highlight');
  }
}

// Use Attribute Directives
<p highLight> This paragraph will be highlighted. </p>
Structural instructions refer to ngIf, ngFor and other instructions mentioned in the template, which modify the DOM structure. For example, rewrite * ngIf:
import { Directive, Input, ViewContainerRef, TemplateRef } from '@angular/core';

@Directive({
  selector: '[myIf]'
})

export class MyIfDirective {

  constructor(private templateRef: TemplateRef<any>,
      private viewContainer: ViewContainerRef) { }

  @Input() set appMyIf(condition: boolean) {
    if (condition) {
      this.viewContainer.createEmbeddedView(this.templateRef);
    } else {
      this.viewContainer.clear();
    }
  }
}

// Use Structural Instructions
<p *myIf="false"> This paragraph will not show. </p>
Pipeline (filter)
Pipeline is actually a filter, which is just called inconsistent. Mainly used for formatting source data without changing source data. Definition and use are also simple:
import { Pipe, PipeTransform } from '@angular/core';

/*
 * Order Cancellation Status: By default ALL means all, CANCEL means cancelled, and NOTCANCEL means normal.
*/
@Pipe({ name: 'cancelStatus' })
export class CancelStatusPipe implements PipeTransform {
    transform(status:string, blank: boolean):string {
         const map = {
             "ALL": "whole",
             "NOTCANCEL": "normal",
             "CANCEL": "Cancelled",
              "": "No time",
         }

         return blank? 'Exceptional case': map[status];
    }
}
Before using, remember to declare in the module, or import it into the shared module and export it in the shared module. Use as follows:
{{ "ALL" | cancelStatus }}  // whole
{{ "ALL" | cancelStatus: true }}  // Exceptional case
Angular has built-in pipes:
// Date Pipe
{{ expression | date:"MM/dd/yy" }}

// Digital DecimalPipe, the composition of digitInfo {minIntegerDigits}.{minFractionDigits}-{maxfractionDigits}
// minIntegerDigits: The integer portion retains the smallest digit, with a default value of 1.
// minFractionDigits: The decimal part retains the smallest number of digits, with a default value of 0.
// maxFractionDigits: The decimal part retains the largest number of digits, with a default value of 3.
{{ expression | number[:digitInfo] }}

// Capitalization
{{ expression | uppercase }}

// A lowercase letter
{{ expression | lowercase }}
Posterior language
Due to space constraints, every feature of Angular has been pointed out to the end. It just talks about some basic concepts and usage methods that you can use in your project. There is also a project that will definitely use the form and its validation, which is a big head, or in the next article alone to carry out it.
If you see it here, thank you for spending so much time reading. Recently, I just purchased videos from Here . Share with you, link: http://pan.baidu.com/s/1c2CGkVY Password: xwg6.
Overall, less than a month after exposure to Angular 2, the project is under development. Briefly speaking, my learning path is as follows:
Looking at the following articles about Angular 2, I have a general impression compared with Angular 1.
Looking at the video tutorials in Resources, I think they are quite good. Let me have an overall concept of Angular 2.
Refer to the official website tutorial to do some examples of hero display board
Start developing and look at the documentation as you develop
When developing, you can try some new knowledge points, such as multi-module, shared module, lazy routing loading, custom form validation instructions, responsive forms, ngrx state management, and so on.
Summary output, that is, the blog you are writing now
Reference material