Study how View is displayed on the screen after the layout file is loaded, that is to say, study the display process of View. The following two aspects will be introduced: 1. The whole process of measurement, layout and drawing from loading layout file to view. 2. How are surface, surface Flinger and view related?
In Activity's onCreate method, we initialize a defined view through setContentView(view), but the view has not been displayed at this time. After the activity executes the onResume method, the display of the interface is completed, which shows that the display of the view has gone through the two processes of activity. Below is a simple process diagram for launching Activity and loading view. 
I. Process Analysis
Starting with the ActivityThread class, we will follow the display process of view step by step.
There is a Handler object in the ActivityThread class that handles messages coming from the server. After receiving the LAUNCH_ACTIVITY message, execute the handleLaunchActivity method, that is, start an Activity.
case LAUNCH_ACTIVITY: {
    Trace.traceBegin(Trace.TRACE_TAG_ACTIVITY_MANAGER, "activityStart");
    ActivityClientRecord r = (ActivityClientRecord)msg.obj;
    r.packageInfo = getPackageInfoNoCheck(r.activityInfo.applicationInfo, r.compatInfo);
    handleLaunchActivity(r, null);
    Trace.traceEnd(Trace.TRACE_TAG_ACTIVITY_MANAGER);
} break;- 1
- 2
- 3
- 4
- 5
- 6
- 7
- 1
- 2
- 3
- 4
- 5
- 6
- 7
In this method, the package information is parsed first, and then the handleLaunchActivity method is called to execute the startup Activity.
We continue to track the handleLaunchActivity method.
// The code above is omitted
// Make sure we are running with the most recent config.
handleConfigurationChanged(null, null);

if (localLOGV) Slog.v(TAG, "Handling launch of " + r);
Activity a = performLaunchActivity(r, customIntent);

if (a != null) {
    r.createdConfig = new Configuration(mConfiguration);
    Bundle oldState = r.state;
    handleResumeActivity(r.token, false, r.isForward,
            !r.activity.mFinished && !r.startsNotResumed);

    if (!r.activity.mFinished && r.startsNotResumed) {
        // The activity manager actually wants this one to start out
        // paused, because it needs to be visible but isn't in the
        // foreground.  We accomplish this by going through the
        // normal startup (because activities expect to go through
        // onResume() the first time they run, before their window
        // is displayed), and then pausing it.  However, in this case
        // we do -not- need to do the full pause cycle (of freezing
        // and such) because the activity manager assumes it can just
        // retain the current state it has.
        try {
            r.activity.mCalled = false;
            mInstrumentation.callActivityOnPause(r.activity);
            // We need to keep around the original state, in case
            // we need to be created again.  But we only do this
            // for pre-Honeycomb apps, which always save their state
            // when pausing, so we can not have them save their state
            // when restarting from a paused state.  For HC and later,
            // we want to (and can) let the state be saved as the normal
            // part of stopping the activity.
            if (r.isPreHoneycomb()) {
                r.state = oldState;
            }
            if (!r.activity.mCalled) {
                throw new SuperNotCalledException(
                    "Activity " + r.intent.getComponent().toShortString() +
                    " did not call through to super.onPause()");
            }
        } catch (SuperNotCalledException e) {
            throw e;
        } catch (Exception e) {
            if (!mInstrumentation.onException(r.activity, e)) {
                throw new RuntimeException(
                        "Unable to pause activity "
                        + r.intent.getComponent().toShortString()
                        + ": " + e.toString(), e);
            }
        }
        r.paused = true;
    }
} else {
    // If there was an error, for any reason, tell the activity
    // manager to stop us.
    try {
        ActivityManagerNative.getDefault()
            .finishActivity(r.token, Activity.RESULT_CANCELED, null);
    } catch (RemoteException ex) {
        // Ignore
    }
}- 1
- 2
- 3
- 4
- 5
- 6
- 7
- 8
- 9
- 10
- 11
- 12
- 13
- 14
- 15
- 16
- 17
- 18
- 19
- 20
- 21
- 22
- 23
- 24
- 25
- 26
- 27
- 28
- 29
- 30
- 31
- 32
- 33
- 34
- 35
- 36
- 37
- 38
- 39
- 40
- 41
- 42
- 43
- 44
- 45
- 46
- 47
- 48
- 49
- 50
- 51
- 52
- 53
- 54
- 55
- 56
- 57
- 58
- 59
- 60
- 61
- 62
- 63
- 1
- 2
- 3
- 4
- 5
- 6
- 7
- 8
- 9
- 10
- 11
- 12
- 13
- 14
- 15
- 16
- 17
- 18
- 19
- 20
- 21
- 22
- 23
- 24
- 25
- 26
- 27
- 28
- 29
- 30
- 31
- 32
- 33
- 34
- 35
- 36
- 37
- 38
- 39
- 40
- 41
- 42
- 43
- 44
- 45
- 46
- 47
- 48
- 49
- 50
- 51
- 52
- 53
- 54
- 55
- 56
- 57
- 58
- 59
- 60
- 61
- 62
- 63
This method is annotated, simple and easy to understand. It mainly implements the performance LaunchActivity and handleResumeActivity methods, which implement the onCreate, onStart and onResume life cycles of Activity respectively.
We continue to track the performance LaunchActivity method
Activity activity = null;
try {
    java.lang.ClassLoader cl = r.packageInfo.getClassLoader();
    activity = mInstrumentation.newActivity(
            cl, component.getClassName(), r.intent);
    StrictMode.incrementExpectedActivityCount(activity.getClass());
    r.intent.setExtrasClassLoader(cl);
    if (r.state != null) {
        r.state.setClassLoader(cl);
    }
} catch (Exception e) {
    if (!mInstrumentation.onException(activity, e)) {
        throw new RuntimeException(
            "Unable to instantiate activity " + component
            + ": " + e.toString(), e);
    }
}

try {
    Application app = r.packageInfo.makeApplication(false, mInstrumentation);

    if (localLOGV) Slog.v(TAG, "Performing launch of " + r);
    if (localLOGV) Slog.v(
            TAG, r + ": app=" + app
            + ", appName=" + app.getPackageName()
            + ", pkg=" + r.packageInfo.getPackageName()
            + ", comp=" + r.intent.getComponent().toShortString()
            + ", dir=" + r.packageInfo.getAppDir());

    if (activity != null) {
        Context appContext = createBaseContextForActivity(r, activity);
        CharSequence title = r.activityInfo.loadLabel(appContext.getPackageManager());
        Configuration config = new Configuration(mCompatConfiguration);
        if (DEBUG_CONFIGURATION) Slog.v(TAG, "Launching activity "
                + r.activityInfo.name + " with config " + config);
        activity.attach(appContext, this, getInstrumentation(), r.token,
                r.ident, app, r.intent, r.activityInfo, title, r.parent,
                r.embeddedID, r.lastNonConfigurationInstances, config);

        if (customIntent != null) {
            activity.mIntent = customIntent;
        }
        r.lastNonConfigurationInstances = null;
        activity.mStartedActivity = false;
        int theme = r.activityInfo.getThemeResource();
        if (theme != 0) {
            activity.setTheme(theme);
        }

        activity.mCalled = false;
        mInstrumentation.callActivityOnCreate(activity, r.state);
        if (!activity.mCalled) {
            throw new SuperNotCalledException(
                "Activity " + r.intent.getComponent().toShortString() +
                " did not call through to super.onCreate()");
        }
        r.activity = activity;
        r.stopped = true;
        if (!r.activity.mFinished) {
            activity.performStart();
            r.stopped = false;
        }
        if (!r.activity.mFinished) {
            if (r.state != null) {
                mInstrumentation.callActivityOnRestoreInstanceState(activity, r.state);
            }
        }
        if (!r.activity.mFinished) {
            activity.mCalled = false;
            mInstrumentation.callActivityOnPostCreate(activity, r.state);
            if (!activity.mCalled) {
                throw new SuperNotCalledException(
                    "Activity " + r.intent.getComponent().toShortString() +
                    " did not call through to super.onPostCreate()");
            }
        }
    }
    r.paused = true;

    mActivities.put(r.token, r);

}- 1
- 2
- 3
- 4
- 5
- 6
- 7
- 8
- 9
- 10
- 11
- 12
- 13
- 14
- 15
- 16
- 17
- 18
- 19
- 20
- 21
- 22
- 23
- 24
- 25
- 26
- 27
- 28
- 29
- 30
- 31
- 32
- 33
- 34
- 35
- 36
- 37
- 38
- 39
- 40
- 41
- 42
- 43
- 44
- 45
- 46
- 47
- 48
- 49
- 50
- 51
- 52
- 53
- 54
- 55
- 56
- 57
- 58
- 59
- 60
- 61
- 62
- 63
- 64
- 65
- 66
- 67
- 68
- 69
- 70
- 71
- 72
- 73
- 74
- 75
- 76
- 77
- 78
- 79
- 80
- 81
- 82
- 1
- 2
- 3
- 4
- 5
- 6
- 7
- 8
- 9
- 10
- 11
- 12
- 13
- 14
- 15
- 16
- 17
- 18
- 19
- 20
- 21
- 22
- 23
- 24
- 25
- 26
- 27
- 28
- 29
- 30
- 31
- 32
- 33
- 34
- 35
- 36
- 37
- 38
- 39
- 40
- 41
- 42
- 43
- 44
- 45
- 46
- 47
- 48
- 49
- 50
- 51
- 52
- 53
- 54
- 55
- 56
- 57
- 58
- 59
- 60
- 61
- 62
- 63
- 64
- 65
- 66
- 67
- 68
- 69
- 70
- 71
- 72
- 73
- 74
- 75
- 76
- 77
- 78
- 79
- 80
- 81
- 82
In this method, we first call mInstrumentation.newActivity to create an instance of activity, then call makeApplication to create application object, then call attach method of activity object through activity.attach, and then execute mInstrumentation.callActivityOnCreate, that is, to call onCreate method of activity object. In onCreate, we call setContentView to set our predefined View, and then we track the activity's setContentView method.
public void setContentView(int layoutResID) {
        getWindow().setContentView(layoutResID);
        initWindowDecorActionBar();
}- 1
- 2
- 3
- 4
- 1
- 2
- 3
- 4
The getWindow() method returns a android The. app.Window object, which is the mWindow member variable just assigned in the attach method, is of type PhoneWindow. Continue to look at PhoneWindow's setContentView method.
public void setContentView(View view, ViewGroup.LayoutParams params) {
    if (mContentParent == null) {
        installDecor();
    } else {
        mContentParent.removeAllViews();
    }
    mContentParent.addView(view, params);
    final Callback cb = getCallback();
    if (cb != null && !isDestroyed()) {
        cb.onContentChanged();
    }
}- 1
- 2
- 3
- 4
- 5
- 6
- 7
- 8
- 9
- 10
- 11
- 12
- 1
- 2
- 3
- 4
- 5
- 6
- 7
- 8
- 9
- 10
- 11
- 12
Phone Windows has two view-related member variables: DecorView mDecor and ViewGroup mContentParent. MDecor is a FrameLayout, and mContentParent is a sub-view of mDecor. It will be clear if we continue to track the following code.
Continue to view the installDecor method
private void installDecor() {
    if (mDecor == null) {
        mDecor = generateDecor();
        mDecor.setDescendantFocusability(ViewGroup.FOCUS_AFTER_DESCENDANTS);
        mDecor.setIsRootNamespace(true);
        if (!mInvalidatePanelMenuPosted && mInvalidatePanelMenuFeatures != 0) {
            mDecor.postOnAnimation(mInvalidatePanelMenuRunnable);
        }
    }
    if (mContentParent == null) {
        mContentParent = generateLayout(mDecor);
        // The following code is omitted
    }
}- 1
- 2
- 3
- 4
- 5
- 6
- 7
- 8
- 9
- 10
- 11
- 12
- 13
- 14
- 1
- 2
- 3
- 4
- 5
- 6
- 7
- 8
- 9
- 10
- 11
- 12
- 13
- 14
Continue looking at the code for the generateLayout method
This method does the following things:
Select different window layout files (root view) for the window according to its style modification type. These window decorative layout files specify a ViewGroup view for storing Activity custom layout files, typically FrameLayout with an ID of: android:id="@android:id/content". For example, window decoration types include Full Screen, NoTitleBar, etc. There are two types of window modification: 1. Specify request Feature () specify window modifier, PhoneWindow object calls getLocalFeature() method to get value; 2. Configure corresponding properties for our activity, that is, android: theme=". PhoneWindow object calls getWindows Style () method.
After determining the window style, select the layout files corresponding to the style, which are located in frameworks/base/core/res/layout/. Typical window layout files are R.layout.dialog_titile_icons, R.layout.screen_title_icons, R.layout.screen_progress, R.layout.dialog_custom_title, R.layout.dialog_title, R.layout.screen_title (the most important). The usual Activity window modifies the layout file, R.layout.screen_simple
(Full-screen Active Window Layout File).
Here's the most commonly used window layout file for Activity, R.layout.screen_title
<LinearLayout xmlns:android="http://schemas.android.com/apk/res/android"
    android:orientation="vertical"
    android:fitsSystemWindows="true">

    <FrameLayout
        android:layout_width="match_parent"
        android:layout_height="?android:attr/windowTitleSize"
        style="?android:attr/windowTitleBackgroundStyle">

        <TextView android:id="@android:id/title"
            style="?android:attr/windowTitleStyle"
            android:background="@null"
            android:fadingEdge="horizontal"
            android:gravity="center_vertical"
            android:layout_width="match_parent"
            android:layout_height="match_parent" />

    </FrameLayout>

    <FrameLayout android:id="@android:id/content"
        android:layout_width="match_parent"
        android:layout_height="0dip"
        android:layout_weight="1"
        android:foregroundGravity="fill_horizontal|top"
        android:foreground="?android:attr/windowContentOverlay" />

</LinearLayout>- 1
- 2
- 3
- 4
- 5
- 6
- 7
- 8
- 9
- 10
- 11
- 12
- 13
- 14
- 15
- 16
- 17
- 18
- 19
- 20
- 21
- 22
- 23
- 24
- 25
- 26
- 27
- 1
- 2
- 3
- 4
- 5
- 6
- 7
- 8
- 9
- 10
- 11
- 12
- 13
- 14
- 15
- 16
- 17
- 18
- 19
- 20
- 21
- 22
- 23
- 24
- 25
- 26
- 27
In the upper part of the layout, the title of the TextView window with id title is displayed, and the FrameLayout with id content is the container for loading the layout of the upper application, that is, the mContentParent object in the code.
Here's a summary of Activity's hierarchical structure.
1. An activity corresponds to a PhoneWindow object, which is a one-to-one relationship. If it starts from Activity A to Activity B, then Activity B will create its own PhoneWindow object.
2. Phone Windows manages the content of the entire screen, excluding the system status bar at the top of the screen. So Phone Windows or Windows is associated with a page of the application.
3. Phone Windows manages both ActionBar and the following content topics. The setContentView() method is used to set the content body, while other methods, such as setTitle(), operate on ActionBar, request Feature () defined in Windows, and so on. There are many settings related to ActionBar attributes.
4. Phone Windows itself is not a View, its member variable mDecor is the View of the whole interface. mDecor is filled in when generating Layout (), while both actionBar and content Parent views are obtained directly from mDecor through findViewById().
The first part, PerfmLaunchActivity, is completed, and the android.app.ActivityThread.handleResumeActivity method is continued. In this method, the onResume method of performing Activity is first called. Next, it's critical to execute this code
if (r.window == null && !a.mFinished && willBeVisible) {
    r.window = r.activity.getWindow();
    View decor = r.window.getDecorView();
    decor.setVisibility(View.INVISIBLE);
    ViewManager wm = a.getWindowManager();
    WindowManager.LayoutParams l = r.window.getAttributes();
    a.mDecor = decor;
    l.type = WindowManager.LayoutParams.TYPE_BASE_APPLICATION;
    l.softInputMode |= forwardBit;
    if (a.mVisibleFromClient) {
        a.mWindowAdded = true;
        wm.addView(decor, l);
    }

// If the window has already been added, but during resume
// we started another activity, then don't yet make the
// window visible.
} else if (!willBeVisible) {
    if (localLOGV) Slog.v(
        TAG, "Launch " + r + " mStartedActivity set");
    r.hideForNow = true;
}- 1
- 2
- 3
- 4
- 5
- 6
- 7
- 8
- 9
- 10
- 11
- 12
- 13
- 14
- 15
- 16
- 17
- 18
- 19
- 20
- 21
- 22
- 1
- 2
- 3
- 4
- 5
- 6
- 7
- 8
- 9
- 10
- 11
- 12
- 13
- 14
- 15
- 16
- 17
- 18
- 19
- 20
- 21
- 22
Among them, WM is a. get Windows Manager (); get, A is Activity, get Windows Manager () returns its mWindows Manager object, which is Windows Manager Impl type, and its internal methods are mostly proxy Windows Manager Global. By tracking the code wm.addView(decor, l), let's continue to look at the addView method in the Windows Manager Global class.
public void addView(View view, ViewGroup.LayoutParams params,
        Display display, Window parentWindow) {
    // Eliminate code

    ViewRootImpl root;
    View panelParentView = null;

    synchronized (mLock) {
        // Start watching for system property changes.
        // Eliminate code

        root = new ViewRootImpl(view.getContext(), display);

        view.setLayoutParams(wparams);

        mViews.add(view);
        mRoots.add(root);
        mParams.add(wparams);
    }

    // do this last because it fires off messages to start doing things
    try {
        root.setView(view, wparams, panelParentView);
    } catch (RuntimeException e) {
        // BadTokenException or InvalidDisplayException, clean up.
        synchronized (mLock) {
            final int index = findViewLocked(view, false);
            if (index >= 0) {
                removeViewLocked(index, true);
            }
        }
        throw e;
    }
}- 1
- 2
- 3
- 4
- 5
- 6
- 7
- 8
- 9
- 10
- 11
- 12
- 13
- 14
- 15
- 16
- 17
- 18
- 19
- 20
- 21
- 22
- 23
- 24
- 25
- 26
- 27
- 28
- 29
- 30
- 31
- 32
- 33
- 34
- 1
- 2
- 3
- 4
- 5
- 6
- 7
- 8
- 9
- 10
- 11
- 12
- 13
- 14
- 15
- 16
- 17
- 18
- 19
- 20
- 21
- 22
- 23
- 24
- 25
- 26
- 27
- 28
- 29
- 30
- 31
- 32
- 33
- 34
Root, as you can see from its name, is the root node, which is the ViewRootImpl type. That is to say, set the incoming DecorView to the root node and continue to view the setView method of ViewRootImpl.
public void setView(View view, WindowManager.LayoutParams attrs, View panelParentView) {

    synchronized (this) {
     if (mView == null) {
         mView = view;
         ...


         // Schedule the first layout -before- adding to the window
         // manager, to make sure we do the relayout before receiving
         // any other events from the system.
         requestLayout();
         ...

         view.assignParent(this);
         ...

     }
    }
}- 1
- 2
- 3
- 4
- 5
- 6
- 7
- 8
- 9
- 10
- 11
- 12
- 13
- 14
- 15
- 16
- 17
- 18
- 19
- 20
- 1
- 2
- 3
- 4
- 5
- 6
- 7
- 8
- 9
- 10
- 11
- 12
- 13
- 14
- 15
- 16
- 17
- 18
- 19
- 20
Firstly, we assign the incoming parameter view to mView. Here we want to show that ViewRootImpl is not actually a subclass of View. mView will be the root node that this object knows and the root node of the whole Activity. Now that there is a root node in the tree structure of the whole view, namely ViewRootImpl, requestLayout() is valid and can be operated in three steps: measure, layout and draw.
Let's continue with the request Layout method
public void requestLayout() {
        if (!mHandlingLayoutInLayoutRequest) {
            checkThread();
            mLayoutRequested = true;
            scheduleTraversals();
        }
}- 1
- 2
- 3
- 4
- 5
- 6
- 7
- 1
- 2
- 3
- 4
- 5
- 6
- 7
The scheduleTraversals() method is executed after checking whether it is on the main thread.
void scheduleTraversals() {
    if (!mTraversalScheduled) {
        mTraversalScheduled = true;
        mTraversalBarrier = mHandler.getLooper().postSyncBarrier();
        mChoreographer.postCallback(
                Choreographer.CALLBACK_TRAVERSAL, mTraversalRunnable, null);
        scheduleConsumeBatchedInput();
    }
}- 1
- 2
- 3
- 4
- 5
- 6
- 7
- 8
- 9
- 1
- 2
- 3
- 4
- 5
- 6
- 7
- 8
- 9
Here is mainly a post mTraversalRunnable member variable.
final class TraversalRunnable implements Runnable {
    @Override
    public void run() {
        doTraversal();
    }
}
final TraversalRunnable mTraversalRunnable = new TraversalRunnable();- 1
- 2
- 3
- 4
- 5
- 6
- 7
- 1
- 2
- 3
- 4
- 5
- 6
- 7
Next, we execute the doTraversal() method. In the doTraversal method, we simply call the performTraversals method. This method is very long. We can study the source code and call the three methods of performMeasure(), performLayout(), and performDraw() in turn. Finally, we begin the measurement, layout and drawing of the control layer. 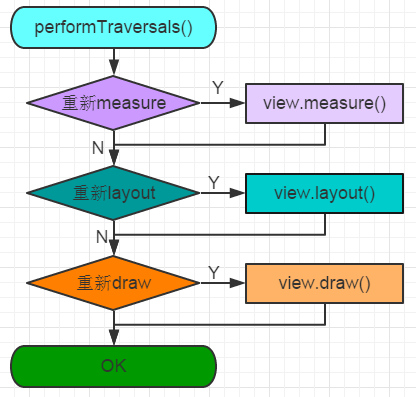
After draw ing, the whole view is displayed. In onDraw of View, the actual operation is the Canvas object. Where does the Canvas object come from? How does it inform surface Flinger to display graphics? surface and surface Flinger are described below.
Surface and Surface Flinger
1. What is Surface and Surface Flinger?
Surface: Surface is equivalent to a container that stores the content that needs to be displayed. Surface is a double buffer, a buffer for drawing and a buffer for display.
Surface Flinger: Surface Flinger is a system service that synthesizes the Surfaces of windows and then displays them to the hardware frame buffer through OpenGLES.
2. Why Surface Flinger?
In general, there is only one hardware frame buffer in the system, and it should not be accessed casually. A service is needed to unify the management of access to it. Surface Flinger is the role.
3. How does canvas relate to surface?
Let's look at the source code for the ViewRootImpl class
// These can be accessed by any thread, must be protected with a lock.
// Surface can never be reassigned or cleared (use Surface.clear()).
private final Surface mSurface = new Surface();

// In drawSoftware method:
Canvas canvas;
canvas = mSurface.lockCanvas(dirty);
....
mView.draw(canvas);
// mView is DecoView, which performs the drawing of the view tree. Canvas is a member variable of Surface- 1
- 2
- 3
- 4
- 5
- 6
- 7
- 8
- 9
- 10
- 1
- 2
- 3
- 4
- 5
- 6
- 7
- 8
- 9
- 10
4. How does surface relate to surface Flinger?
Let's first look at the constructor of ViewRootImpl
public ViewRootImpl(Context context, Display display) {
        mContext = context;
        mWindowSession = WindowManagerGlobal.getWindowSession();
        mDisplay = display;
        mBasePackageName = context.getBasePackageName();
        ...
- 1
- 2
- 3
- 4
- 5
- 6
- 7
- 1
- 2
- 3
- 4
- 5
- 6
- 7
Among them, getWindows session will establish a relationship with Windows Manager Service. Let's take a brief look at the source code of the getWindows Session method.
public static IWindowSession getWindowSession() {
synchronized (WindowManagerGlobal.class) {
    if (sWindowSession == null) {
        try {
            InputMethodManager imm = InputMethodManager.getInstance();
            IWindowManager windowManager = getWindowManagerService();
            sWindowSession = windowManager.openSession(
                    imm.getClient(), imm.getInputContext());
            float animatorScale = windowManager.getAnimationScale(2);
            ValueAnimator.setDurationScale(animatorScale);
        } catch (RemoteException e) {
            Log.e(TAG, "Failed to open window session", e);
        }
    }
    return sWindowSession;
}
- 1
- 2
- 3
- 4
- 5
- 6
- 7
- 8
- 9
- 10
- 11
- 12
- 13
- 14
- 15
- 16
- 17
- 1
- 2
- 3
- 4
- 5
- 6
- 7
- 8
- 9
- 10
- 11
- 12
- 13
- 14
- 15
- 16
- 17
We then execute the performance Traversals method after do Traversal in the above process
private void performTraversals() {

    // cache mView since it is used so much below...
    final View host = mView;
    boolean initialized = false;
    boolean contentInsetsChanged = false;
    boolean visibleInsetsChanged;
    try {
        relayoutResult = relayoutWindow(params, viewVisibility, insetsPending);
// The following code is omitted- 1
- 2
- 3
- 4
- 5
- 6
- 7
- 8
- 9
- 10
- 1
- 2
- 3
- 4
- 5
- 6
- 7
- 8
- 9
- 10
ViewRoot also has a Surface member variable called mSurface, which is the client representing Surface Flinger. ViewRoot draws on this Surface and will eventually be synthesized by Surface Flinger.
private int relayoutWindow(WindowManager.LayoutParams params, int viewVisibility,
  boolean insetsPending) throws RemoteException {

  //ReayOut is a cross-process call, mSurface is passed in as a parameter, and it is getting closer and closer to the truth!
       int relayoutResult = sWindowSession.relayout(

            mWindow, params,
            (int) (mView.mMeasuredWidth * appScale + 0.5f),
            (int) (mView.mMeasuredHeight * appScale + 0.5f),
            viewVisibility, insetsPending, mWinFrame,
            mPendingContentInsets, mPendingVisibleInsets,
            mPendingConfiguration, mSurface);  // mSurface is passed in as a parameter.

}- 1
- 2
- 3
- 4
- 5
- 6
- 7
- 8
- 9
- 10
- 11
- 12
- 13
- 14
- 1
- 2
- 3
- 4
- 5
- 6
- 7
- 8
- 9
- 10
- 11
- 12
- 13
- 14
Next, go to the server to see the relayout Windows method of Windows Manager Service.
public int relayoutWindow(Session session, IWindow client,
    WindowManager.LayoutParams attrs, int requestedWidth,
    int requestedHeight, int viewVisibility, boolean insetsPending,
    Rect outFrame, Rect outContentInsets, Rect outVisibleInsets,
    Configuration outConfig, Surface outSurface){

    .....
  try {
    //win is the original Windows State!
        Surface surface = win.createSurfaceLocked();
        if (surface != null) {
         //First create a local surface, then copy the surface to the incoming client surface
            outSurface.copyFrom(surface);
            win.mReportDestroySurface = false;
            win.mSurfacePendingDestroy = false;
           } else {
           outSurface.release();
        }
    }
}
- 1
- 2
- 3
- 4
- 5
- 6
- 7
- 8
- 9
- 10
- 11
- 12
- 13
- 14
- 15
- 16
- 17
- 18
- 19
- 20
- 21
- 1
- 2
- 3
- 4
- 5
- 6
- 7
- 8
- 9
- 10
- 11
- 12
- 13
- 14
- 15
- 16
- 17
- 18
- 19
- 20
- 21
The client's surface is finally linked to the surface allocated by the server, and then the view is drawn using surface's mCanvas.
Well, the display process of view in the upper layer is connected in series, and the rest of the work will be displayed by the lower Display system.