Preface
Because the project needs to customize the camera, I learned about Android's API for the camera. Android SDK 21 (LOLLIPOP) has abandoned the previous Camera class and provided the relevant API of Camera 2. At present, there is little information about Camera 2 API on the Internet. The author collects online information, and combines his own practice, to make a summary here.
Technological process
Because Camera2 provides more interfaces, it is flexible, but it also increases the complexity of use. First, let's get a general idea of the process of calling camera2, so that we can sort out our ideas.
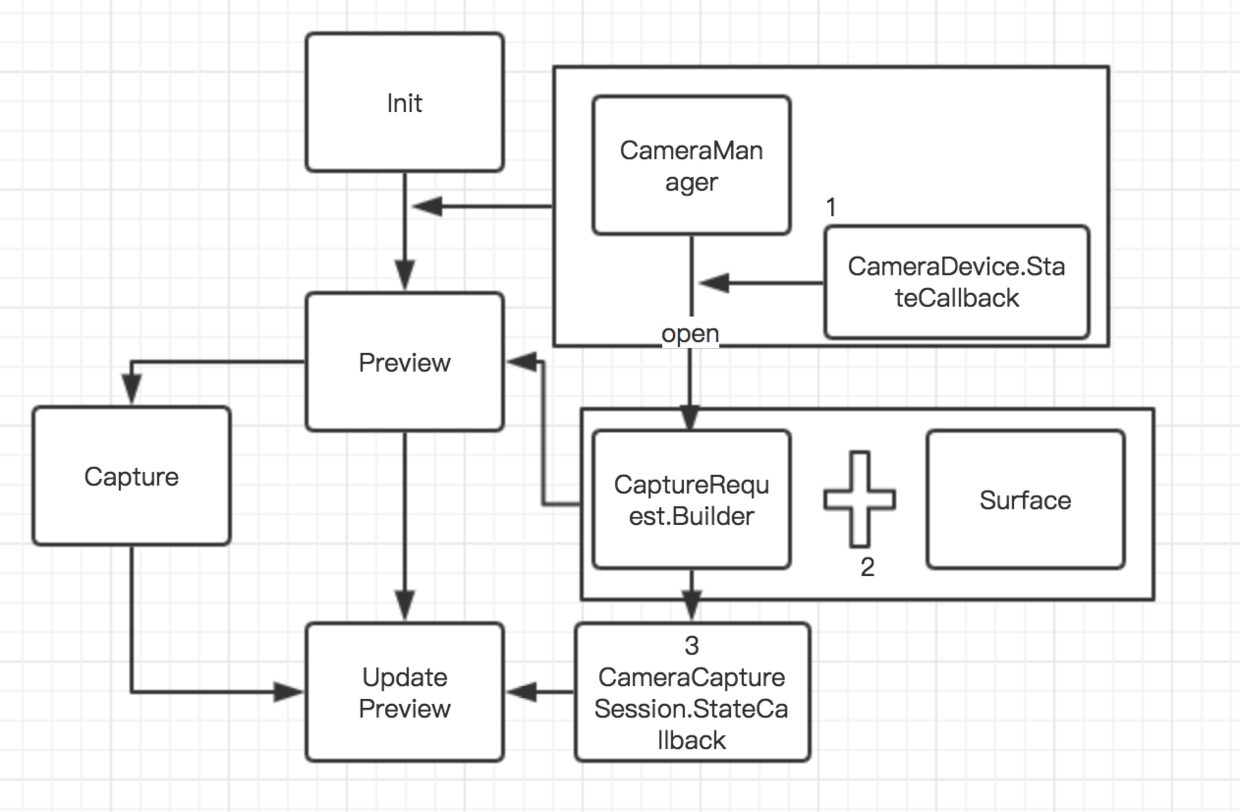
To display the picture captured by the camera, only three steps are needed: initializing the camera, previewing, and updating the preview. That's the left side of the picture above. To achieve these three steps, the main interface classes and their action steps are shown in the right part of the figure above. Let's go into the code below.
case
First, create a camera interface:
activity_camera.xml
<LinearLayout xmlns:android="http://schemas.android.com/apk/res/android"
    android:layout_width="match_parent"
    android:layout_height="wrap_content"
    android:orientation="vertical">

    <TextureView
            android:id="@+id/camera_texture_view"
            android:layout_width="match_parent"
            android:layout_height="match_parent" />

    <ImageButton
            android:id="@+id/capture_ib"
            android:layout_width="60dp"
            android:layout_height="60dp"
            android:layout_marginBottom="10dp"
            android:layout_gravity="bottom|center"
            android:background="@drawable/send_pres"/>

</LinearLayout>
The interface is simple, with only one TexureView and one button.
Next, initialize and display the image captured by the camera in Activity.
One of the first problems to be solved is the stretching of the picture.
To solve this problem, we need to start with TextureView.
CameraActivity.java
mTextureView.setSurfaceTextureListener(new TextureView.SurfaceTextureListener() {
            @Override
            public void onSurfaceTextureAvailable(SurfaceTexture surfaceTexture, int width, int height) {
                mWidth = width;
                mHeight = height;
                getCameraId();
                openCamera();
            }

            @Override
            public void onSurfaceTextureSizeChanged(SurfaceTexture surfaceTexture, int i, int i1) {

            }

            @Override
            public boolean onSurfaceTextureDestroyed(SurfaceTexture surfaceTexture) {
                return false;
            }

            @Override
            public void onSurfaceTextureUpdated(SurfaceTexture surfaceTexture) {

            }
        });
Initialize the camera in onSurface Texture Available. Through the CameraManager object openCamera, this is the first step in the Init step in the flow chart. OpenCamera has three parameters, the first is cameraId of String type, the second is CameraDevice.StateCallback, and the third is Handler. Here we want to declare a StateCallback:
private CameraDevice.StateCallback mCameraDeviceStateCallback = new CameraDevice.StateCallback() {
        @Override
        public void onOpened(CameraDevice cameraDevice) {
            mCameraDevice = cameraDevice;
            createCameraPreview();
        }

        @Override
        public void onDisconnected(CameraDevice cameraDevice) {
            mCameraDevice.close();
            mCameraDevice = null;
        }

        @Override
        public void onError(CameraDevice cameraDevice, int i) {
            mCameraDevice.close();
            mCameraDevice = null;
        }
    };
As you can see, after camera is ready, you can create a preview interface. To solve the problem of screen stretching is to set a proper proportion of Surface Texture buffer size for the preview interface.
private void createCameraPreview() {
        try {
            SurfaceTexture texture = mTextureView.getSurfaceTexture();
            assert texture != null;
            CameraCharacteristics characteristics = mCameraManager.getCameraCharacteristics(mCameraId);
            StreamConfigurationMap map = characteristics.get(CameraCharacteristics.SCALER_STREAM_CONFIGURATION_MAP);
            int deviceOrientation = getWindowManager().getDefaultDisplay().getOrientation();
            int totalRotation = sensorToDeviceRotation(characteristics, deviceOrientation);
            boolean swapRotation = totalRotation == 90 || totalRotation == 270;
            int rotatedWidth = mWidth;
            int rotatedHeight = mHeight;
            if (swapRotation) {
                rotatedWidth = mHeight;
                rotatedHeight = mWidth;
            }
            mPreviewSize = getPreferredPreviewSize(map.getOutputSizes(SurfaceTexture.class), rotatedWidth, rotatedHeight);
            texture.setDefaultBufferSize(mPreviewSize.getWidth(), mPreviewSize.getHeight());
            Log.e("CameraActivity", "OptimalSize width: " + mPreviewSize.getWidth() + " height: " + mPreviewSize.getHeight());
            ...
In this paper, the switching width and height are judged according to the rotating angle of the current device and sensor, and then the width and height which are most suitable for the current size ratio are obtained by Camera Characteristics, and then the width and height are set to Surface Texture.
private Size getPreferredPreviewSize(Size[] sizes, int width, int height) {
        List<Size> collectorSizes = new ArrayList<>();
        for (Size option : sizes) {
            if (width > height) {
                if (option.getWidth() > width && option.getHeight() > height) {
                    collectorSizes.add(option);
                }
            } else {
                if (option.getHeight() > width && option.getWidth() > height) {
                    collectorSizes.add(option);
                }
            }
        }
        if (collectorSizes.size() > 0) {
            return Collections.min(collectorSizes, new Comparator<Size>() {
                @Override
                public int compare(Size s1, Size s2) {
                    return Long.signum(s1.getWidth() * s1.getHeight() - s2.getWidth() * s2.getHeight());
                }
            });
        }
        return sizes[0];
    }
Here Sizes is the resolution of the camera's return support. Find the closest resolution from the parameters we pass.
The next step is to create and update the preview interface through CaptureRequest.Builder and Camera CaptureSession. StateCallback:
...
Surface surface = new Surface(texture);
            mBuilder = mCameraDevice.createCaptureRequest(CameraDevice.TEMPLATE_PREVIEW);
            // Setting Preview Objects
            mBuilder.addTarget(surface);
            mCameraDevice.createCaptureSession(Arrays.asList(surface), new CameraCaptureSession.StateCallback() {
                @Override
                public void onConfigured(CameraCaptureSession cameraCaptureSession) {
                    if (null == mCameraDevice) {
                        return;
                    }
                    mSession = cameraCaptureSession;
                    mBuilder.set(CaptureRequest.CONTROL_MODE, CameraMetadata.CONTROL_MODE_AUTO);
                    try {
                        // Keep updating captured images to TextureView
                        mSession.setRepeatingRequest(mBuilder.build(), mSessionCaptureCallback, mBackgroundHandler);
                    } catch (CameraAccessException e) {
                        e.printStackTrace();
                    }
                }

                @Override
                public void onConfigureFailed(CameraCaptureSession cameraCaptureSession) {
                    Toast.makeText(CameraActivity.this, "Camera configuration change", Toast.LENGTH_SHORT).show();
                }
            }, null);
        } catch (CameraAccessException e) {
            e.printStackTrace();
        }
This completes the first step of customizing the camera. Source address stamp here.
Author: Ken Choi - Aurora
Original: Android Uses camera2 API to Customize Cameras
KNOWLEDGE COLUMN: Aurora Daily